Windows 11: Stop Intelligent Assistant

Windows 11: Stop Intelligent Assistant
Windows Copilot, Microsoft’s new AI assistant, can assist you with a variety of tasks, such as answering questions, changing system settings, and creating AI images. However, if you’re not a fan of Copilot or simply don’t need it, you can remove its taskbar icon or disable it entirely on your Windows 11 PC. Here, we’ll show you how.
How to Remove the Copilot Icon From the Windows 11 Taskbar
By default, the Copilot icon appears in the Windows 11 taskbar. However, if you prefer not to have it there but still want to use it occasionally, it’s easy to hide the Copilot icon. Simply right-click anywhere on an empty spot on your taskbar and select Taskbar settings. In the Settings window that appears, turn off the toggle next to Copilot.
![]()
This should remove the Copilot icon from the taskbar. You can still access Copilot by pressing the Win + C keyboard shortcut in Windows 11.
How to Completely Disable Copilot via Group Policy Settings
Although hiding the Copilot is quite easy, it does not turn it off completely, and you might inadvertently access it. Fortunately, you can turn off Copilot completely via the Local Group Policy Editor on PCs running the Professional, Education, or Enterprise edition of Windows 11.
If you are using Windows 11 Home, skip to the Registry Editor method below or use a workaround to enable the Local Group Policy Editor on Windows Home before continuing.
- Press Win + S to access the search menu.
- Type gpedit.msc in the search box and select the first result that appears.
- Select Yes when the User Account Control (UAC) prompt appears.
- Use the left pane to navigate to User Configuration > Administrative Templates > Windows Components > Windows Copilot.
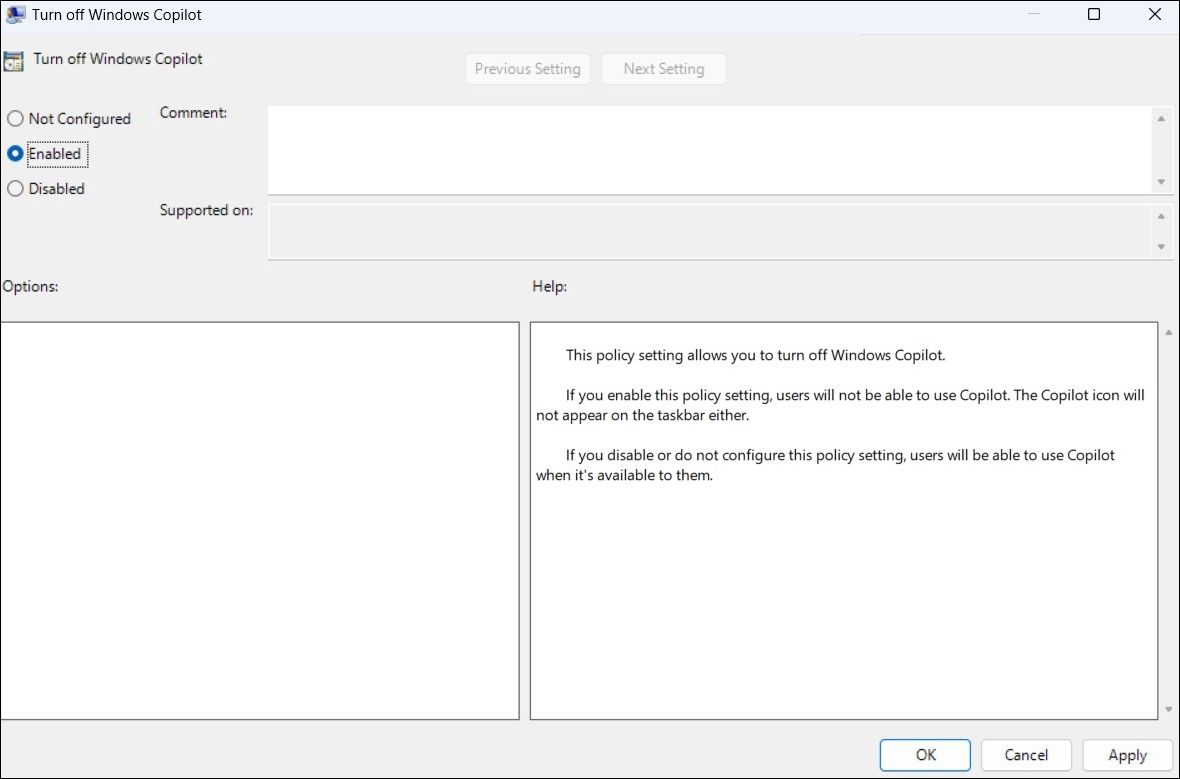
- Double-click the Turn off Windows Copilot policy on your right.
- Select the Enabled option.
- Hit Apply followed by OK.

Once you complete the above steps, Copilot will be disabled on your Windows 11 PC and you won’t be able to access it even with the keyboard shortcut. If you want to re-enable Copilot later, repeat the above steps and set the Turn off Windows Copilot policy to Not configured or Disabled.
How to Completely Disable Copilot by Modifying Registry Files
Another way to disable Copilot on Windows 11 involves modifying registry files. However, since editing the registry can be risky, you should follow the steps carefully. Also, be sure to back up all the registry files or create a restore point . This will allow you to restore the registry files in case something goes wrong.
Once you’ve done that, here’s what you need to do to disable Copilot via the Registry Editor:
- Press Win + R to open the Run dialog.
- Type regedit in the text box and press Enter to open the Registry Editor.
- Select Yes when the User Account Control (UAC) prompt appears.
- Use the left pane to navigate to HKEY_CURRENT_USER > Software > Policies > Microsoft > Windows.
- Right-click the Windows key and select New > Key. Name it WindowsCopilot.
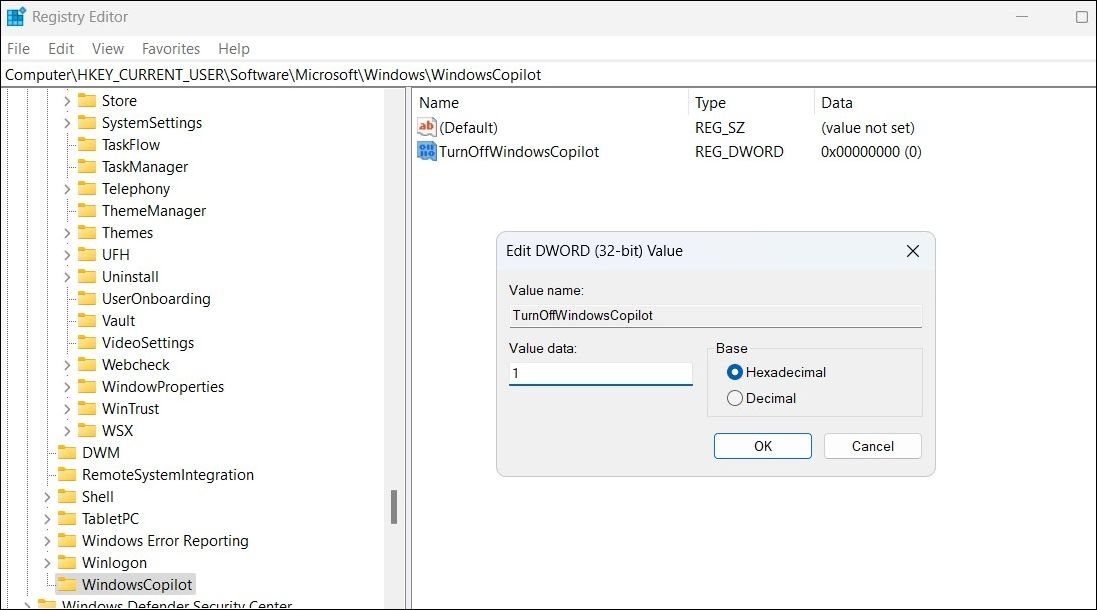
- Right-click on the WindowsCopilot DWORD, go to New, and select DWORD (32-bit) Value from the submenu. Name the DWORD TurnOffWindowsCopilot.
- Double-click the TurnOffWindowsCopilot DWORD, type 1 in the text field, and click OK.
- Restart your PC for the changes to take effect.

And that’s about it. Windows Copilot will be disabled on your PC. To re-enable it in the future, repeat the above steps and set the TurnOffWindowsCopilot DWORD value to 0. You can also delete the TurnOffWindowsCopilot DWORD instead.
Get Rid of Copilot on Windows 11
While Windows Copilot is a powerful tool, not everyone may want to use it. Fortunately, it’s possible to get rid of it. The above steps will help you achieve your goal, whether you want to keep Copilot out of sight or turn it off entirely.
Also read:
- [New] 2024 Approved Essential Techniques for Efficient Utilization of Zoom's Whiteboard Feature
- [New] FB Video Capture Toolkit for 2024
- [Updated] 2024 Approved Unveiling the Essence of Top-Tier Screen Recorders with OBS
- 8 Ways to Transfer Photos from Nokia XR21 to iPhone Easily | Dr.fone
- Complete Guide to Protect and Transfer iPhone 13 Files Without Dependence on Apple's iTunes for Windows/Mac Users
- Essential Insights: Access & Customize Your Fax Cover in Win11
- Free Steps to Move Your iBook Collection From iOS to Android
- Guidelines to Fix Windows Alt Key Issues (49 Characters)
- In 2024, Spoofing Life360 How to Do it on Apple iPhone XS Max? | Dr.fone
- Inside Tools for Windows 11 Management
- Mastering the Remedy for Windows 10 Print Failure XFFFFFF
- Overcoming Active Directory Printer Issues on Microsoft's Latest OS
- Pinpointing Voice Input Anomalies on PCs
- Solutions to Rectify Windows' GeForce Error X0001
- Strategies to Circumvent File Cap on Windows
- Troubleshoot and Improve Your PC's GPU Usage – Tackling Windows 1N Desktop Manager Issues
- Ultimate Choice Top Android 3D Players
- Unveiling the Grim Realm: An In-Depth Analysis of Bloodborne's Haunting Adventure
- Windows 11 Device Health: Essential Steps to Confirm Availability
- Title: Windows 11: Stop Intelligent Assistant
- Author: Joseph
- Created at : 2024-11-24 02:03:21
- Updated at : 2024-11-25 01:15:32
- Link: https://windows11.techidaily.com/windows-11-stop-intelligent-assistant/
- License: This work is licensed under CC BY-NC-SA 4.0.

