
Windows 10/11 Auto-Cleanup: A Step-by-Step Guide
Windows 10/11 Auto-Cleanup: A Step-by-Step Guide
For many, a cluttered desktop and downloads folder is just a way of life—no matter how hard you try, they somehow always ends up disorganized. Need to do a bit of digital spring-cleaning? Fortunately, there are lots of ways you can keep your Windows 10 computer decluttered.
You can get rid of Windows 10 bloatware. You can sort your right click menu. You can even declutter your search results. And of course, you can clean up your desktop. If you’re looking for a more passive approach, here’s how to erase old files on Windows 10 and 11.
1. Auto-Delete Old Files or Folders Using Storage Settings
The Settings menu lets you do and manage a lot of stuff on your Windows computer. From updates to tweaking the Windows appearance—you can do almost everything. It’s no surprise then that you can also use it for setting up an auto-deletion setting on your Windows. Here’s how:
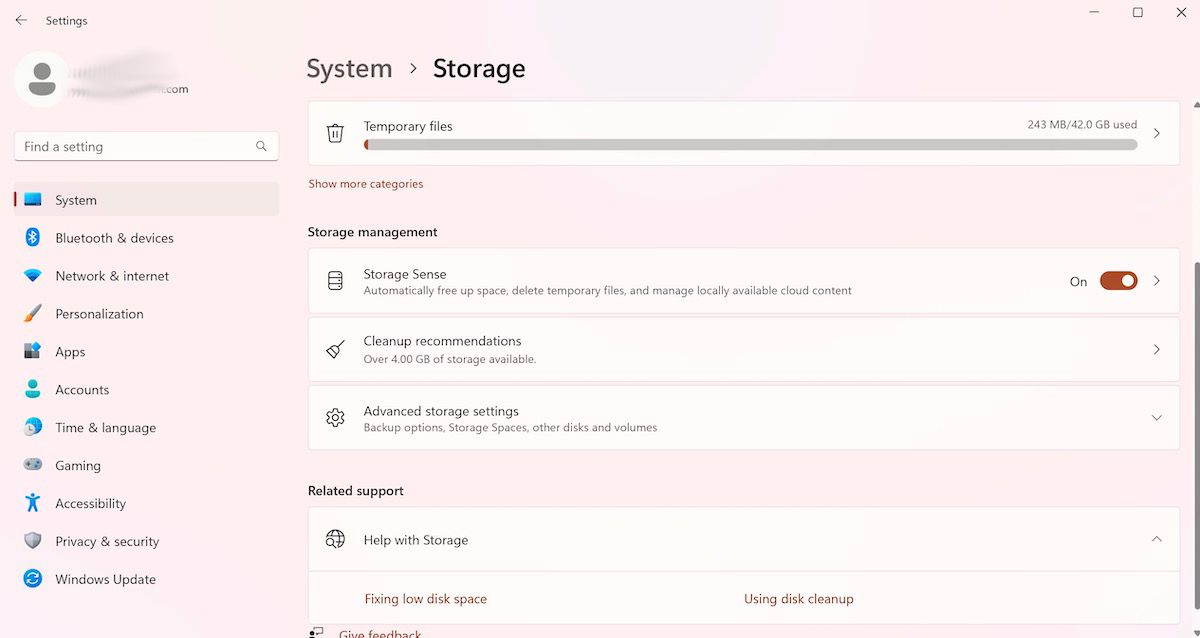
- Go to Settings > System > Storage.
- Toggle on the Storage Sense feature.
- Then, click Configure Storage Sense or run it now.
- Under Temporary Files, set up your desired time frames fore deleting files in the recycle bin and files in your Downloads folder.

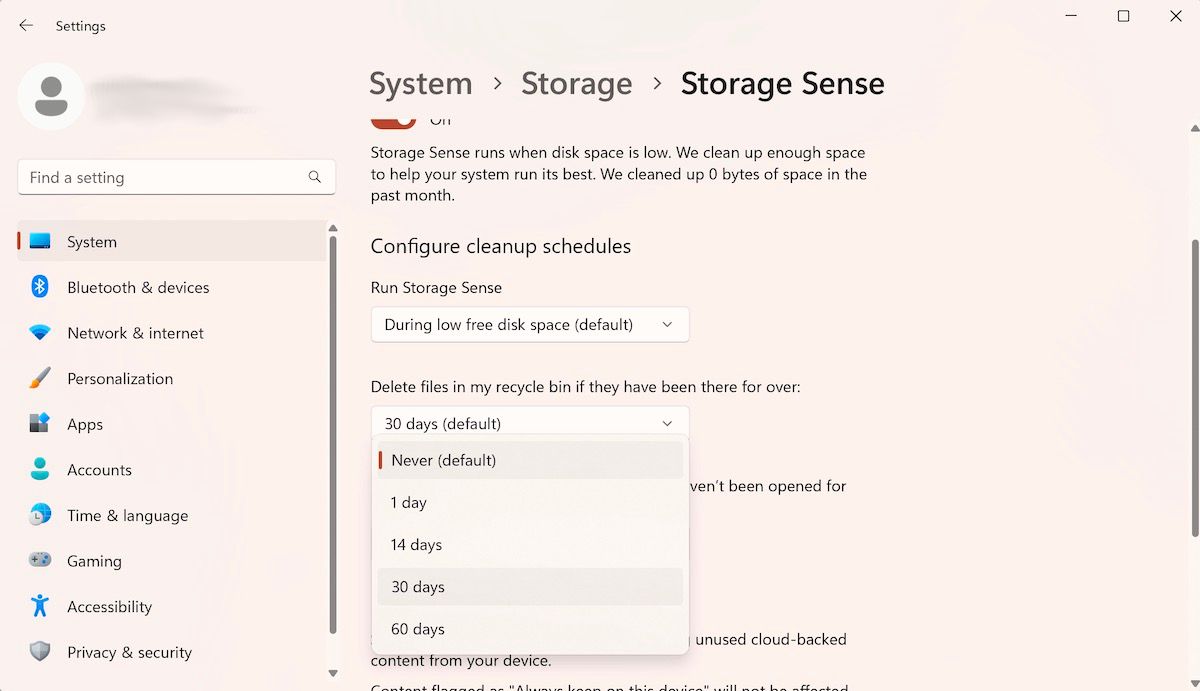
Not all files in the Downloads folder will be deleted after the set time; just those that haven’t been opened. This means if you download a file and want to open it later, it will still be deleted after the set time. If you turn this setting on, you should move anything out of the Downloads folder that you intend to keep.
If you want, you can always turn off the setting by simply disabling the Storage Sense button later on.
2. Deleted Old Files or Folders With the Command Prompt
Like most things on Windows, you can use the Command Prompt here as well. A replacement for the easy pin-and-point graphical user interface, the Command Prompt works with simple text-based commands to help you perform different admin functions and fix various troubleshooting issues on Windows.
Here’s how you can use it to fix your storage issues via the ForFiles command on Windows:
- Head to the Start menu search bar, type in ‘cmd’, and run the CMD as an administrator.
- Now, to delete the files that you haven’t modified in 30 days, type in the following command and hit Enter:
ForFiles /p "C:\path\to\folder"/s /d -30 /c "cmd /c del /q @file"
The “C:\path\to\folder” and /d -30 here refer to the folder path from where you want to delete files and the specific time for which you’d like to delete your file. Replace them with the settings that suit you.
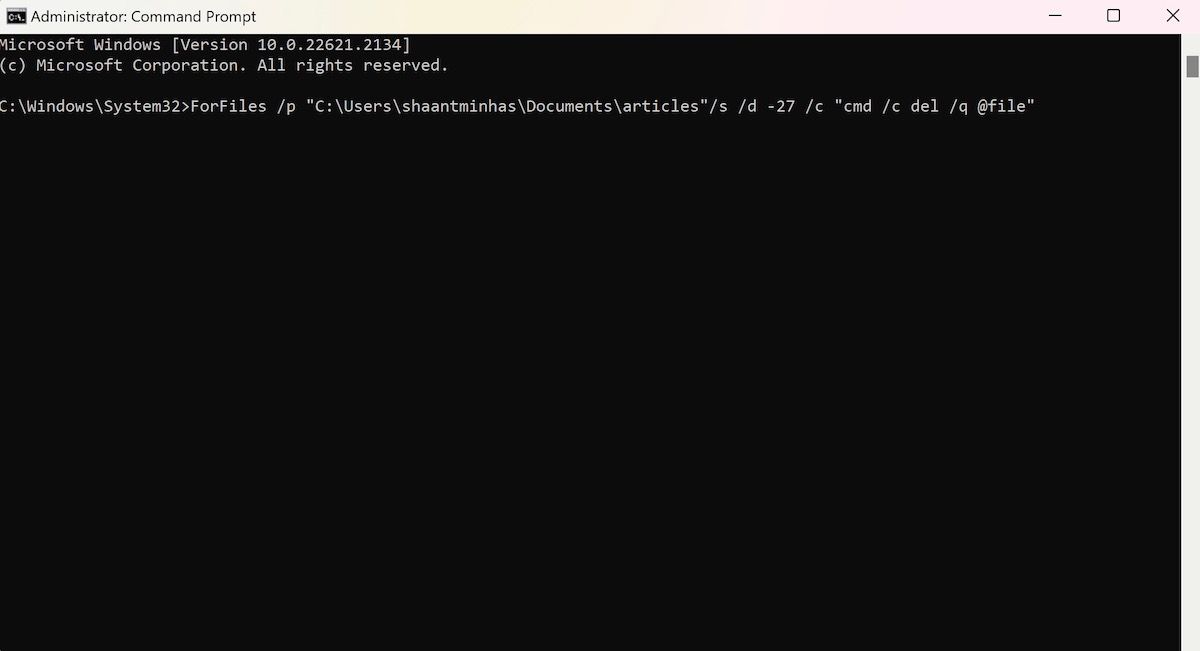
Your files will be removed as quickly as soon as you hit the above commands.
3. Use Task Scheduler on Windows
Task Scheduler is a simple Windows tool that lets you easily automate your repetitive Windows tasks. Just set up the task, and the app will handle whatever you have asked it to do. When it comes to auto-deleting your files or folders, the ForFiles command is what you will need to help you delete your older files or folders.
Here’s how you can automate the deletion:
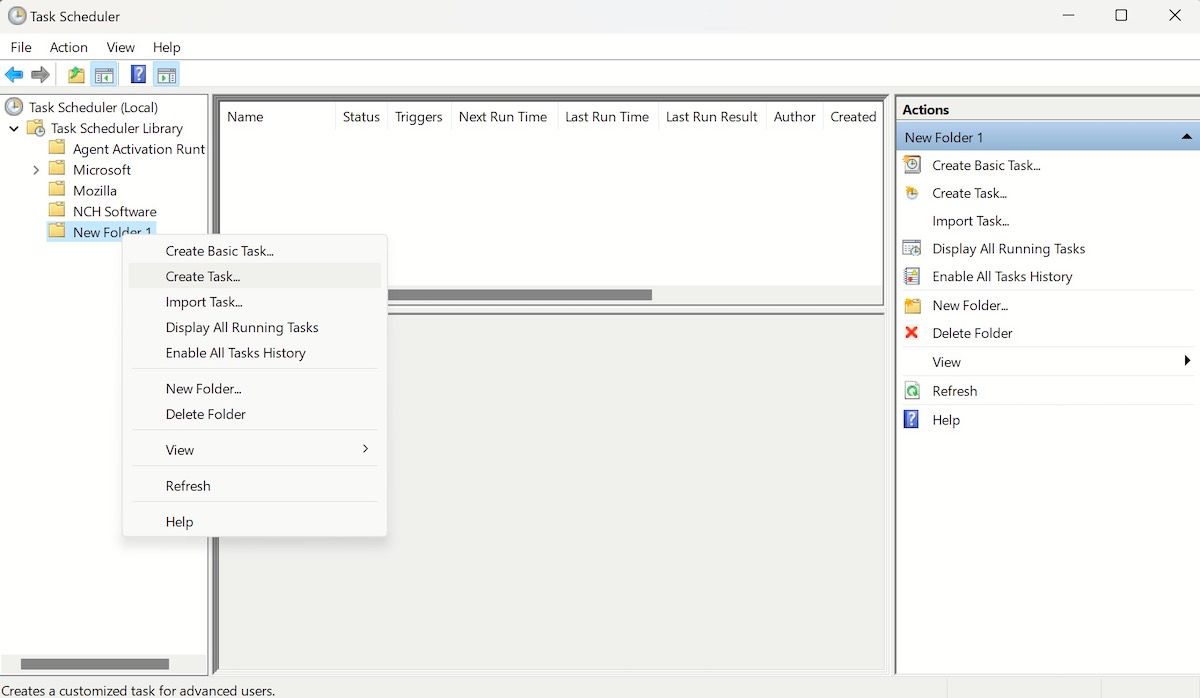
- Head to the Start menu search bar, type in ‘task scheduler’, and select the best match.
- Right-click on Task Scheduler Library and select New Folder.
- Put in any name and click on OK.
- Right-click on the recently created folder and select the Create Task option.
- In the Name box, enter a name for the task.
- Now, in the General tab, under the Security options section, select the Run whether the user is logged on or not option.
- Make sure the Do not store password checkbox is unselected.
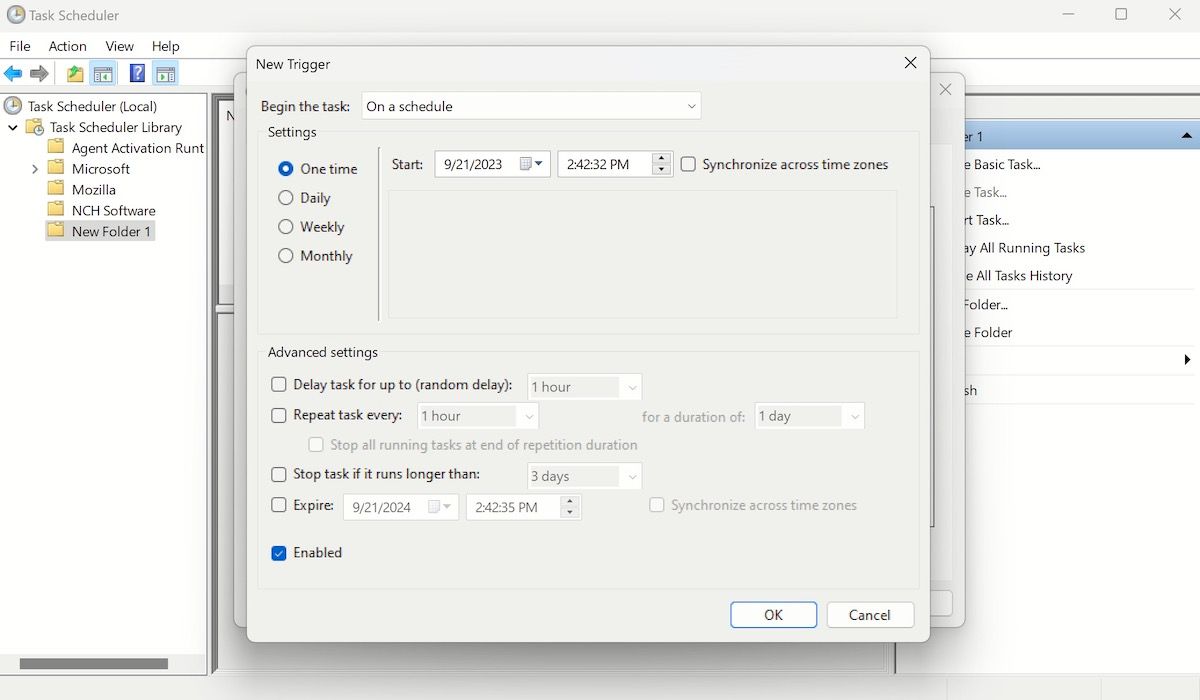
- Click on the Triggers tab and select the New button.
- Select On a schedule option using the Begin the task setting.
- Under the Settings section, set up the timings of the tasks you’d like to run. Finally, click on OK.
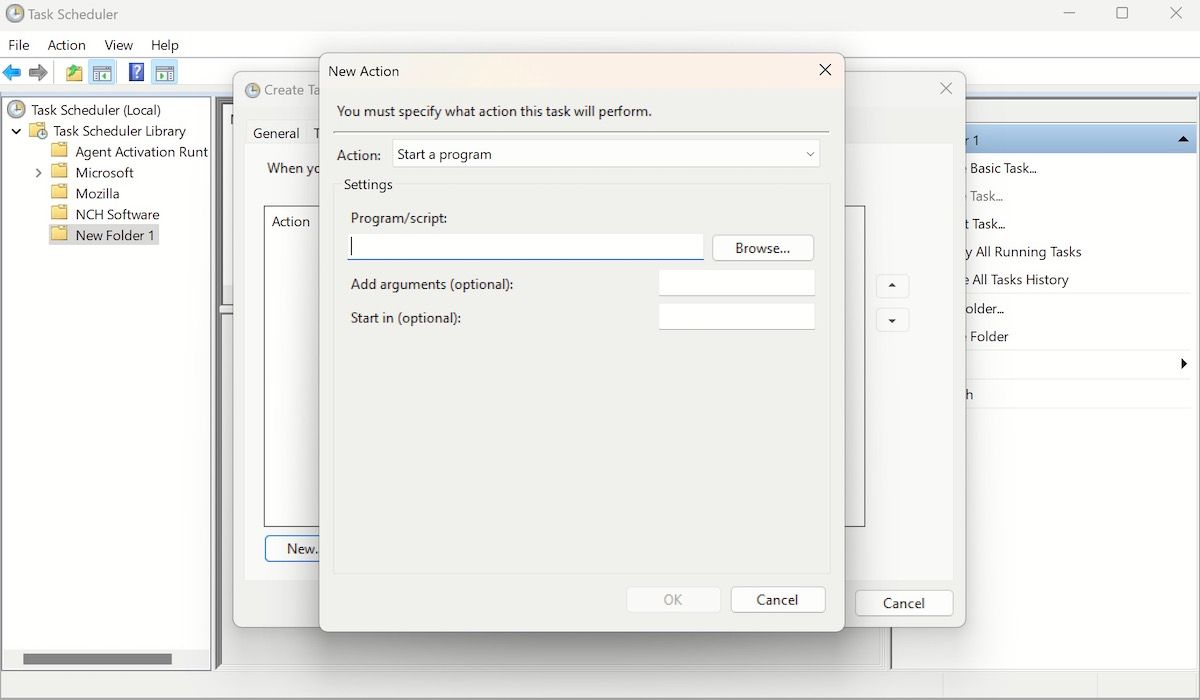
Now, head to the Actions tab and click on the New button. From the Actions drop-down menu, select the Start a program option.
In the Program/script box, type in the following command:
ForFiles
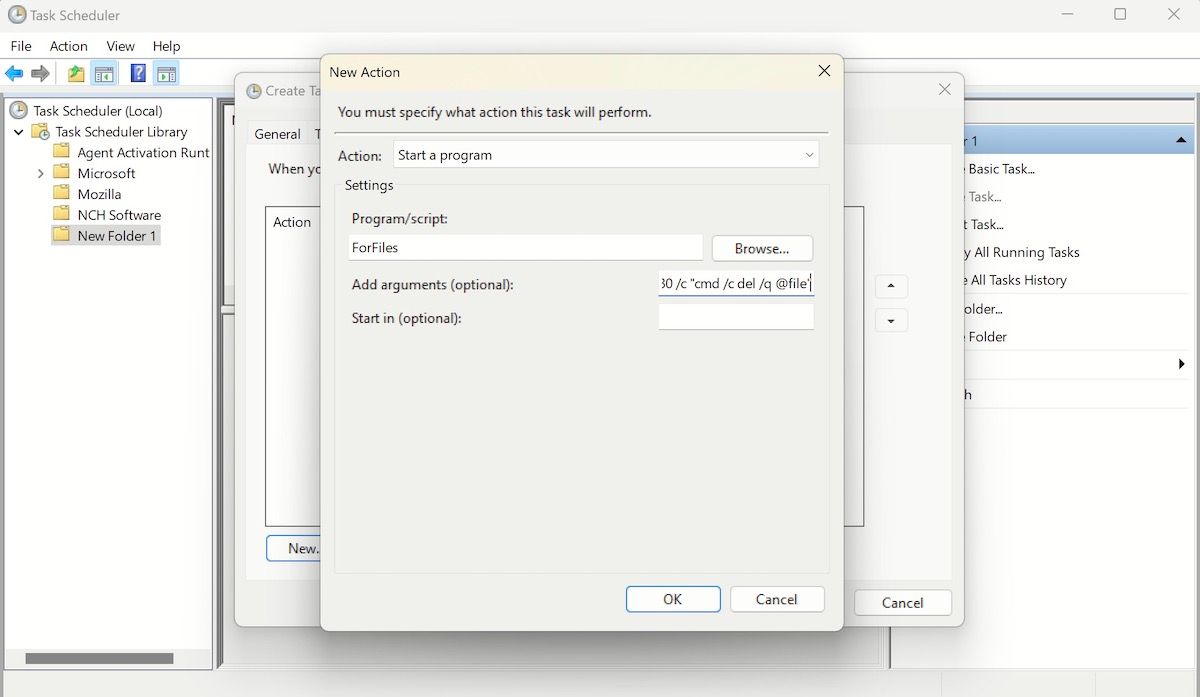
Similarly, in the Add arguments box, type in the following command:
/p "C:\path\to\folder"/s /d -30 /c "cmd /c del /q @file"
In the above command, tweak the “C:\path\to\folder“ to the path of the folder where your files are and replace “/d -30“ with actual number you’d like pick. So, your command will become something like this:
/p "%userprofile%\Users\[Your Username]\Downloads" /s /d -30 /c "cmd /c del /q @file"
Click on OK. Finally, from the Settings tab, check the following checkboxes and then click on OK:
- Allow task to be run on demand.
- Run the task as soon as possible after a scheduled start is missed.
- If the task fails, restart every.
That’s it—finalize the changes by clicking OK once again, and you will be done in no time. From here forward, your files will be automatically deleted within the specified time. Of course, if you later change your mind you can always reverse this setting by simply deleting the new folder your created in first step (which in our case, will be New Folder 1).
Auto-Deleting Old Files or Folders on a Windows Computer
Keeping unnecessary files on your computer is seldom useful. They eat up memory space, hamper your PC’s performance, and clog the file organization. Setting up auto-delete instructions, with whichever method you prefer, lets you rid your PC of this extra baggage.
However, we’d add that auto-removing files or folders from your PC is just one part of cleaning up your Windows. There are many other important hacks such as removing unused apps, terminating pointless background processes, and tweaking settings to whatever is most relevant to your situation. So, make sure you follow all the best principles for running your Windows as smoothly as possible.
You can get rid of Windows 10 bloatware. You can sort your right click menu. You can even declutter your search results. And of course, you can clean up your desktop. If you’re looking for a more passive approach, here’s how to erase old files on Windows 10 and 11.
Also read:
- [New] 2024 Approved Determining View Count's Direct Effect on Creator Revenue
- [New] Sending Direct Tweets Share Photos/Videos on Twitter without Retweeting
- [Updated] 2024 Approved How To Make Looping Videos for Instagram?
- Combatting 'Memory Test Failed' In Windows
- Evaluating Hidden Gems in Windows' System Monitors
- Reduce Precision Jumps: Turn Off Mouse Speed on Your PC
- Remedies for Sudden Stoppages of Windows Notepad App
- Resolving Printer Warning Messages Swiftly with Tips From YL Software Experts
- Revamping Your Podcast's Identity Leading AI Tools for 2024
- Solutions to Spy on Vivo Y78+ with and without jailbreak | Dr.fone
- Timelapse with iPhone A Step-by-Step Guide for 2024
- Top 12 Vlogger-Friendly Cameras Unveiled, In 2024
- WIN10 Troubleshooting: Make Functions Work Again
- Title: Windows 10/11 Auto-Cleanup: A Step-by-Step Guide
- Author: Joseph
- Created at : 2025-02-07 05:49:05
- Updated at : 2025-02-10 18:55:14
- Link: https://windows11.techidaily.com/windows-1011-auto-cleanup-a-step-by-step-guide/
- License: This work is licensed under CC BY-NC-SA 4.0.