Unraveling ViVeTool: Enable Unseen Features on Windows PCs

Unraveling ViVeTool: Enable Unseen Features on Windows PCs
ViVeTool is an open-source command-line tool to enable experimental but hidden features on your Windows computer. It is also available in a GUI version, which makes it much easier to enable or disable certain features on Windows.
It allows you to try newer and unreleased features on your stable or developer Windows releases, such as the multi-tab feature in File Explorer or restore the classic Windows 11 context menu. But should you use ViVeTool? Let’s find out!
What Is ViVeTool, and How Does It Work?
ViVeTool is a third-party open-source C# library and console app to enable unreleased features on your Windows computer. You can also use it to restore or disable certain features.
ViVeTool uses feature IDs, part of Windows Feature Management, a software-development practice, to identify the available features. You can then use the feature IDs to enable or disable certain features on your Windows computer by using the ViVeTool command-line or GUI utility.
For example, if you want to remove the new search box and replace it with the classic search icon, you’ll need to run the ViVetool /disable /id:39263329 command using the ViVeTool command-line utility.
The feature ID id:39263329 in the above command tells the ViVeTool and the subsequent API request which feature to toggle on your Windows computer.
You can source the feature ID from the internet or by using the ViVeTool GUI version. That said, the feature ID description in the GUI version is mostly cryptic, so tread carefully. Once you have the feature ID, you can use the ViVeTool command-line or GUI version to enable or disable features on your Windows computer.
Is ViVeTool Safe to Use?
ViVeTool doesn’t add new features on its own. It simply toggles the existing features to enable or disable them for your Windows system. However, since these features are experimental by nature, activating them may sometimes cause some issues.
If you want to use ViVeTool on your daily driver, go through the Windows data backup and recovery options and proceed with the steps below. Ideally, use a virtual machine to test new features, and if found to be stable, apply them to your daily driver.
How to Download and Install the ViVeTool GUI Version
ViVeTool GUI is the forked version of the ViVeTool command-line utility. It is less complicated to use and removes the hassle of executing commands or remembering them in the first place. The GUI version is available as an executable installer or portable version. Here’s how to install and use ViVeTool GUI on Windows.
To download the ViVeTool GUI version:
- Go to the ViVeTool GUI page on GitHub.

- Download the latest version of the Setup.exe file available. You can also download a portable version if you prefer.
- Run the setup file and keep the default settings. Follow the on-screen instructions to install the app.
How to Install Unreleased Features Using ViVeTool on Windows
Now that the app is installed, you can use it to find and install unreleased features on your Windows computer. Here’s how to do it:
- Launch the ViVeTool using a desktop shortcut or from the Start menu.

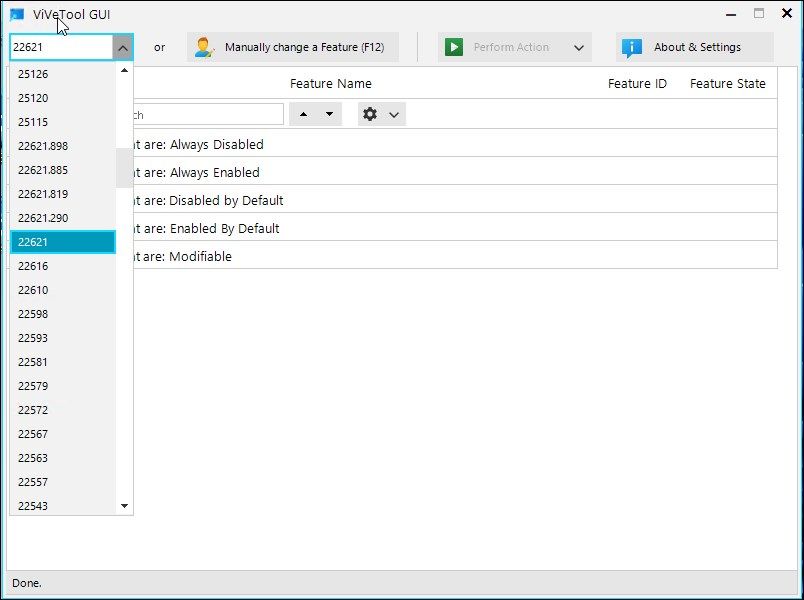
- Click the Select Build drop-down in the top-left corner and select your Windows build. You can check Windows 11 build and version using the Settings app. ViVeTool GUI will now start looking for all the available features for the selected build. This may take a few minutes, so wait till the list is populated.
- ViVeTool GUI categorizes the available features into different categories, including Always Disabled, Always Enabled, Disabled by Default, Enabled by Default, and Modifiable. You can expand the category and select the feature to install.
- Next, select the feature you want to enable or disable. Alternatively, type the feature name in the search bar to find a specific feature.

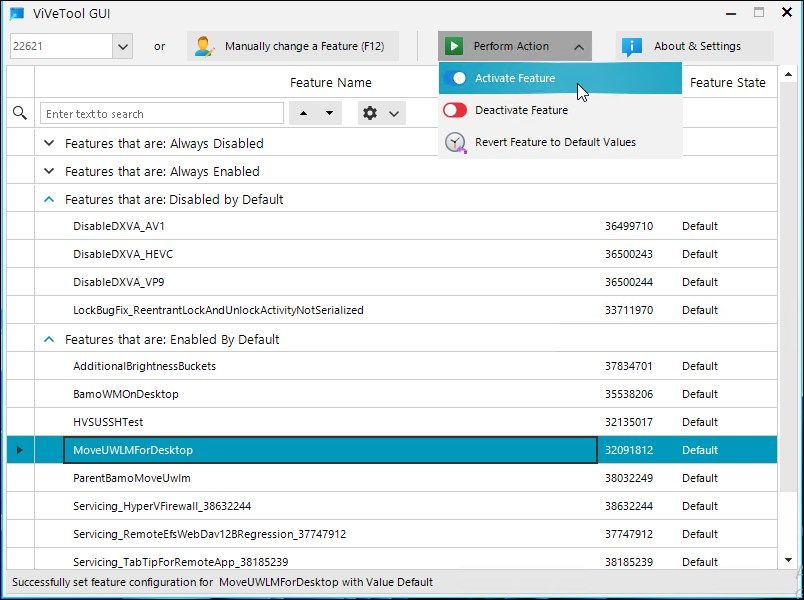
- Click the Perform Action drop-down select Activate to enable the feature. Wait for the success message and click Close.

- If the changes are not immediately visible, restart Windows Explorer to apply the changes. In some instances, you may need to restart your PC to make the changes.
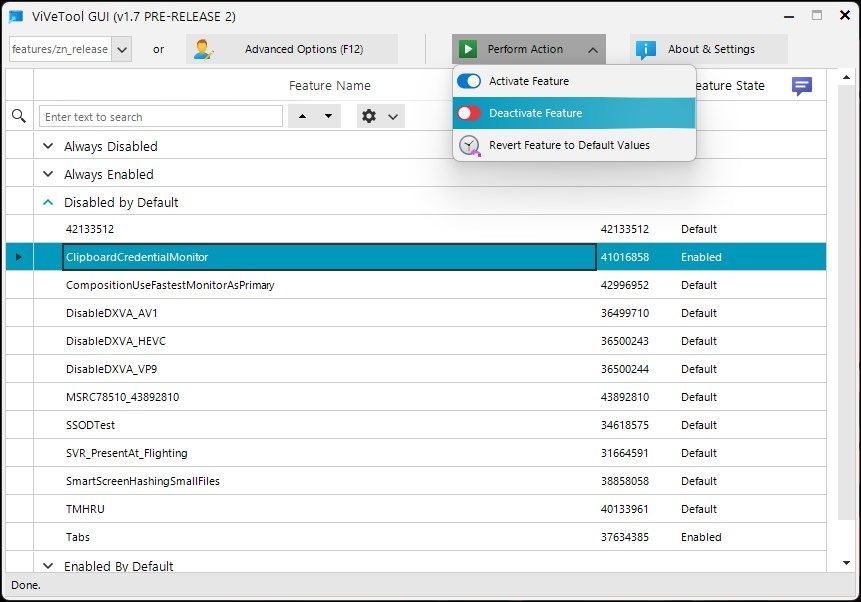
To revert the changes or disable a feature, you can use the Deactivate Feature option available in ViVeTool. Here’s how to disable a feature using ViVeTool:
- Launch ViVeTool GUI.
- Search and select the feature you want to disable.
- Click the Perform Action drop-down in the top-right corner.
- Select Deactivate Feature and click OK.
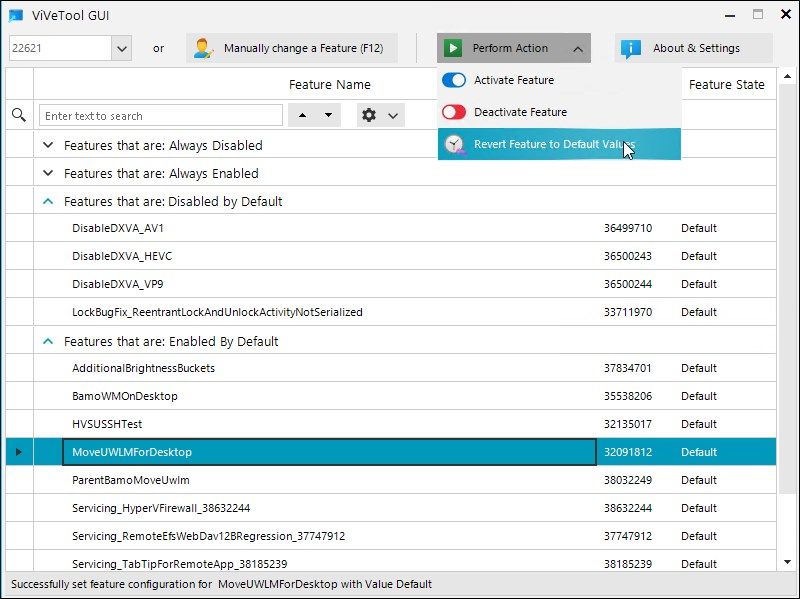
Alternatively, you can also revert the feature to its default state. To do this, select the modified feature, click on Perform Action, and select Revert Feature to Default Values. The changes will take effect when you restart your computer next time.
Here are a few new and lesser-known Windows features that you can enable using ViVeTool before anyone else:
- Enable Windows Copilot Using ViVeTool
- Enable the Home Section in the Settings App in Windows 11
- Enable Instant Search Results in File Explorer in Windows 11
- Enable the Enhanced Taskbar in Windows 11
- Enable the Volume Mixer in the Action Center in Windows 11
How to Use the ViVeTool Command-Line Version
The original version of ViVeTool is a command-line utility. While it offers similar functionality as the GUI version, it is an efficient way to enable and disable Windows features quickly. Here’s how to do it:
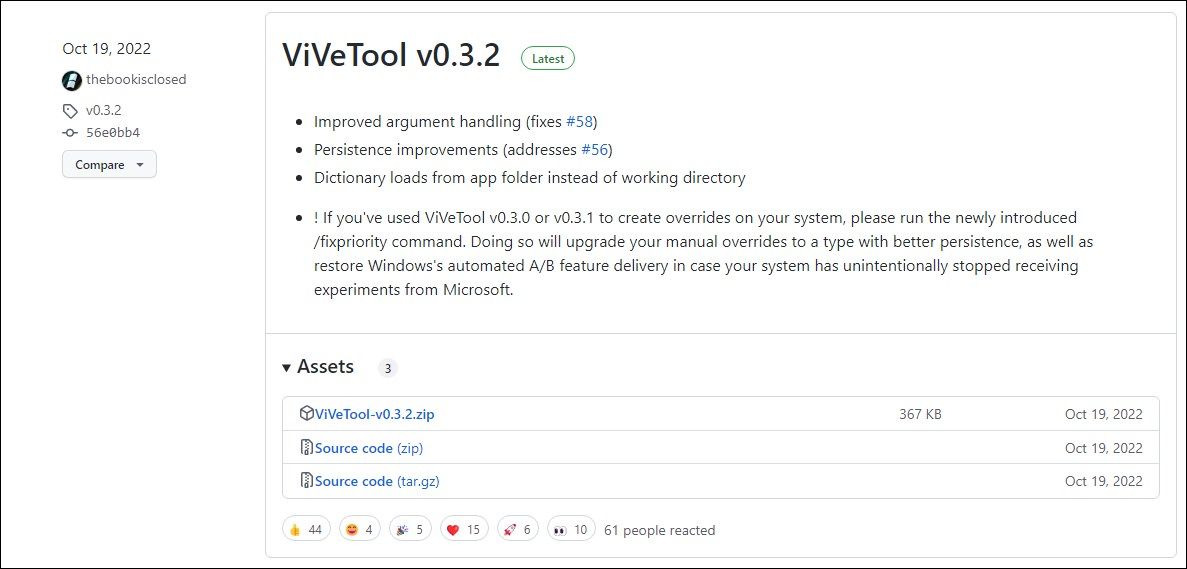
- Go to the ViVeTool page on GitHub. This lists all the releases of ViVeTools since its inception.

- Locate the latest version of ViVeTools. As of writing this, Version 1.6.2 is the latest stable release available, and version 1.7 is available as a pre-release.
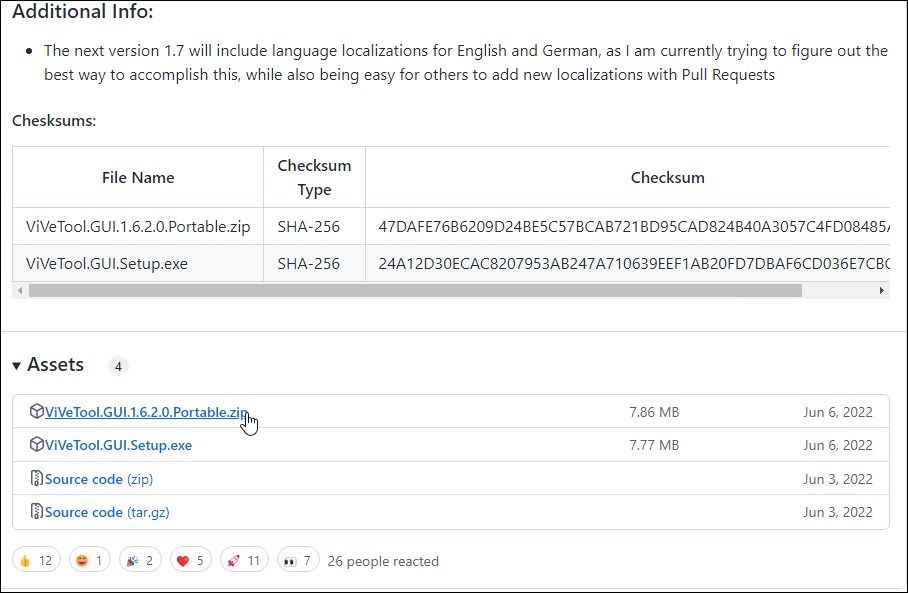
Click on Assets to view the download options.
Next, click the ViVeTool.GUI.1.6.2.0.Portable.zip file (version may change with the new releases) to download the latest version to your local drive.

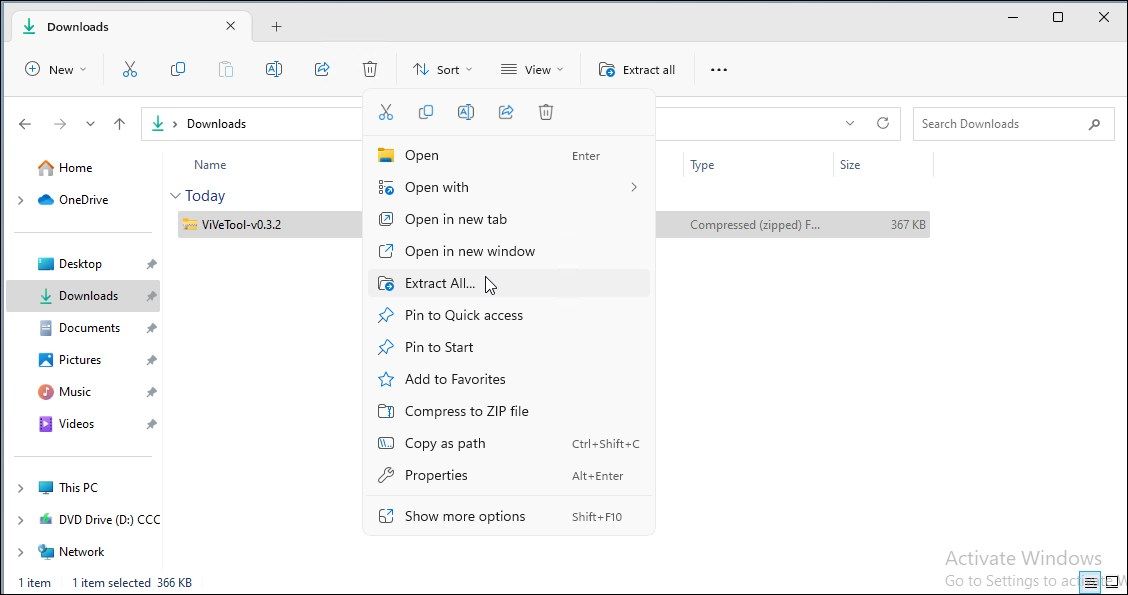
Right-click on the Zip file and select Extract all. Select a destination and click Extract. Take note of the extraction folder.
Next, press the Win key and type cmd.
Right-click on Command Prompt and select Run as administrator.

In the Command Prompt, change the directory to ViVeTool extracted folder. So, type the following command and press Enter to change the directory:
cd /d [ViVeToolFolderPath]For example, if I have the ViVeTool folder saved in C:\Users\username\Downloads\ViVeTool-v0.3.2, then the full command will look this:
cd /d C:\Users\username\Downloads\ViVeTool-v0.3.2Next, to enable a feature, use the following command and press Enter:
ViVeTool.exe /enable /id:featureIDIn the above command, replace featureID with the feature ID you want to enable.

For example, to enable the tab feature in File Explorer, the feature ID is id:37634385. So, the full command will look like this:
ViVeTool.exe /enable /id:37634385
3. If you want to disable a feature, then the command will look something like this:ViVeTool.exe /disable /id:featureID
4. Once the command is executed, type exit and press Enter to close the Command Prompt.
5. Restart your PC to apply the changes. After the PC restarts, the changes should be visible.
Why Does Enabling a Feature in ViVeTool Not Do Anything?
You may not be able to enable all the features present in ViVeTool. Almost all the hidden features are OS build-dependent. This means if you enable a feature using ViVeTool, but the changes don’t take effect, it is likely because the feature is not supported by the Windows OS build version you are running.
In other instances, it may be due to the feature state being set to Always Disabled or Enabled during compilation. In this instance, even if ViVeTool successfully processes your request, you are unlikely to see any real changes, as the feature is hard-coded to remain on or off.
ViVeTool’s Supported Commands
Apart from the /enable and /disable command, ViVeTools support a bunch of other commands to reset the custom configuration for specific or all features, update ViVeTool, and export and import custom feature configuration.
| ViVeTool Command | Action |
|---|---|
| /enable | Enable a feature |
| /disable | Disable a feature |
| /query | Find a list of all the existing features configuration |
| /reset | To reset a custom configuration for a specific feature |
| /resetall | To reset a custom configuration for all the features |
| /addsubs | To add a feature usage subscription |
| /delsub | To remove a feature usage subscription |
| /export | To export custom feature configuration |
| /import | To import custom feature configuration |
| /fixlkg | Fix the current ‘Last Known Good’ rollback system corruption |
| /appupdate | Look for new ViVeTool updates |
| /notifyusage | Shows a feature notification |
ViVeTool Brings Hidden Windows Experimental Features to Everyone
ViVeTool makes it easy to find and test new experimental features before they are released to the public. Whether you use the GUI or command-line version, it lets you easily enable and disable some exciting and annoying features.
That said, many of these hidden features may be buggy and cause system malfunction. So, keep your system backup handy before you tinker with ViVeTool.
It allows you to try newer and unreleased features on your stable or developer Windows releases, such as the multi-tab feature in File Explorer or restore the classic Windows 11 context menu. But should you use ViVeTool? Let’s find out!
Also read:
- [New] 2024 Approved Today’s Biggest Bites The Top YouTube Hits
- Decoding the Appeal What Makes You Love Filmora Editing?
- How to Install HP Universal Printing Software for Windows Systems
- How to Track Vivo S17e by Phone Number | Dr.fone
- In 2024, Innovating Visual Stories Mastering Photo Distortions in PS
- Maximizing Efficiency: Set Predefined App Sizes in Win11
- Selecting Your Next Laptop: Insider's List of Top E Places To Shop
- Steps to Address Security Glitches in Windows 10/11
- Tackle Windows 11 Woes - Your Guide to Fixing 11 Issues
- Tailor Your Own Lock Pattern in Windows 11
- The Role and Significance of Windows ~BT Folders
- Ultimate Troubleshooting for Cyberpunk 2Erpunk's Distorted Sounds - Fixing Common Issues
- Voice Recorder Efficiency: Essential Keyboard Shortcuts in Windows 11
- Title: Unraveling ViVeTool: Enable Unseen Features on Windows PCs
- Author: Joseph
- Created at : 2024-12-20 17:21:11
- Updated at : 2024-12-25 16:19:26
- Link: https://windows11.techidaily.com/unraveling-vivetool-enable-unseen-features-on-windows-pcs/
- License: This work is licensed under CC BY-NC-SA 4.0.
