Streamline and Simplify Game Setup in Xbox App

Streamline and Simplify Game Setup in Xbox App
The Xbox app lets you purchase and install games on any of your system drives. Usually, this process works well, but sometimes, the Xbox app won’t let you install games in any location other than the default directory. This can be problematic, especially when you want to install a big-size game, but the default directory doesn’t have enough space.
Such situations usually arise due to corruption in the Xbox app or misconfigured registry settings. Fortunately, it’s very easy to troubleshoot this problem. Here are some fixes to try when you can’t choose a drive to install games on the Xbox app.
1. Restart the Computer

You might fail to change the installation drive in the Xbox app due to a temporary system glitch or bug. Luckily, you can quickly eliminate such bugs and glitches by restarting your computer.
To restart, press theAlt + F4 hotkeys to open the Shut Down Windows prompt, click the drop-down icon, chooseRestart from the context menu, and then clickOK. After restart, launch the Xbox app and check if you can choose a different drive to install games. If not, then it’s time to dive into the advanced troubleshooting methods.
2. Change the Installation Directory in the Xbox App Settings
There are two places from where you can change the installation drive on the Xbox app. One is while installing the game, whereas the other is the Xbox settings menu.
If the first method is not working, you can use the second method to change the installation drive in the Xbox app. So, here’s how to edit the Xbox app settings to change its default download location.
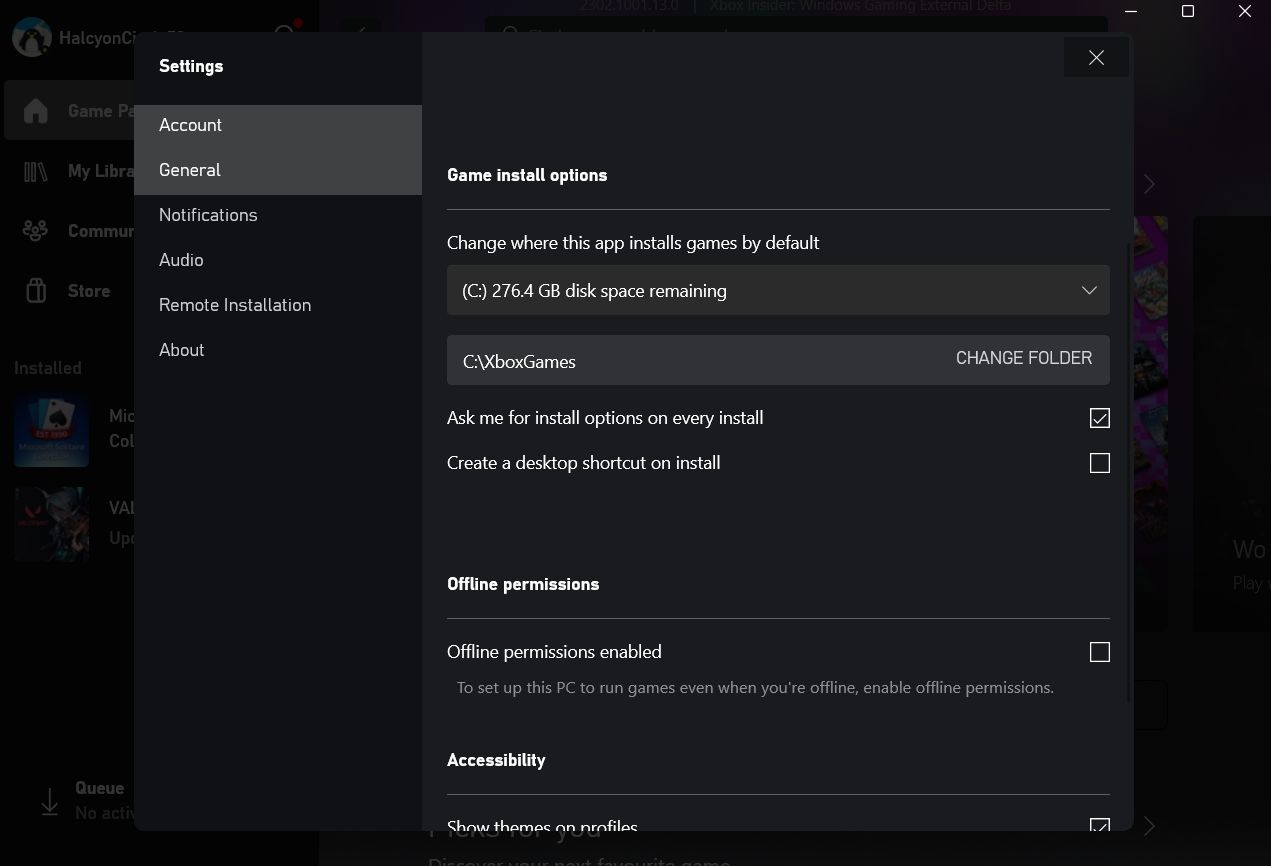
- Launch the Xbox app, click on your profile in the top left corner, and chooseSettings from the context menu.
- ChooseGeneral from the left sidebar.
- Click theChange folder option underChange where this app installs games by default .


- Choose the location where you want to install the game and then click theSelect Folder option.
3. Customize the System Settings
If editing the Xbox app settings wasn’t helpful, you can edit the system settings and check if it makes a difference. Here’s what you need to do:
- Press theWin + I hotkeys to open theSettings app.
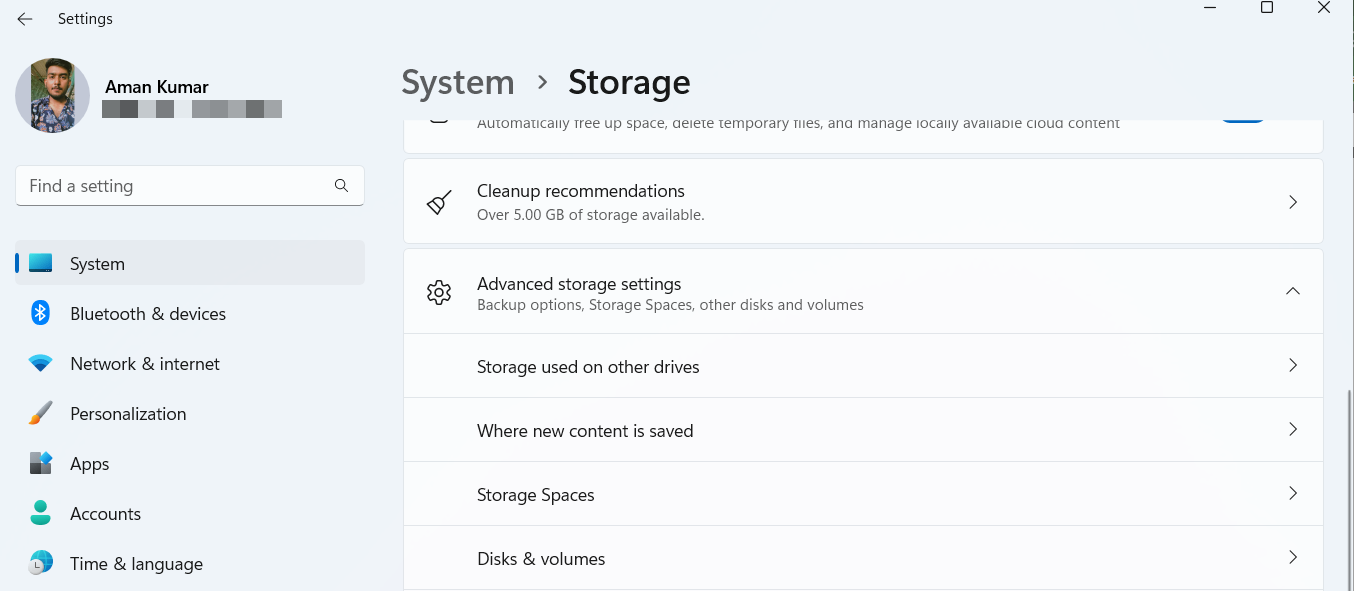
- ChooseSystem from the left sidebar and then click on theStorage option in the right pane.
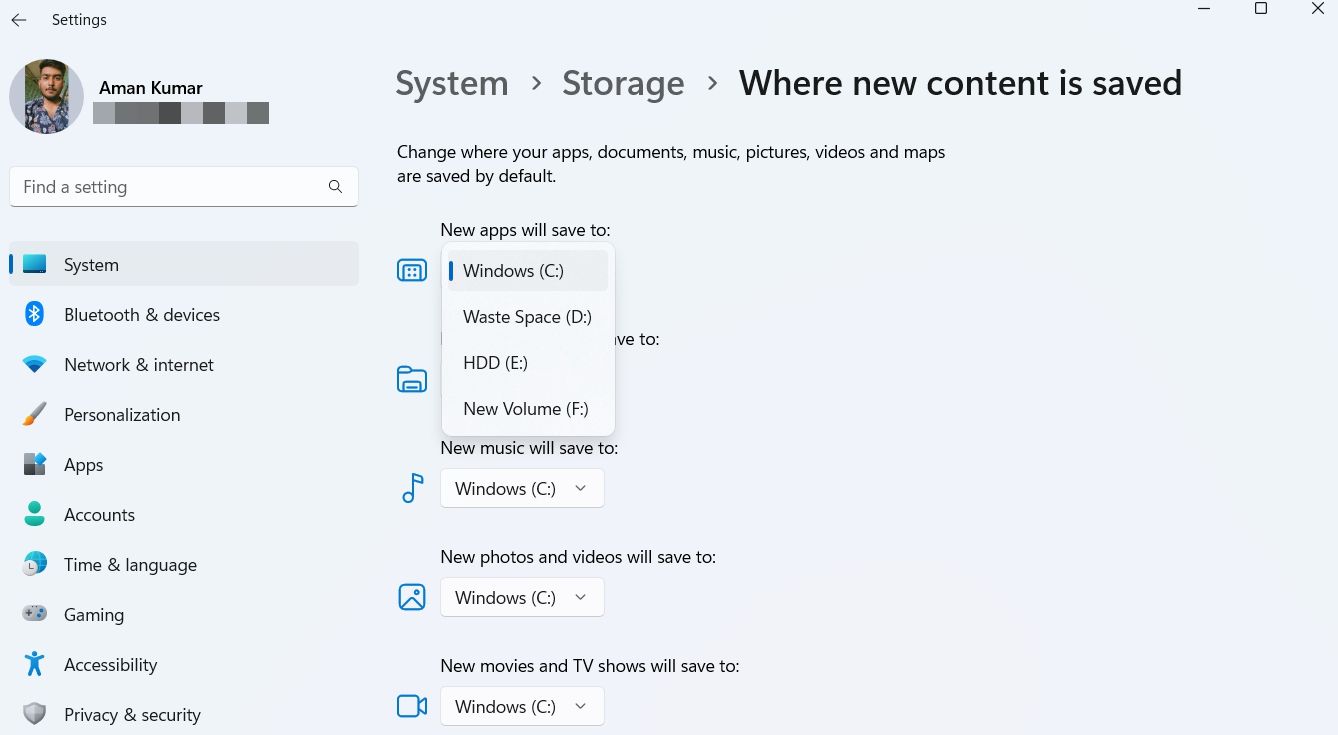
- Click the drop-down icon next toAdvanced storage settings and chooseWhere new content is saved option from the context menu.

- Click the drop-down icon under theNew apps will save to section, choose the drive where you want to install the game, and then clickApply.


That’s it! Restart your computer and check if the problem continues.
4. Restart Important Xbox Services
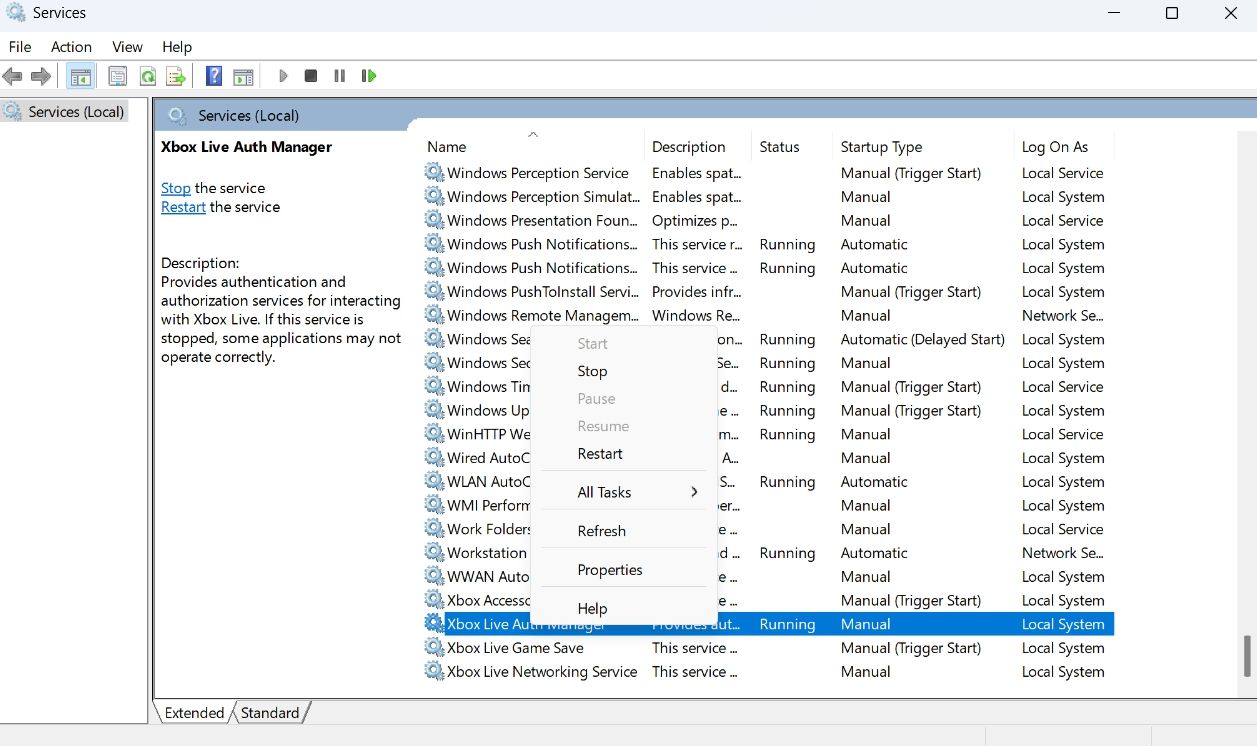
There are certain Xbox services that must be running for you to use the Xbox app properly. If any of these services fail to start properly, you might face the problem at hand.
To fix that, restart each service manually. Here’s how to do that:
- Open the Run dialog box by pressing theWin + R hotkeys.
- Typeservices.msc in the search bar and click OK.
- In the Services window, locate and right-click on the following services and chooseRestart from the context menu.
Xbox Accessory Management Xbox Live Game Save Xbox Live Auth Manager Xbox Live Networking Service
5. Reinstall the Gaming Services App
The Gaming Services app allows you to seamlessly download apps and games from the Microsoft Store and the Xbox app. But if the app gets corrupt, you might face various issues, including the one in question.
The solution, in this case, is to reinstall the Gaming Services app on your computer. You can do that by following the below instructions:
Editing the registry can be dangerous, as one wrong edit can make your system unstable. To ensure that your data is secure even if something goes wrong,back up the registry .
- Open the Run dialog box, typeregedit, and click OK.
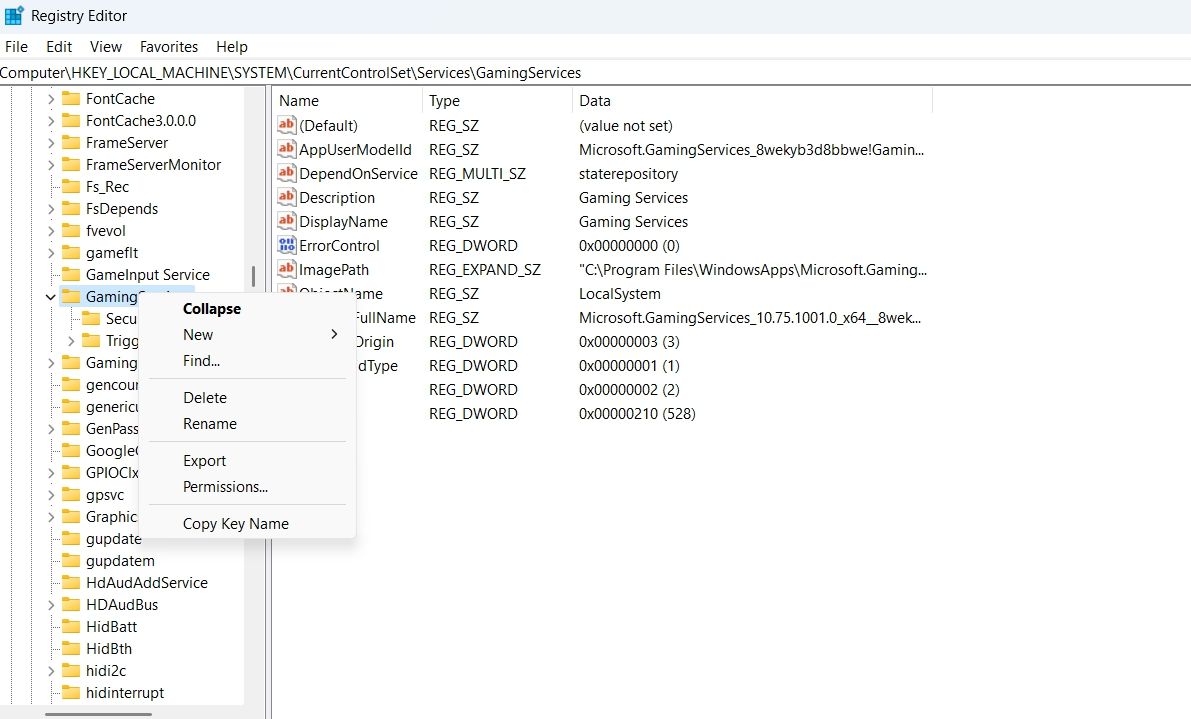
- In the Registry Editor, navigate to the below location:
HKEY_LOCAL_MACHINE\SYSTEM\CurrentControlSet\Services - Right-click on theGamingServices folder in the left sidebar and chooseDelete from the context menu.

- ClickYes to confirm your selection.
- Next, delete theGamingServicesNet folder as well in the left sidebar.
Now, open the elevated PowerShell window (see how to open Windows PowerShell as an administrator ), type the following command, and pressEnter .
Get-AppxPackage *gamingservices* -allusers | remove-appxpackage -allusers
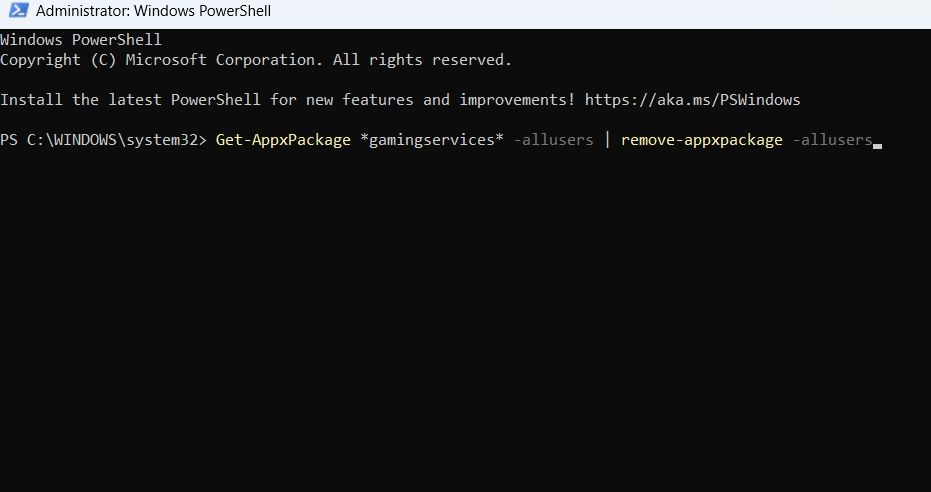
After uninstalling the Gaming Services app, restart your computer. Then, open the Microsoft Store, search for and download the Gaming Services app again.
6. Repair the Xbox App
It’s very common for the Xbox app to get corrupt and throw various issues. The best way to remove corruption from the UWP apps like the Xbox app is to use the Windows repair feature.
Check out how to repair apps and programs on Windows for information on how to do this.
7. Update the Xbox App
If repairing the Xbox app doesn’t remove the corruption, consider updating the app. Downloading the latest update of the Xbox app will not only remove the corruption but also introduce new features.
To update the Xbox app, follow the below steps:
- Open the Microsoft Store and click theLibrary option in the left sidebar.
- Click theGet updates button to allow the Microsoft Store to search for available updates of the installed apps.
The Microsoft Store will now automatically download updates for installed apps, including the Xbox app.
While you’re at installing updates, we’d also recommend downloading any available Windows updates . To do so, launch the Settings app, chooseWindows Update from the left sidebar, and then click theCheck for Updates button to install any available update on your computer. Following this, you will be able to choose a drive to install games on the Xbox app.
Change the Download Location of the Xbox App
The Xbox app is a great place to download your favorite games. However, the app might fail to change the installation location of games. Fortunately, you can quickly eliminate this issue by following the above fixes.
Meanwhile, you might be interested to know how to increase downloading speed of the Xbox app.
- Title: Streamline and Simplify Game Setup in Xbox App
- Author: Joseph
- Created at : 2024-08-15 15:56:22
- Updated at : 2024-08-16 15:56:22
- Link: https://windows11.techidaily.com/streamline-and-simplify-game-setup-in-xbox-app/
- License: This work is licensed under CC BY-NC-SA 4.0.




 The BootIt Collection covers multi-booting, partitioning, and disk imaging on traditional PC’s using the standard BIOS and newer PC’s using UEFI. The collection includes BootIt Bare Metal (BIBM) for standard BIOS systems and BootIt UEFI (BIU) for UEFI system.