Steps for Deleting Account Info From Windows Logon

Steps for Deleting Account Info From Windows Logon
If you frequently use your computer in public places, it’s a good idea to remove your email address from the Windows login screen. This means people can’t get your email address if they see your screen over your shoulder.
You can accomplish this using the Settings app, Group Policy Editor, or Registry Editor. In this post, we’ve covered all these methods in detail.
1. How to Hide Email Address From Windows Login Screen Using the Settings App
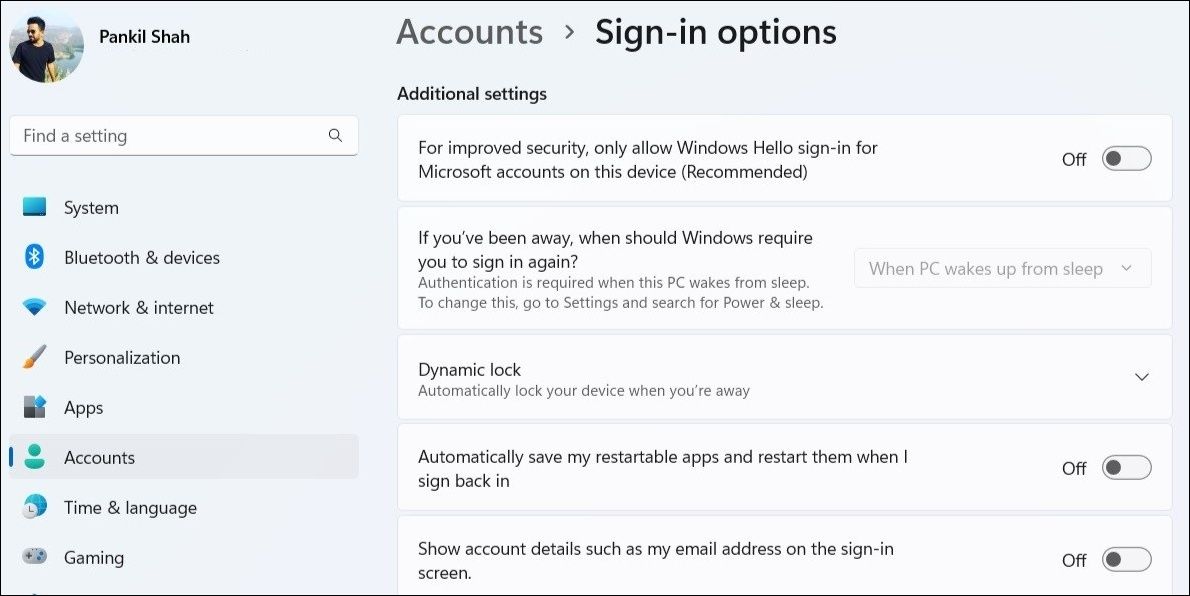
The Windows Settings app provides a quick way to hide account information from the login screen. So, if you are in a rush, use the following steps to remove user email addresses from the Windows login screen.
- PressWin + I or use one of the many ways to launch the Settings app .
- Navigate toAccounts > Sign-in options .
- UnderAdditional settings , toggle off the switch next to Show account details such as my email address on the sign-in screen .

2. How to Hide Email Address From Windows Login Screen Using the Group Policy Editor
The Group Policy Editor (or gpedit.msc) is a handy Windows tool for configuring advanced system settings. You can also this tool to hide your email address from the Windows login screen.
Note that the Group Policy Editor is only available on Windows Professional, Education, and Enterprise editions. If your PC is running Windows Home, check out how to access the Local Group Policy Editor on Windows Home before proceeding.
- PressWin + S to open the search menu.
- Typegpedit.msc in the search box and select the first result that appears.
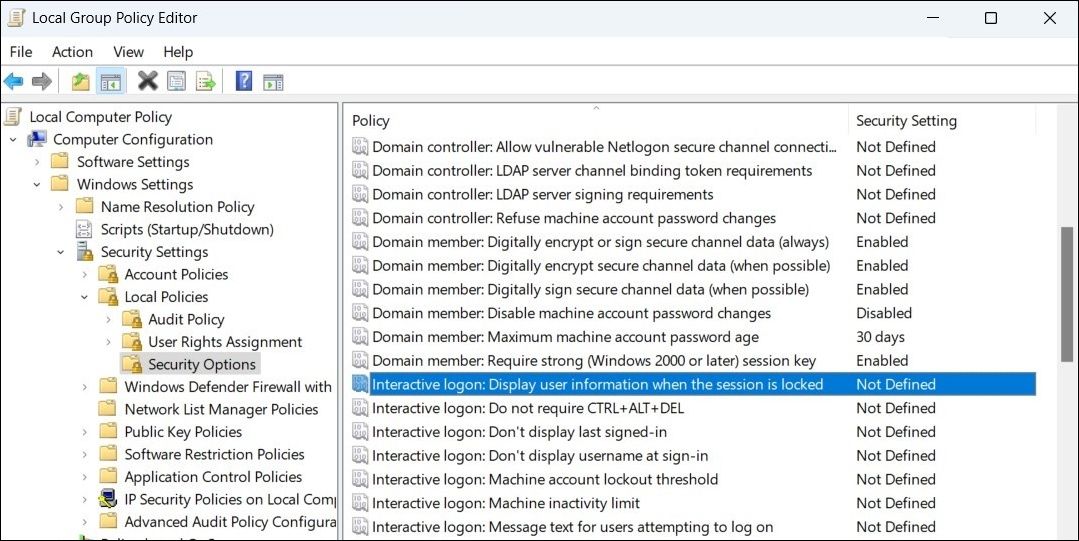
- Use the left pane to navigate to Computer Configuration > Windows Settings > Security Settings > Local Policies > Security Options .
- Double-click the Interactive Logon: Display user information when the session is locked policy on your right.
- In the properties window, click the drop-down menu to select theDo not display user information option.
- ClickApply followed byOK .


- Next, double-click on theInteractive logon: Do not display last user name policy from the same section.
- SelectEnabled in the properties window.
- ClickApply followed byOK to save changes.
3. How to Hide Email Address From Windows Login Screen Using the Registry Editor
If the above two methods don’t work for some reason, you can make changes to the Windows registry files to hide your email address from the login screen. For that, you’ll need to use the Registry Editor on Windows.
When it comes to editing Registry files, it’s important to be cautious as making incorrect changes can cause irreversible damage to your PC. We recommend you either back up all the registry files or create a restore point before you make any changes. If you need help with that, check our guides on how to back up the Windows registry and how to create a restore point in Windows .
Once you’re done with that, use the following steps to hide your email address from the Windows login screen via Registry Editor.
- PressWin + X to open the Power User menu and selectRun from the list.
- Typeregedit in the text box and pressEnter to open the Registry Editor.
- SelectYes when the User Account Control (UAC) prompt appears.
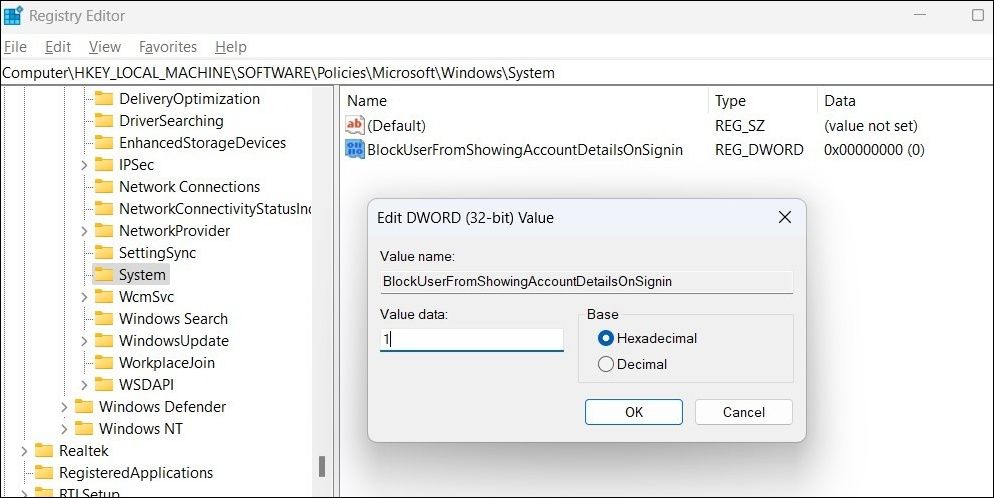
- Use the left pane to navigate to HKEY_LOCAL_MACHINE > SOFTWARE > Policies > Microsoft > Windows > System .
- Right-click on theSystem key and selectNew > DWORD (32-bit) Value .
- Rename the DWORD toBlockUserFromShowingAccountDetailsOnSignin .
- Double-click on the newly created DWORD and enter1 in theValue data field. Then, clickOK .

Exit the Registry Editor and restart your PC for the changes to take effect.
Hiding Your Email Address From the Windows Login Screen Is Easy
As we just saw, hiding your personal information from the Windows login screen barely takes a couple of minutes, regardless of the method you employ.
- Title: Steps for Deleting Account Info From Windows Logon
- Author: Joseph
- Created at : 2024-08-15 15:50:12
- Updated at : 2024-08-16 15:50:12
- Link: https://windows11.techidaily.com/steps-for-deleting-account-info-from-windows-logon/
- License: This work is licensed under CC BY-NC-SA 4.0.


 Easy GIF Animator is a powerful animated GIF editor and the top tool for creating animated pictures, banners, buttons and GIF videos. You get extensive animation editing features, animation effects, unmatched image quality and optimization for the web. No other GIF animation software matches our features and ease of use, that’s why Easy GIF Animator is so popular.