
Step-by-Step Tutorial on Setting Fixed Columns & Rows in Microsoft Excel

Step-by-Step Tutorial on Setting Fixed Columns & Rows in Microsoft Excel
Quick Links
Do you have an Excel sheet where you want the columns and rows at fixed sizes ? You can lock the column width and row height for your entire spreadsheet in a few steps to prevent accidental resizing.
Maybe you have data that you want to display in a specific way. For instance, you might expand a cell to accommodate a large font or an image . Because it’s so easy to resize columns and rows by dragging them, you or a collaborator might do it unintentionally. Rather than spending time constantly getting those columns or rows back to the sizes you want, just lock them.
Unlock the Cells in the Sheet
Whether you realize it or not, all cells in your Excel sheet are locked by default if you’ve never protected the sheet. This doesn’t prevent changes or edits until you use the sheet protection feature which we’ll describe below.
So, the first step is to unlock all cells in your sheet to allow you to enter data and make changes outside of the locked column and row sizes.
Related: How to Lock Cells in Microsoft Excel to Prevent Editing
Select the sheet by clicking the Select All button (triangle) on the top left corner of the sheet.
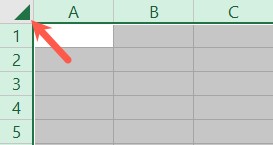
Open the Format Cells box by right-clicking and choosing “Format Cells” or by going to the Home tab and clicking the Format Cells launcher (tiny arrow) on the bottom right of the Number section of the ribbon.

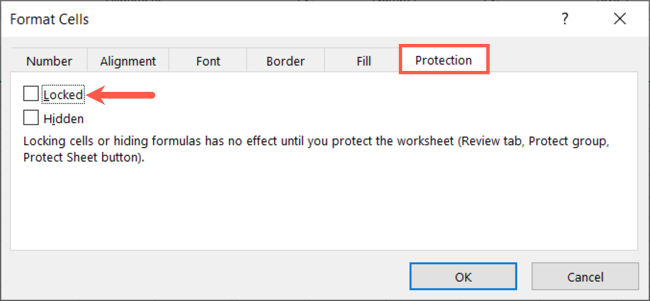
Go to the Protection tab and uncheck the box for Locked. Then, click “OK” to apply the change.
Protect the Sheet
Now that all cells in your sheet are unlocked, you’ll protect the sheet but only for the columns and row sizes (formatting.)
Related: How to Protect Workbooks, Worksheets, and Cells From Editing in Microsoft Excel
Head to the Review tab and click “Protect Sheet” in the Protect section of the ribbon.

Enter a password to secure the protection and check the box at the top for Protect Worksheet and Contents of Locked Cells. Then, check every box in the list beneath except for Format Columns and Format Rows depending on which you want to protect, or both.
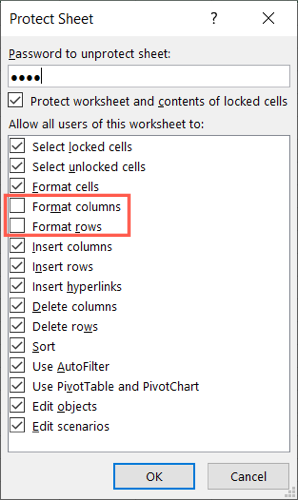
This allows you to continue working with your sheet and editing anything you like, except for the column and/or row formatting. Those are the only items locked. Select “OK.”
You can also uncheck the boxes for inserting or deleting columns and rows if you want to protect those as well.
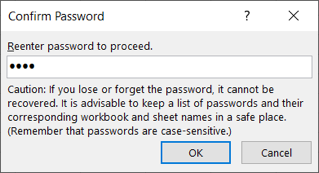
Confirm the password and select “OK.”
Now, you can give your change a test. You’ll notice that you no longer see the double-sided arrow between columns or rows.

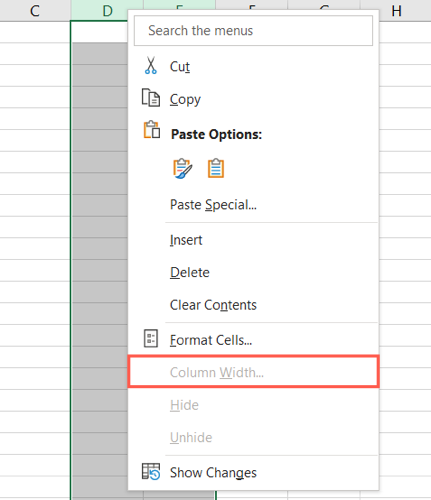
Additionally, the resizing options in the shortcut menu are grayed out and unavailable.
Allow Column and Row Resizing Again
To remove the protection from the sheet and allow resizing again, go to the Review tab and pick “Unprotect Sheet.”

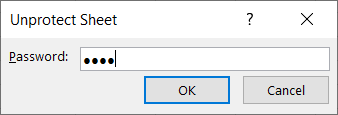
Enter the password and click “OK.”
You’ll then see the double-sided arrow between columns and rows.

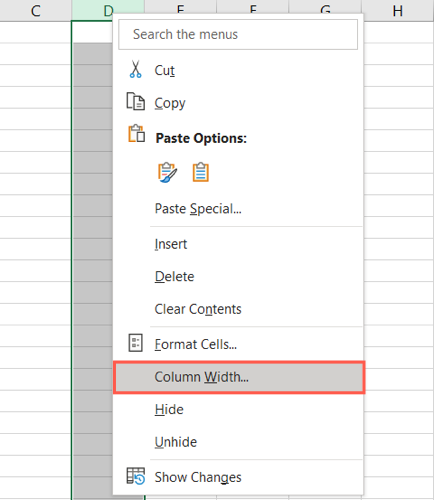
You also have the option to resize them in the shortcut menu.
Locking the sizes for your columns and rows in Excel takes only a few steps that are worth your time to prevent unwanted changes.
For more, look at how to freeze and unfreeze columns and rows .
Also read:
- [Updated] Avoid Pitfalls Maintaining YouTube Thumbnail Quality for 2024
- [Updated] Exploring Affordable Video Players on Various Systems for 2024
- [Updated] In 2024, Best Zoom Audio Settings for Getting Audio Quality [2 Ways]
- 2024 Approved Enhance Creativity on a Budget Pick From These 8 Zero Price Edits
- 高画質オプティマイズ:永久に変わらないMP4動画へのSRT字幕完全リンク方法
- ChatGPT: Ensuring Effectiveness & Risk in Exerrances
- How To Change Country on App Store for Apple iPhone 12 mini With 7 Methods
- How to Install and Activate Defender Application Guard on Edge for Enhanced Safety
- How to Unlink Your OneDrive From Your Microsoft Account on Windows
- In 2024, Top 5 Lava Yuva 3 Bypass FRP Tools for PC That Actually Work
- Masterful Mix: Select 5 FREE PC Audio Programs
- Quick Setup for Hosting Online Seminars on PC/Mac for 2024
- Secure Pathway to Start Elevated PowerShell on Win11 Systems
- Setting Up Defender Application Guard for Secure Edge Use in Win 11
- Stay Ahead of the Game with W11 Pro Special Deals
- Windows Sign In: How to Delete Your Email
- Title: Step-by-Step Tutorial on Setting Fixed Columns & Rows in Microsoft Excel
- Author: Joseph
- Created at : 2024-10-27 16:10:22
- Updated at : 2024-10-30 16:39:09
- Link: https://windows11.techidaily.com/step-by-step-tutorial-on-setting-fixed-columns-and-rows-in-microsoft-excel/
- License: This work is licensed under CC BY-NC-SA 4.0.