
Step-by-Step Guide: Adding a Summary Row at the End of Your Microsoft Excel Tables

Step-by-Step Guide: Adding a Summary Row at the End of Your Microsoft Excel Tables
Quick Links
- Insert a Total Row Using Table Design
- Insert a Total Row Using a Keyboard Shortcut
- Insert a Total Row by Adding a Row and Formula
Tables in Microsoft Excel provide many benefits for working with your data. And if your table contains figures that you’d like to total at the bottom, this is a simple task. Here are three ways to add a total row to a table in Excel.
Insert a Total Row Using Table Design
You can add a total row to the bottom of your table using a simple checkbox.
Select any cell in your table and go to the Table Design tab that displays. In the Table Style Options section of the ribbon, check the box for Total Row.

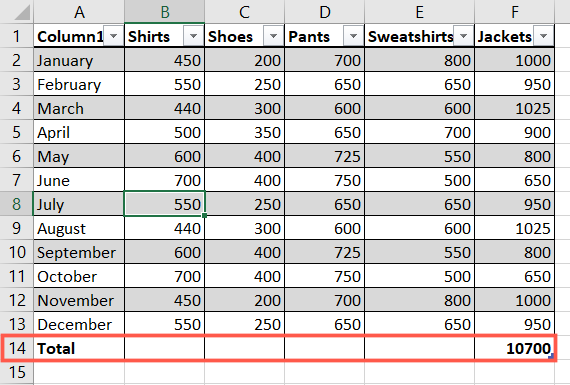
You’ll likely see only one total display, which is currently how the Total Row feature works. But in a few clicks, you can fill in the rest.
The total row at the bottom provides you with a drop-down list of options for each column. Click that arrow and choose “SUM” for one of the columns.
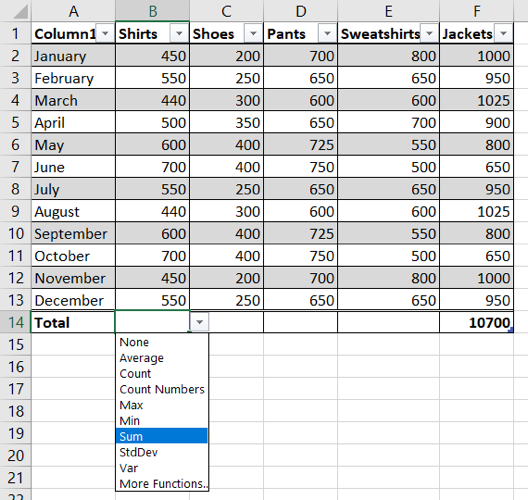
If you look at the formula bar, you’ll see that the formula added is actually the SUBTOTAL function. This is a Structured Reference formula that’s solely for tables in Excel.
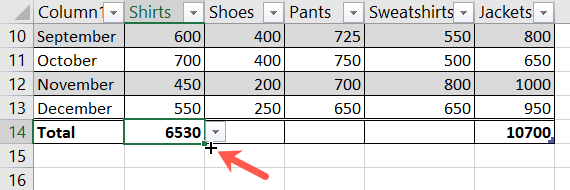
Then, select the cell and place your cursor on the bottom-right corner to display the fill handle (plus sign). Drag to the remaining cells in that total row to copy the formula.
Related: How to Automatically Fill Sequential Data into Excel with the Fill Handle
If you prefer, you can also click the drop-down arrow in each cell and select “SUM” rather than copying the formula.
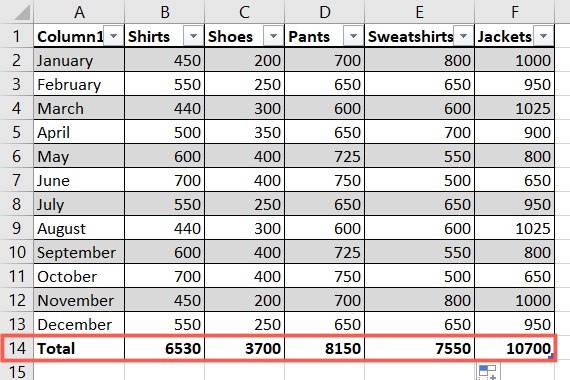
You should then see the totals for all columns in your Excel table.
Insert a Total Row Using a Keyboard Shortcut
If you’re a fan of using keyboard shortcuts to perform tasks quickly, then this method is for you.
Select any cell in your table and press Ctrl+Shift+T. And there you go! A total row is added to the bottom of your table.

Luckily, this keyboard shortcut works the same way as the Total Row checkbox on the Table Design tab above, so you can follow the same steps to insert the remaining totals and copy the formula to the other cells in the total row.
Related: All the Best Microsoft Excel Keyboard Shortcuts
Insert a Total Row by Adding a Row and Formula
One more way to easily insert a total row in your table is by adding a row, using the SUM formula, and copying it across.
You can quickly add a row to the bottom of your table by going to the last cell in the first column and typing. For instance, you can type in the word Totals and hit Enter, which automatically creates a new table row.

Next, select the cell to the right to insert your first total. Go to the Home tab and click “Sum” in the Editing section of the ribbon.
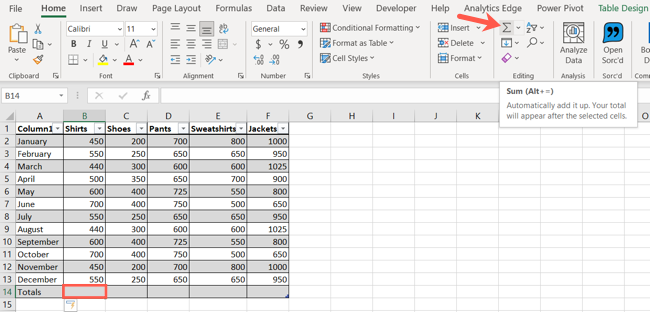
Now that you have the total for the first column, you can copy that formula to the other cells.
Select the cell with the SUM formula , place your cursor on the bottom-right corner to display the fill handle, and then drag to the remaining cells in that total row.

That’s all there is to it! From there, you can format the total row to make it stand out if you like.
Totaling figures in a spreadsheet is a basic function, so having three simple ways to add a total row lets you use the method that’s most comfortable for you.
Related: How to Create Expense and Income Spreadsheets in Microsoft Excel
Also read:
- [Updated] In 2024, Unmatched Video Upload Aides to Twitter
- 2024 Approved Leveraging Patient Stories A Guide to Powerful Videography
- Apple's Tunes in the Frame of Reality
- Download and Read Your FlipBuilder.com eBooks Anywhere - For iOS & Android Devices
- Embracing the World, One Post at a Time with Insta Captions
- Expert Tips for Conducting OBS Meetings via Zoom
- Fixing Windows Store Failure Codes
- Guide to Self-Clearing Windows Recycle Bin
- How to Halt Windows Desktop Keys Effectively
- Proven Tactics for Heic to JPEG Conversion Process on Windows 11 Systems
- Redefining Phones' Role in Windows 11 Networking
- Secure a Static Backdrop on Modern Windows 11 PCs
- Updated 2024 Approved No-Watermark Video Joiners Our Top Picks
- Title: Step-by-Step Guide: Adding a Summary Row at the End of Your Microsoft Excel Tables
- Author: Joseph
- Created at : 2024-10-25 16:08:30
- Updated at : 2024-10-30 16:31:20
- Link: https://windows11.techidaily.com/step-by-step-guide-adding-a-summary-row-at-the-end-of-your-microsoft-excel-tables/
- License: This work is licensed under CC BY-NC-SA 4.0.