
Revitalize Your Search on Windows 11: 11 Key Fixes Included

Revitalize Your Search on Windows 11: 11 Key Fixes Included
Did you start your PC today only to find your Windows search bar missing or not working? The Windows search bar is a handy function. But when it doesn’t want to play ball, it can make your life difficult.
When the Windows search bar doesn’t work as it should, it can be a result of several things. But before you troubleshoot the Windows 11 search bar not working fiasco, let’s see if it’s enabled in your Windows.
Having Trouble Typing?
If you’re having issues typing in the search bar, there are a whole slew of things you can try to fix this specific problem. Fortunately, we have a guide on fixing Windows Search when it doesn’t let you type , so check that out for more details.
1. Check If the Windows Search Bar Is Enabled
While the Search bar comes enabled by default on your Windows 11, it’s possible to disable it manually. If you share your PC with other people or if you have tinkered with the settings in the past, it’s likely that the search bar might have been disabled. If you’re not sure, we suggest you first verify if that’s indeed the case.
Here’s how you can do that:
- To enable it, start by pressing Win + I to launch the Settings app.
- Select Personalization from the left sidebar.
- Next, switch to the right pane and select Taskbar.
- On the next screen, make sure that that button next to Search in the Taskbar items section is enabled.
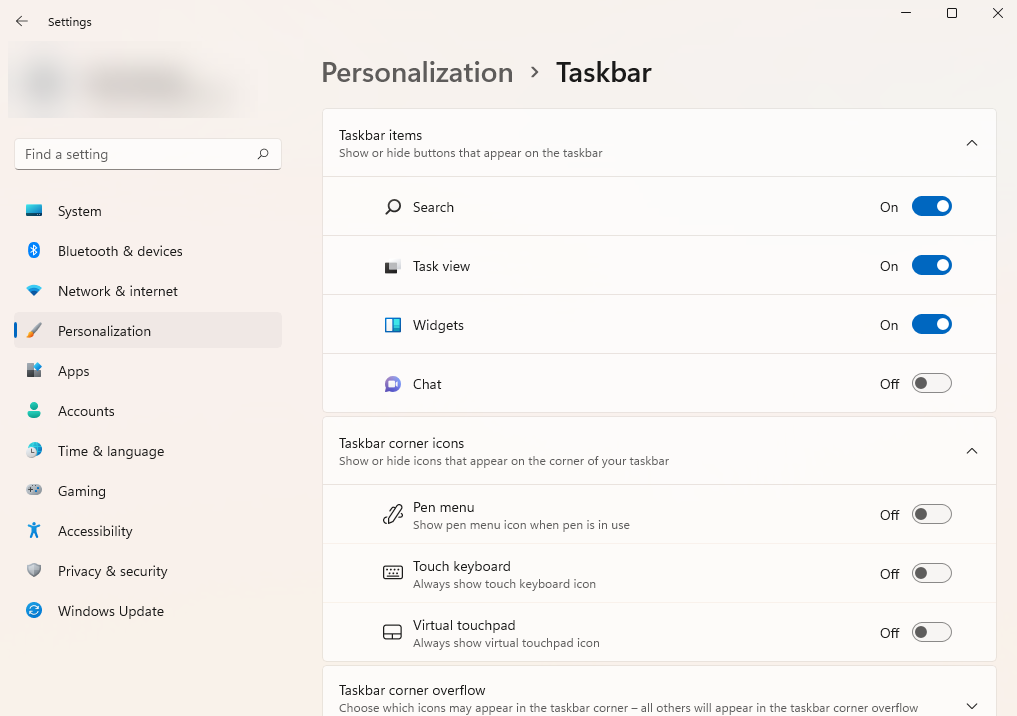
Note that the search bar doesn’t appear as a bar on Windows 11 like it does on Windows 10. It appears as a button with a search icon next to the Windows button.
2. Restart Your PC
As a rule of thumb, restarting your PC can fix a surprisingly long list of problems. As such, before you perform any other steps in this article, reboot your system and see if that helps.
No luck? If the problem sticks around, it’s time to try other methods.
3. Update Your Windows to the Latest Version
If you haven’t updated your PC in a long time, now may be a good time. Updating Windows might just fix your Windows search bar not working problem.
Follow these steps to continue:
- Press Win + I to launch the Settings app and select the last option in the sidebar called Windows Update.
- Click on the blue Check for updates button.
- If Windows finds any new updates, you’ll see an Install now button. Click on it.
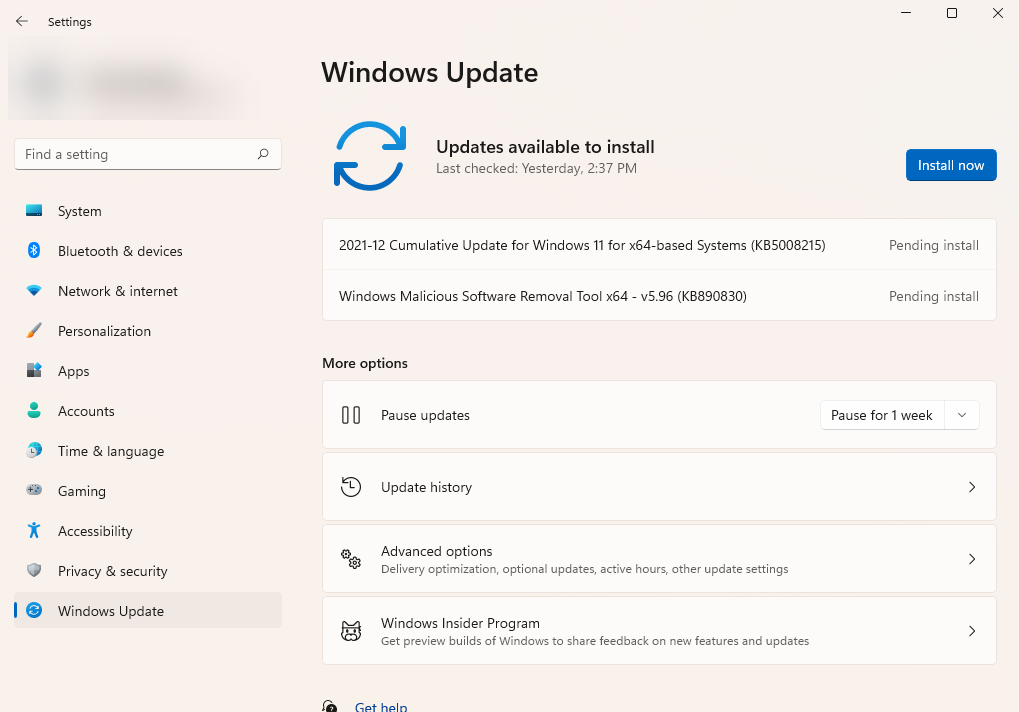
Now, wait until the app finishes installing the updates, and then see if you’re still facing any problems on your Windows PC.
4. Restart Windows Search Bar Process
The search bar process is suspended in the background when you’re not using the Windows search bar. When you try to type in the search bar, the process activates automatically. However, if it glitches out for some reason, your search bar will not work.
But the good thing is, you can easily restart the process. To do so, press Ctrl + Shift + Esc to launch the Task Manager and switch to the Details tab. Now, look for a process called SearchHost.exe. Right-click on it and select End process.
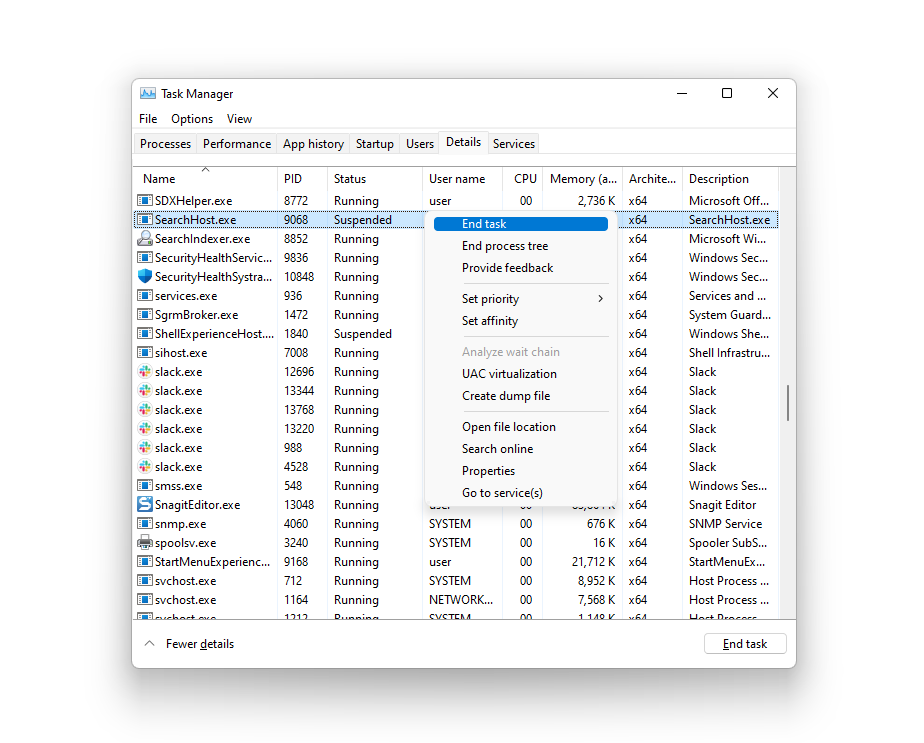
Once you’ve ended the task, click on the search button in the Windows 11 taskbar (the magnifying glass). Hopefully, it should work now.
5. Restart the Windows Search Service
If your Windows search bar still doesn’t work, restarting the Windows Search service may fix the issue. Follow these steps to continue:
- Press Win + R, type services.msc, and press Enter. You’ll see the Services console pop up.
- Look for a service called Windows Search and double-click on it.
- This will launch the service’s Properties window.
- Click on the Stop button. Once the service stops, click on the Start button.
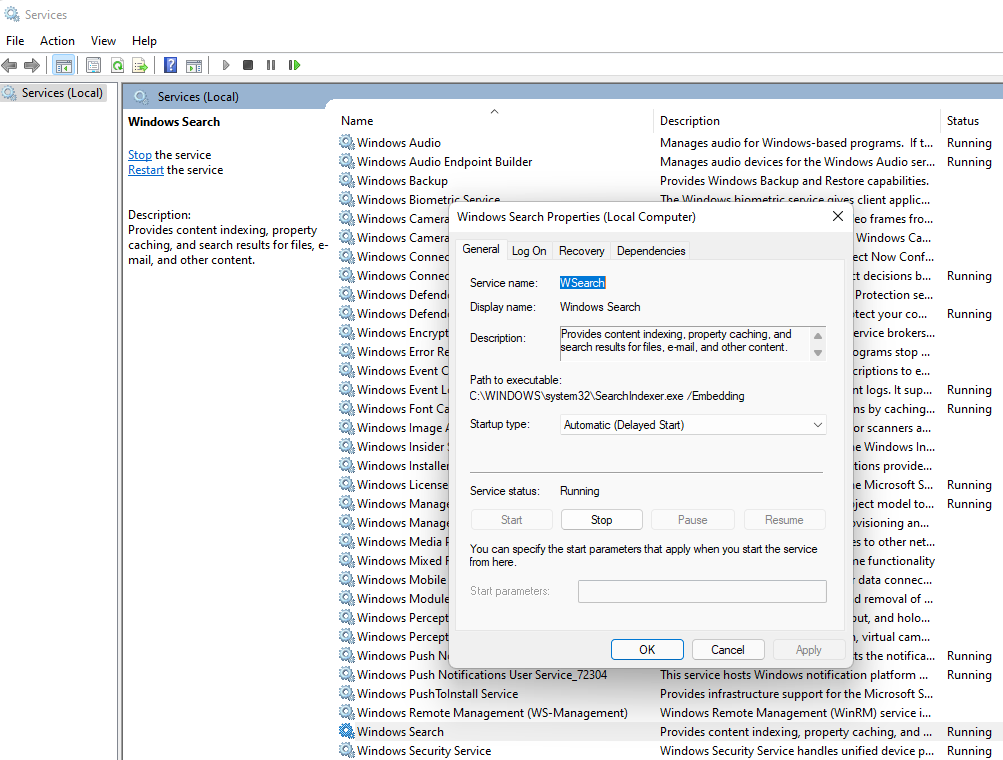
Try using the search bar now and see if it works.
6. Rebuild the Windows Search Index
Windows 11 relies on a search index for quickly delivering results to your search queries. However, if there’s a problem with the index, the Windows search bar may stop working.
Fortunately, rebuilding the search index isn’t as complex as it may sound. Here’s how to do so:
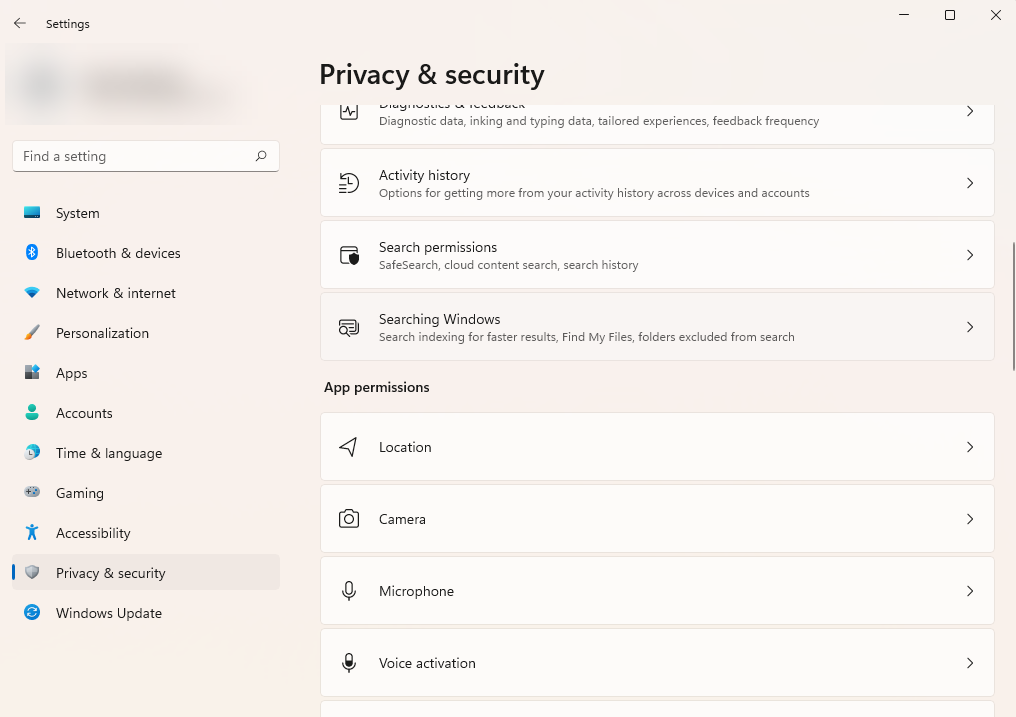
- Press Win + I to launch the Settings app and click on Privacy & security from the left sidebar.
- Switch to the right pane and select Searching Windows.
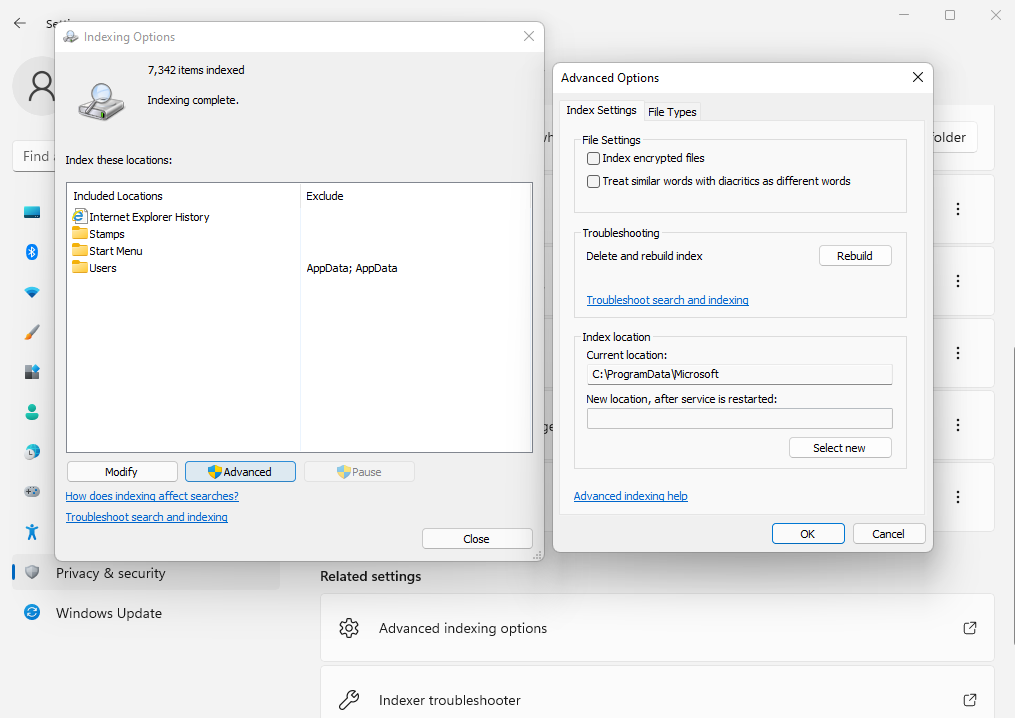
- On the next screen, scroll to the bottom and click on Advanced indexing options. This will launch the Indexing Options window.
- Click on the Advanced button at the bottom of the window.
- In the Advanced Options window, click on the Rebuild button.
- When prompted for confirmation, click OK.
Close
Once the index is rebuilt, hopefully, the Windows search bar will start working.
7. Use the Windows Search Troubleshooter
If your Windows search bar is still not working, you can try the built-in Windows troubleshooter. Follow these steps to continue:
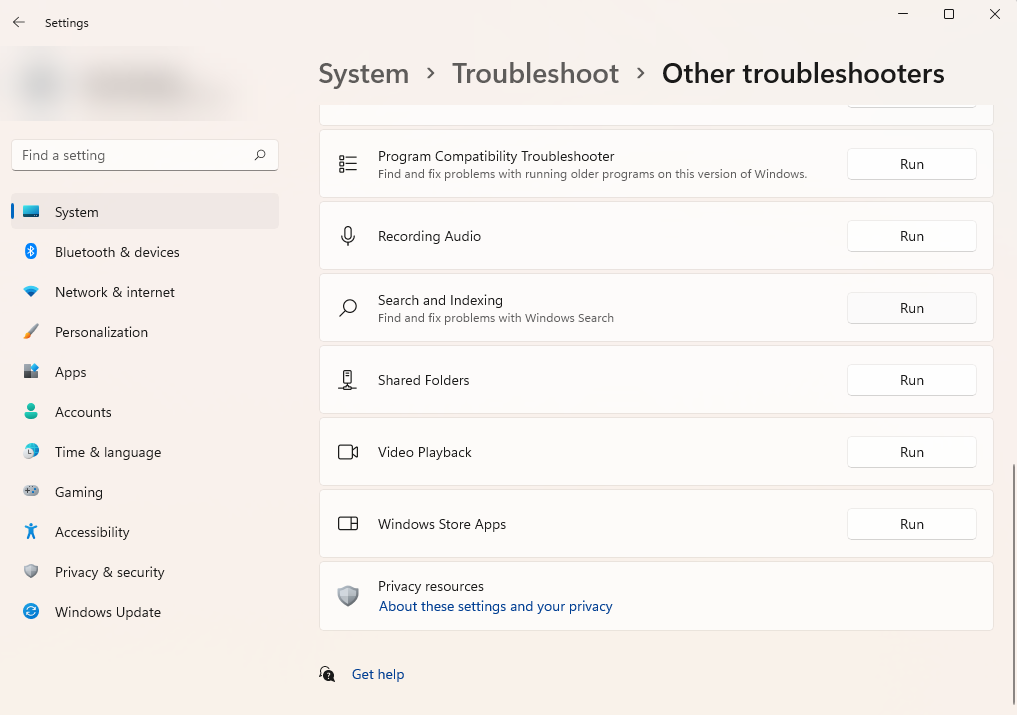
- Press Win + I to launch the Settings app and select System from the left sidebar.
- From the right pane, select Troubleshoot.
- Under the Options section, select Other troubleshooters.
- On the next screen, look for the Search and Indexing troubleshooter, and click on the Run button next to it.
When the troubleshooter launches, Windows will ask you to select the issues you’re facing from a list. Check the boxes for the issues you’re facing and click on the Next button.
If the troubleshooter finds any issues, it will fix them for you or let you know that they can’t be fixed automatically.
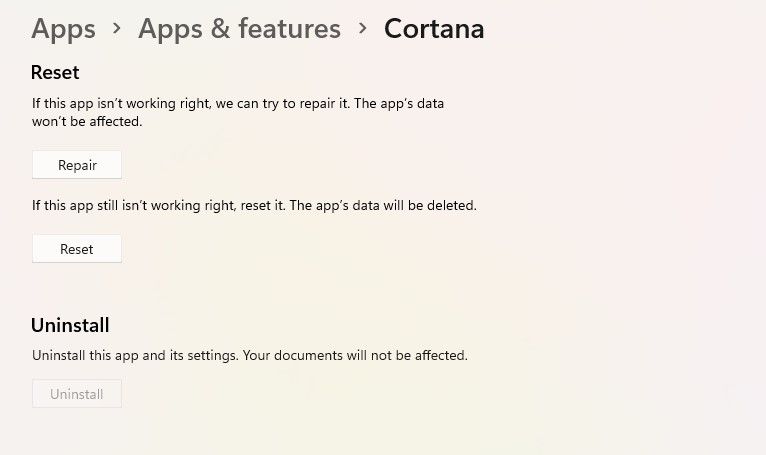
8. Reset Cortana
According to Microsoft , you might be able to fix the Windows search not working issue by resetting Cortana if you use Windows 10 version 1809 or earlier.
- Launch the Start menu search bar and right-click on Cortana.
- Select More > App settings.
- Finally, select Reset.
9. Reset Windows Search Using Windows PowerShell
If you’re running Windows 10 version 1903 (May 2019 update) or later, you can try resetting the Windows search using PowerShell.
Start by downloading the reset Windows search PowerShell script from Microsoft . Next, right-click on the script and select Run with PowerShell. Select Open when you see the security warning.
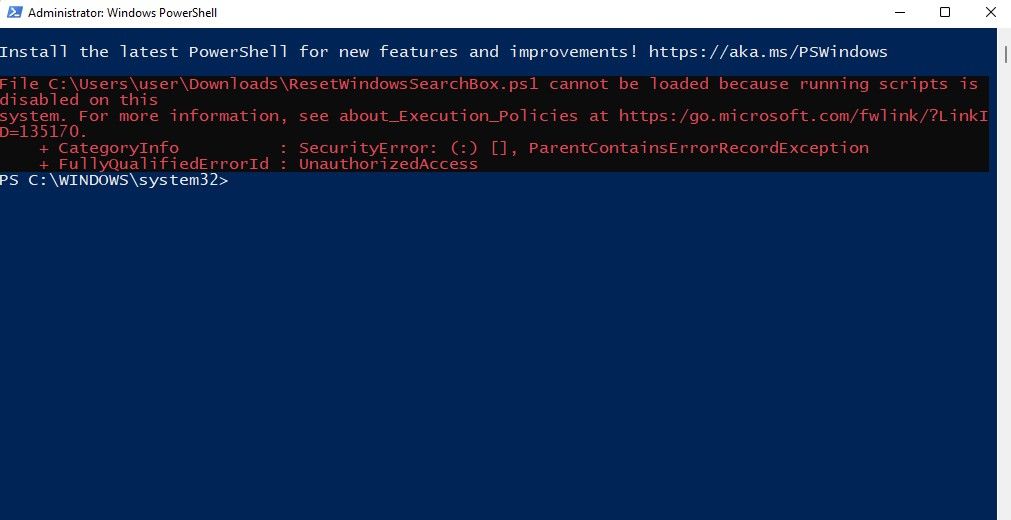
When PowerShell opens, you’ll probably see an error that says running scripts is disabled on this system. If you do, execute the following command:
Set-ExecutionPolicy -Scope CurrentUser -ExecutionPolicy Unrestricted
You’ll see a warning message. Press Y and then Enter to move forward.
Exit PowerShell and then again, right-click on the file you downloaded and select PowerShell. When asked if you want to allow this app to make changes to your device, select Yes. You’ll see a message that says Done.
Don’t close the PowerShell window just yet. Press any key to continue using PowerShell. Then, run the following command to revert the change made to the execution policy earlier:
Set-ExecutionPolicy -Scope CurrentUser -ExecutionPolicy Restricted
Press Y and then Enter to continue. Exit the PowerShell window and try using Windows search now.
10. Reset Windows Search Service by CMD
While you should be able to reset your Windows Search Service with PowerShell, it might not work in all cases. In places like this, Command Prompt can come to your rescue and fix the issue with the Windows search bar.
Follow these steps to continue:
- Head to the Start menu search bar, type in ‘cmd,’ and launch Command Prompt as an administrator.
- In the command prompt, type in the following command and hit Enter to stop the search service:
net stop wsearch - To restart the service, type in the following command and hit Enter:
net start wsearch
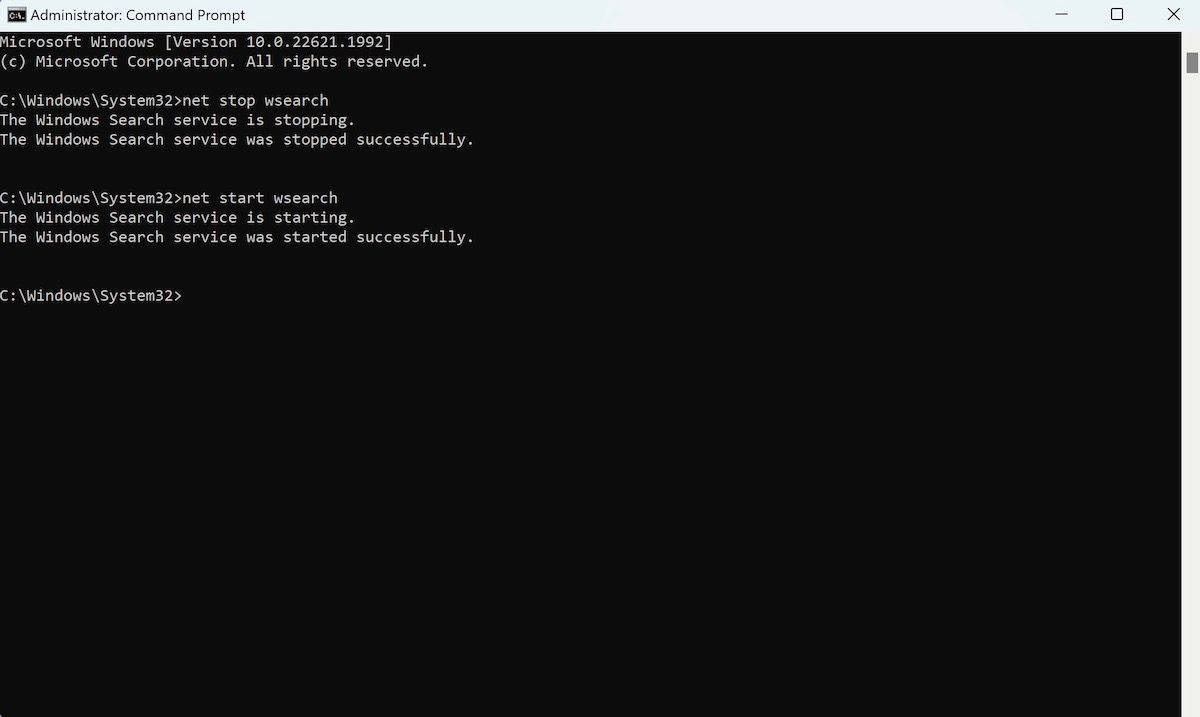
Now that you’ve reset the service, go ahead and check if the search bar is working normally.
11. Reset Windows
Resetting your Windows computer should be your last resort to fix the Windows search bar. And as a last resort, it’s a handy way to reset your Windows and make it as good as new.
Begin by pressing Win + I and navigating to System > Recovery. Next, click on the Reset PC button.
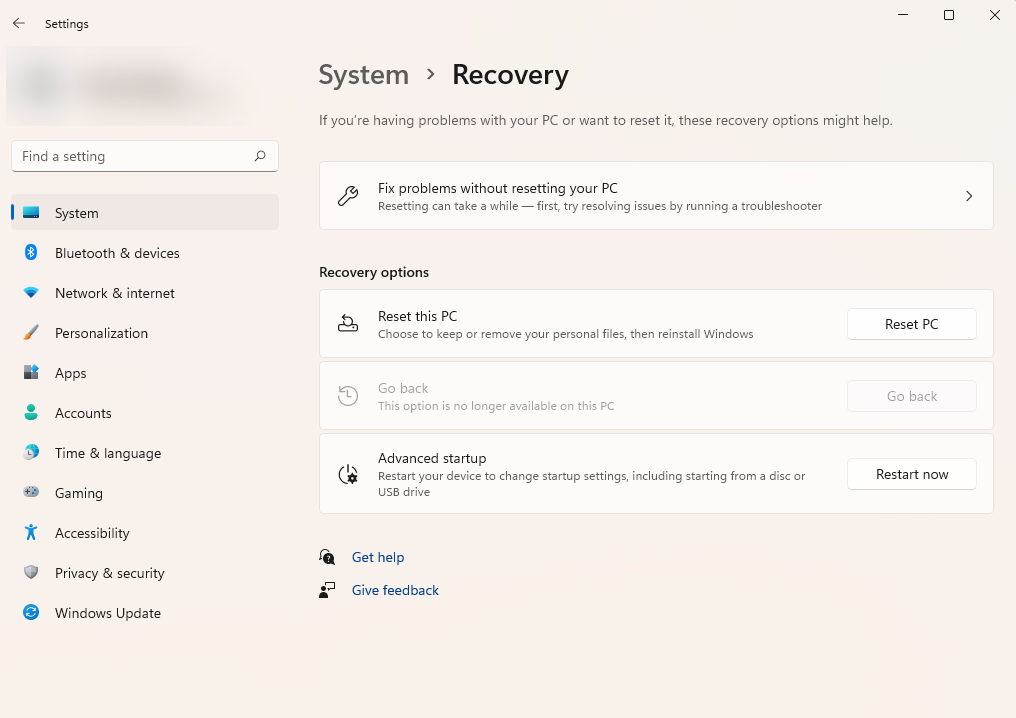
You’ll now be asked if you want to remove all files or keep them. If you want your Windows in mint condition, select the Remove everything option. Otherwise, select the Keep my files option.
Did You Fix the Windows Search Not Working Issue?
Windows 11 is a nice visual upgrade. And it doesn’t make sense to go back to Windows 10 for something as menial as the Windows search bar not working.
Hopefully, one of these fixes solved your Windows 11 search bar not working issue. However, if you search your Windows all the time, you may want to consider a third-party tool. They are often more powerful than the Windows search bar.
When the Windows search bar doesn’t work as it should, it can be a result of several things. But before you troubleshoot the Windows 11 search bar not working fiasco, let’s see if it’s enabled in your Windows.
Also read:
- [Updated] 2024 Approved Seeing the Unseen Tracking Instagram Viewers Meticulously
- 4 Ways to Transfer Music from Apple iPhone 12 Pro to iPod touch | Dr.fone
- Comprehensive Guide to the Newly Launched Samsung Galaxy Buds+
- Delving Into Previous Social Interactions on FB
- Fixing Failed Steam Remote Links on PC
- Ford Mustang Pursuit Edition: High-Quality Vehicle Backgrounds & Desktop Graphics - YL Computing
- Halt High Contrast Customization in Windows
- In 2024, Fresh Vlog Discussion Ideas Each Day
- In 2024, How to Make Amazing Slow Motion Video on Android Easily
- Method to Modify Display Settings
- Perfect Visuals: Your Guide to Leveraging Background Blur on Windows 11 Photos App
- Solutions for Non-Responsive Windows Shift.
- The Art of Managing Windows Users via CLI
- Top 10 Fixes When Skype Fails To Connect Or Function Correctly
- Upgrade Video Quality From Yesteryears Using MadVR, Windows Edition
- Title: Revitalize Your Search on Windows 11: 11 Key Fixes Included
- Author: Joseph
- Created at : 2024-12-24 17:23:54
- Updated at : 2024-12-25 17:19:55
- Link: https://windows11.techidaily.com/revitalize-your-search-on-windows-11-11-key-fixes-included/
- License: This work is licensed under CC BY-NC-SA 4.0.