
Recovering From Remote Access Denied Issue
Recovering From Remote Access Denied Issue
People utilize VPNs (Virtual Private Networks) for more secure and anonymous web browsing. However, some users can’t utilize VPN connections on their Windows PCs because of an error message that says, “connection to the remote computer could not be established.” Some users see that error message within Settings when they try to connect to VPNs.
This error will prevent you from connecting to a VPN on your Windows 11/10 PCs. Is that same error affecting your PC’s VPN connectivity? If so, this is how you can probably fix that VPN connection issue on a Windows PC.
1. Run the Network Adapter Troubleshooting Tool
Windows troubleshooters can often be useful for fixing network-related issues. The Network Adapter troubleshooter will likely be the most useful troubleshooting tool for resolving this VPN error. However, the Internet Connection troubleshooter could also address issues causing the VPN connection error.
You can access both troubleshooters within Settings. This how to run any Windows troubleshooter article provides step-by-step instructions for opening troubleshooters in the Windows 10 or 11 Settings app. Then go through the Network Adapter or Internet Connection troubleshooter to apply any manual resolutions they recommend.
 vMix HD - Software based live production. vMix HD includes everything in vMix Basic HD plus 1000 inputs, Video List, 4 Overlay Channels, and 1 vMix Call
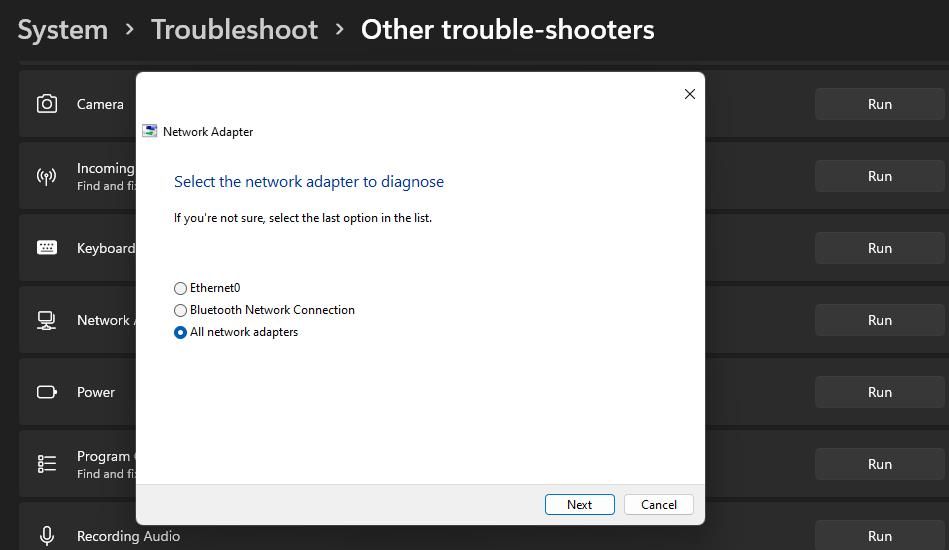
2. Turn Off the Proxy Server Setting
An intermediary proxy server can act as a firewall for enhanced network security. However, having proxy servers enabled can cause issues for VPN connections. So, it’s recommended to disable the “use a proxy server” setting to eliminate that potential cause for this VPN error.
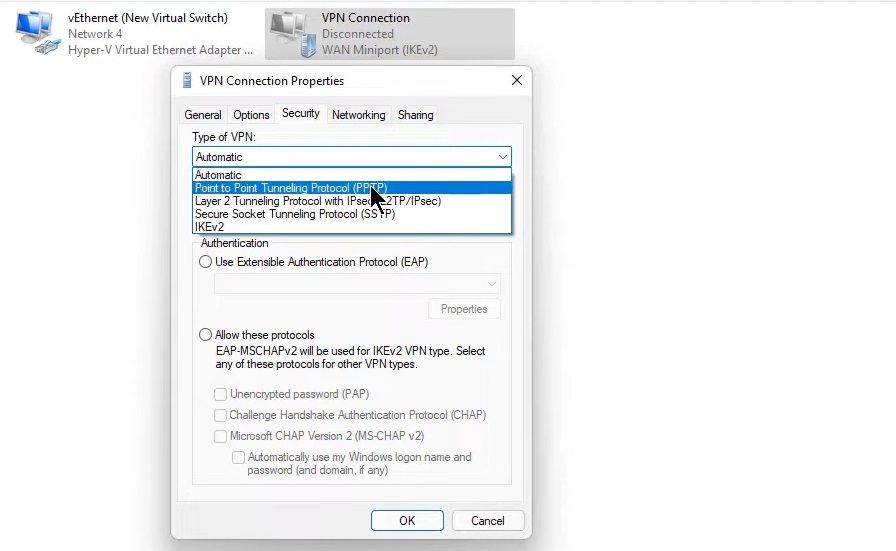
3. Reconfigure Your VPN Connection’s Security Settings
This VPN error message suggests that you try reconfiguring some network settings to resolve the issue. Changing VPN connection security settings could feasibly resolve this issue for some users. Try changing your VPN’s connection’s security settings like this:
- Launch Run (simultaneously press the Win + R keys) and input “ncpa.cpl” in that accessory’s Open box.
- Click OK in Run to bring up a Network Connections window.
- Then right-click on your VPN connection and select Properties.
- Click Security in the VPN properties window.
- Select the Point to Point Tunnelling Protocol option on the Type of VPN drop-down menu.

- Click the Allow these protocols radio button.
- Select the Challenge Handbrake Authentication Protocol (CHAP) checkbox.
- Next, click the Microsoft CHAP Version 2 checkbox to select that option.
- Click OK to set the new VPN security settings.
Misconfigured settings in your VPN client software can also feasibly cause connection issues. To remedy that, try resetting your VPN client software settings to default. Look for and select an option within your VPN software that generally restores default settings.
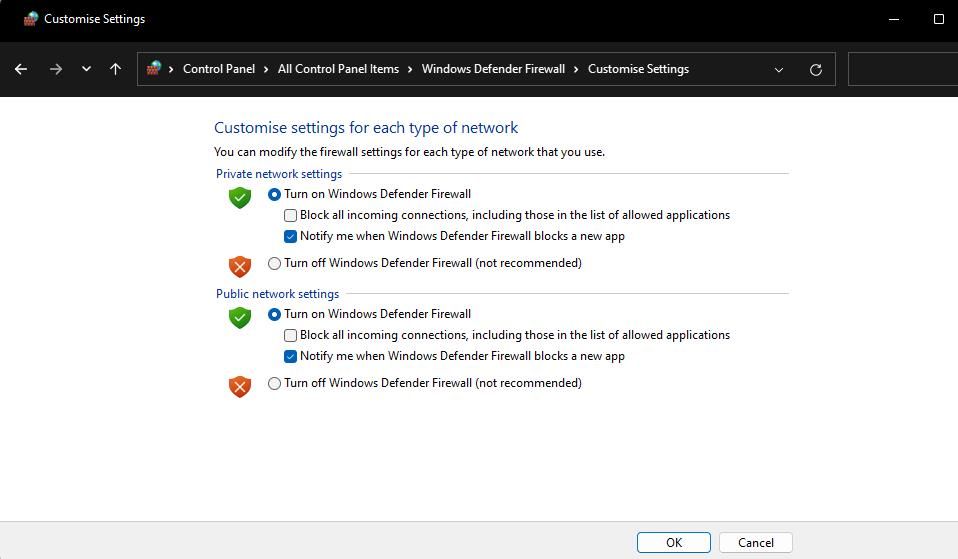
4. Disable the Windows Firewall
Windows Defender Firewall might be causing this error by blocking the VPN connection. To ensure WDF isn’t blocking your VPN connection, try temporarily disabling Windows Defender Firewall . Then return to Settings to see if the “Connection to the remote computer could not be established” error persists.
If this works, don’t leave the firewall off. Instead, add your VPN connection to Windows Defender Firewall’s allowed list. To do that, you’ll need to select the Private and Public checkboxes for your VPN connection, as covered within this guide to allowing apps through Windows Firewall .
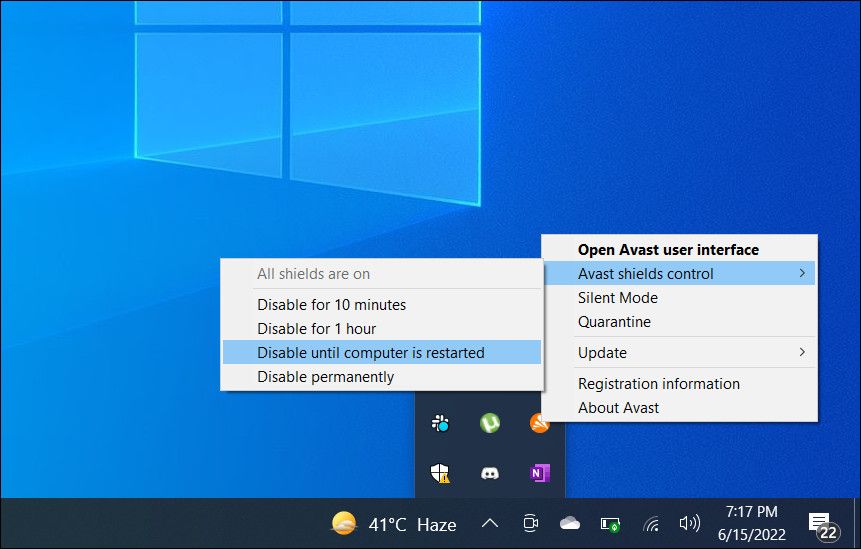
5. Disable Third-Party Security Software Packages
Many third-party security (antivirus) software packages also have integrated firewalls that can block VPN connections. If there’s third-party security software installed on your PC, turn off its firewall component to see if that makes any difference to your VPN connection. Then set up a firewall exception for your VPN connection within your security software if that does resolve the issue.
 TubeDigger - online video downloader from mostly any site
6. Reinstall the WAN Miniport Devices
Reinstalling WAN Miniport devices is a potential resolution many users confirm fixes the “Connection to the remote computer could not be established.” Applying this potential solution will reinstall the drivers for virtual network adapters that have variable protocols, which often resolves this VPN error. You can reinstall WAN Miniport devices like this:
- First, right-click on the Windows taskbar icon (Start button) and select Device Manager.
- Click the little arrow beside Network adapters to view all devices for that category.
- Right-click on the WAN Miniport (IKEv2) adapter and select Uninstall device.
OtsAV TV Webcaster
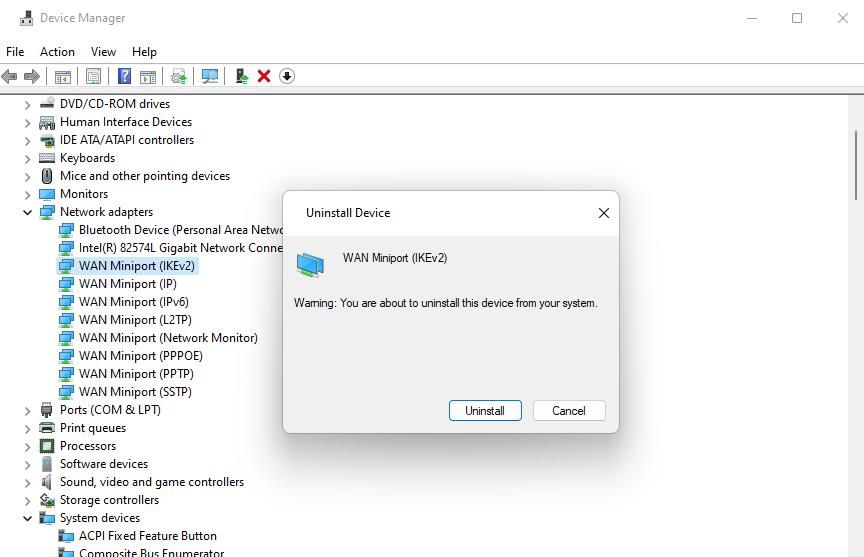
- Press Uninstall within the confirmation dialog box.
- Repeat the previous two steps for all WAN Miniport adapters shown within Device Manager.
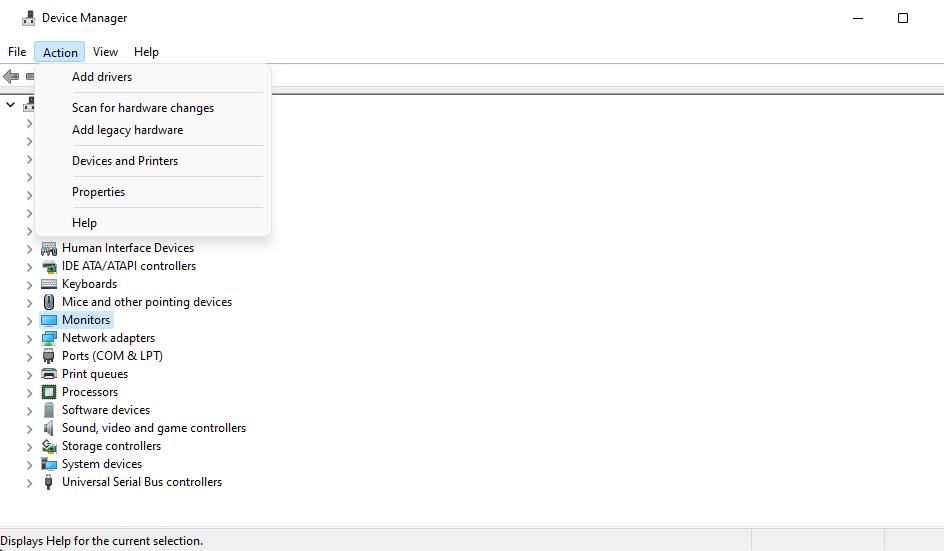
- When you’ve uninstalled all the WAN Miniport devices, click the Action menu.
- Select the Scan for hardware changes option to reinstall the WAN Miniport devices.
 OtsAV TV Webcaster
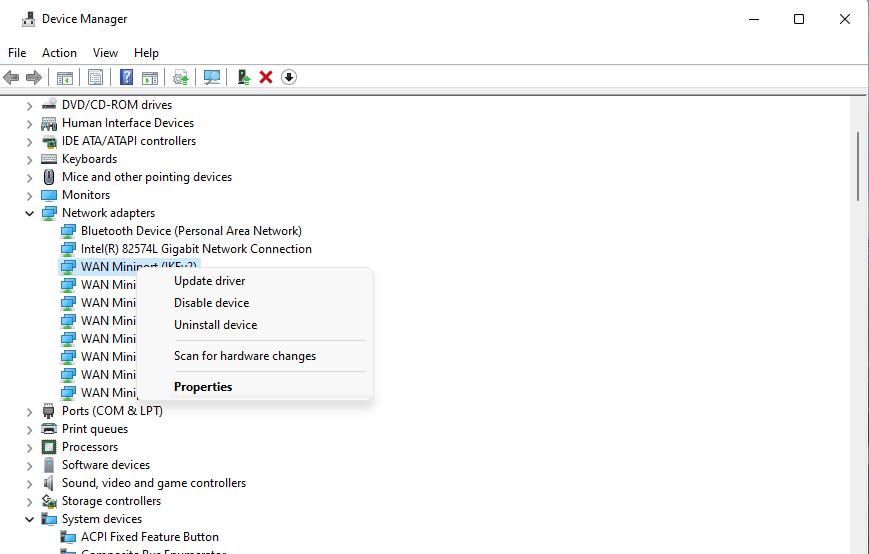
Then return to Settings and try connecting with your VPN again.
7. Reset Your PC’s Network Settings
A network reset will reinstall all your PC’s network adapters. So, this potential resolution could have a similar effect to the preceding one, and some users have confirmed it to work. However, a network reset also restores network components to default settings.
You can reset network adapter settings by inputting and executing a series of netsh and ipconfig commands. However, it’s more straightforward to apply this fix by clicking the Reset now button in Settings. Check out our how to reset your network settings guide for further details about how you can access that option.

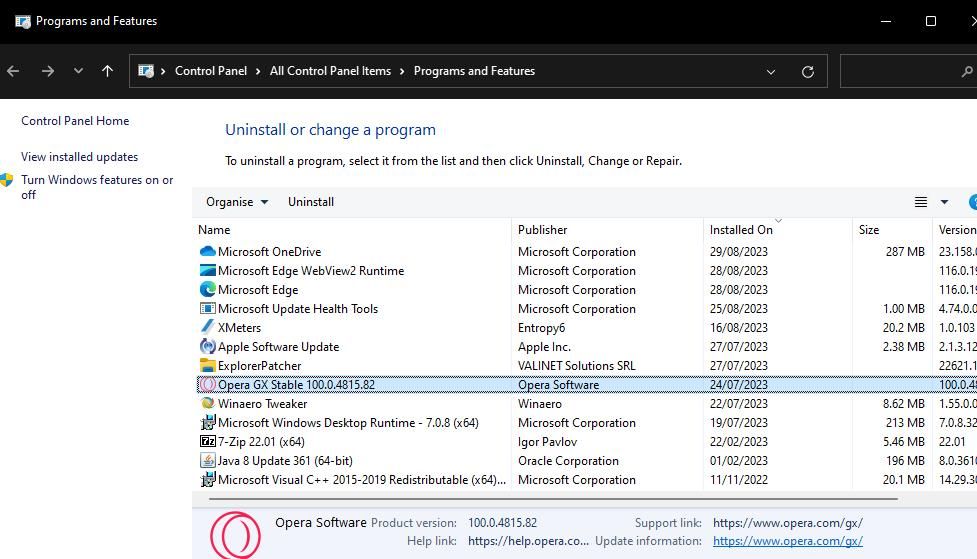
8. Reinstall Your VPN Software
Reinstallation of your VPN software might be necessary if none of the other potential solutions here work for you. Applying such a solution will likely address software issues causing this VPN connection error. You’ll also update your VPN software by installing its latest version.
You can remove your VPN client software within Programs or Features or Settings as outlined in this guide to uninstalling Windows software . Make sure you also remove any additional extras installed with your VPN client, such as network TAP adapters. Resetting your PC’s network settings will also probably uninstall VPN software.

Then open the official publisher download page for your VPN software. Select to download the latest VPN client software version for Windows 11/10 from there. Run the downloaded VPN software installer to reinstall.

Key features:
• Import from any devices and cams, including GoPro and drones. All formats supported. Сurrently the only free video editor that allows users to export in a new H265/HEVC codec, something essential for those working with 4K and HD.
• Everything for hassle-free basic editing: cut, crop and merge files, add titles and favorite music
• Visual effects, advanced color correction and trendy Instagram-like filters
• All multimedia processing done from one app: video editing capabilities reinforced by a video converter, a screen capture, a video capture, a disc burner and a YouTube uploader
• Non-linear editing: edit several files with simultaneously
• Easy export to social networks: special profiles for YouTube, Facebook, Vimeo, Twitter and Instagram
• High quality export – no conversion quality loss, double export speed even of HD files due to hardware acceleration
• Stabilization tool will turn shaky or jittery footage into a more stable video automatically.
• Essential toolset for professional video editing: blending modes, Mask tool, advanced multiple-color Chroma Key
Re-establish Your VPN Connection on Windows
Those potential fixes for the “Connection to the remote computer could not be established” error will probably re-establish your VPN connection. In many cases, reinstalling WAN Miniport adapters or disabling proxy servers will often do the trick. However, you might need to try alternative resolutions here to get this VPN connection issue resolved.
This error will prevent you from connecting to a VPN on your Windows 11/10 PCs. Is that same error affecting your PC’s VPN connectivity? If so, this is how you can probably fix that VPN connection issue on a Windows PC.
- Title: Recovering From Remote Access Denied Issue
- Author: Joseph
- Created at : 2024-07-29 04:20:04
- Updated at : 2024-07-30 04:20:04
- Link: https://windows11.techidaily.com/recovering-from-remote-access-denied-issue/
- License: This work is licensed under CC BY-NC-SA 4.0.