
Process to Undo System Image Fault: 0X80780119
Process to Undo System Image Fault: 0X80780119
Creating a system image backup is essential in protecting your data and ensuring system recoverability, but the process of doing so might not always go smoothly. One such error that the users often encounter is the System Restore error 0x80780119, which prevents the users from completing the backup process.
Below, we take a look at the common causes of this issue and discuss the different solutions you can try to get rid of this error for good.
Why Are You Unable to Create a System Image?
If you are unable to create a system image due to the error 0x80780119, it might be because of one or more of the following reasons:
- Insufficient disk space: Restore points take up space in the drive they are saved, and so to create new restore points on your computer, you must have sufficient disk space available. In case you are running out of space on your system, you are likely to face the error at hand.
- Incorrect backup settings: Your backup settings must be configured correctly. If there is an issue with these settings, the System Restore will encounter issues while creating a restore point.
- External drive issues: If you are using an external drive for backup, it is essential to ensure that it is connected to the system properly and is functioning. In case there is an issue with the external drive due to any of these problems, the System Restore utility might return the error 0x80780119.
- Corrupt system files: The critical system files that are essential to create restore points and use the System Restore utility might have gotten corrupt, which is leading to the error under discussion.
- Antivirus interruption: If you are using a security program on your computer, there is a chance that it is blocking the restore tool from functioning properly. This typically happens when you are using a third-party antivirus solution.
Regardless of what might be resulting in the problem in your case, the solutions we have listed below are sure to help you get the restore utility back on track. Proceed with the solutions one by one and follow the steps carefully for successful execution.
1. Free Up Disk Space
When you create a restore point in Windows, the system requires sufficient space on the destination drive to store all the backup files. If you do not have enough space, the System Restore is likely to return errors like the 0x80780119 error.
This is why, before moving onto the complex troubleshooting methods, we recommend you ensure you have sufficient space available on the destination drive. If you are low on space, you can free it up by removing unnecessary files. Here are a few areas to focus on:
- Temporary files: Temporary files and other unnecessary data can be cleaned up by using the Disk Cleanup tool . It will list down all such files, and you can then specify which to remove. Simply type “Disk Cleanup” in the search area on your taskbar and click Open to launch the utility.
- Downloads folder: Access the Download folder in File Explorer and delete all the files you no longer need.
- Uninstall unused programs: If there are apps that you do not use anymore, head over to the Control Panel to uninstall them from the system. This will free up a great amount of space that can be used by the System Restore utility.
In case you have large files or folders that you do not want to remove but also don’t need immediately, you can consider moving them to an external drive to free up space.

2. Check and Repair Disk Errors
You might also be facing the system restore issue due to disk errors in the system.
During the backup process, the system needs to read data from the targeted disk and write it to the backup destination. If there is an issue with the disk, the system may have issues reading the data or might write corrupted data in the backup file, which can result in different errors.
Additionally, your disk might have bad sectors which cannot store data properly and might also prevent the system from reading data during the backup process.
To ensure this isn’t the case in your situation, it is best to check the disk for errors using the built-in utilities offered by Windows. The first tool that we recommend using is the CHKDSK utility which can be used via Command Prompt. It works by scanning the system and checking the integrity of the disk. If a problem is identified, CHKDSK will attempt to fix it automatically.
Alternatively, you can head over to the File Explorer and follow these steps:
- In File Explorer, head over to the root of the drive you want to check and right-click on it.
- Choose Properties from the context menu.
- In the Properties dialog, navigate to the Tools tab and move to the Error checking section.
- Click on the Check button here and wait for the system to complete the scan. This may take some time, depending upon the size of your disk.

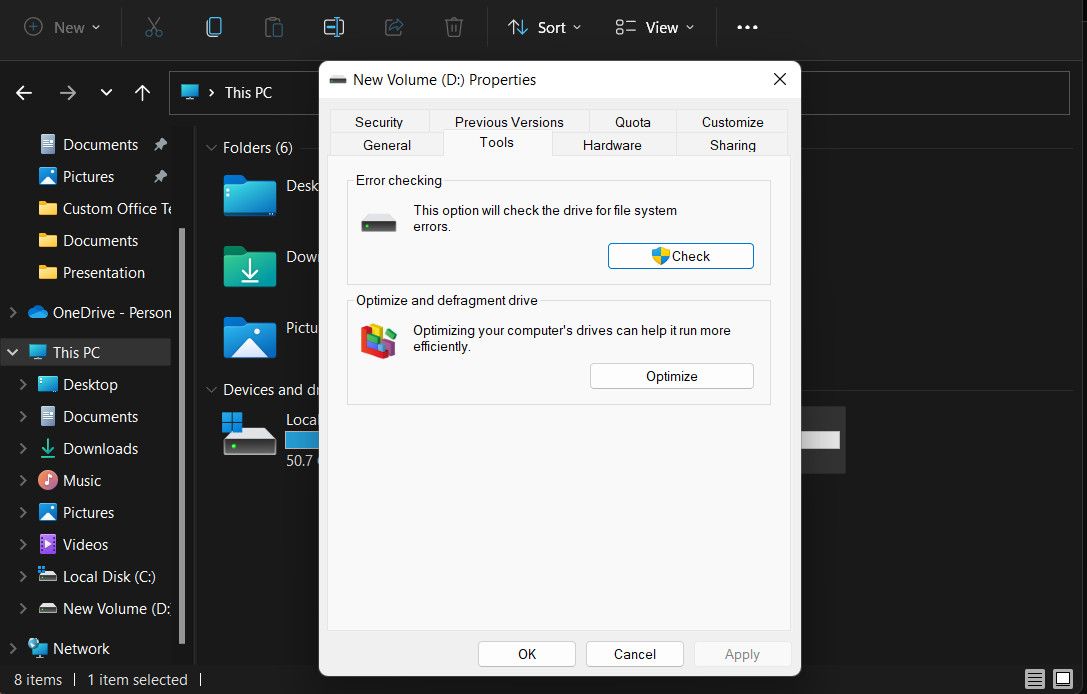
If any issues are found, Windows will prompt you to repair them. Follow the on-screen instructions to proceed.
Power Tools add-on for Google Sheets, 12-month subscription
3. Enable System Protection
Several users also noticed that they were facing the problem due to the system protection feature being disabled for the targeted drive. If you have this option disabled in your system, we suggest enabling it and checking if that makes any difference.
Here is how you can do that:
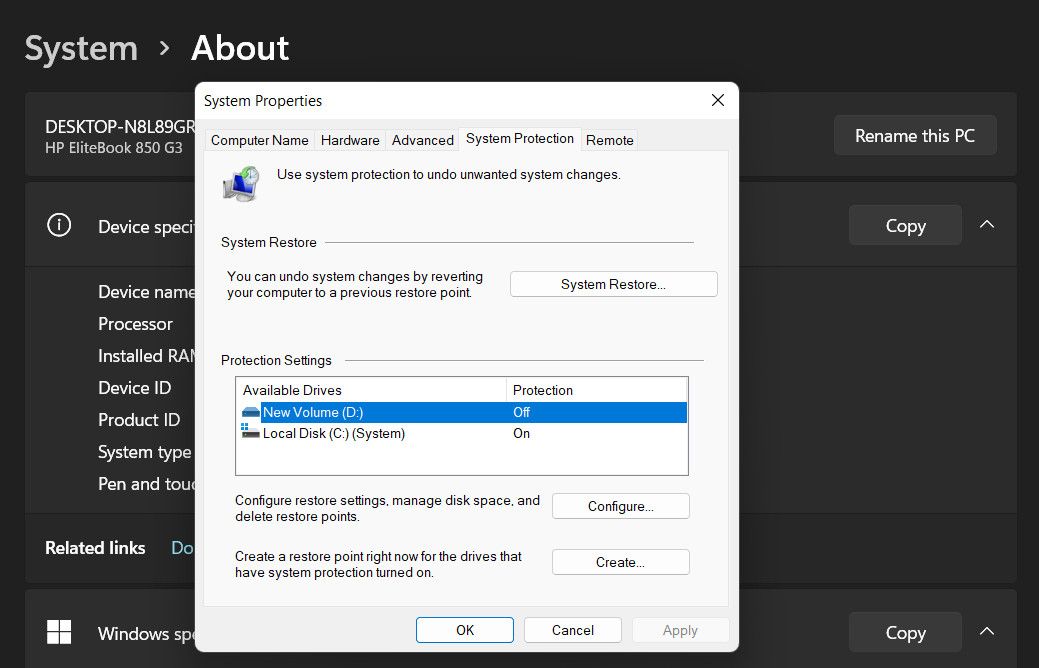
- Press the Win + I keys together to open the Settings app.
- Navigate to System > About.
- Head over to the Device specifications section and click on the System protection option.
- In the following dialog, head over to the System Protection tab.
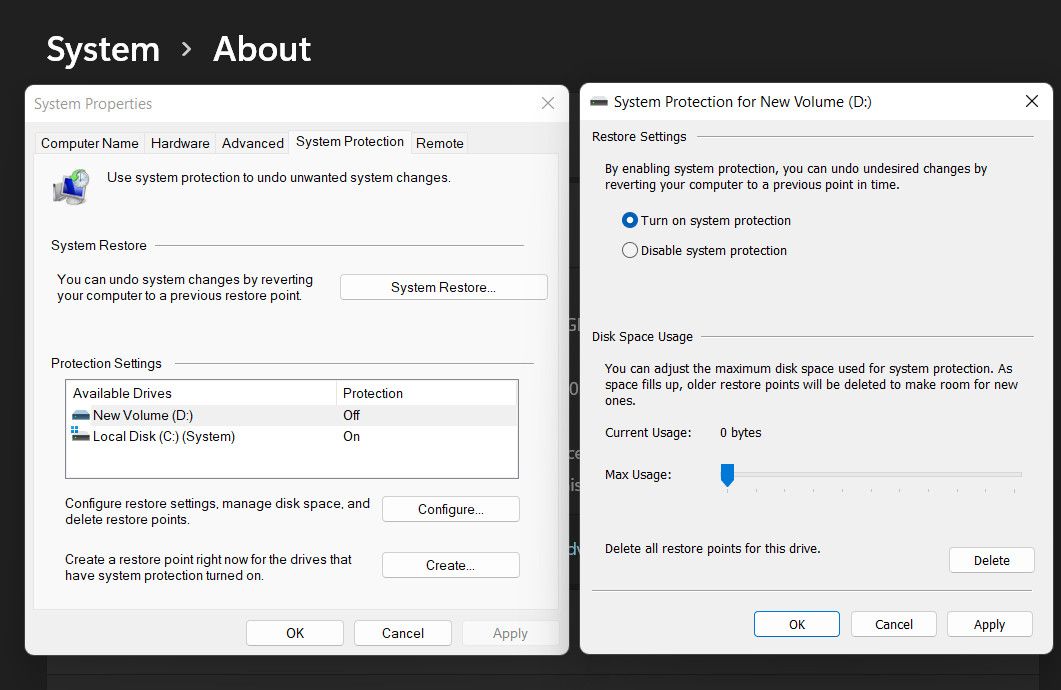
- Choose the targeted drive and click on the Configure button.
- Enable the Turn on system protection option and click Apply > OK to save the changes.
With Screensaver Wonder you can easily make a screensaver from your own pictures and video files. Create screensavers for your own computer or create standalone, self-installing screensavers for easy sharing with your friends. Together with its sister product Screensaver Factory, Screensaver Wonder is one of the most popular screensaver software products in the world, helping thousands of users decorate their computer screens quickly and easily.


 With Screensaver Wonder you can easily make a screensaver from your own pictures and video files. Create screensavers for your own computer or create standalone, self-installing screensavers for easy sharing with your friends. Together with its sister product Screensaver Factory, Screensaver Wonder is one of the most popular screensaver software products in the world, helping thousands of users decorate their computer screens quickly and easily.
You can now close the System Protection dialog and check if the issue is resolved.
4. Delete USN Journal
The USN Journal (Update Sequence Number Journal) is a feature in the NTFS file system that tracks all the changes made on a disk. It is stored in the reserved partition and over time, it can consume a significant amount of your disk space, which may be preventing a restore point from being created.
You can reclaim this disk space by deleting the USN Journal. Doing so will also eliminate the possibility of any conflicts that might be arising due to inconsistencies between the journal and the files being backed up.
Here is how you can do that:
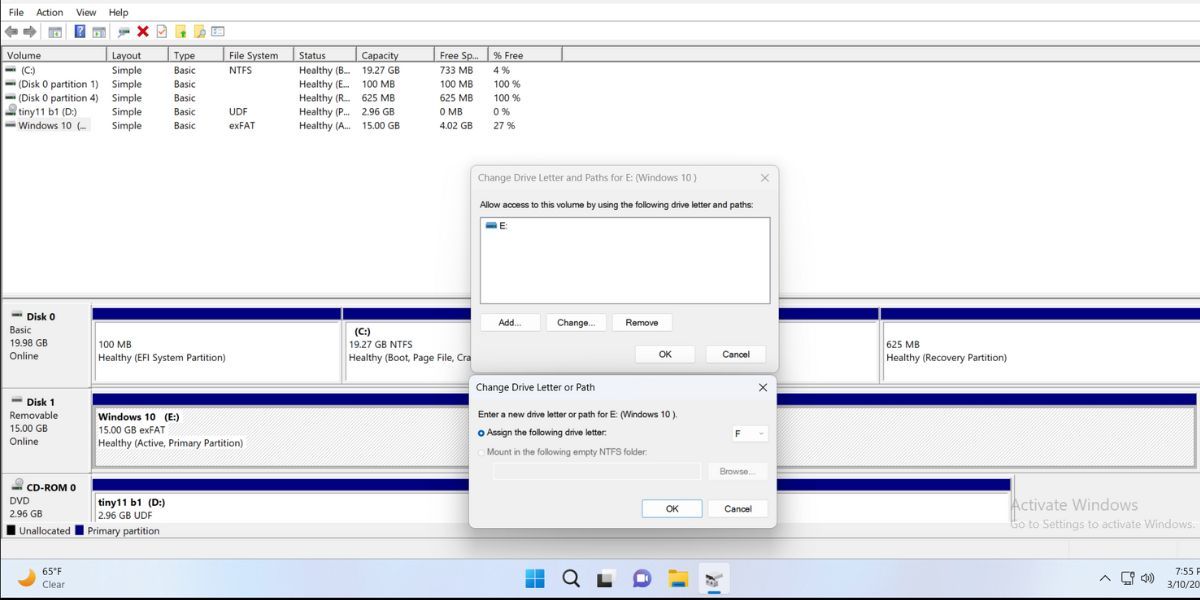
- Type “Create and format hard disk partitions” in Windows search and click Open.
- In the following window, right-click on the System Reserved volume and choose Change Drive Letter and Paths from the context menu.
- Now, click on the Add button.
- In the next dialog, choose Assign the following drive letter and click OK.
- Once done, press the Win + R keys together to open Run.
- Type “cmd” in Run and click Ctrl + Shift + Enter to open Command Prompt as an administrator.
- Confirm your action in the UAC prompt.
- Execute the following commands in Command Prompt one by one:
fsutil usn queryjournal F:fsutil usn deletejournal /N /D F:
After the commands are executed, you can close Command Prompt and check if the issue is resolved.

Create a Backup Without Any More Errors on Windows
Ensuring the protection of your data should be your foremost priority, and a system image backup plays a vital role in safeguarding against unforeseen data loss. With the solutions above, you should be able to get the System Restore utility up and running in no time. However, if the problem persists, you can consider reporting the issue to Microsoft and try the specific solutions they suggest. Till then, you can switch to a third-party backup tool to safeguard your data.
Below, we take a look at the common causes of this issue and discuss the different solutions you can try to get rid of this error for good.
- Title: Process to Undo System Image Fault: 0X80780119
- Author: Joseph
- Created at : 2024-08-15 15:52:05
- Updated at : 2024-08-16 15:52:05
- Link: https://windows11.techidaily.com/process-to-undo-system-image-fault-0x80780119/
- License: This work is licensed under CC BY-NC-SA 4.0.