
Playnite Extension: Virtual Games Collection
Playnite Extension: Virtual Games Collection
You’ve already set up Playnite for your favorite game stores, turning it into a “global” front-end for all your PC-centric gaming. But what if you’re also into retro-gaming and emulators?
Thankfully, Playnite can handle your emulated games, too, since it supports many popular emulators.
Let’s see how you can have Playnite detect them, scan your emulated games, and include them in your unified game library.
How to Use Playnite Extensions
We saw how you can use Playnite to unify and make sense of your games collections . And yet, you might have even more games, thanks to the magic of emulation. What about those?
Although it’s not apparent from the get-go, Playnite is emulation-friendly. For an optimal experience, though, it’s best to install extensions that can help with emulated content.
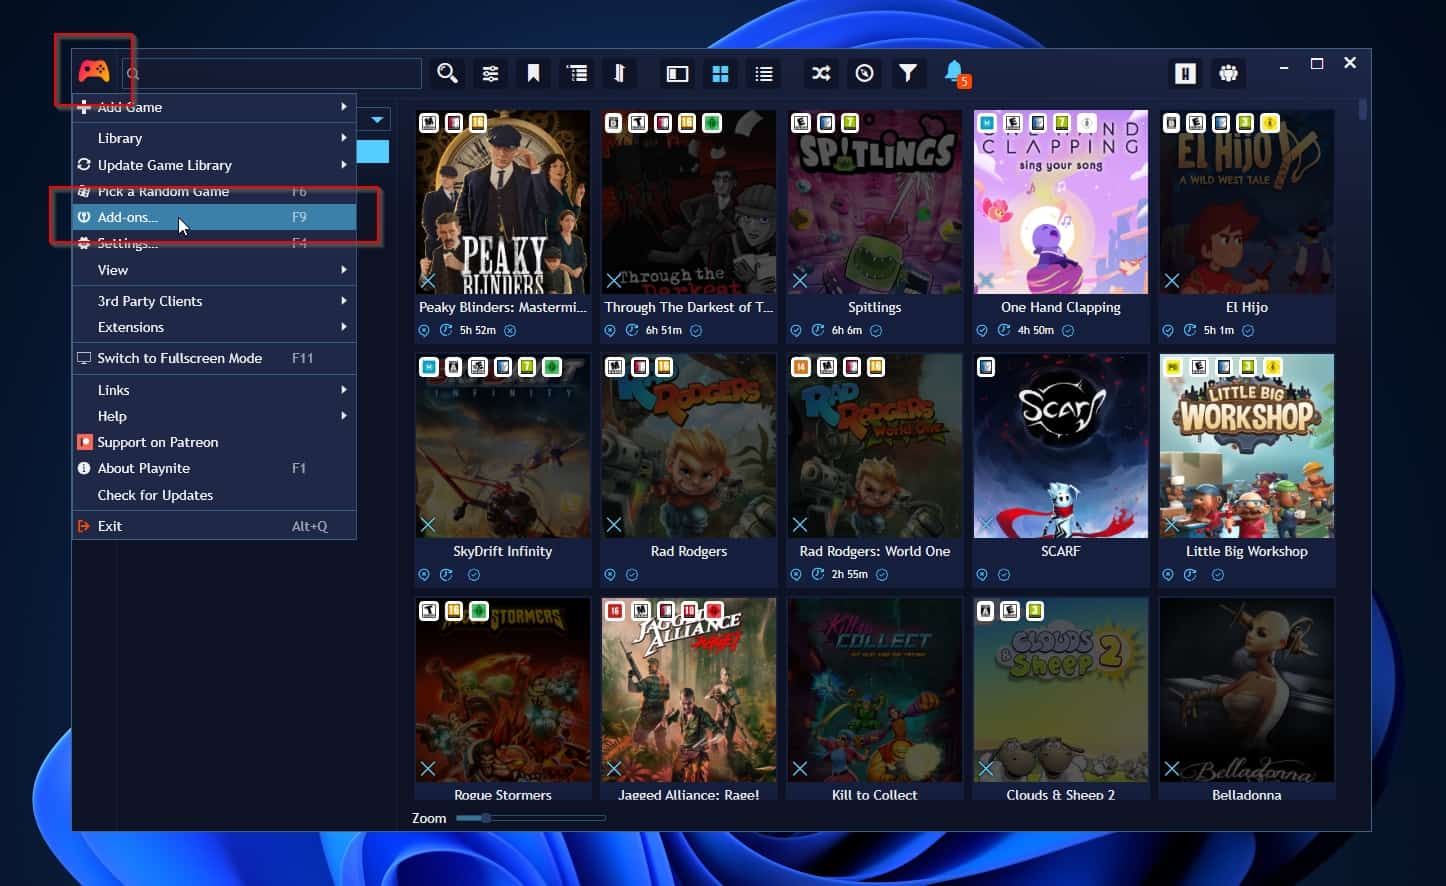
To do that, click Playnite’s icon on the top left of its window to access its main menu. From there, select Add-ons. Alternatively, press F9 on your keyboard to move directly to that spot.
Metadata Sources
In Playnite, metadata sources are online databases the app can query to “pull in” information about your games.
You can add many such databases to Playnite, and the app will query them automatically based on the content and context or offer you the option to select which one to use.
To add metadata sources to Playnite, expand Browse in the navigational tree view on the left of Playnite’s add-ons window.
There, click on Metadata Sources to see a list of all available game information databases you use.
To install one of them, click on its entry and then the install button on the details pane on the right of Playnite’s add-ons window.
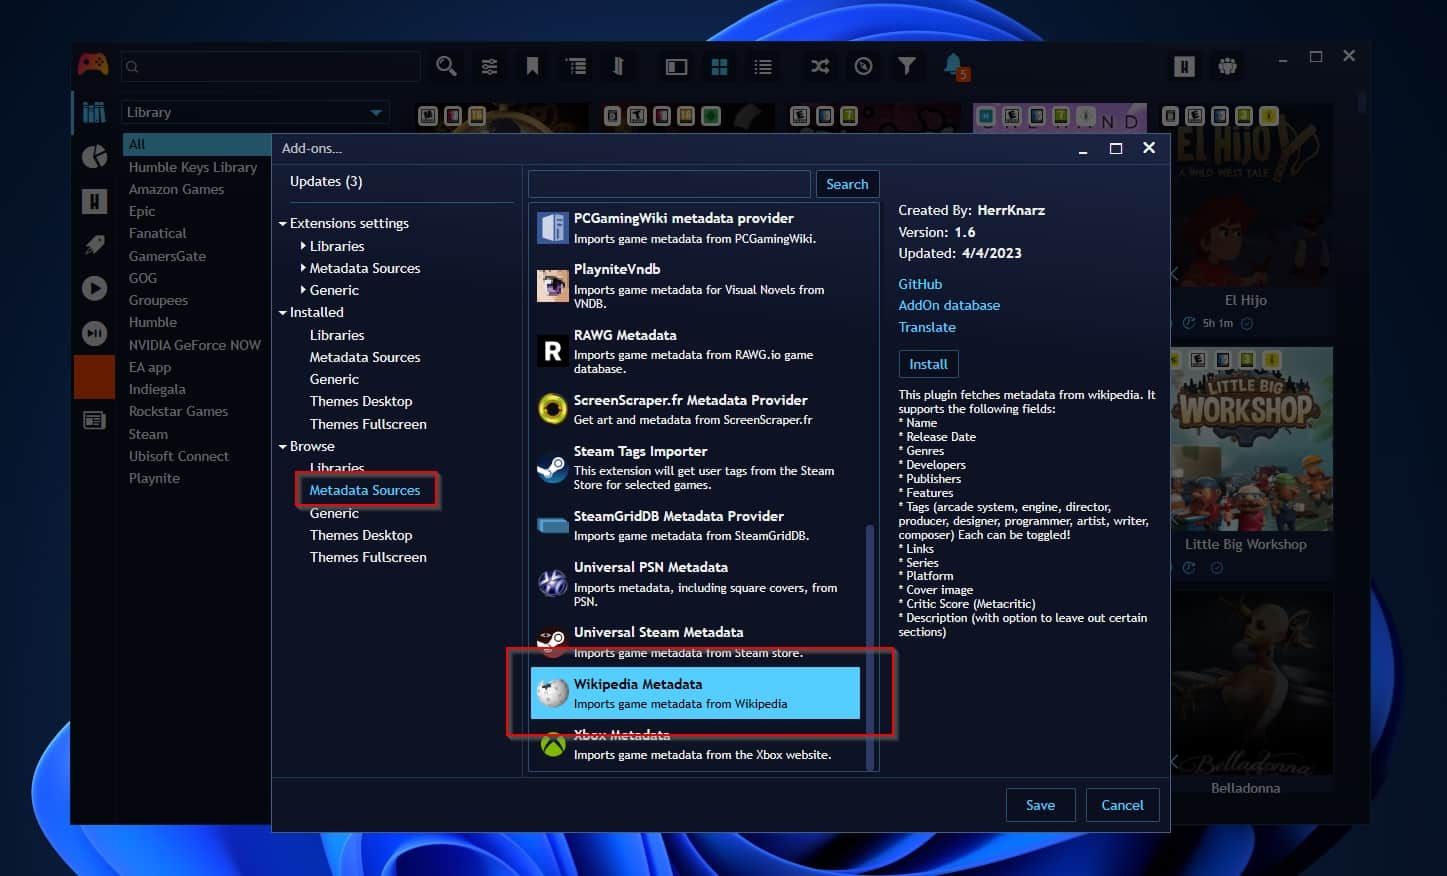
Since we are dealing with emulated content and retro games, we suggest you install the following metadata sources:
- GameTDB Metadata Provider
- IGDB Metadata Provider
- MobyGames Metadata
- ScreenScraper.fr Metadata Provider
- Wikipedia Metadata
You can click on each one in Playnite and check the details pane to learn more about them.
The “Generic” Page
Although we won’t use them for this article, Playnite has some emulation-related add-ons, making your retro-gaming life easier.
You can find those on the Generic page, directly below the Metadata Sources page we saw above.
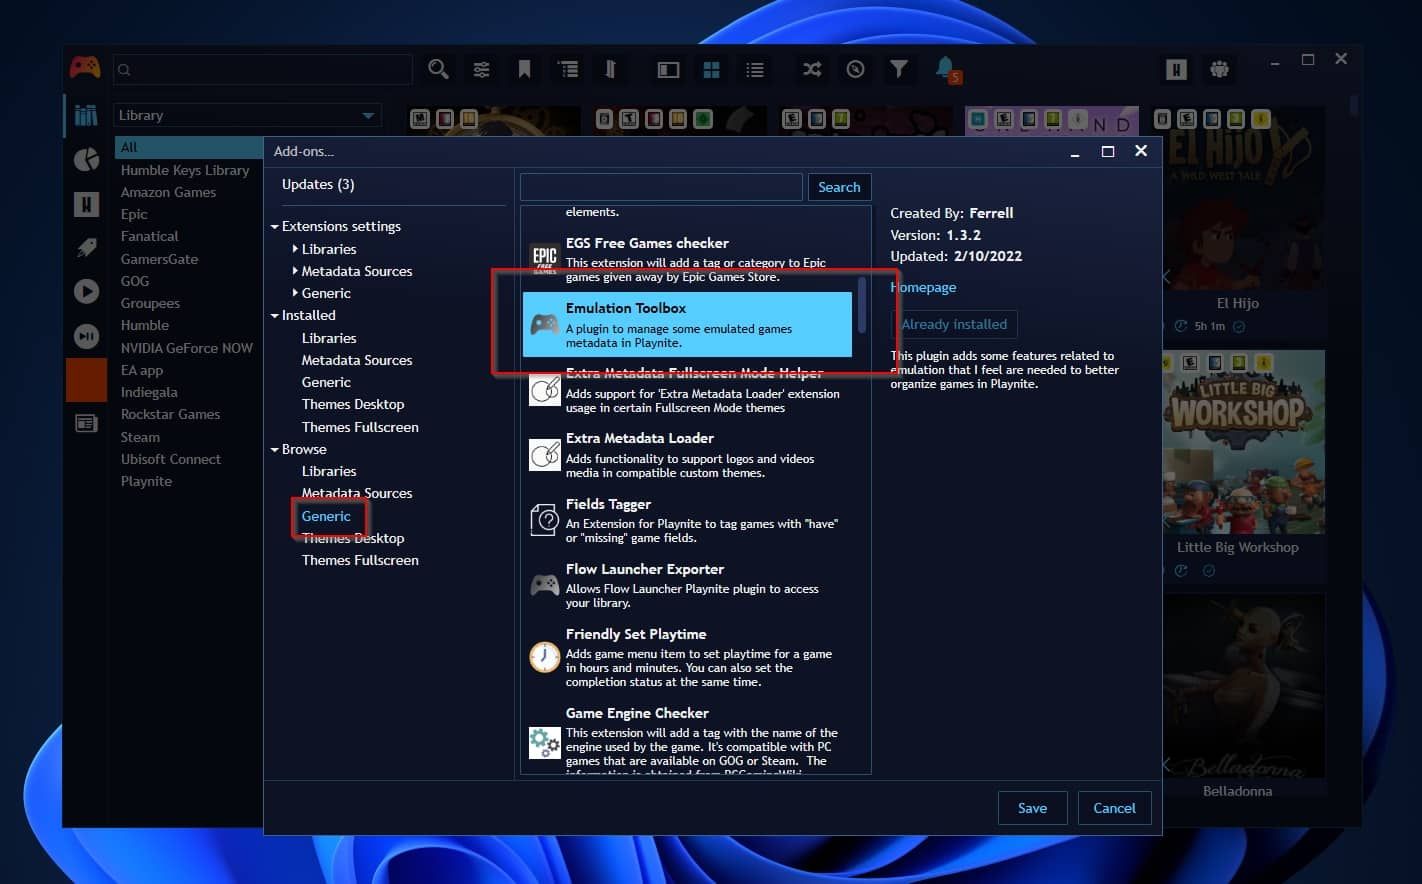
The ones we suggest you check are the following:
- Emulation Toolbox
- MAME Tools
- MAME Utility
With Playnite ready to play nice with emulated content, we are prepared to add some retro games to its library.

How to Configure Emulators With Playnite
Almost all emulators allow you to launch them from the terminal using a command and some flags. Those flags can change the emulator’s options and define a game to launch. Usually, one of those flags allows directly launching the emulator and a chosen game in full screen, skipping the emulator’s interface.
Playnite can take the path of any game you select and map it to the emulator’s “game-to-launch” variable. Then, execute the command that runs the emulator, auto-loads, and runs the chosen game.
As a result, you will be able to click on the Play icon on a game’s thumbnail, and after it launches, grab your joypad and start playing. Just as if it was a native PC title. The emulator will (usually) remain hidden unless you need to access its options or decide to quit a game.
That’s useful for a seamless gaming experience, especially if you’re also using your PC as a media center/console alternative, and want to keep it joypad-friendly. If you’re in the opposite camp, you might prefer multitasking on your ultrawide monitor and keeping multiple windows in view. For that, check our guide on how you can force all your games into windowed mode in Windows 10 & 11 .
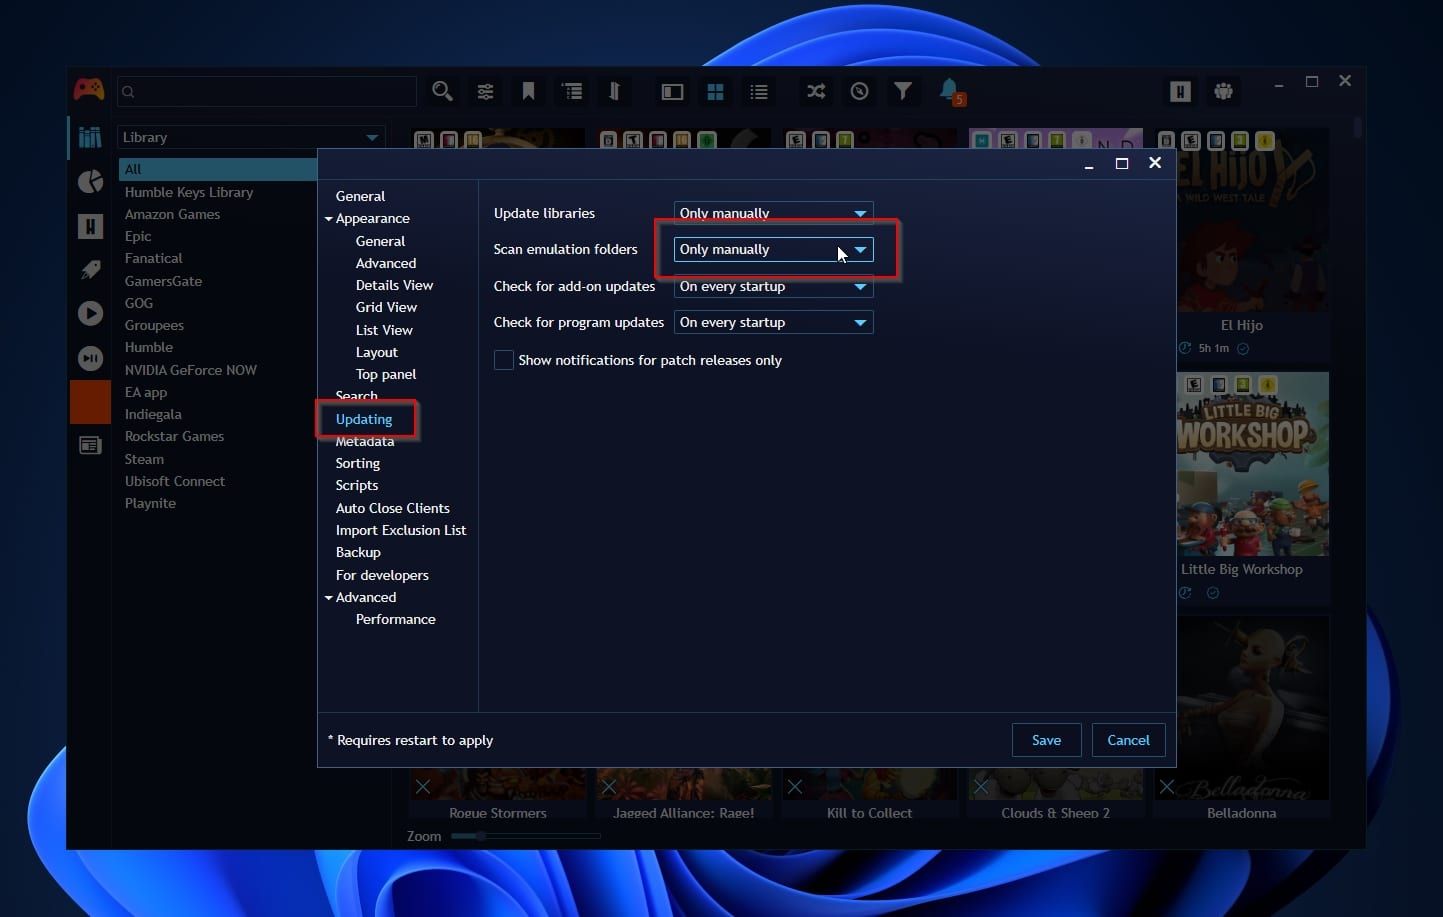
How to Prevent Automatic ROM Scans
Are you often adding or removing titles to your emulated games collection or otherwise fiddling with it? You might want to avoid including your emulated games in Playnite’s regular library updates. Having Playnite rescan huge ROM libraries with thousands of files could make the app crawl.
To find that option, click Playnite’s icon on the top left of the app to access its main menu, and select Settings (or press F4 on your keyboard).
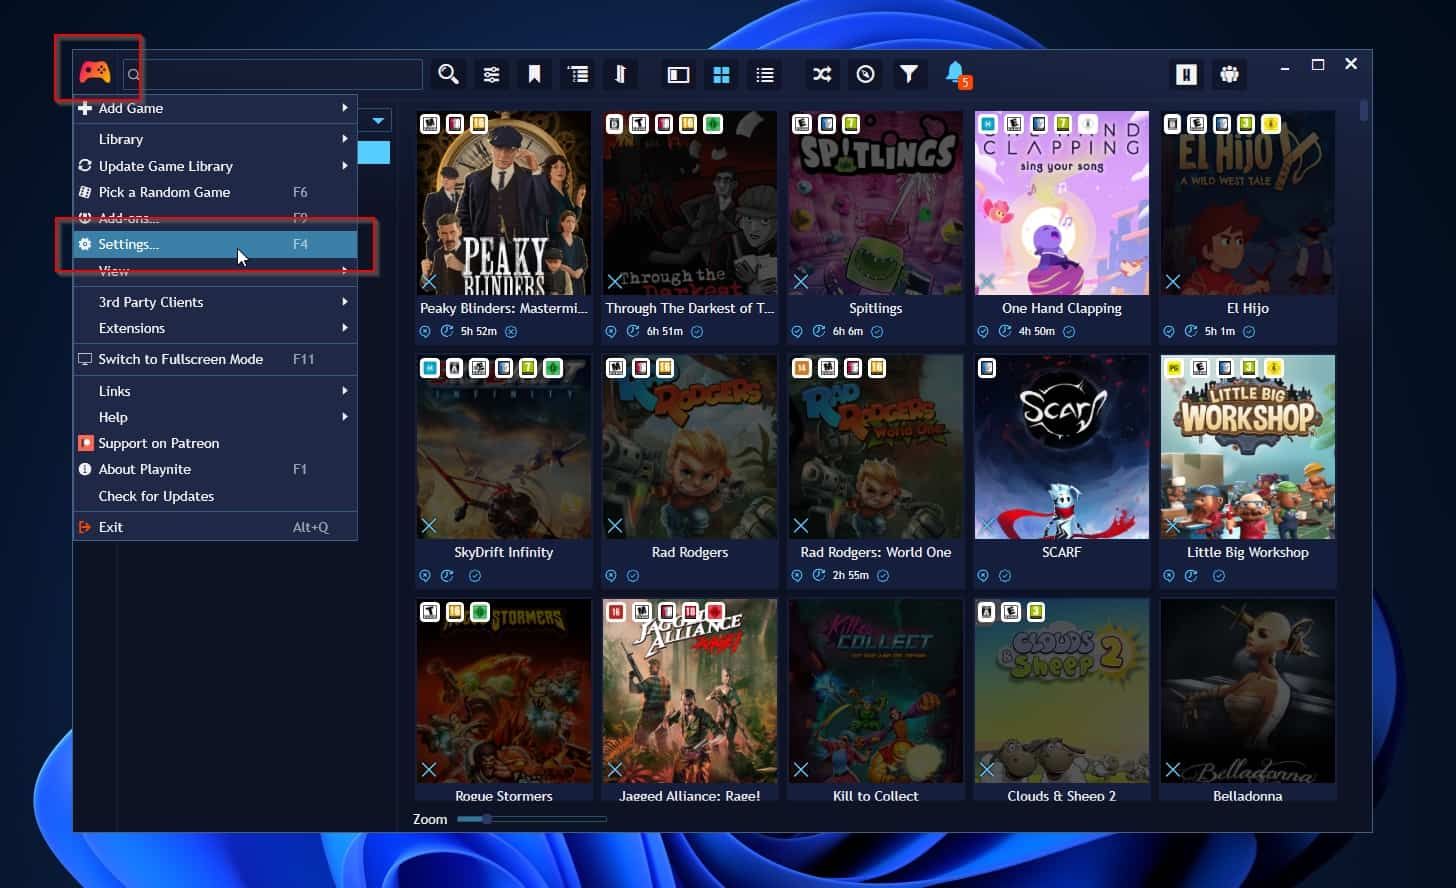
Then, select Updating in the navigational tree on the left of that window. Use the drop-down menu on the right of Scan emulation folders to change its value to Only manually. Then, click Save to register your tweak and exit that window.
 Glary Utilities PRO - Premium all-in-one utility to clean, speed up, maintain and protect your PC
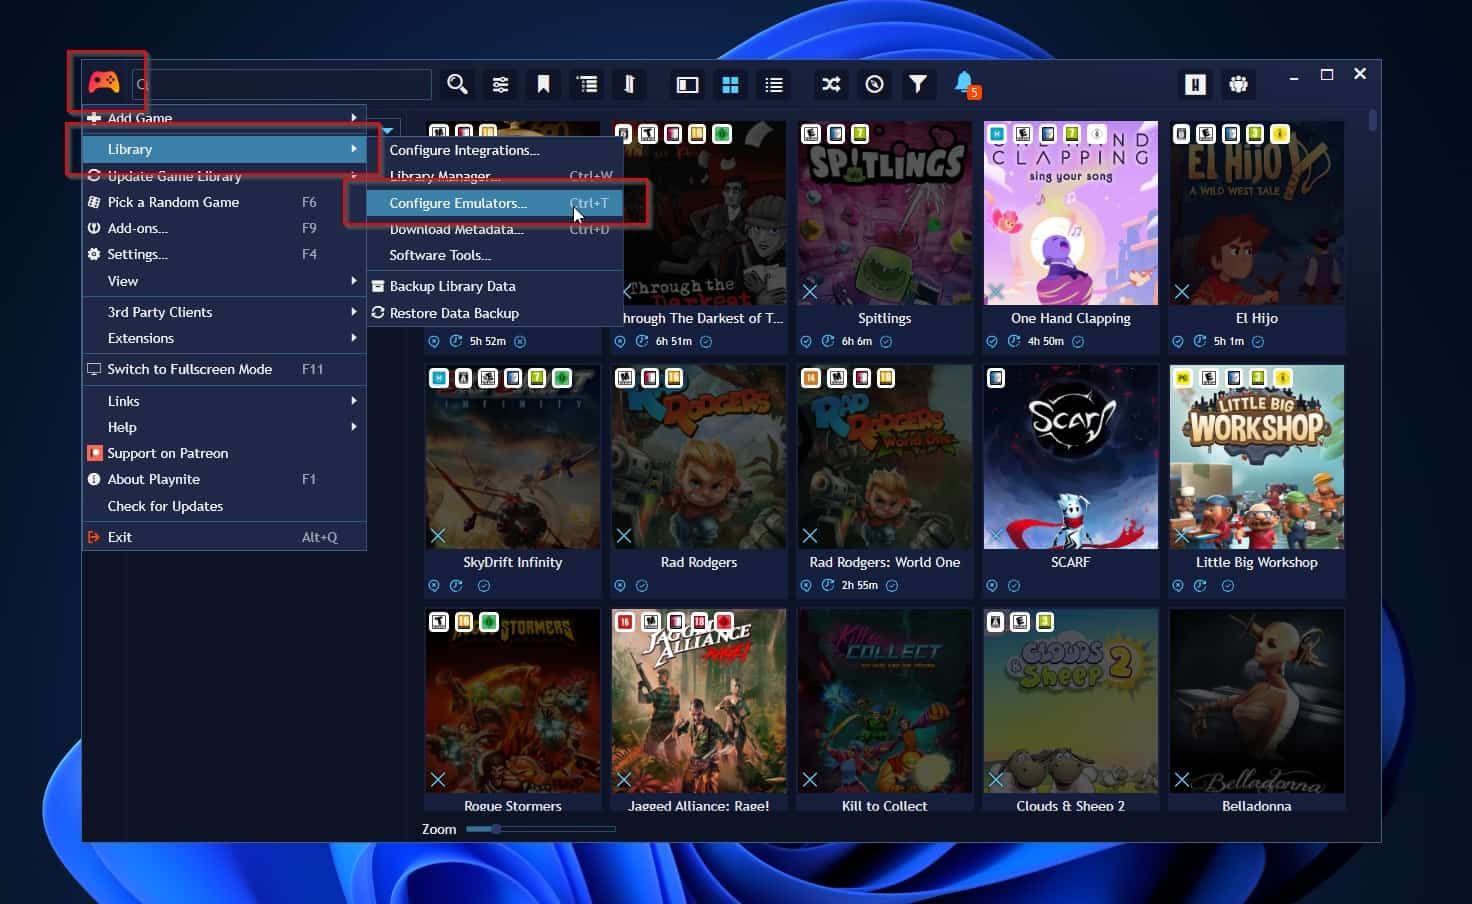
With that out of the way, it’s time to add some emulators to Playnite.
Click on Playnite’s icon on the top left of its window again to access its menu, and select Library > Configure Emulators. It’s probably quicker if you press Ctrl + T on your keyboard, though.
How to Download Emulators in Playnite
There are dozens of emulators available for every retro platform imaginable. If they support flags, you can use them through Playnite. However, you’ll have to create a configuration for them yourself. Thankfully, Playnite already supports many of them and offers predefined configurations that enable their use without lifting a finger to “add support” for them.
While on the Emulators tab of the Configure Emulators window, click on Download Emulators on the bottom right. Playnite will show you a list of supported emulators and some information about them. Still, it cannot automatically download and install them for you.
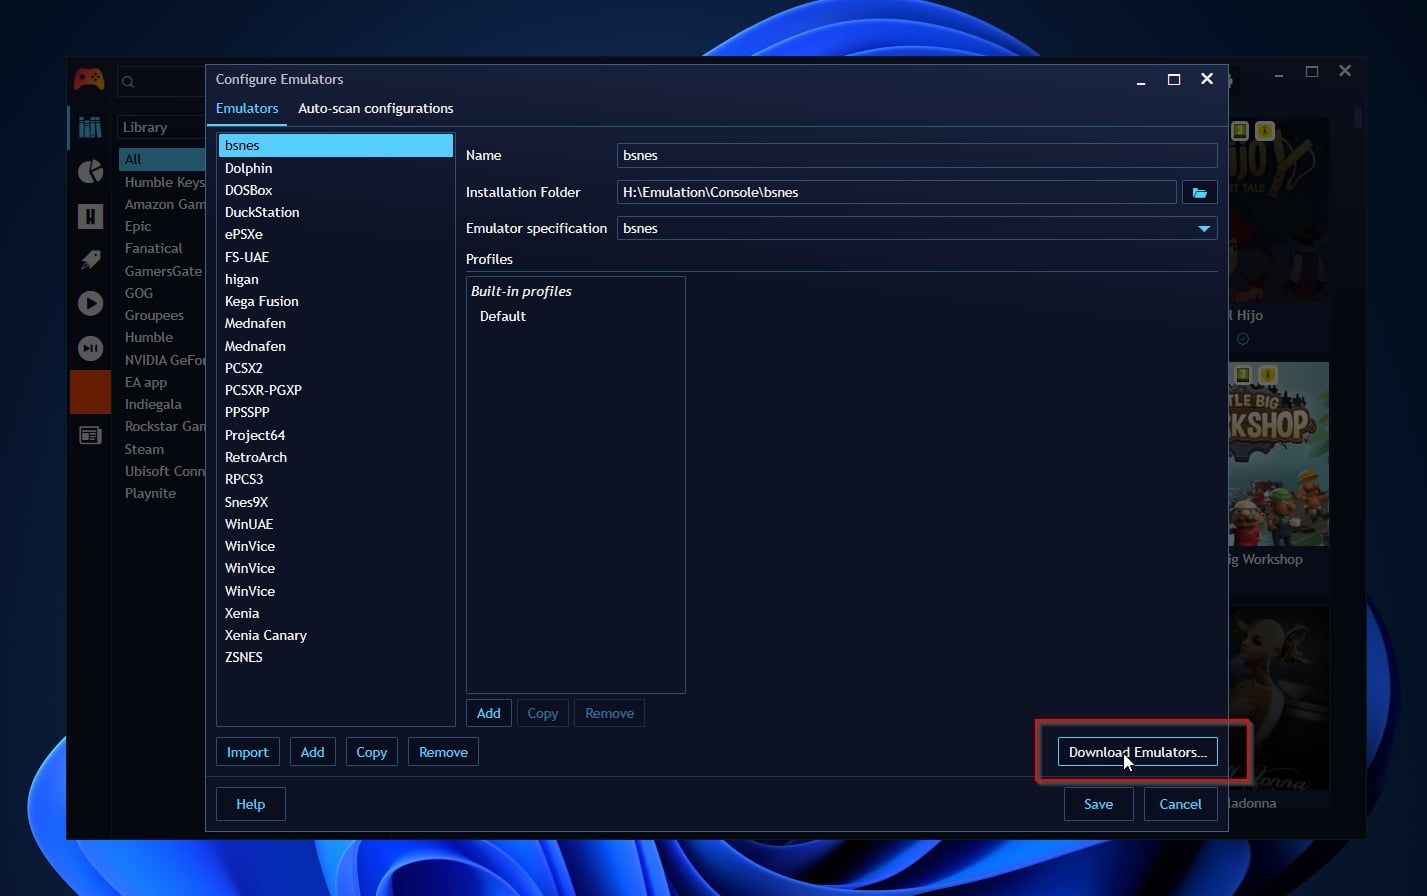
So, that’s where we will take a short break while you check that list, choose the ones you want, visit their sites, download, and install them. After doing that, you are ready to move to the next step.
Making Sense Of Emulation Profiles
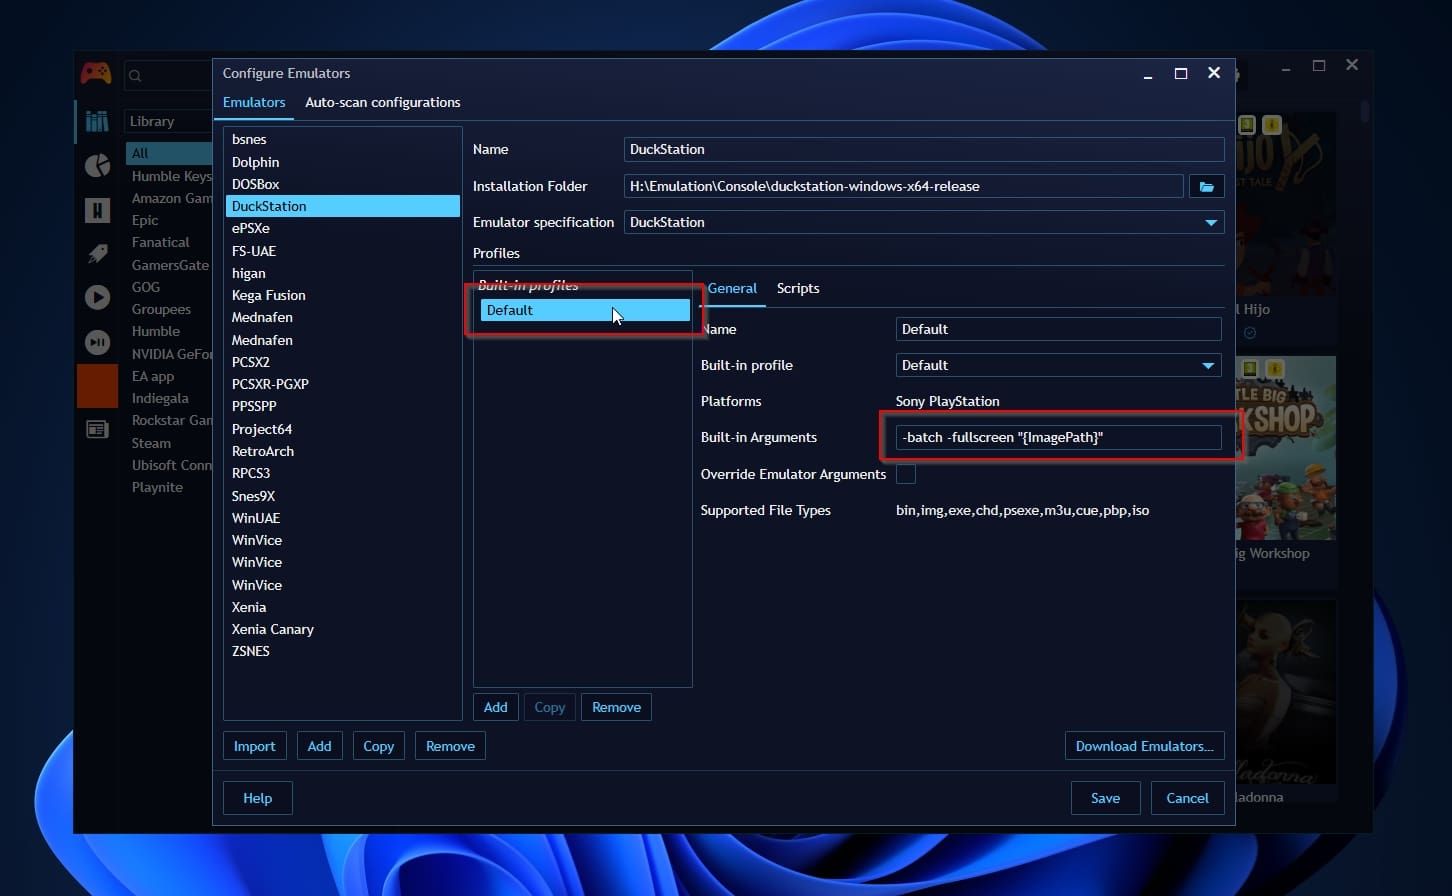
Choose one of the emulators you’ve downloaded and installed from the list on the left, and click on the button with the folder icon on the right of Installation Folder. Then, select the path where you installed that emulator.
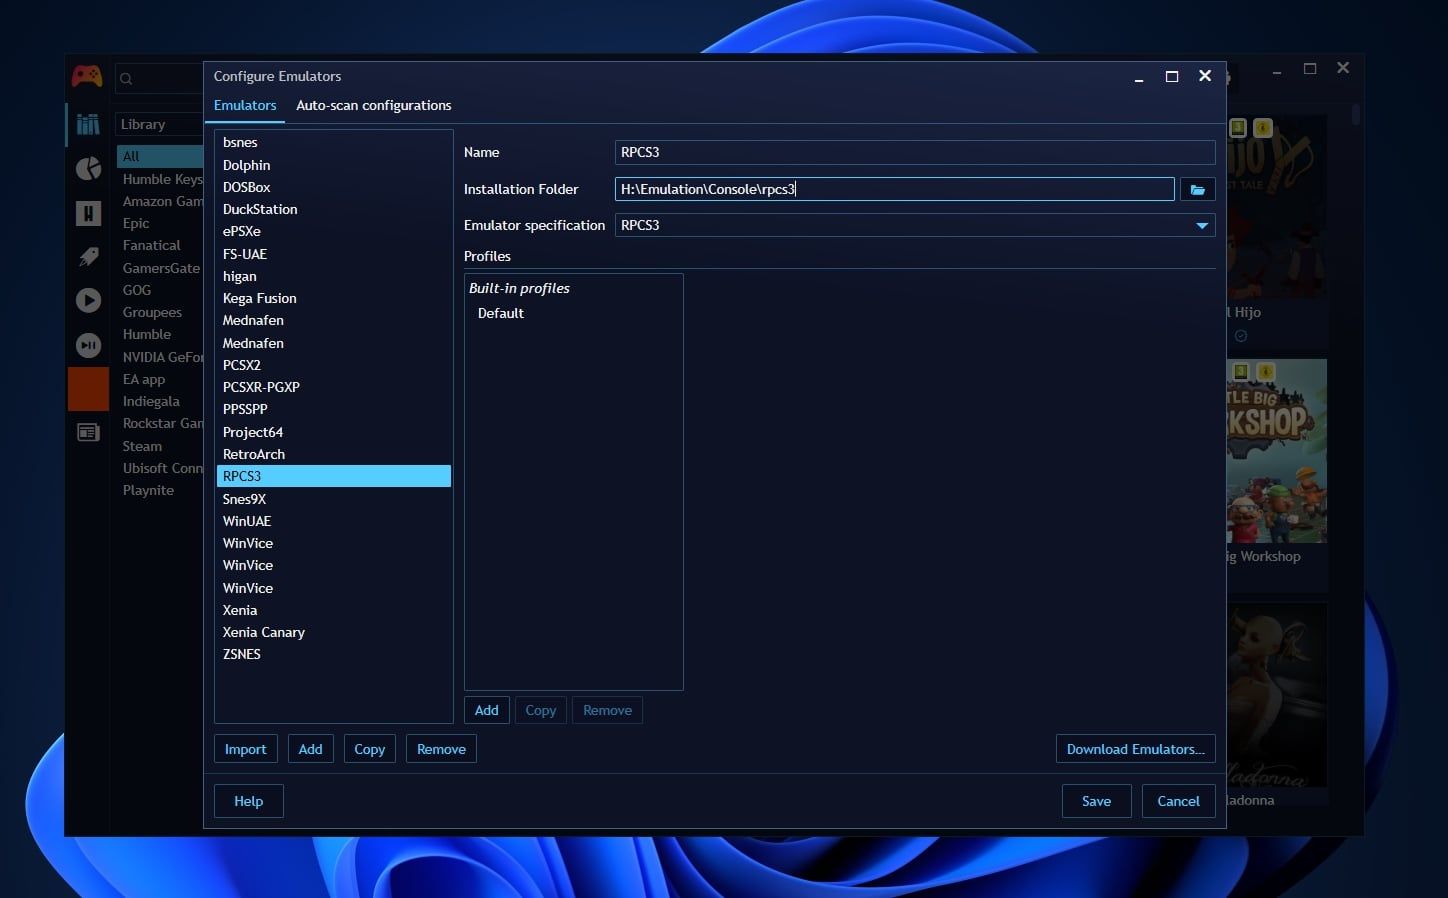
If you want to customize how an emulator launches your titles, click on its Default built-in profile. Then, check the launch arguments and update them as you wish, according to the emulator’s specifications.
With those flags, and depending on the emulator, you can, for example, set a specific resolution for launching your games, change the input device you’ll use for playing, etc.

WPS Office Premium ( File Recovery, Photo Scanning, Convert PDF)–Yearly
You can also create more profiles with alternative configurations for each emulator. Still, we won’t go over this in this article.
Since you can use many emulators for each platform, Playnite treats emulators and emulated platforms distinctly. By visiting the second tab of that window, Auto-scan Configurations, you can select with which emulator you want to scan a platform’s titles. You can also choose if they should be included in the update scans of your whole Playnite game library.
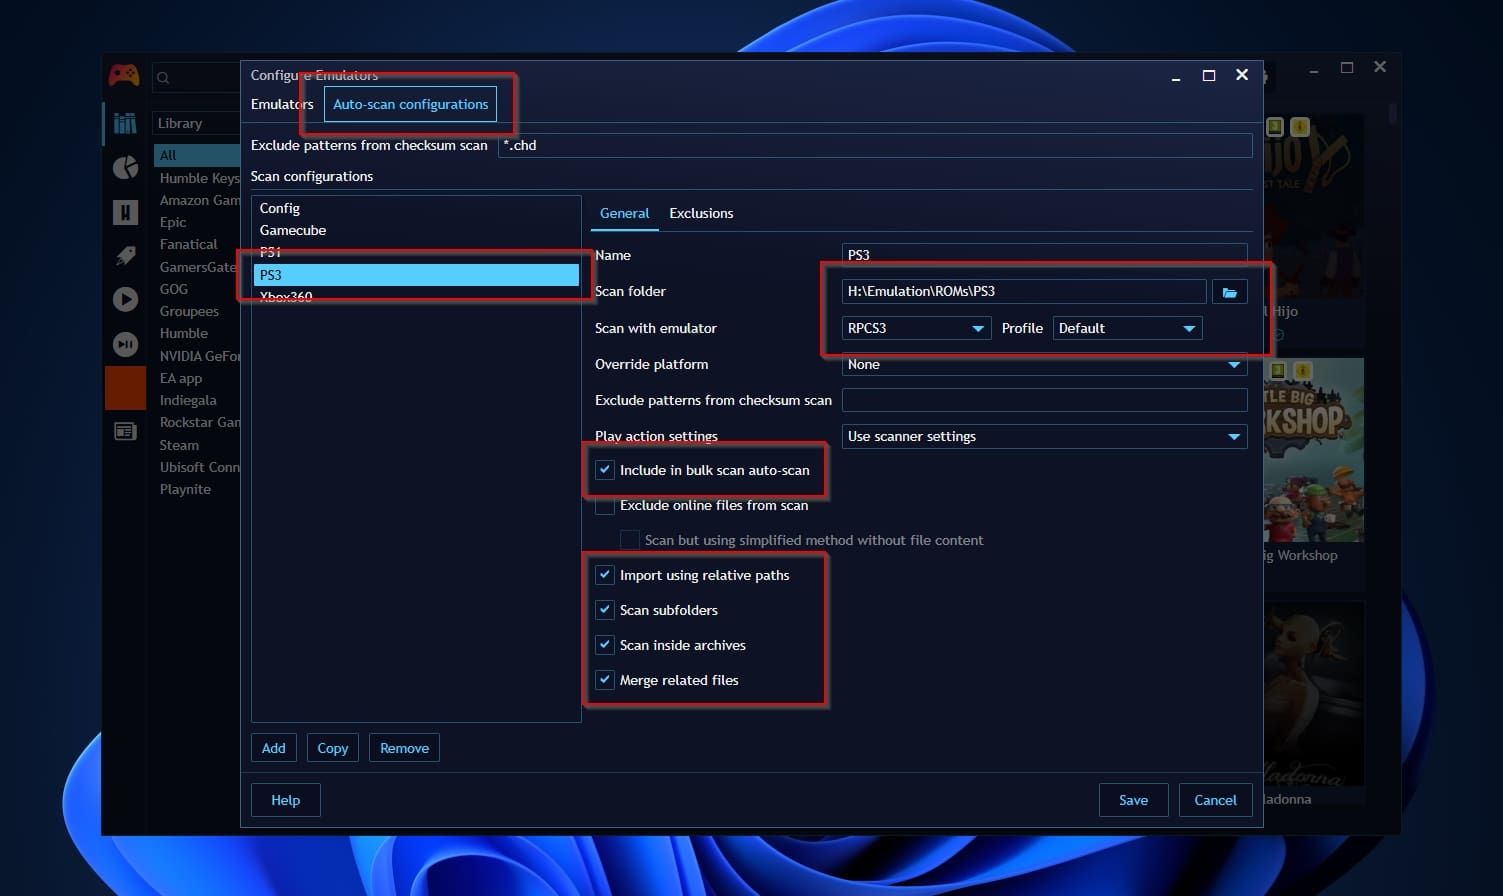
Depending on how you keep your game ROMs stored and the chosen emulator, you can also select if you want to import those titles using a relative path, scan the chosen platform’s folder for more games within subfolders, scan inside archives, and if all files related to a title should be presented individually or “merged” into a single library entry.
Importing ROMs With Auto-Scan Configuration
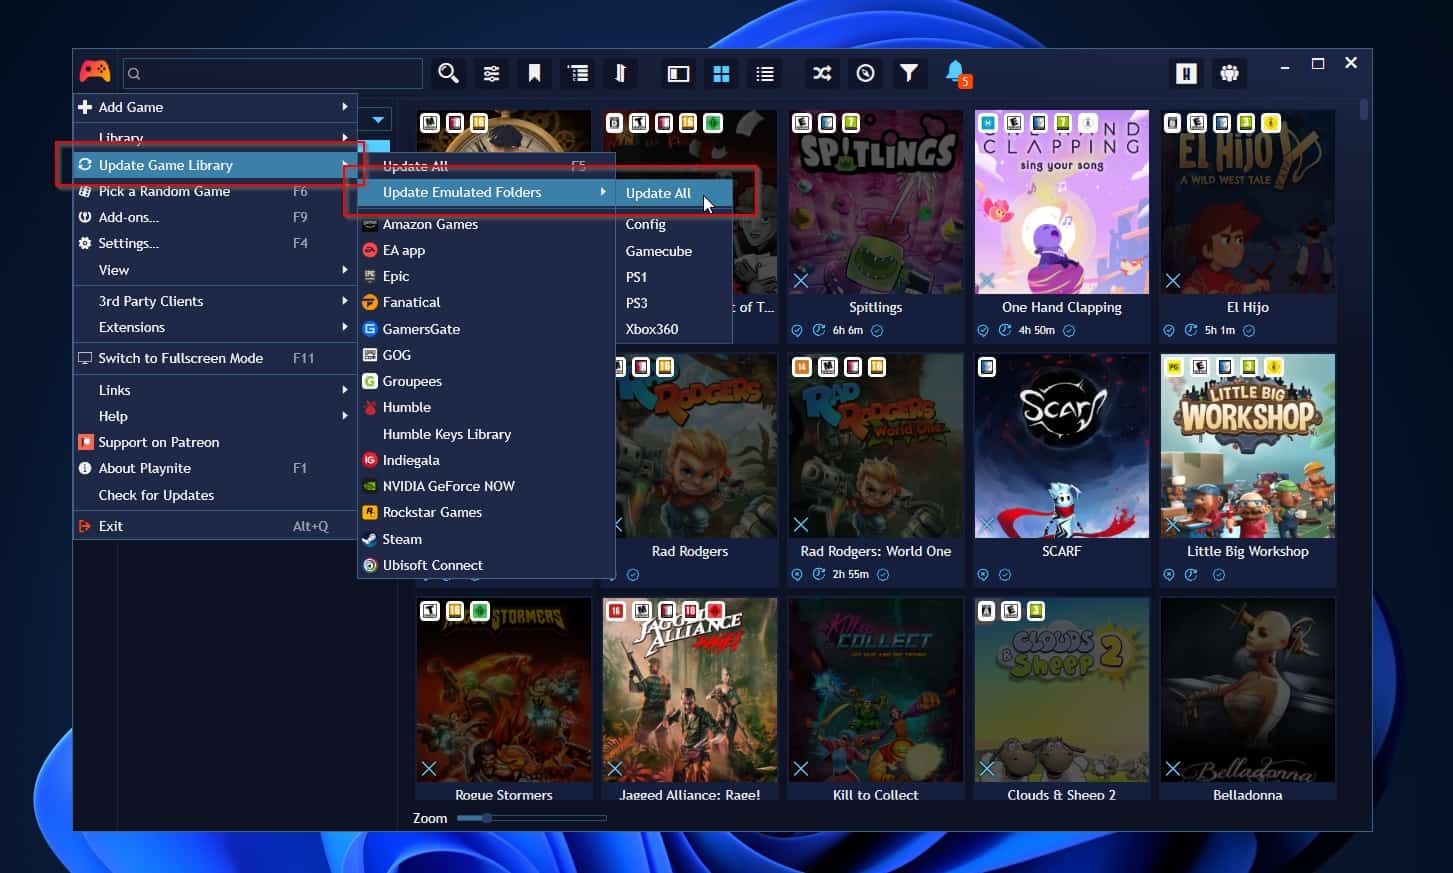
With your emulators and Auto-scan Configurations set up, you can now add your emulated games to your Playnite library. This painfully complicated process consists of the following steps:
- Click on Playnite’s icon on the top left of its window, and select Update Game Library > Update Emulated Folders > Update All.
- Wait.
 Glarysoft File Recovery Pro - Helps to recover your lost file/data, even permanently deleted data.
Playnite might ask you from which metadata source to “pull” details for a title. The app may also ask you to ensure it identified some games correctly, presenting a list of titles for them it deems similar.
After a while, your Playnite library should present all your emulated titles for all the emulators and platforms you’ve added among your “native” PC games.
Navigating Your Emulated Games in Playnite
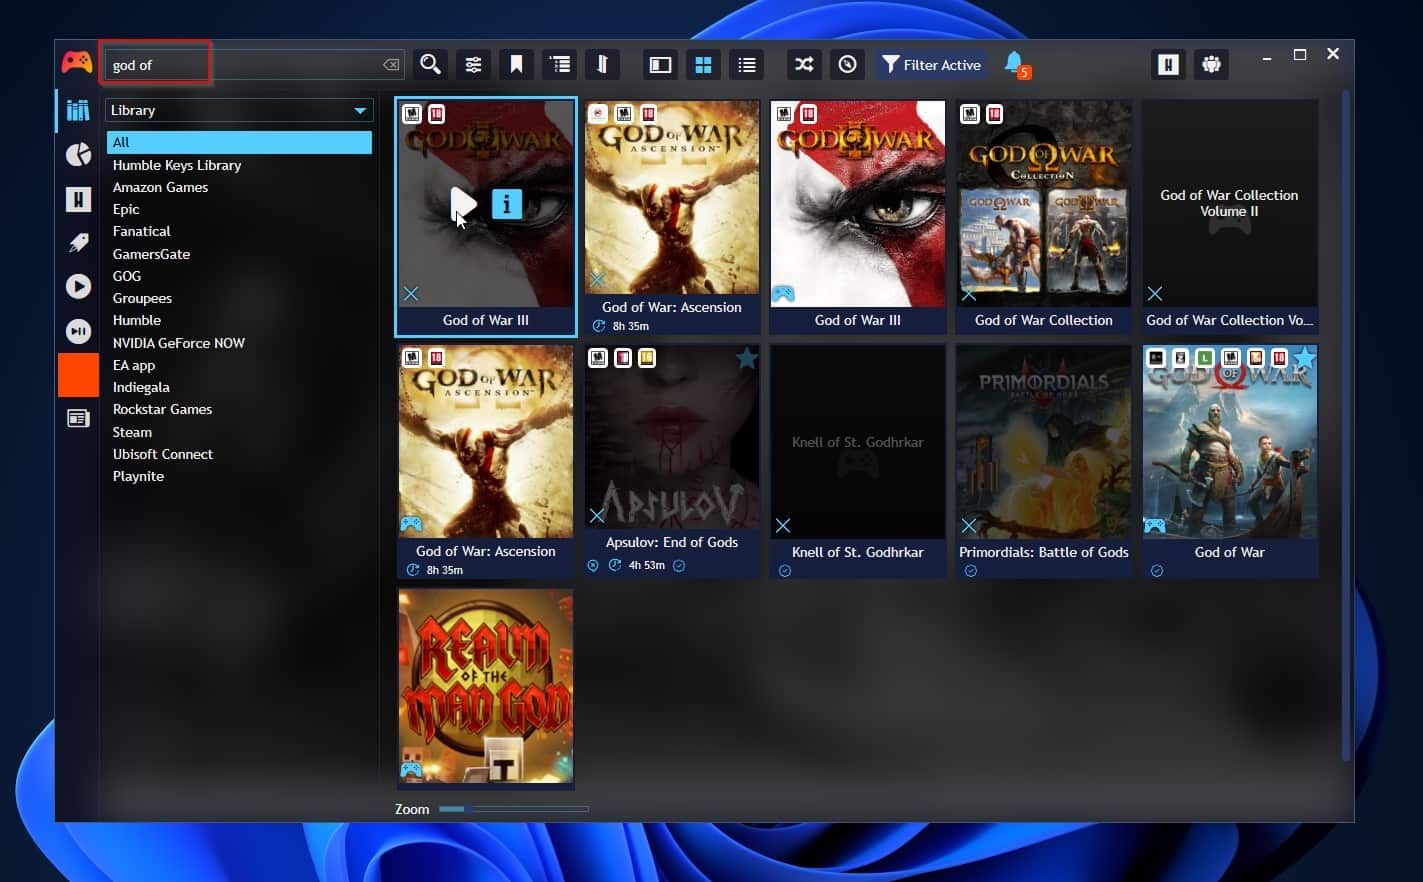
You can treat your emulated games through Playnite like your installed “native” PC games. You can use Playnite’s Search functionality, accessible from the field on the top left of its interface, to seek a particular title based on its name.
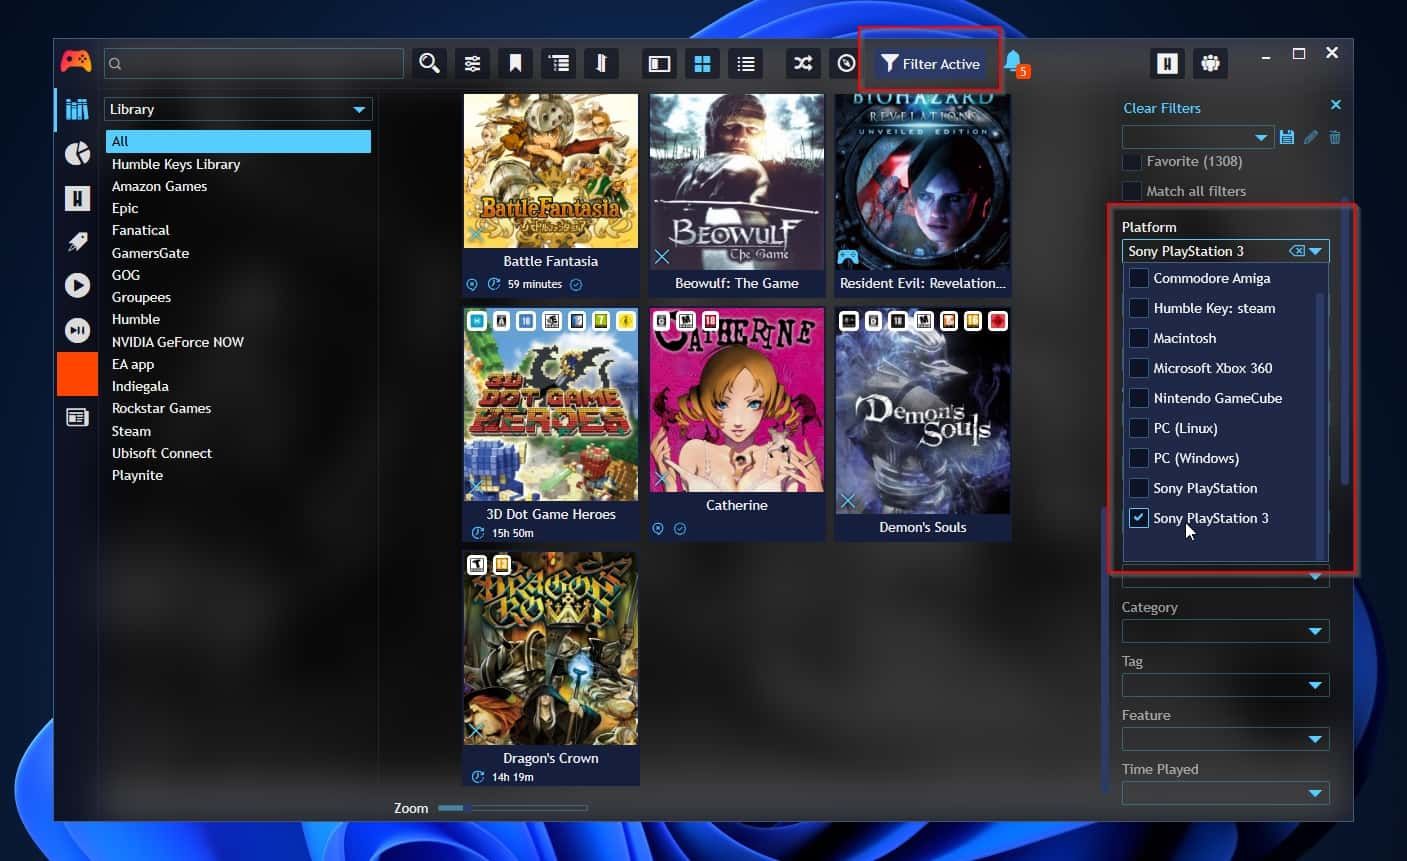
Playnite doesn’t present your emulated platforms as separate libraries. However, you can still “filter down” your games list to, for example, see only titles for PlayStation 3.
To do that, visit Playnite’s Filters pane, and find the aptly-named Platform filter. From there, select the platform whose titles you want to see.
 Any DRM Removal for Mac: Remove DRM from Adobe, Kindle, Sony eReader, Kobo, etc, read your ebooks anywhere.
To play a game, since thanks to your actions above Playnite knows which emulator to use to launch it, you can simply click on its play icon.

If, even after you have access to every single game on your PC through Playnite, it still doesn’t cut it for you, there are alternatives worth trying. Check our list of the best game launchers to launch and organize PC games , but keep in mind that many of them are less emulation-friendly.
Retro Gaming Made Easier With Playnite
Playnite’s major pro is how it can unify all your titles from all your libraries, no matter the digital store you bought them from, and present them through an easy-to-navigate interface. Thanks to everything we saw here, you can add all your emulated games to the mix.
Thankfully, Playnite can handle your emulated games, too, since it supports many popular emulators.
Let’s see how you can have Playnite detect them, scan your emulated games, and include them in your unified game library.
- Title: Playnite Extension: Virtual Games Collection
- Author: Joseph
- Created at : 2024-08-15 15:58:18
- Updated at : 2024-08-16 15:58:18
- Link: https://windows11.techidaily.com/playnite-extension-virtual-games-collection/
- License: This work is licensed under CC BY-NC-SA 4.0.