
Personalizing Win11 Screen Saver Settings
Personalizing Win11 Screen Saver Settings
Screensavers are no longer necessary since most modern displays are no longer susceptible to screen burn-in. Nevertheless, screensavers are still lovely decorations on your computer monitor when idle; that’s why Windows 11 still has this feature, with five default options.
But how do you customize these default screensavers? Check out the steps below and get yourself a screensaver that reflects your personality and character.
How to Customize Windows 11 3D Text and Photos Screensavers with Screen Saver Settings
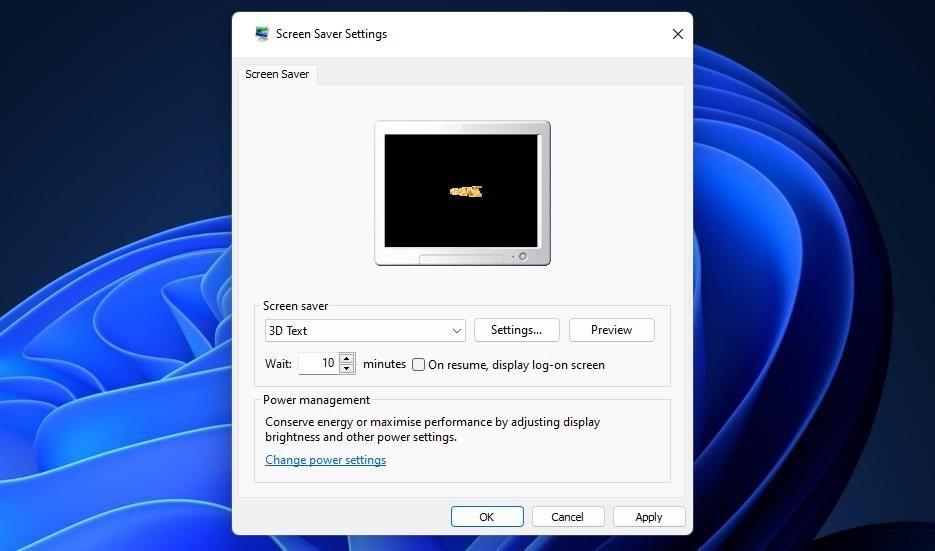
The Screen Saver Settings window is where you can set your screensaver. It also has a Settings button that’ll let you customize them. However, 3D Text and Photos are the only default screensavers for which Windows 11 has some built-in settings.
So, here’s how to open Screen Saver Settings to customize and set the 3D Text or Photos screensaver.
- Right-click the taskbar button for the Start menu to selectSearch .
- Enter the keywordscreensaver inside theType here to search box.
- ClickChange screen saver to access that window.
- Then click theScreen saver drop-down menu.
- Select the3D Text orPhotos screensaver on the menu.

- After selecting one of those two screensavers, you can customize it by pressing theSettings button.
- ClickApply to set your chosen screensaver.
ClickingSettings for 3D Text will bring up a 3D Text Settings window. There you can change the screensaver’s text by clicking theCustom Text radio button and inputting different text in the box. Or you can chooseTime to show a 3D digital clock instead. Press theFont button to select a different font and style.
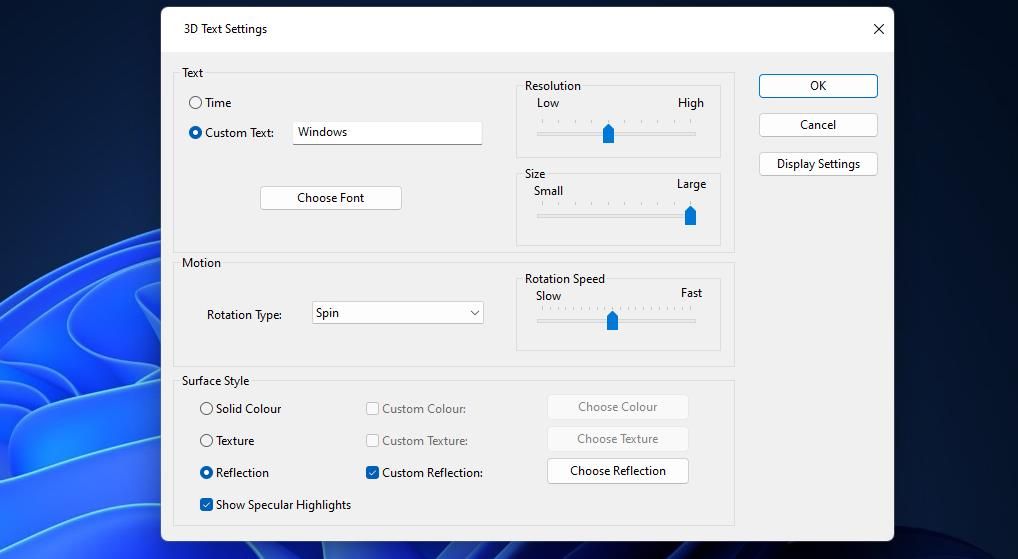
Below are some motion settings you can alter to change how the 3D text rotates. Click theRotation Type drop-down menu to choose a different rotation style setting. Drag theRotation Bar slider’s left and right to change how quickly the text rotates.
Plus, you can change the text’s surface and color style. ClickSold Color >Custom Color >Choose Color to bring up a palette. Then select a different text color on the palette and selectOK .
To change the texture of the text, you’ll first need to download a BMP texture file from a suitable source (or convert a JPEG file to Bitmap image format ). Websites like Unsplash, Pixabay, and Freepik have a multitude of texture backgrounds you can download. Click theTexture >Custom Texture settings in the 3D Text window. Press theChoose Texture button to select your downloaded BMP file.

If you choose the Photos screensaver, clicking itsSettings button will open a window from which you can change the slideshow’s folder and speed. Press theBrowse button on that window to select a different image folder. Choose aFast ,Medium , orSlow option on theSlideshow speed drop-down. Then clickSave to apply the settings.

Wait time andOn resume are the only options you can change for the Photos and 3D Text screensavers outside the settings windows. Adjust theWait time value to set a longer or shorter idle activation time for the screensaver. If you prefer to return to a log-in screen after resuming, select theOn resume option.
How to Customize Bubbles, Mystify, and Ribbons with Winaero ScreenSavers Tweaker
Clicking theSettings buttons for the Bubbles, Mystify, and Ribbons screensavers in Windows 11 won’t open any options for them. To customize those screensavers, download and launch the freeware Winaero Screensaver Tweaker software. That portable app lets you tweak hidden options for Bubbles, Mystify, and Ribbons in Windows platforms dating back to Vista. This is how you can download and launch Winaero Screensaver Tweaker:
- Open the Winaero Screensaver Tweaker download page.
- Click theDownload Windows Screensavers Tweaker link.
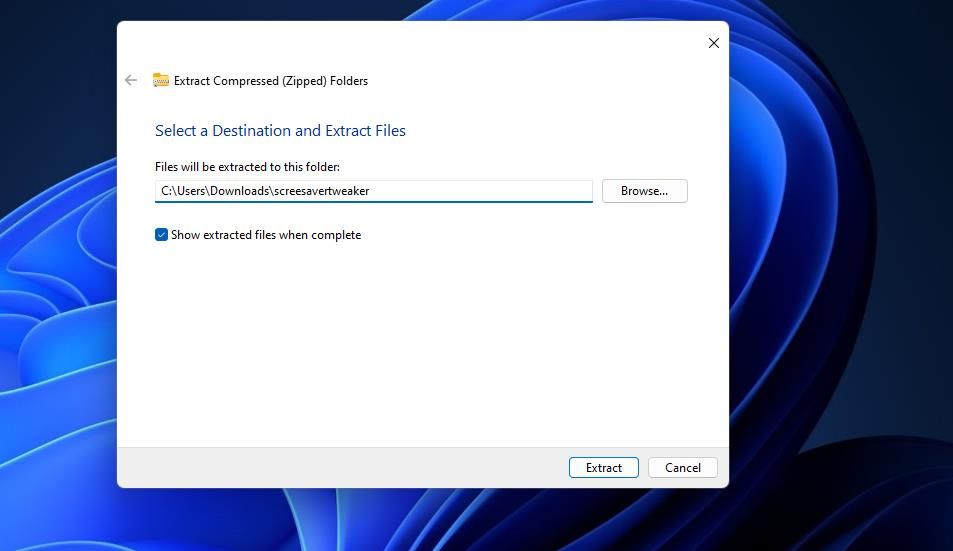
- Open whatever directory includes theSystem_Screensavers_Tweaker.zip file by pressingWindows key +E and navigating to it within File Explorer.
- Extract theSystem_Screensavers_Tweaker.zip file as instructed within our how-to unzip files guide.
Software Update Pro - Check and update software installed on your computer.
- Next, open the extracted screensavertweaker folder.
- Click the Windows 8 and x64 subfolders.
- Then double-clickScreensaversTweaker.exe to open the Windows Screensavers Tweaker software.
 Software Update Pro - Check and update software installed on your computer.
 Now you can customize Windows 11’s other default screensavers. However, note that you’ll need to have one of the Bubbles, Mystify, or Ribbons screensavers selected for its customization settings to work. So, choose one of those screensavers if you haven’t already.
Click theBubbles tab to view options for customizing that screensaver. There you can change the number of bubbles the screensaver has by dragging the slider on theNumber ofSpheres bar. To change the size of the bubbles, drag the slider on theSphere Radius bar. You can change the force of turbulence (bubble bounce) by dragging the slider on theTurbulence Force bar.
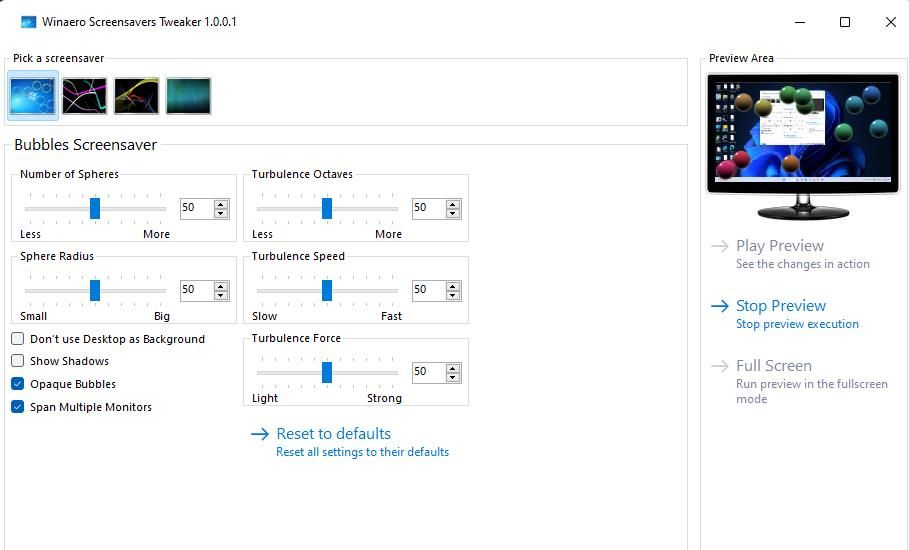
Below the bars, there are some checkbox settings you enable or disable. SelectingOpaque Bubbles will display non-transparent bubbles in the screensaver. You can omit the desktop wallpaper from the screensaver by choosing the Don’t useDesktop as Background checkbox.
Select theRibbons tab to customize that screensaver. There you can reduce or increase the number of ribbons by dragging the slider on theNumber of Ribbons bar. To make the ribbons broader or narrower, drag theRibbon Width bar’s slider.


The ribbons blur and fade in the screensaver by default. However, you can change that by deselecting theApply Blur and Fade checkbox. Then ribbons will fill up the screen without fading away.
To customize Mystify, select that screensaver’s tab. You can increase or reduce the number of lines Mystify has by dragging the slider on theNumber of Lines bar. Drag theLines Width bar’s slider to set broader or narrower lines.
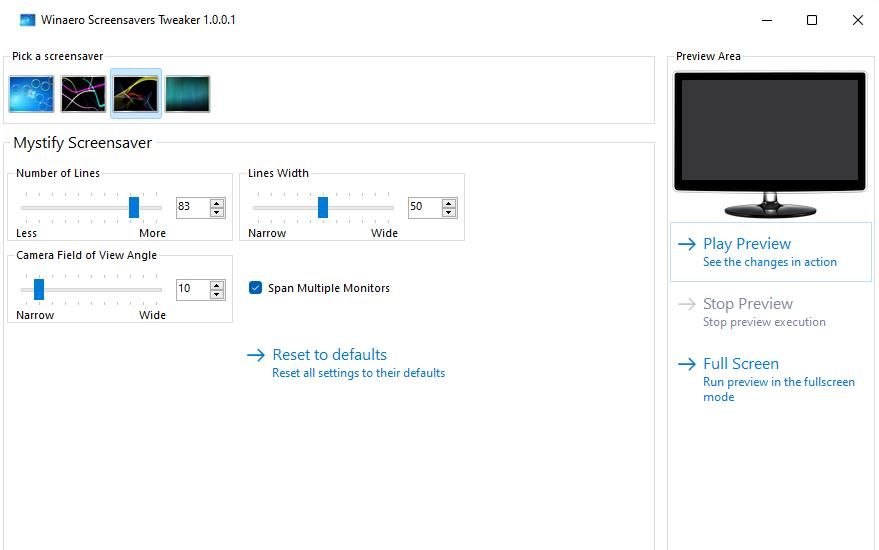
The Mystify, Bubbles, and Ribbons tabs all includeSpan Multiple Monitor checkboxes. That setting is enabled by default so that the screensaver extends across multiple monitors. Deselecting that checkbox will display a set screensaver separately on multiple monitors.
You can select to preview all changes you make to screensavers within the software. ClickPlay Preview to see the screensaver in a small thumbnail screen. Or chooseFull Screen to see what the customized screensaver looks like in fullscreen mode.

Customize Windows 11’s Screensavers for Better Effect
Even though they’re no longer essential, the default Windows 11 screensavers still look groovy. So, it’s worth setting one of those screensavers to liven up your PC when idle. You can refine their look according to preference by tweaking the customization settings outlined above.
- Title: Personalizing Win11 Screen Saver Settings
- Author: Joseph
- Created at : 2024-08-15 15:46:53
- Updated at : 2024-08-16 15:46:53
- Link: https://windows11.techidaily.com/personalizing-win11-screen-saver-settings/
- License: This work is licensed under CC BY-NC-SA 4.0.