
Overcoming Windows Auto Detection Errors
Overcoming Windows Auto Detection Errors
After having Windows troubleshoot a network error for you, you might have come across this message:
Windows could not automatically detect this network’s proxy settings.
What does this mean, and how do you fix it? Let’s take a look at Windows’ proxy settings and the steps to repair this.
1. Reboot Your Computer and Router
Before you launch into any specific troubleshooting, it’s always a good idea to restart your equipment first. There’s a chance that this will clear up your issue in a few moments.
Because this error is usually related to misconfigured settings on one computer, restarting your router likely won’t have an effect. But it’s still an important network troubleshooting step for problems of any kind.
If the problem hasn’t fixed itself after you reboot your computer and router, continue on with the more detailed steps.
2. Review Proxy Settings in Windows
Because this issue is related to your Windows proxy settings, that’s a sensible first place to check. To access proxy settings in Windows 10, openSettings , select theNetwork & Internet category, and switch to theProxy tab on the left sidebar. This is in the same place on Windows 11, exceptProxy is an item in the list instead of appearing on a sidebar.
Here you’ll see a list of options related to proxy servers. If you don’t use a proxy (as is the case for most home users), make sure thatUse a proxy server near the bottom is turned off. LeaveAutomatically detect settings on if it is already.
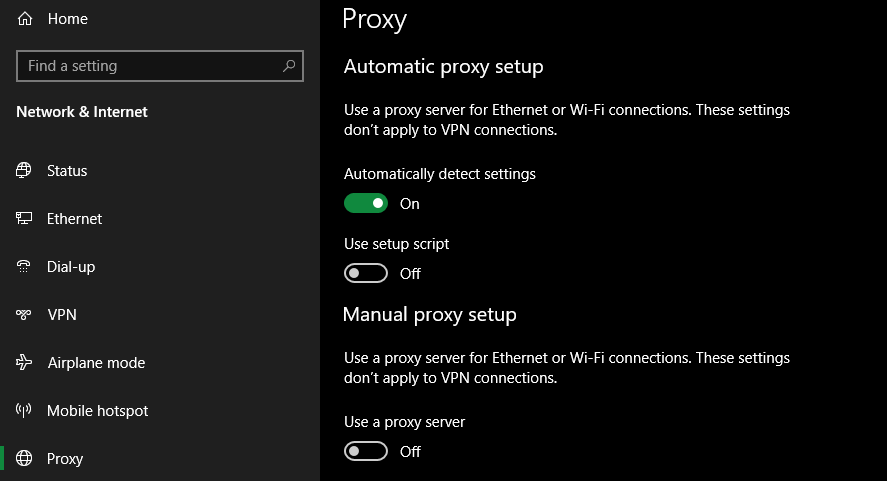
For those who do connect with a proxy, such as people in a business or school environment, you might want to check with your system administrator to make sure you have the correct proxy details here. They’ll be able to speak to any issues specific to your network.
After this, try reconnecting to the network again and getting online. If you still get the error, turn offAutomatically detect settings in the proxy options and try once more.

What’s a Proxy Server?
We don’t want to bore you with the details while you try to fix this proxy setting issue. However, it’s useful to understand the basics of what a proxy actually is and why Windows can run into problems with it.
Essentially, a proxy server acts as a middleman between your computer and the internet. Instead of you connecting directly to the internet, you connect to the proxy server, which grabs information from the internet for you.
These are most common in business and school use, where system administrators use them for security and efficiency. It’s very unlikely that you would use a proxy server on your home network, unless you specifically set one up. This is why in most home cases, you should clear any proxy settings that might exist when you run into this issue.

3. Run the Network Adapter Troubleshooter
When you right-click on the network connection icon in your System Tray and choose to troubleshoot, it runs theInternet Connections troubleshooter. This is what results in the “Windows could not detect proxy settings” error. But there’s another network troubleshooter you can run that might provide more help.
On Windows 10, openSettings again and visitUpdate & Security > Troubleshoot , followed byAdditional troubleshooters . On Windows 11, go to Settings > System > Troubleshoot > Other troubleshooters .
ChooseNetwork Adapter from the list and walk through the troubleshooter. As seasoned Windows users know, these troubleshooters don’t always fix your problem, but it’s still worth a try.
4. Auto-Obtain IP Address and DNS Info
As it turns out, there aren’t many troubleshooting steps specific to proxy servers. We’ll share more tips below, but bear in mind that the troubleshooting for this looks similar to fixing the “No Internet Access” Windows error from this point on.
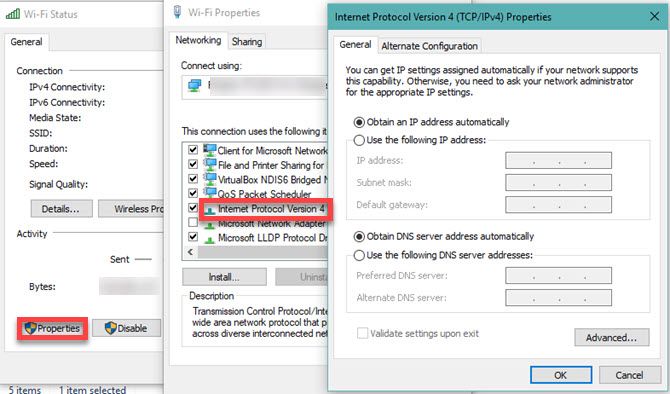
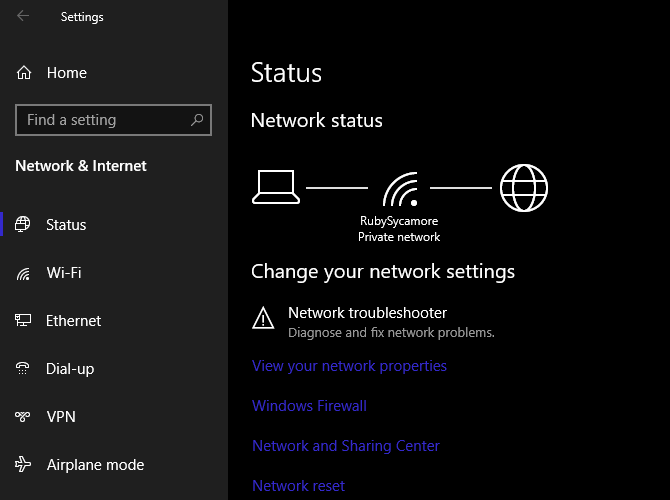
While not technically related to your proxy settings, misconfigured IP address or DNS settings can cause this error too. To check these on Windows 10, browse toSettings > Network & Internet > Status . Click theChange adapter options button in the list to see all your network connections, then double-click on the one you’re using.
Here, click theProperties button and double-clickInternet Protocol Version 4 in the list. Make sure you have bothObtain an IP address automatically andObtain DNS server address automatically selected. Misconfigured settings here will prevent you from getting online.

On Windows 11, go toSettings > Network & internet and chooseWi-Fi orEthernet depending on the connection you’re using. Then click your network name. If you don’t seeAutomatic (DHCP) next to bothIP assignment andDNS server assignment , click theEdit button next to both and set them to this value.
5. Update or Roll Back Your Network Driver
An outdated network driver may lead to connection problems. Similarly, you might have recently installed a botched update for your network driver. In either case, replacing the driver could clear the proxy message issue.
To look at this, right-click on the Start button and chooseDevice Manager to open that utility. Expand theNetwork adapters section and double-click on the connection you use.
Then, on theDriver tab, you can chooseRoll Back Driver to uninstall the latest update and return to the previous one. Use this if you started experiencing this issue after updating—though it might not be available in all cases.
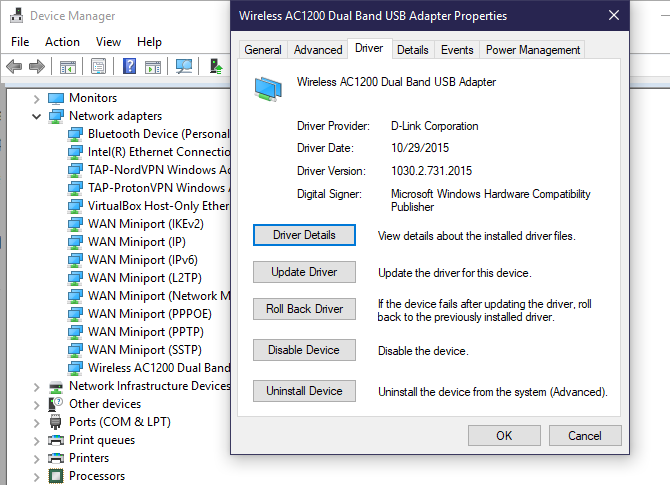
ChooseUpdate Driver and you can check for new updates over the internet. Since this likely won’t find anything, you’ll need to manually update your drivers by downloading them from the manufacturer.
6. Reset Network Configuration via the Command Prompt
Windows offers many network troubleshooting tools through the Command Prompt. A few quick commands can often clear up your issue in moments. If you’re still having trouble at this point, right-click the Start button again and open a Command Prompt, PowerShell, or Windows Terminal window with administrator rights.
Then input the following commands followed byEnter , one at a time. They will reset various network functions of your computer, such as clearing out old connection data and getting a new IP address from the router:
netsh winsock reset
netsh int ip reset
ipconfig /release
ipconfig /renew
ipconfig /flushdns
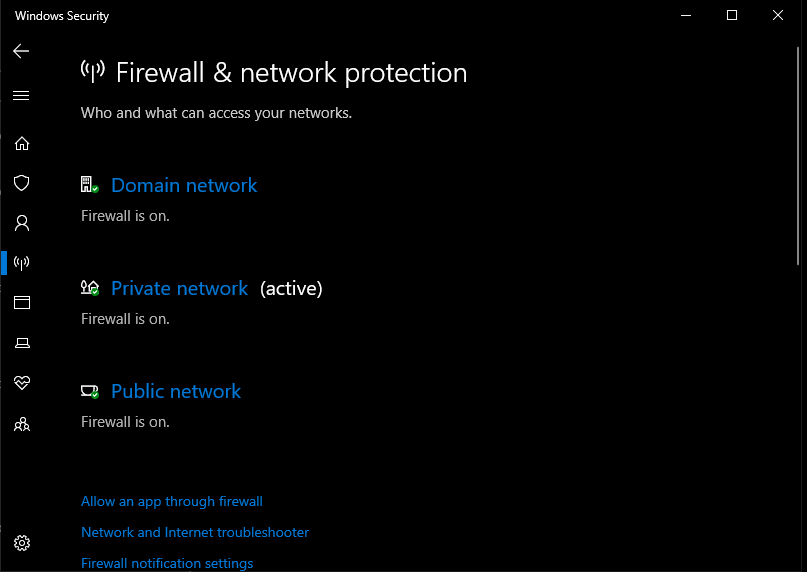
7. Review Firewall, VPN, and Antivirus Software
 EmEditor Professional (Lifetime License, non-store app)
You should next make sure you don’t have a firewall, VPN, or security suite interfering with your network connection. Perhaps your chosen software had an update that changed an option you weren’t aware of, or you just installed a new app that changed proxy settings for some reason.
Try disabling your firewall, VPN, and antivirus software one at a time, then see if the error goes away. If it does, the issue lies with one of those apps. You’ll need to configure them to avoid interfering with regular network activity.
8. Scan for Malware
Some malware can continually mess with your proxy settings to prevent you from getting online. If you run into the “Windows could not detect this network’s proxy settings” message every time you reboot, you may be a victim of this.
You should thus run a scan with a trusted anti-malware app, like Malwarebytes . This will detect any malware running on your system and get rid of it. If the scan finds any infections, take the recommended action and see if your connection works normally again.
## 9\. Utilize a Restore PointThe System Restore feature in Windows lets you return to a previous point at which your computer was working normally. If your issues started recently, you should try this to see if you can go back in time.
To access it, head toSettings > System > About . On the right sidebar in Windows 10, clickSystem protection (expand the Settings window horizontally if you don’t see it). On Windows 11, you’ll seeSystem protection next toRelated links in theDevice specifications box once you’ve expanded it.
In the resultingSystem Properties dialog box on theSystem Protection tab, clickSystem Restore to open a new window. Windows will walk you through choosing a restore point and confirming the operation. Of course, if your computer hasn’t created any restore points, you can’t use this feature.

Note that using a restore point will remove any programs and drivers you’ve installed since making that restore point. You can clickScan for affected programs on a restore point to see what effect it will have. Using a System Restore won’t affect any of your personal files.
10. Reset Your Network Settings

After trying everything above, you should resort to a full reset of your network configuration in Windows. You’ve already spent a lot of time working on this, and a reset should clear whatever persistent problem is blocking your connection with this “cannot detect proxy settings” error.
Thankfully, Windows 10 makes it easy to reset your whole configuration. OpenSettings > Network & Internet . On theStatus tab, findNetwork reset at the bottom and click it. On Windows 11, this is under Settings > Network & internet > Advanced network settings > Network reset instead.
Be aware that this will remove all network information from your computer, so you’ll need to reconnect to saved networks again. If you’re OK with this, clickReset now . Your computer will perform the reset, then restart.
Windows Could Not Detect Proxy Settings: Resolved
Now you know what to do when Windows cannot detect proxy settings. All network errors are frustrating, but you should be able to clear this one up without much work. It’s most important to make sure that you have a proxy turned off (if you don’t use one) or configured properly (if you do use one).
Otherwise, some standard network troubleshooting should have you all patched up and ready to get back online.
- Title: Overcoming Windows Auto Detection Errors
- Author: Joseph
- Created at : 2024-08-15 15:58:16
- Updated at : 2024-08-16 15:58:16
- Link: https://windows11.techidaily.com/overcoming-windows-auto-detection-errors/
- License: This work is licensed under CC BY-NC-SA 4.0.