Overcoming Wi-Fi Connectivity Hurdles: Clearing Action Shortcomings
Overcoming Wi-Fi Connectivity Hurdles: Clearing Action Shortcomings
The “Action needed” prompt for Wi-Fi in Windows pops up when users try to connect to a Wi-Fi network on their devices and can occur with both new and old/trusted networks.
Below, we discuss the common causes of this problem alongside the troubleshooting methods you can try to fix this issue once and for all.
1. Disable the NCSI Probe From Windows Registry
In most cases, the “Action Needed” prompt appears when there are corporate Wi-Fi networks with multiple endpoints available. This prompt is associated with the Network Connectivity Status Indicator (NCSI) feature, which verifies the network connection and internet access.
Occasionally, the NCSI feature may mistakenly trigger this prompt while performing network connectivity checks, even if the network is functioning properly.
To fix this problem, you can manually disable the NCSI Active probe via Windows Registry. However, before you proceed, we recommend creating a Registry backup , just to be safe.
Once that is done, here is how you can proceed:
Press the Win + R keys together to open Run.
Type “regedit” in Run and click Enter.
Choose Yes in the User Account Control prompt.
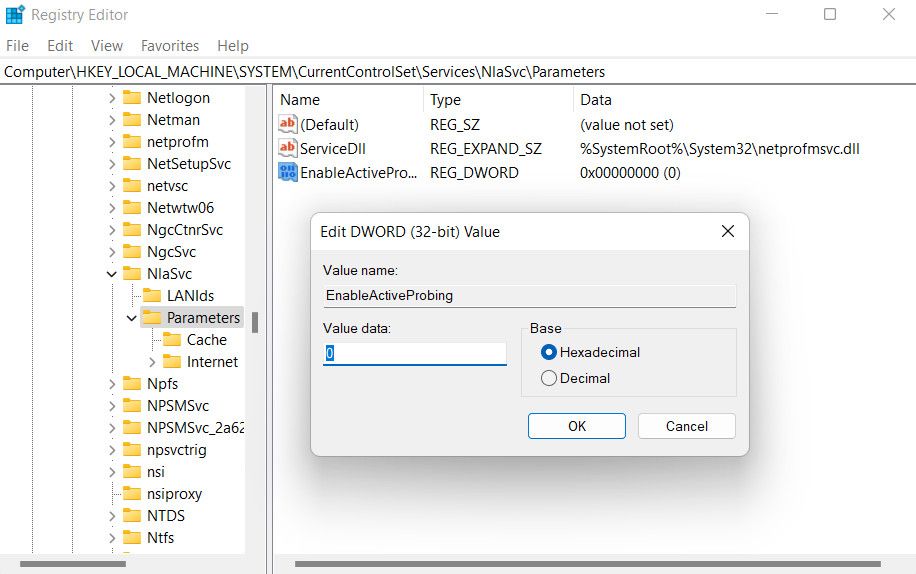
Inside the Registry Editor, navigate to the location below:
HKEY_LOCAL_MACHINE\SYSTEM\CurrentControlSet\Services\NlaSvc\Parameters\InternetMove to the right pane and right-click on the EnableActiveProbing value.

Type 0 in the text field for Value data and click OK.
Now, navigate to the following location:
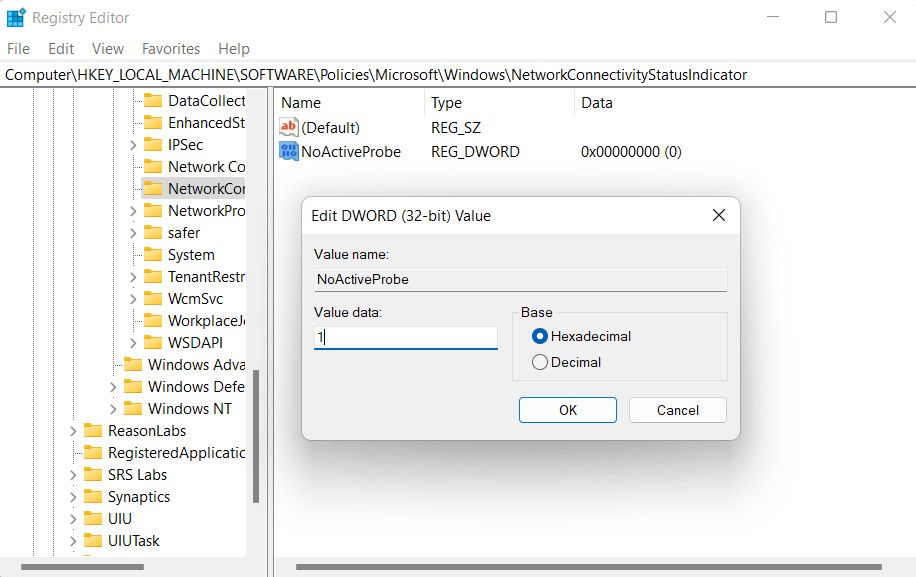
HKLM\Software\Policies\Microsoft\Windows\NetworkConnectivityStatusIndicatorMove to the right side and right-click on an empty space.
Choose New > DWORD (32-bit) Value and rename it as NoActiveProbe.
Double-click on this newly created value and change its value data to 1.
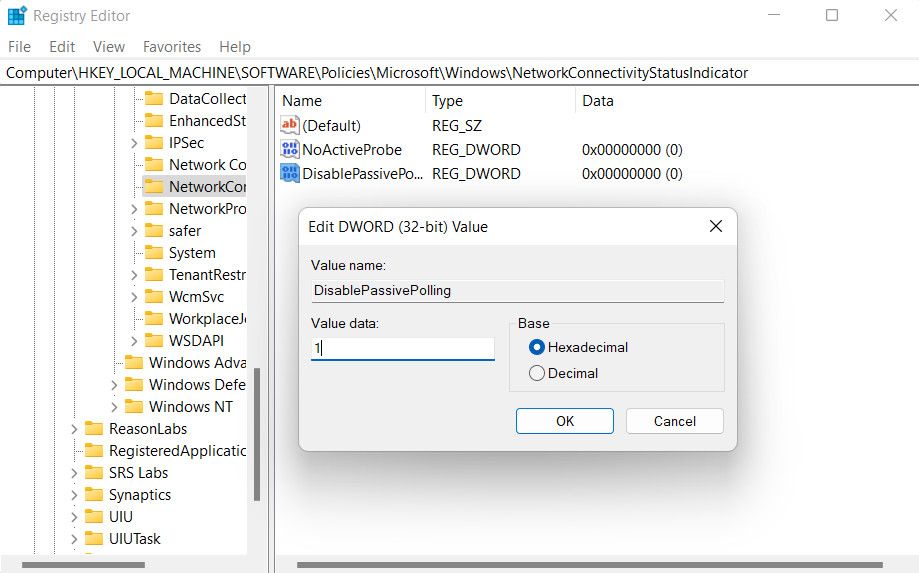
Now, create another value the same way and name it as DisablePassivePolling.
Double-click on DisablePassivePolling and change its value data to 1 as well.
Click OK to save the changes and exit the Registry Editor.
Finally, restart your computer and upon reboot, check if the problem is resolved.
2. Disable the NCSI Probe From GPE
If using the Windows Registry did not work, you can also make the same changes using the Group Policy Editor.
Follow these steps to proceed:
- Press the Win + R keys together to open Run.
- Type “gpedit.msc” in Run and click Enter.
- Choose Yes in the User Account Control prompt.
- In the Group Policy Editor, navigate to the location below:
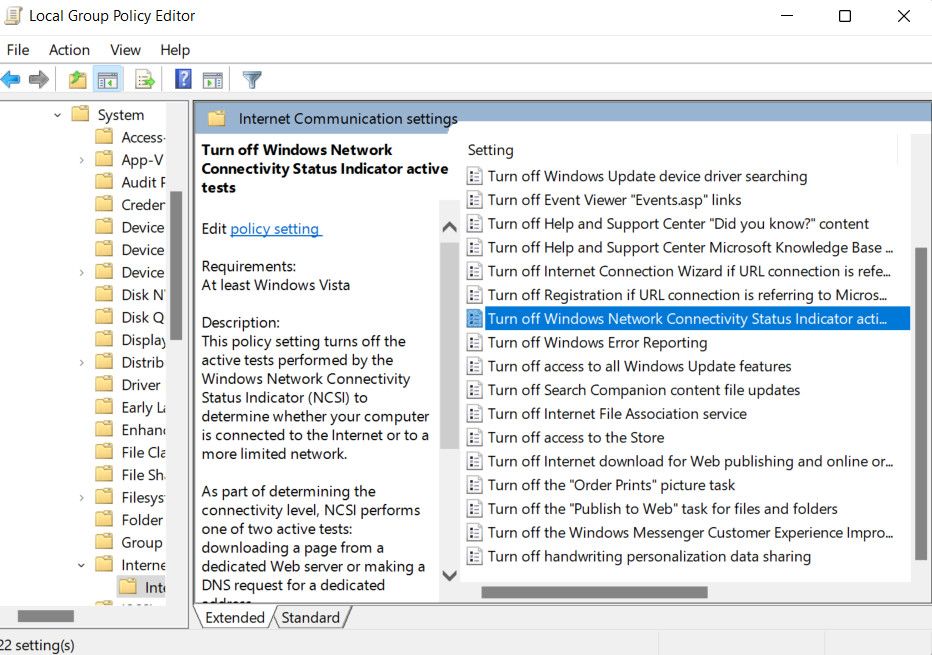
Computer Configuration\Administrative Templates\System - Select Internet Communication Management > Internet Communication Settings and click on Turn off Windows Network Connectivity Status Indicator active tests.
TubeDigger - online video downloader from mostly any site
- Checkmark the box with Enabled and click Apply > OK to save the changes.
- Next, head over to the following location:
Computer Configuration\Administrative Templates\Network - Select Network Connectivity Status Indicator > Specify passive polling.
- Choose Enabled and click Apply > OK to save the changes.
- Close the Group Policy Editor and restart your computer.
 TubeDigger - online video downloader from mostly any site
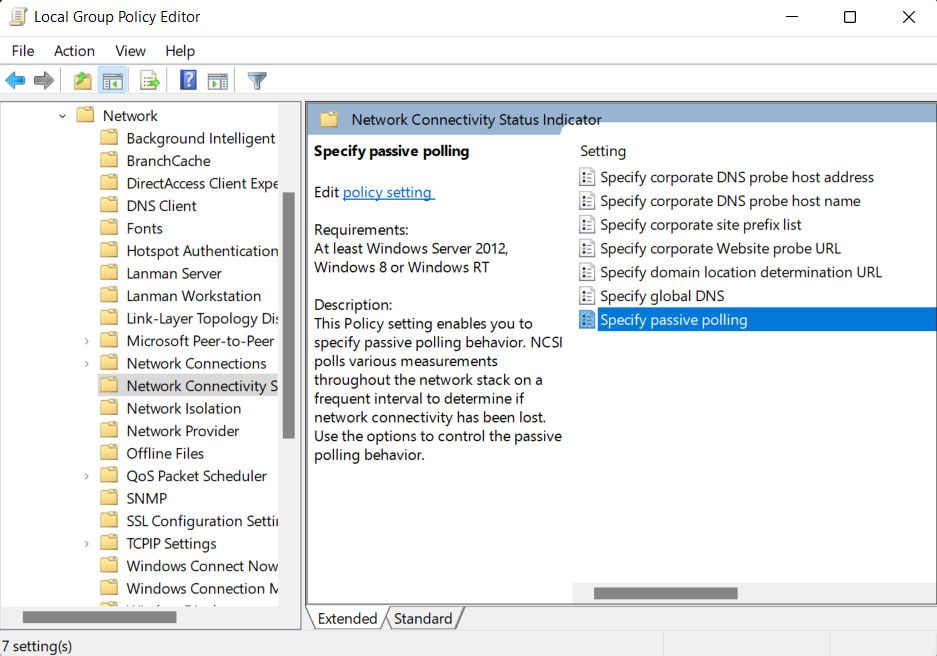

Hopefully, upon reboot, the issue will no longer appear.
3. Run the Internet Connection Troubleshooter
If the scenarios we have discussed above do not apply to you, you might also be facing the problem because of a temporary glitch in the system. In this case, you can run the internet connection troubleshooter. This is a built-in utility that scans your system for underlying related issues. If a problem is identified, it will either fix it for you or suggest a solution that you can apply automatically.
Here is how you can run it:
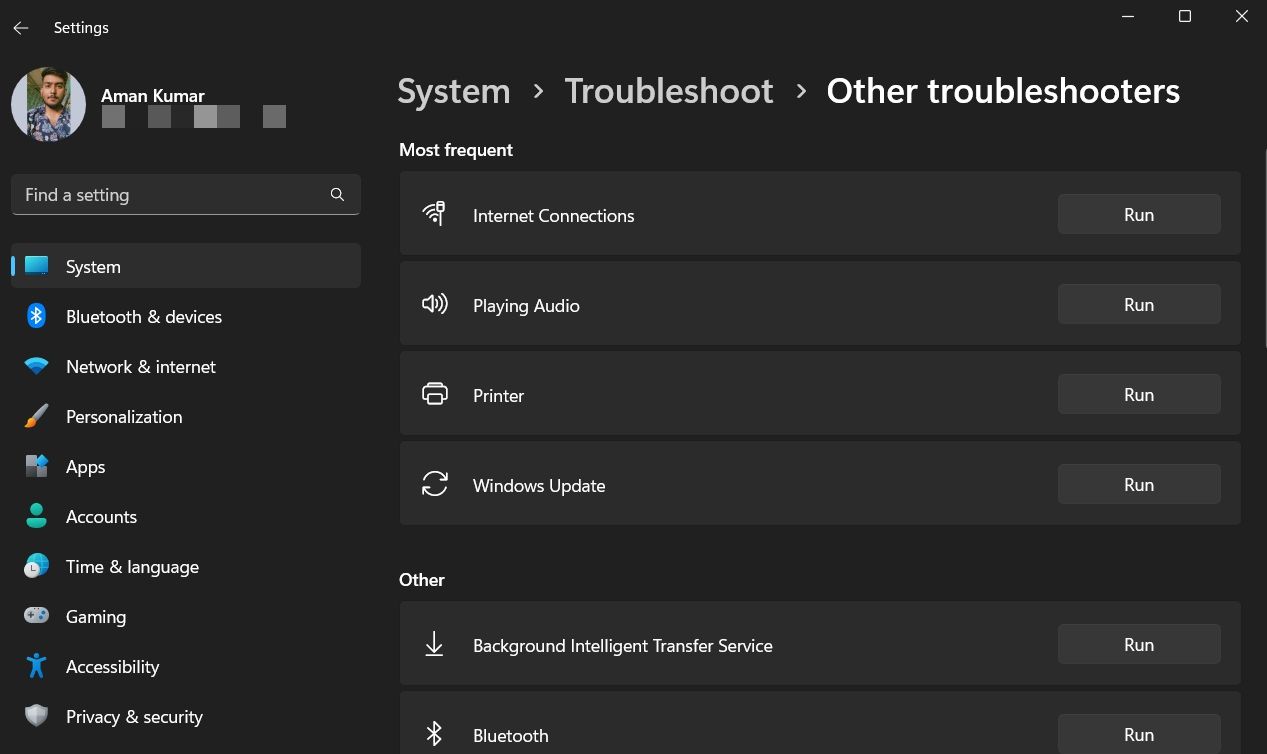
- Press the Win + I keys together to open the Settings app.
- Click on System and choose Troubleshoot.
- Choose Other troubleshooters.
- You should now be able to see a list of troubleshooters offered by Windows. Locate the Internet connection troubleshooter and click on the Run button for it.
- Wait for the troubleshooter to complete its scan and once done, check if a problem is identified. If it is, click on the Apply this fix option. You can also apply a solution manually.
- In case the troubleshooter fails to identify the culprit, click on Close the troubleshooter option and move to the next method below.
You might also be facing the issue if the fast startup feature is interfering with network-related processes in Windows. If this feature is enabled on your computer, disabling it might help fix the underlying error as this will allow the system to completely shut down, which can help in refreshing network settings and resolving any network-related issues.
Here is how you can proceed:
- Open Run by pressing the Win + R keys together.
- Type “control” and click Enter.
- In the Control Panel, expand the View by section and choose Large icons.
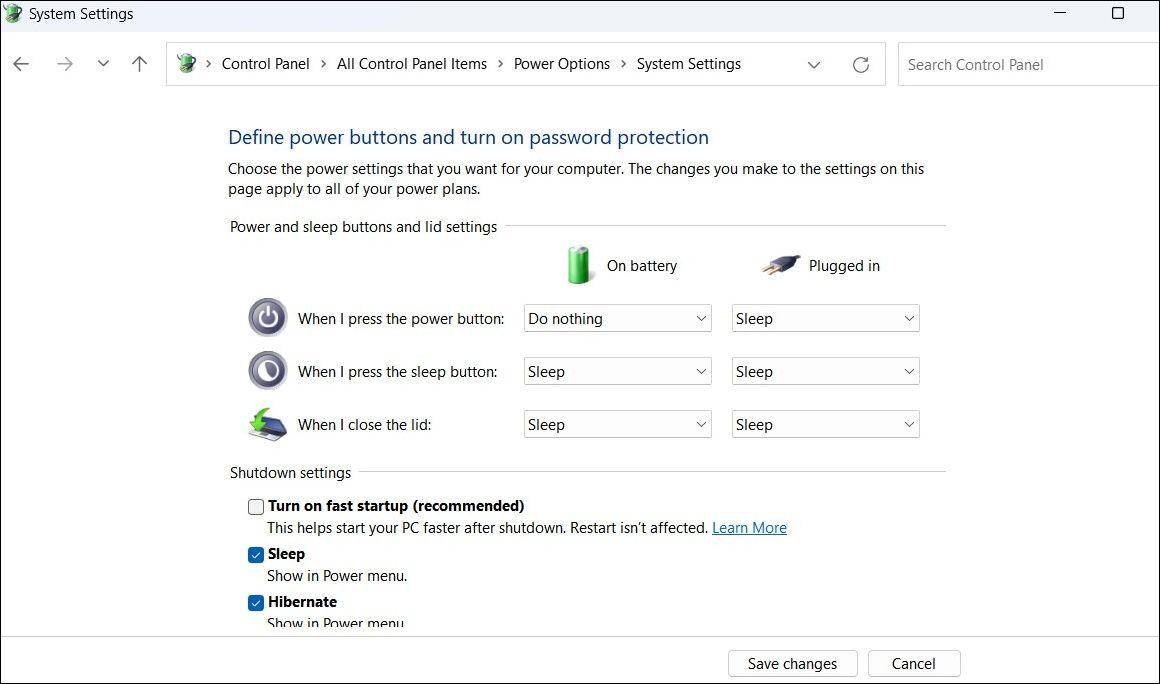
- Click on Power Options from the list and select Choose what the power buttons do.
- Choose Change settings that are currently unavailable and navigate to the Shutdown settings option.
- Uncheck the box associated with Turn on fast startup (recommended).
Project Manager - Asset Browser for 3Ds Max
- Click on the Save changes button and exit Control Panel. Check if the issue is now resolved.

 Project Manager - Asset Browser for 3Ds Max
 Any DRM Removal for Win:Remove DRM from Adobe, Kindle, Sony eReader, Kobo, etc, read your ebooks anywhere.
5. Try These Additional Generic Fixes
If the specific fixes we have listed above have not worked for you, there are some additional fixes related to the network errors in Windows that you can try.
These include updating the network drivers, re-enabling your wireless network adapter, installing the latest system updates, and resetting the network configurations on your computer. Our guide on how to fix common Windows network errors discusses all of these in detail, so you can head over there for step-by-step instructions.
Fixing Network Connections in Windows Made Easy
Network-related issues in Windows can be annoying, especially if they are preventing you from establishing a stable connection. Hopefully, the steps listed above will help you fix the “Action needed” problem for good.
If you ever need to undo the changes that you made in the Registry Editor or GPE to fix this issue, simply re-enable the respective keys and policies by visiting the locations we have mentioned above in this guide. You can also contact the official Microsoft support team if the error appears even after you have tried all the solutions.
Below, we discuss the common causes of this problem alongside the troubleshooting methods you can try to fix this issue once and for all.
- Title: Overcoming Wi-Fi Connectivity Hurdles: Clearing Action Shortcomings
- Author: Joseph
- Created at : 2024-08-15 15:58:15
- Updated at : 2024-08-16 15:58:15
- Link: https://windows11.techidaily.com/overcoming-wi-fi-connectivity-hurdles-clearing-action-shortcomings/
- License: This work is licensed under CC BY-NC-SA 4.0.