
Neutralize Required Condition Red Flags in Win11
Neutralize Required Condition Red Flags in Win11
Key Takeaways
- Windows 11 has stricter hardware requirements, resulting in a “System requirements not met” watermark for unsupported hardware.
- You can remove the watermark by modifying the Registry Editor or using the Group Policy Editor.
- New updates may cause the watermark to reappear, requiring you to repeat the removal steps.
If you are running Windows 11 on unsupported hardware, the newer operating system version will show a “System requirement not met” watermark in the bottom left corner of your screen.
This may not be a concern if you use the OS in a virtual machine. But a watermark can stick out like a sore thumb for most people. Fortunately, you can remove the system requirements not met watermark with a registry hack and the Group Policy Editor.
Why Does Windows 11 Show the “System Requirements Not Met” Watermark?
Microsoft Windows 11 has a much stricter hardware requirement than its predecessors. If your system does not meet the minimum system requirement, including TPM 2.0, the installation will stop abruptly.
However, with the problem came many workarounds that allowed you to bypass the restriction and install Windows 11 on unsupported hardware.
While Microsoft initially allowed installation on unsupported hardware with a warning about security issues and lack of future updates, it has now decided to put a permanent watermark to remind the users that their system is not supported. A similar message may also appear in the Settings app.
1. Remove the “System Requirement Not Met” Watermark Using the Registry Editor
If you see the “system requirements not met” watermark on your PC, you can remove it by modifying a DWORD value in Registry Editor.
As modifying the Windows Registry involves risk, create a restore point before making any changes using the Registry Editor.
Follow these steps to remove the “System requirement not met” watermark in Windows 11:
- Press Win + R to open the Run dialog.
- Type regedit and click OK to open the Registry Editor.
- In the Registry Editor, navigate to the following path. You can also copy and paste the path in the Registry Editor address bar for quick navigation.
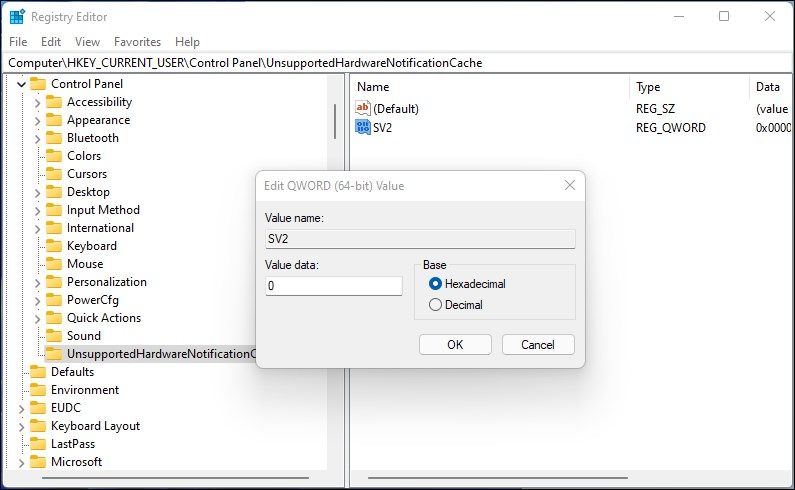
HKEY_CURRENT_USER\Control Panel\UnsupportedHardwareNotificationCache - In the right pane, right-click on the SV2 DWORD value and select Modify.
- Enter 0 into the value data field.

- Click OK to save the changes.
- Close the Registry Editor and restart your PC to apply the changes. After restarting, Windows 11 will no longer show the unsupported hardware watermark.
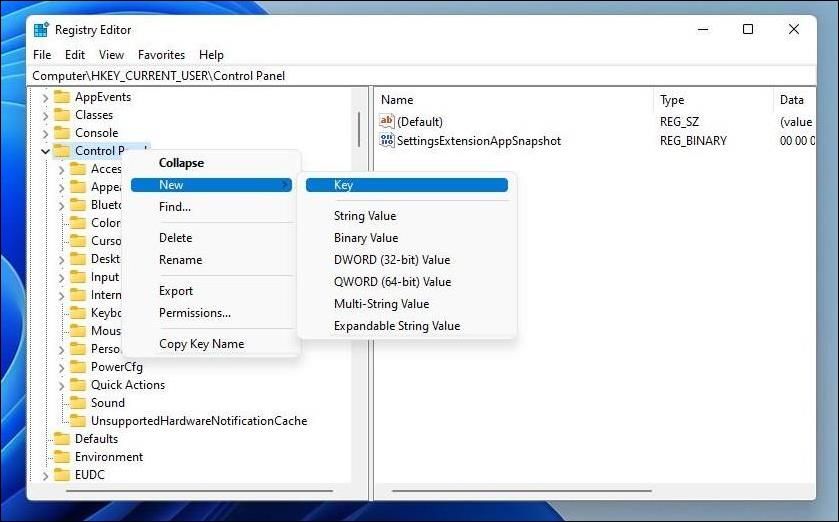
If you don’t have the UnsupportedHardwareNotificationCache key, you must create a new one and set its value. To do this:
- In Registry Editor, right-click the Control key (HKEY_CURRENT_USER\Control Panel) and select New > Key.
- Next, rename the key as UnsupportedHardwareNotificationCache.
- Next, right-click on the new key and select New > DWORD (64-bit) value.
- Rename the value as SV2.
- Next, modify the SV2 DWORD value and set its Value data to 2.
- Click OK to save the changes.
The watermark may reappear with new updates. So, you must repeat the steps after installing the update to keep your desktop clean.
2. Remove the System Requirement Not Met Message Using the Group Policy Editor
You can use the Group Policy Editor to turn off the System requirements not met message in Windows 11. To achieve this, we’ll need to modify the Hide messages when Windows system requirements are not met Group Policy and set it to enabled.
Only the Windows 11 Pro, Enterprise, and Education edition comes with the Local Group Policy Editor installed by default. If running the Home edition, follow these steps to enable the Group Policy Editor in Windows Home .
To turn off the System requirement not message using GPedit:
- Press Win + R to open the Run dialog.
- Type gpedit.msc and click OK to open Group Policy Editor. Click Yes if prompted by User Account Control.
- In Group Policy Editor, navigate to the following location:
Local Computer Policy > Computer Configuration > Administrative Templates > System - In the right pane, scroll down and locate the Hide messages when Windows system requirements are not met policy.
- Next, select and double-click on the policy to open its properties.
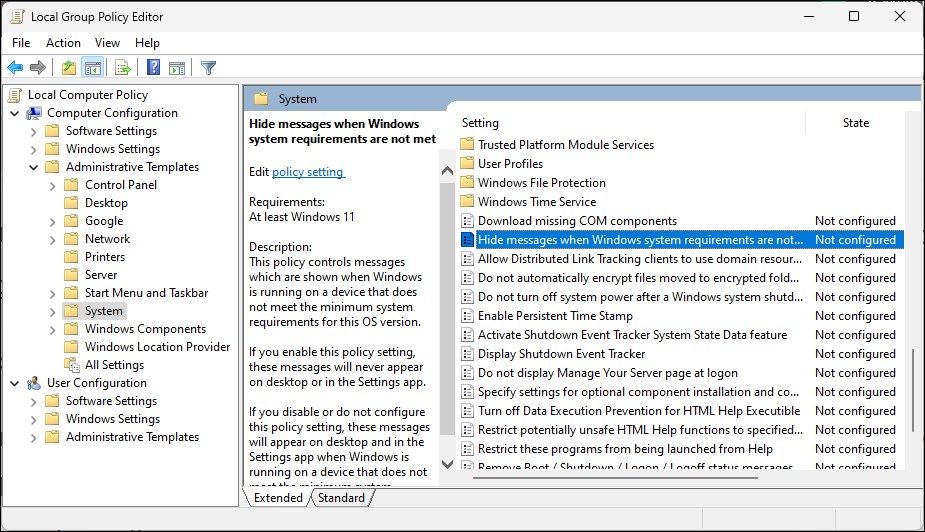
- Select Enabled to enable the policy setting.
- Click Apply and OK to save the changes.

Now, you need to restart your computer to apply the changes. After the restart, the “minimum system requirements are not met message” will not be displayed on the desktop.;
If you need to revert the changes, open the Hide messages when Windows system requirements are not met policy again and set it to Not Configured.
Removing the “System Requirement Not Met” Watermark in Windows 11
If you have bypassed the TPM secure boot requirement to install Windows 11, you will likely see the System requirement not met watermark on your PC. Fortunately, you can remove the watermark by modifying a Windows registry entry or configuring a group policy using GPedit.
If you are running Windows 11 on unsupported hardware, the newer operating system version will show a “System requirement not met” watermark in the bottom left corner of your screen.
This may not be a concern if you use the OS in a virtual machine. But a watermark can stick out like a sore thumb for most people. Fortunately, you can remove the system requirements not met watermark with a registry hack and the Group Policy Editor.
Why Does Windows 11 Show the “System Requirements Not Met” Watermark?
Microsoft Windows 11 has a much stricter hardware requirement than its predecessors. If your system does not meet the minimum system requirement, including TPM 2.0, the installation will stop abruptly.
However, with the problem came many workarounds that allowed you to bypass the restriction and install Windows 11 on unsupported hardware.
While Microsoft initially allowed installation on unsupported hardware with a warning about security issues and lack of future updates, it has now decided to put a permanent watermark to remind the users that their system is not supported. A similar message may also appear in the Settings app.
1. Remove the “System Requirement Not Met” Watermark Using the Registry Editor
If you see the “system requirements not met” watermark on your PC, you can remove it by modifying a DWORD value in Registry Editor.
As modifying the Windows Registry involves risk, create a restore point before making any changes using the Registry Editor.
Follow these steps to remove the “System requirement not met” watermark in Windows 11:
- Press Win + R to open the Run dialog.
- Type regedit and click OK to open the Registry Editor.
- In the Registry Editor, navigate to the following path. You can also copy and paste the path in the Registry Editor address bar for quick navigation.
HKEY_CURRENT_USER\Control Panel\UnsupportedHardwareNotificationCache - In the right pane, right-click on the SV2 DWORD value and select Modify.
- Enter 0 into the value data field.
- Click OK to save the changes.
- Close the Registry Editor and restart your PC to apply the changes. After restarting, Windows 11 will no longer show the unsupported hardware watermark.
If you don’t have the UnsupportedHardwareNotificationCache key, you must create a new one and set its value. To do this:
- In Registry Editor, right-click the Control key (HKEY_CURRENT_USER\Control Panel) and select New > Key.
- Next, rename the key as UnsupportedHardwareNotificationCache.
- Next, right-click on the new key and select New > DWORD (64-bit) value.
- Rename the value as SV2.
- Next, modify the SV2 DWORD value and set its Value data to 2.
- Click OK to save the changes.
The watermark may reappear with new updates. So, you must repeat the steps after installing the update to keep your desktop clean.
2. Remove the System Requirement Not Met Message Using the Group Policy Editor
You can use the Group Policy Editor to turn off the System requirements not met message in Windows 11. To achieve this, we’ll need to modify the Hide messages when Windows system requirements are not met Group Policy and set it to enabled.
Only the Windows 11 Pro, Enterprise, and Education edition comes with the Local Group Policy Editor installed by default. If running the Home edition, follow these steps to enable the Group Policy Editor in Windows Home .
To turn off the System requirement not message using GPedit:
- Press Win + R to open the Run dialog.
- Type gpedit.msc and click OK to open Group Policy Editor. Click Yes if prompted by User Account Control.
- In Group Policy Editor, navigate to the following location:
Local Computer Policy > Computer Configuration > Administrative Templates > System - In the right pane, scroll down and locate the Hide messages when Windows system requirements are not met policy.
- Next, select and double-click on the policy to open its properties.
- Select Enabled to enable the policy setting.
- Click Apply and OK to save the changes.
Now, you need to restart your computer to apply the changes. After the restart, the “minimum system requirements are not met message” will not be displayed on the desktop.;
If you need to revert the changes, open the Hide messages when Windows system requirements are not met policy again and set it to Not Configured.
Removing the “System Requirement Not Met” Watermark in Windows 11
If you have bypassed the TPM secure boot requirement to install Windows 11, you will likely see the System requirement not met watermark on your PC. Fortunately, you can remove the watermark by modifying a Windows registry entry or configuring a group policy using GPedit.
Also read:
- [New] Instagram Video Preservation Direct & Indirect Approaches for 2024
- [Updated] 2024 Approved Desktops in Focus - Free Capture Tutorials
- [Updated] In 2024, The Gamer's Guide to Boosting PC Speed Controls
- Accelerated Cross-Language Compreinasion via Windows Keyboard Tricks
- Elevate Desktop Experience: Fixing 'This PC' Spotlight
- Eliminating PUBG Save Problems on Windows Systems
- How to Boost Your uTorrent Download Speeds - Expert Tips
- How to Unlock Xiaomi Redmi K70 Pattern Lock if Forgotten? 6 Ways
- In 2024, How to Erase an Apple iPhone 7 Plus without Apple ID?
- In 2024, Simple and Effective Ways to Change Your Country on YouTube App Of your Google Pixel Fold | Dr.fone
- In 2024, The Complete Blueprint for Extracting FB Graphics to Your Device
- Mastering Files: 6 Methods to Retrieve Windows 11 Paths
- Overcoming Windows Pen-Pad Glitches
- Rectifying Screen Resolution Problems in Windows OS
- Seamless Changeover A Comprehensive List of Free Transformer Tools
- The Ultimate Print Guide to Making Your PowerPoint Shine on a Windows System
- Unlocking Battle.net Accessibility on 10/11 Systems
- Title: Neutralize Required Condition Red Flags in Win11
- Author: Joseph
- Created at : 2025-02-07 22:55:00
- Updated at : 2025-02-10 18:37:23
- Link: https://windows11.techidaily.com/neutralize-required-condition-red-flags-in-win11/
- License: This work is licensed under CC BY-NC-SA 4.0.