Insights Into ftdibus.sys: Windows' Memory Safeguard Breach

Insights Into ftdibus.sys: Windows’ Memory Safeguard Breach
You may have encountered unfamiliar files and programs on your Windows system, like “ftdibus.sys,” which usually operate quietly in the background but occasionally cause system issues.
Below, we’ll explore the identity and role of “ftdibus.sys” and provide guidance on addressing any problems it might trigger within your system.
Understanding the “ftdibus.sys” File
In Windows, “ftdibus.sys” is a system file of FTDI USB drivers, specifically for FTDI (Future Technology Devices International) USB devices. It helps ensure the proper functioning of FTDI USB devices on Windows operating systems by allowing the system to communicate with and control FTDI devices.
If you have a device that uses the “ftdibus.sys” driver, you may encounter the error “Memory integrity cannot be turned on due to ftdibus.sys” when you try to enable memory integrity in Windows settings. This means that the driver is not compatible with memory integrity and may prevent it from working properly.
If you are facing this specific problem, the fixes below should help you get back on track in no time.
1. Update the FTDI Drivers
Many users face difficulties when enabling Memory Integrity due to outdated FTDI drivers on their systems. This happens because these drivers, when outdated or corrupted, are not fully compatible with the latest Windows versions and their security features, including Memory Integrity.
To address these driver-related problems, the simplest solution is to update the drivers to their most recent versions. This can be accomplished either through the built-in Windows Update feature or via the Device Manager.
Here is how:
- Press the Win + S keys together to open the Search utility.
- Type “Device Manager” in the field and click Open.
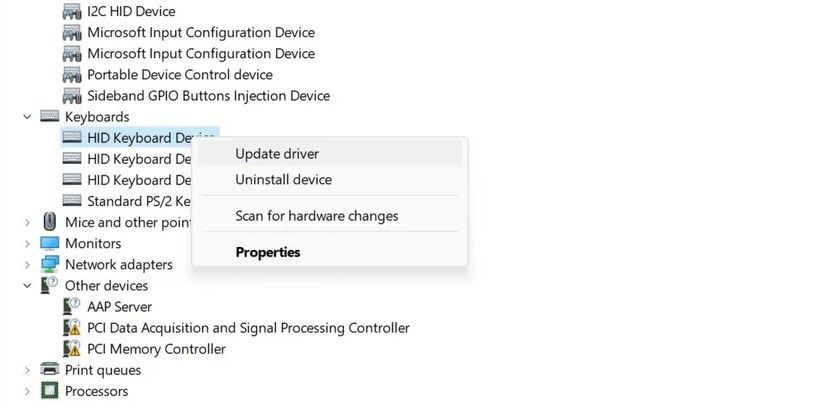
- In the following window, look for the targeted drivers and right-click on them. In some cases, you might see a yellow exclamation mark associated with the drivers, which indicates that the driver is corrupt or needs to be updated.
- Choose Update driver from the context menu.

- Now, select Search automatically for drivers and let the utility scan for any updated driver versions on the system. If it finds any, you can proceed with the on-screen instructions to install it.
- If the latest available version is already installed, you can click on the Search for updated drivers on Windows Update and see if that helps. You can also head over to the Settings app to install the latest driver updates.
Another way to get the latest available drivers on the system is by heading over to the manufacturer’s website (Future Technology Devices International, in this case) and searching for the latest driver versions there.
If you find a suitable version, click on it to download it on the system. Then, follow the steps 1-4 we have listed above again, and this time, choose Browse my computer for drivers. You can now head over to the download location of the new driver and install it manually by following the instructions on your screen.
2. Disable the Driver
If updating the driver does not help, you can try disabling it temporarily. It is, however, important to note that this can affect the functionality of associated hardware, rendering it unusable.
Moreover, this may not fully address the root cause of the problem, so we only recommend proceeding with this method if nothing else works and you need to access the memory integrity feature immediately.
Follow these steps to proceed:
- Launch the Device Manager as described above.
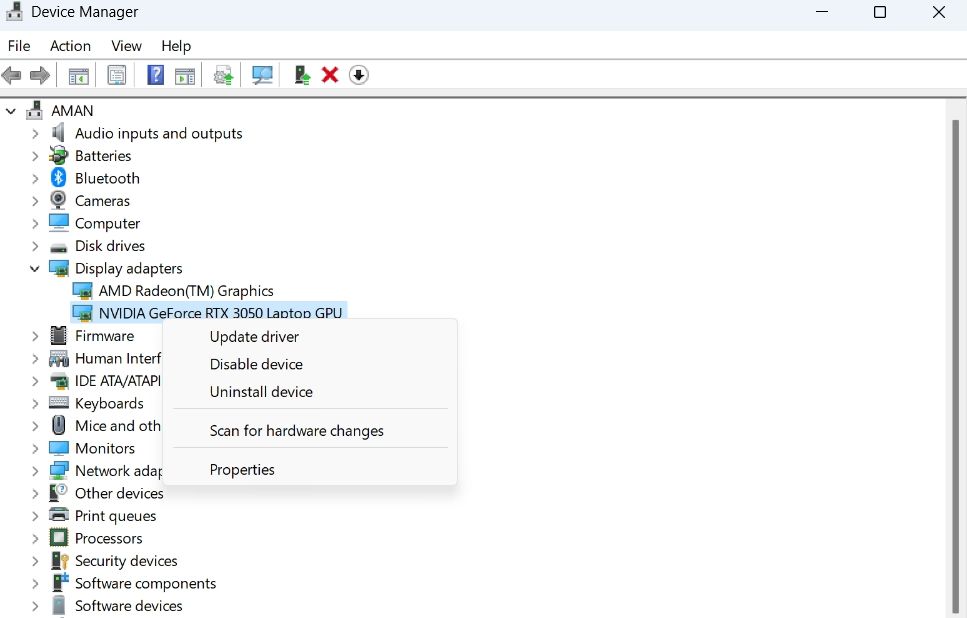
- Right-click on the targeted driver and choose Disable device from the context menu.

- Confirm your action in the next prompt. You might need administrative access to the system to proceed with this.
Once the driver is disabled, try enabling memory integrity again. You can enable the driver back by following the same steps once the issue is resolved.
In case you do not need the driver on your system at all, it is best to uninstall it. For that, right-click on the driver in the Device Manager and choose Uninstall device. Follow the on-screen prompts to complete the process and perform a system restart to complete the changes.
3. Restore Your System

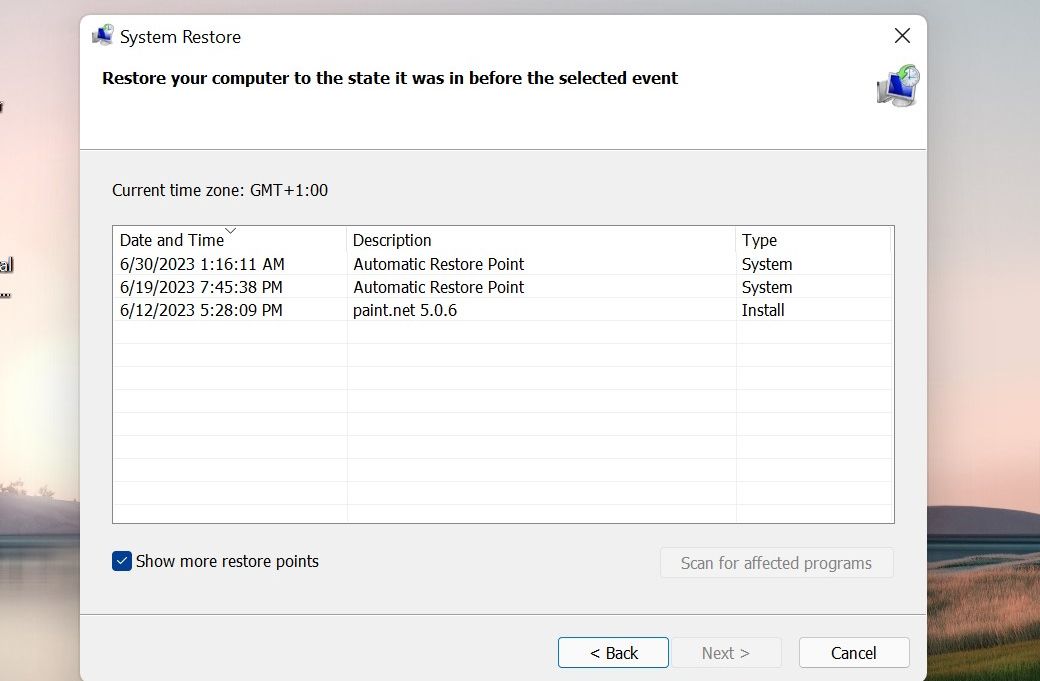
If you suspect that recent changes to your system might have caused this issue, you have the option to utilize the built-in system restore tool in Windows to undo those changes.
This tool periodically creates restore points on your system, allowing you to return your system to a prior state when such a restore point was generated. This can be an effective method for resolving problems associated with recent system alterations.
4. Force Enable Memory Integrity
While there are several straightforward methods to address any issues preventing you from enabling Memory Integrity in Windows, you do have the alternative of making specific adjustments within the Registry Editor to enable Memory Integrity in Windows.
If you decide to proceed with this method, we highly recommend creating a Registry backup , just to be safe. Once that is done, head over to our guide on the different ways to enable memory integrity in Windows and follow the step-by-step instructions carefully.
5. Contact FTDI Support
Finally, if none of the solutions help, we recommend reaching out to the official FTDI support and reporting the problem to them. Hopefully, they will be able to suggest you a fix.
You can also seek assistance from the Microsoft Support team by utilizing the “Get Help” app included with Windows or accessing Bing Chat for AI-guided support.
Windows’ Hidden Processes: Stay Informed for a Smooth Experience
Although the ‘ftdibus.sys’ process is not inherently malicious, it can occasionally disrupt your system. Fortunately, the solutions provided in this guide can resolve these issues. To safeguard against future problems, ensure your system and drivers remain up-to-date. We also recommend conducting regular system scans with a trusted security program for additional security.
Below, we’ll explore the identity and role of “ftdibus.sys” and provide guidance on addressing any problems it might trigger within your system.
Also read:
- [New] Audiovisual Symphony Adding Music to Your YouTube Masterpieces for 2024
- [New] In 2024, BenQ BL2711U Reviewed - The Apex of 27” High-Definition Monitoring Technology
- [New] No. 1 Ranked YouTube To Text Online Service
- [Updated] 2024 Approved Scouting the Best Cameras for Aspiring Muso Videographers
- 2024 Approved Chrome/Safari Blank Screens? Here Are 9 Tips to Restore Your Video
- A Detailed Guide YouTube's Most Engaging Storytellers in '23
- Advanced Tips for Efficient Toolbar Usage in Microsoft Win11 PCM
- Disabling Windows 11 Camera App Error 0xA00F425D Fixes
- Discover ViVeTool: Your Ticket to Access Latest Windows Innovations
- Easy Integration: Portable Software Menus for W11+
- Hacks to do pokemon go trainer battles For Honor Magic 5 Lite | Dr.fone
- Meeting Prep 101: Test Your Windows Webcam, Microphone
- Reviving Instagram: The Rationale Behind Its Comeback
- Step-by-Step to Become a Win 11 Insider
- Steps for Resolving Installation Issues with Microsoft Store Apps
- Tech Trends Spotlight 5 Cutting-Edge Camcorders for Slow Motion for 2024
- The Ultimate Guide to Pinpointing Device Serial Numbers on Windows
- Top 6 Windows 11: Prime FPS Monitors & Trackers
- Win11's Aural Ascension - Convex Audio Driver Update Required
- Title: Insights Into ftdibus.sys: Windows' Memory Safeguard Breach
- Author: Joseph
- Created at : 2024-10-05 23:07:42
- Updated at : 2024-10-13 02:29:37
- Link: https://windows11.techidaily.com/insights-into-ftdibussys-windows-memory-safeguard-breach/
- License: This work is licensed under CC BY-NC-SA 4.0.

