Initiate System Check with These 5 Methods

Initiate System Check with These 5 Methods
Startup Repair is a free tool from Microsoft that scans for and then fixes many common Windows problems, including the ones encountered during a startup. But launching and using the tool can get tricky depending on the error you are facing.
We have looked over a host of different ways to access the tool. So, let’s look at all of them one by one.
1. Open Startup Repair Using the Settings App
This is the easiest way to go about launching the Startup Repair tool on Windows. So we will lay out this method first.
How to Use the Windows 11 Settings App
Here’s how you can do it on Windows 11:
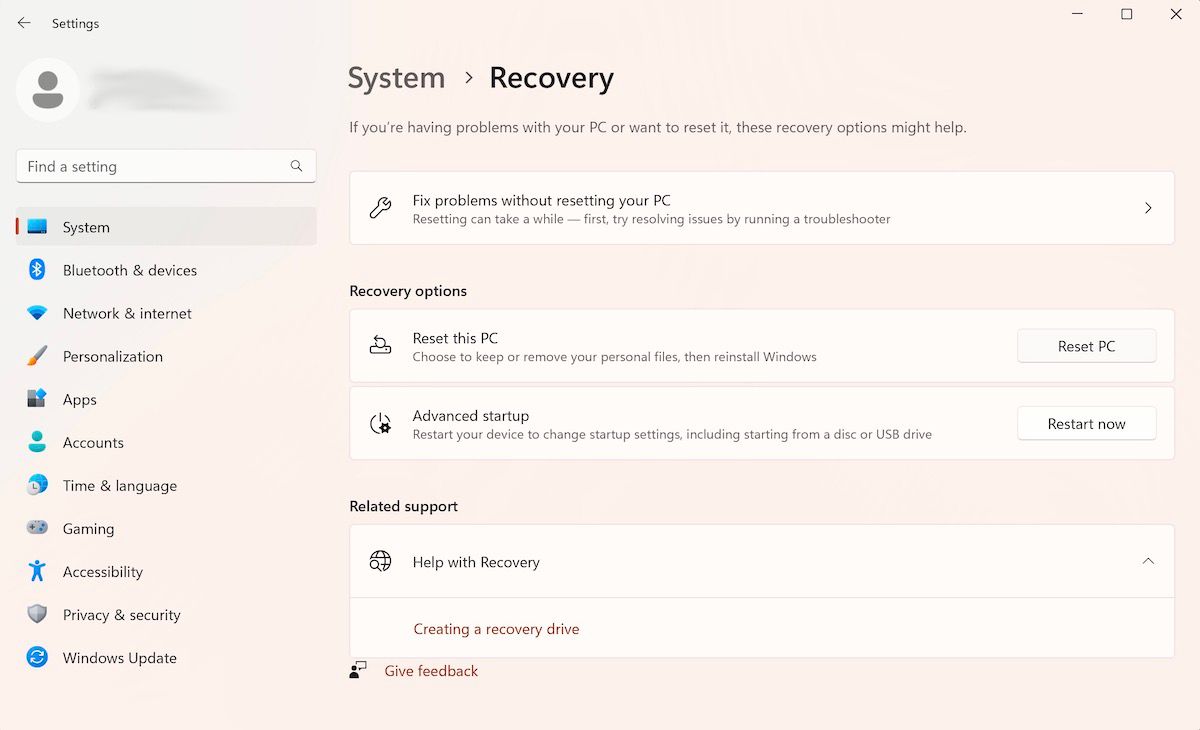
- Head to the Start menu search bar, type in ‘settings’, and select the best match. Alternatively, press the Windows key + I shortcut.
- Now, select the System > Recovery button.
- From under the Advanced Startup section, click on Restart now.

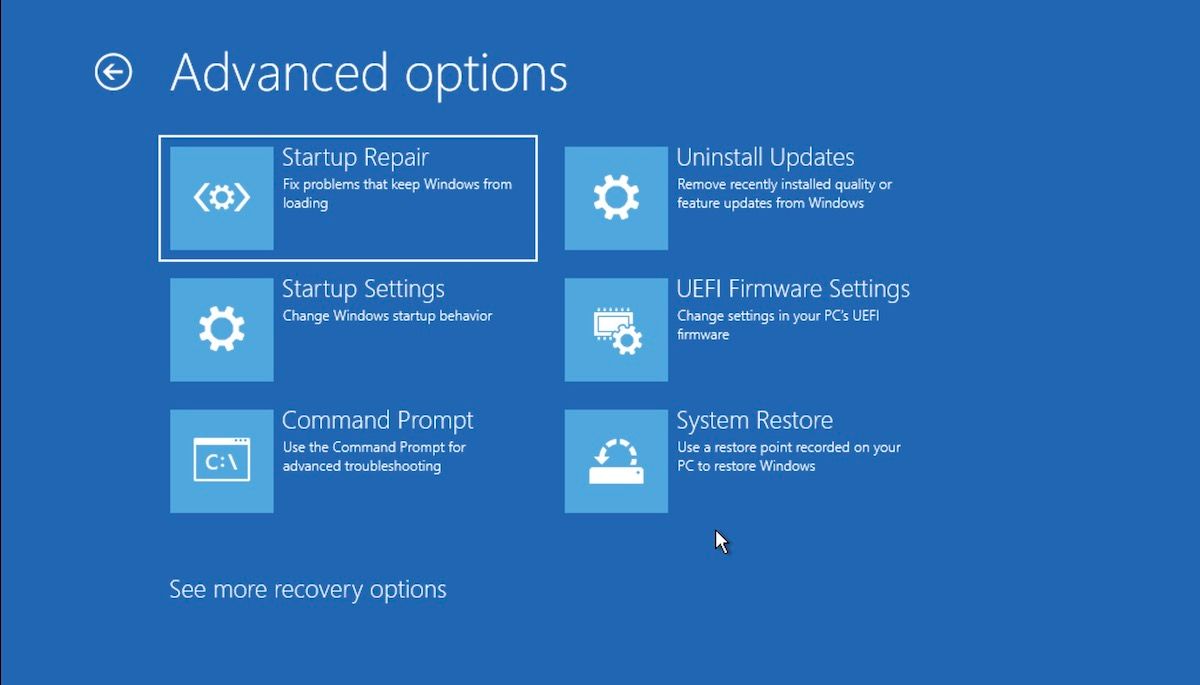
On the next boot-up of Windows, your PC will be launched in the Windows Recovery Environment. From there, click on Troubleshoot > Advanced Options > Startup Repair.
And that’s it. As soon as you click on the above option, the Startup Repair tool will be launched right then and there.
How to Use the Windows 10 Settings App
While the basic structure of opening Startup Repair on Windows 10 remains the same, the particular instructions on the screen will be slightly different. So, here’s how you can launch Startup Repair on Windows 10:
- Press the Windows key + I shortcut to open the Settings menu.
- Select Update & Security > Recovery.
- Under the Advanced startup menu, click on Restart now.
Your Windows will boot into Windows Recovery Environment (Win RE) as soon as you do this. From there, the steps are similar to the ones you followed for Windows 11.
2. Run the Startup Repair Tool Through the Desktop
The method we’ve laid out above will practically work for all users. And in the cases where it doesn’t—usually when you can’t access or open the Settings app —use this method. Here’s how:
- Click the Start menu icon and select the Power button.
- Hold down the Shift key and then click on Restart.
That’s it; your PC will be restarted from here, and you will be then taken to the Win RE menu. From there, follow the above steps from method one and click on Advanced Options > Startup Repair.

The Startup Repair tool will be launched from here.
3. Run the Startup Repair From BIOS
If you have an installation media, using or opening the Startup Repair tool won’t be too much of a struggle. Just plug in the USB stick containing the installation media and start your PC from the ground up.
Before you get started, you should create a Windows USB installation stick if you don’t already have it. After you have the USB stick ready, follow the below steps:
- Enter your BIOS/UEFI settings and set your USB stick as the first booting option.
- Then, plug in the installation USB stick and boot your PC with it.
- In the Windows Setup, select the Windows edition, language, etc.
- Finally, click on the USB stick to get started with Startup Repair.
The Startup Repair tool will be launched from here, and it will look up and fix any issues it finds on your Windows computer.
4. Use the Command Prompt
The Command Prompt is a free Windows utility that lets you manage your Windows settings and things in a way that makes using Windows a breeze.
Here’s how you can use the Command Prompt to launch the Startup Repair on your PC:
- Head to the Start menu search bar, type in ‘cmd’, and run the Command Prompt as an administrator.
- In the cmd, type in the following command and hit Enter:
shutdown /r /o

As soon as you hit Enter, your PC will be restarted in the Advanced Startup Options menu; you can then select the Startup Repair option from there.
5. Use the F11 Shortcut Key During Boot
Sometimes, simply hitting the F11 key repeatedly during the boot-up can take you to the Advanced Options menu on many computers. So, make sure you give this a go as well. From there, you can easily access the Windows Startup Options tool.
Opening the Startup Repair Tool on a Windows PC
Like almost everything on Windows, there are many ways to open the Startup Repair tool on Windows. So even if one way of opening the tool doesn’t work, you have the others to try out.
We have looked over a host of different ways to access the tool. So, let’s look at all of them one by one.
Also read:
- [New] In 2024, Leading E-Conference Headline Generator
- [New] The Essence of Timelessness Instagram's Slow-Motion Guide
- A to Z of Mindfulness for Christians | Free Book
- Advanced Audio Segmentation Made Simple A Premiere Guide
- Can I use iTools gpx file to catch the rare Pokemon On Vivo V30 Pro | Dr.fone
- Effective Strategies for Setting Up and Using Mirror Mode in AOMEI Backup
- Exploring Drive Labeling: C: Vs D: Specifics
- How to Enable and Utilize the Script Execution Policy in Windows PowerShell
- How to Use Google Assistant on Your Lock Screen Of Oppo Find X7 Phone
- In 2024, FRP Hijacker by Hagard Download and Bypass your Tecno Phantom V Flip FRP Locks
- Jumpstart Joy: Eliminate Windows 11'S Sluggishness
- Navigating Through Memory Diagnostic Failures
- Reversing the No-Script Decree in Windows: 4 Pathways to Execution Enablement
- Title: Initiate System Check with These 5 Methods
- Author: Joseph
- Created at : 2025-02-24 16:04:20
- Updated at : 2025-03-02 09:41:30
- Link: https://windows11.techidaily.com/initiate-system-check-with-these-5-methods/
- License: This work is licensed under CC BY-NC-SA 4.0.