How to Show or Hide the “Dim Display After” Option in the Power Options Menu on Windows

How to Show or Hide the “Dim Display After” Option in the Power Options Menu on Windows
There are times when you need to step away from your PC, and if you’re gone long enough, the screen will automatically dim. Windows does this to preserve your battery, and you can adjust when your display should darken in the Power Options menu by editing the Dim display after option.
If for some reason you can’t see the Dim display after option in the Power Options menu, or it’s there and you want to remove it, you can use PowerShell or the Registry Editor to show or hide it. Here’s how.
Disclaimer: This post includes affiliate links
If you click on a link and make a purchase, I may receive a commission at no extra cost to you.
How to Show or Hide the “Dim Display After” Option Using PowerShell
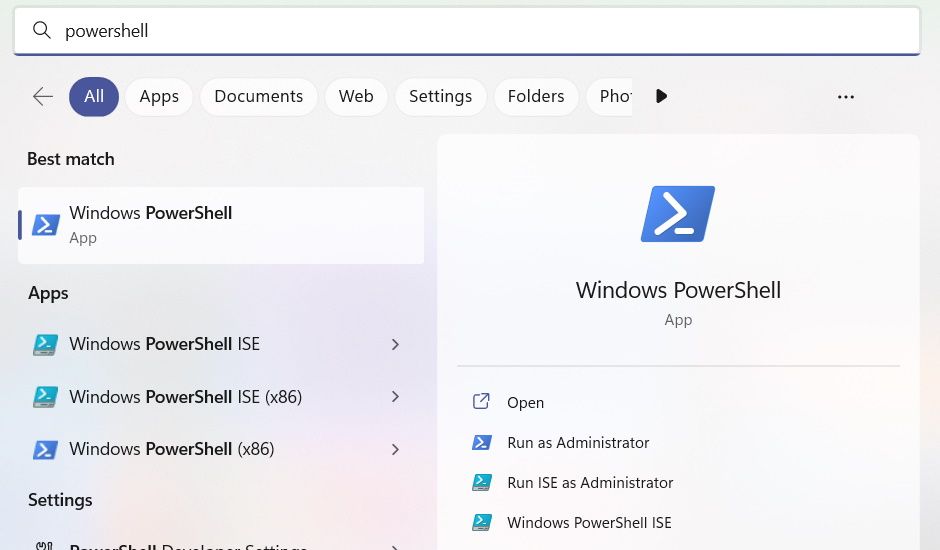
First, launch Windows PowerShell. There are many ways to open PowerShell on Windows , but the easiest method is to press Win + S to open Windows Search. Then, enter powershell in the search box and click on Windows PowerShell when it appears in the search results.

In PowerShell, enter the following command to show the Dim Display after option in the Power Options menu:
powercfg -attributes SUB_VIDEO 17aaa29b-8b43-4b94-aafe-35f64daaf1ee -ATTRIB_HIDE
To hide it, enter the following command:
powercfg -attributes SUB_VIDEO 17aaa29b-8b43-4b94-aafe-35f64daaf1ee +ATTRIB_HIDE
After entering the command you want, hit the Enter key on your keyboard for PowerShell to execute it. Afterward, the Dim display after option should appear or disappear accordingly in the Power Options menu.
How to Show or Hide the “Dim display after” Option Using the Registry Editor
Considering how vital the Windows Registry is for the smooth operation of Windows, you might want to back up the registry before you edit it. Afterward, open the Registry Editor by pressing Win + R, typing regedit in the text box, and clicking OK.

Click Yes to bypass the UAC prompt.
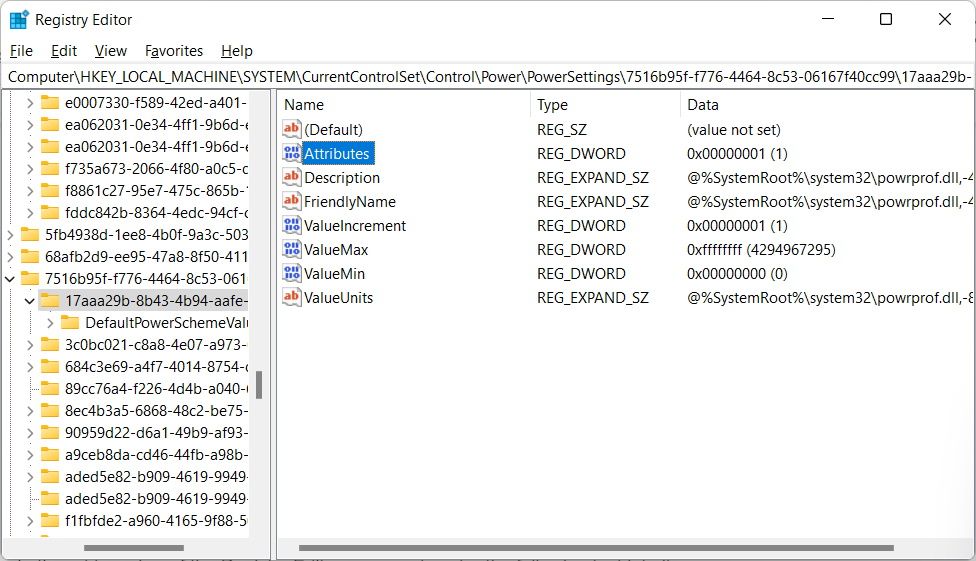
In the address bar of the Registry Editor, copy and paste the following text into it:
HKEY_LOCAL_MACHINE\SYSTEM\CurrentControlSet\Control\Power\PowerSettings\7516b95f-f776-4464-8c53-06167f40cc99\17aaa29b-8b43-4b94-aafe-35f64daaf1ee
On the right panel, double-click the Attributes entry to open it up for editing.

Then, in the Value data text box, enter 1 to hide Dim display after in the Power Options menu or 2 to show it.

Now you can open the Power Options menu (see how to open the power options on Windows 10 ) and check under Display to see if the Dim display after option is there or not.
Controlling the “Dim Display After” Option in the Power Options Menu
Now that you know how to show or hide Dim display after, you know what to do when you can’t find it in the Power Options menu or need to remove it. We recommend keeping it hidden and then bringing it up whenever you need it. This will make sure that no one messes with this important display setting when you’ve set it up perfectly.
Also read:
- [New] Unlocking Spotify’s Advertising Opportunities A Roadmap
- [Updated] Harnessing the Power of Quality Photography Without a Price Tag for 2024
- 2024 Approved Ranking Reign Supreme with These 11 Video SEO Techniques on YouTube
- DVD をファイナライズする手順 in Windows 10 - TV, 他プレーヤーでの再生可能
- Fixing the 'Lost Renderer' Phenomenon in OW2
- Harnessing 2024 Innovative Approaches to Facebook Advertising
- How to Convert CR2 Images to JPGs on Windows
- Life360 Learn How Everything Works On Honor X8b | Dr.fone
- Mastering Windows 11: Unveiling Rarely Used Functions
- Overcoming Admin-Restricted Setup Issues in Windows
- Overcoming Chrome Profile Issues for Windows Users
- Overcoming Write Restrictions in Steam Libraries on Windows 11
- Restoring Razer Device Functionality in Windows 11
- The Ultimate Guide to Supercharging Your Window's Start Menu
- Troubleshooting Tips for Persistent Kinects and Freezes in Genshin Impact on PC
- Ultimate Guide to Resolving NBA 2K24 Error Code 727E66aC
- Winning the Battle Against Unsuccessful Windows Patches: Solutions Proven Effective
- Title: How to Show or Hide the “Dim Display After” Option in the Power Options Menu on Windows
- Author: Joseph
- Created at : 2025-03-01 09:37:04
- Updated at : 2025-03-01 17:13:32
- Link: https://windows11.techidaily.com/how-to-show-or-hide-the-dim-display-after-option-in-the-power-options-menu-on-windows/
- License: This work is licensed under CC BY-NC-SA 4.0.