
How to Reset Freezes & Crashes in Virtual Worlds
How to Reset Freezes & Crashes in Virtual Worlds
VMware Workstation Player is among the best virtualization software available today. You can create virtual machines and install operating systems on them. Virtual machines save you the trouble of wiping your hard disk to try out an operating system. However, it is not the only use case of third-party hypervisors like VMware.
And although virtual machines typically run smoothly, you might occasionally experience a BSOD error while launching or using a virtual machine in a VMware workstation player. So, we’ll list the potential reasons for BSODs in VMware along with multiple methods to resolve the issue.
Reasons for VMware BSOD Error on Windows 11
Here are a few possible reasons for the VMware BSOD error on Windows:
- Native virtualization services like WHP are running alongside VMware.
- You are using an outdated version of Windows.
- VMware is conflicting with another application or background service.
- The virtual machine is eating up more resources than the system can spare.
How to Fix VMware BSOD Error on Windows 11
Now, you know the possible reasons for the BSOD error while using VMware. Try out the following methods to fix the issue.
### 1\. Restart VMwareBefore moving on to more complex fixes, restart the VMware program on your Windows 11 computer. Close the program and terminate all its processes from the Task Manager. Now, relaunch VMware and power on a virtual machine. Keep the machine running for some time, and keep an eye out for BSOD errors.
2. Update VMware
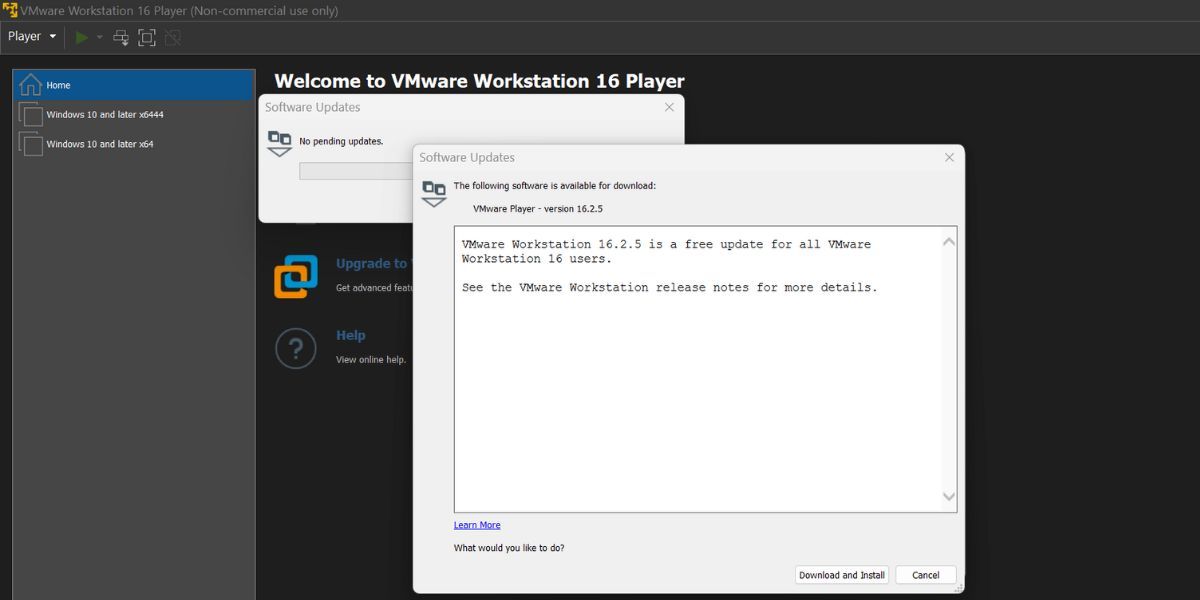
An outdated version of VMware can act finicky with the new system updates. So, you must update it to apply fixes released by developers for newfound bugs. Here’s how to do it:
- Launch VMware on your system.
- Navigate to the top left section and click on the Player button.
- Then, go toHelp > Software Updates .
- Click on theCheck for Updates button. Wait for the utility to search for the latest available update, if any.
- If an update is available, click on theDownload and install button. Wait for the update to install.

- UAC will pop up. Click on theYes button to begin the update installation.
- Close the VMware program. Follow the on-screen prompts to install the update on your system.
- Click on theFinish button after the installation completes successfully.
- Restart your system. Launch VMware and start a virtual machine. Check if the program produces a BSOD error.

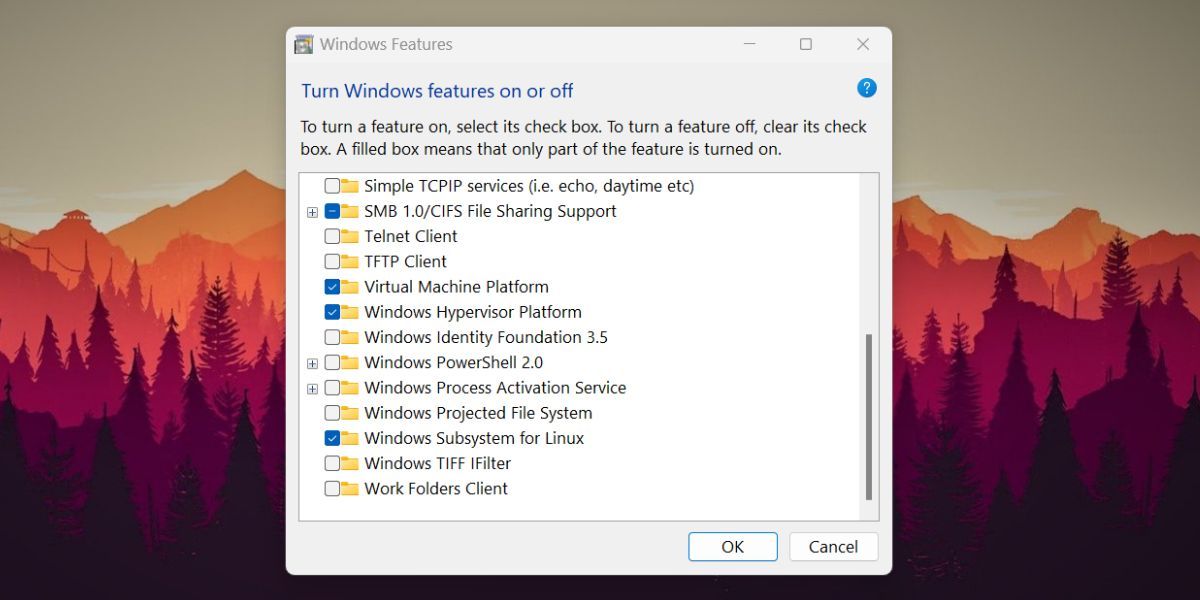
3. Disable Hyper-V and Other Windows Features
Third-party hypervisors fail to launch or work properly when Hyper-V or other virtualization features such as Windows Hypervisor Platform, Virtual Machine Platform, and more. You must turn off all these features before using VMware on your Windows 11 system.
Repeat the following steps to disable Windows features:
- PressWin + R to launch the Run command box. Typeappwiz.cpl and press the enter key.
- Programs and Features utility will launch. Click on theTurn Windows features on or off option.
- Scroll down and uncheck theHyper-V feature in the list. Similarly, uncheck theWindows Hypervisor Platform ,Virtual Machine Platform , andWindows Subsystem for Linux .
- Windows will uninstall all these features from your system and auto-restart it to apply changes. It will take a while to remove all these features.
- Sign in and launch VMware again. Now, power on a virtual machine and check if a BSOD error pops up.
 Software Update Pro - Check and update software installed on your computer.
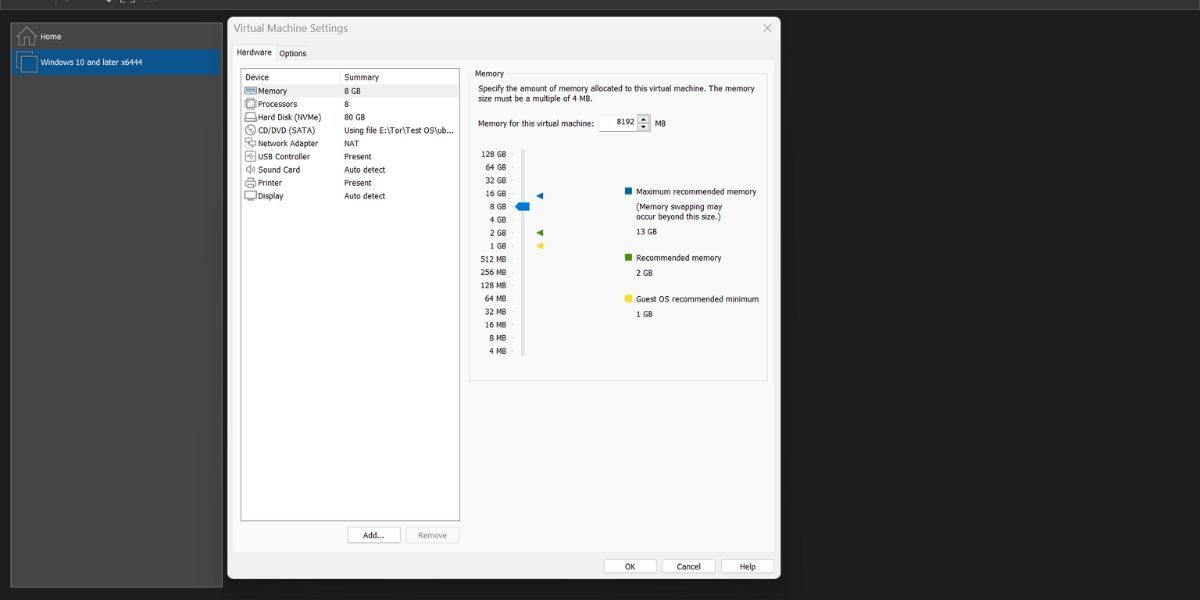
4. Reconfigure Virtual Machine Resources
If your virtual machine crashes and throws a BSOD error, it is likely consuming more resources than your system can spare. Ideally, you should not devote more than 50 percent of any hardware (CPU, RAM, or disk space) to a virtual machine. Always leave enough for the host system to run smoothly and then devote the rest to the virtual machine.
Here’s how to reconfigure virtual machine resources in VMware.
- Launch VMware on your system. Click on any virtual machine in the list and select theedit virtual machine settings option.
- Under the hardware tab, click on theMemory option. Adjust the slider to the recommended memory size.
- Move to the Processors option and expand thenumber of processor cores dropdown list. Selectfour and click on theOK button.
SwifDoo PDF Perpetual (1 PC) Free upgrade. No monthly fees ever.
- These hardware settings are different for every operating system. Make sure to allocate only the bare minimum resources specified by the operating system developers.
- Now, power on the virtual machine and use it for some time. If you still encounter a BSOD error, move to the next method.
 SwifDoo PDF Perpetual (1 PC) Free upgrade. No monthly fees ever.
 5. Update Windows
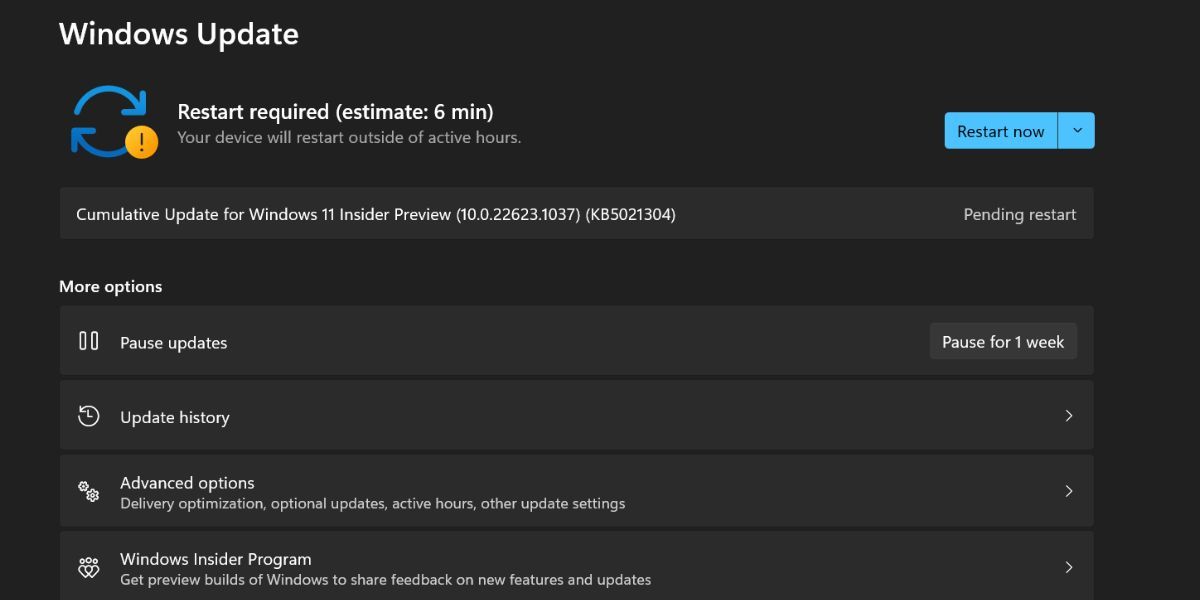
An outdated version of Windows can contain bugs and may not sit well with new apps and software. So, update your Windows system using the settings app. Repeat the following steps to update Windows:
- PressWin + I to launch the Settings app .
- Navigate to the top right section and click on the Windows Update icon.
- Click on theCheck for updates button. Wait for the utility to search for new updates for your device.
- Download and install the update.Restart your system to apply the update.
- Launch VMware on your system and start a virtual machine.
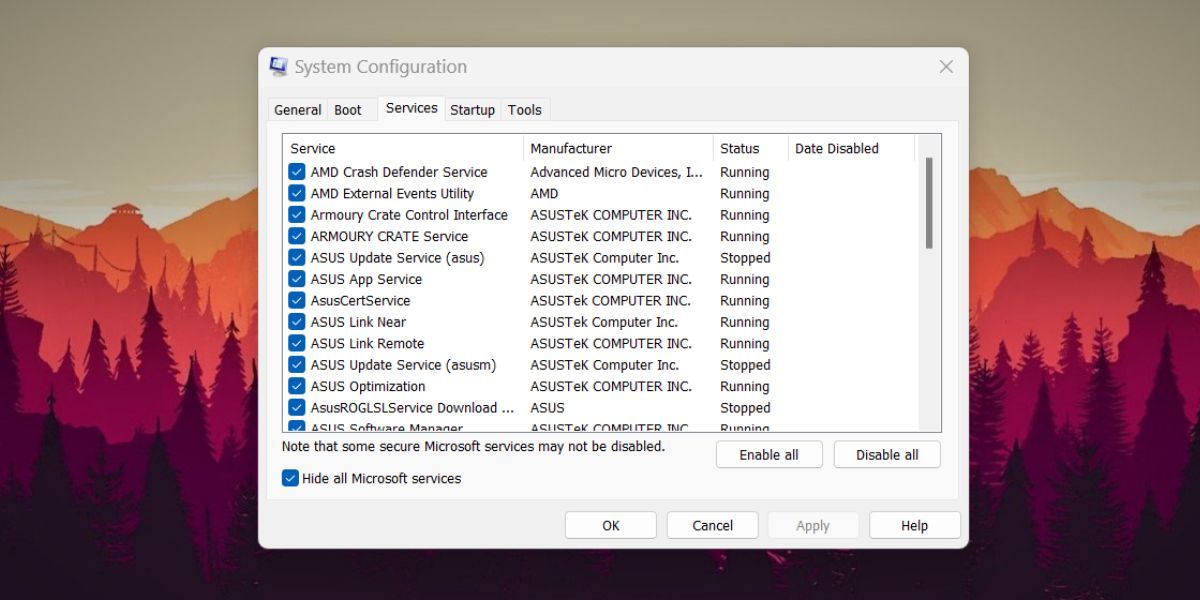
6. Perform a Clean Boot
A background program could be interfering with the nominal working of VMware. You must perform and clean boot to isolate and identify the root cause of trouble. Clean boot will start Windows with basic drivers and programs.
To clean boot your Windows PC, repeat the following steps:
- PressWin + R to launch the Run command box .
- Typemsconfig and press the enter key. The system configuration utility will launch.
- Switch to theServices tab and click on theHide all Microsoft services option.
- Click on theDisable all button and then switch to the startup tab. Click on the Open Task Manager option.
- Task Manager will launch. Right-click on a startup program and select theDisable option. Repeat this action for all programs.
Epubor Ultimate for Win:Helps you read books anywhere, including the best eBook Converter + eBook DRM Removal functions. - Close Task Manager and click on theOK button.
- Restart your system and launch VMware. If it runs fine, open System Configuration, enable some services, and try again.
- Identify and uninstall the troublemaker program or keep its services disabled on startup.
7. Use a Different ISO File
A corrupt ISO file can also cause a BSOD error while installing the operating system on a virtual machine. If you are using an old ISO file that is possibly corrupt, download its most recent version and add it to the virtual machine.
Start the virtual machine and boot from that ISO file using the boot menu options. Begin the installation process and check if the process completes without an issue.
 Easy and Safe Partition Software & Hard Disk Manager
8. Use a Different Hypervisor
The last resort is to use a different hypervisor program for the time being. Try a level-1 hypervisor like Hyper-V or use level-2 hypervisors like VirtualBox or QEMU. Report the issue to the VMware developers and wait for them to release a bug fix for the BSOD issue.
VirtualBox had a similar issue when it wasn’t compatible with Windows 11. It took Oracle some time to release a compatible version, forcing users to find a temporary alternative while waiting for the fix.
VMware BSOD Error Won’t Bother You Anymore
VMware can easily run all the popular operating systems inside a virtual machine. But the BSOD error renders the program unusable. Try out the basic troubleshooting methods and update VMware and Windows. After that, disable Windows Hyper-V and other virtualization features and reconfigure the virtual machine resources.
- Title: How to Reset Freezes & Crashes in Virtual Worlds
- Author: Joseph
- Created at : 2024-08-15 16:05:13
- Updated at : 2024-08-16 16:05:13
- Link: https://windows11.techidaily.com/how-to-reset-freezes-and-crashes-in-virtual-worlds/
- License: This work is licensed under CC BY-NC-SA 4.0.