Guide to Cease Built-In Desktop Keyboard in Windows OS

Guide to Cease Built-In Desktop Keyboard in Windows OS
Sometimes you don’t want your laptop’s keyboard to take inputs. This is usually because you’re plugging in an external keyboard, either because the built-in one is broken or you just want a larger typing space with a full-sized keyboard.
However, since the keyboard is an integral part of your portable computer, disabling its primary input method is a little tricky. Here, we show you how to temporarily and permanently disable the laptop keyboard on Windows 10 and 11.
How to Find Your Laptop Keyboard in Device Manager
Whether you want to disable your laptop keyboard temporarily or permanently, you will need to uninstall the input device from Device Manager.
For this, you’ll need to identify the integrated keyboard in Device Manager. Since Device Manager will list all the recognized keyboards, including external keyboards, here’s how you can identify your laptop keyboard from the list.
To identify the built-in keyboard in Device Manager:
- Press Win + R to open Run.
- Type devmgmt.msc and click OK to open Device Manager.
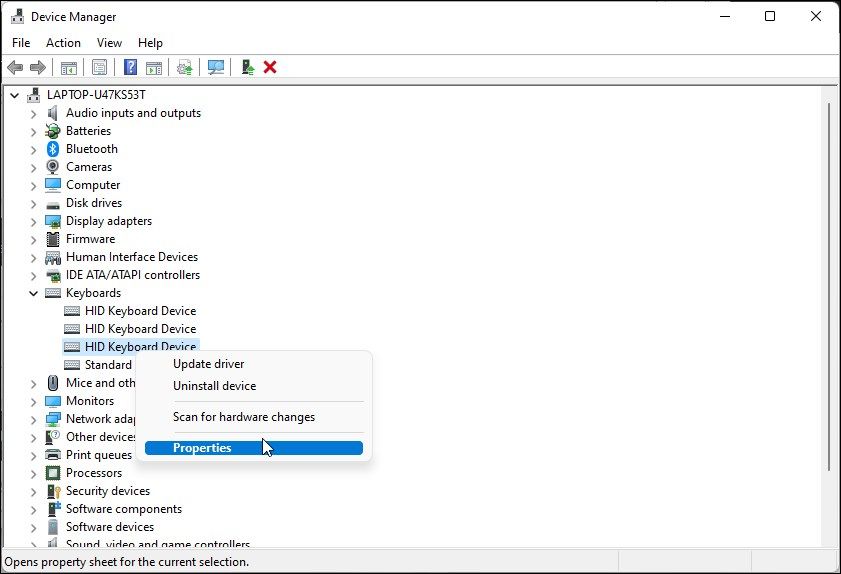
- In Device Manager, expand the Keyboards section.

- Right-click on the first keyboard entry (HID/Standard) and select Properties.
- In the General tab, check the Location section. If it says Location 1 or Plugged into keyboard port, it is likely your laptop’s internal keyboard.
- Bluetooth and USB keyboards will show On Bluetooth Low Energy and On US Input Device, respectively as its location.
If you don’t find your keyboard listed, make sure you have set Device Manager to show hidden devices.
How to Disable the Laptop Keyboard Temporarily
To disable your laptop’s keyboard temporarily:
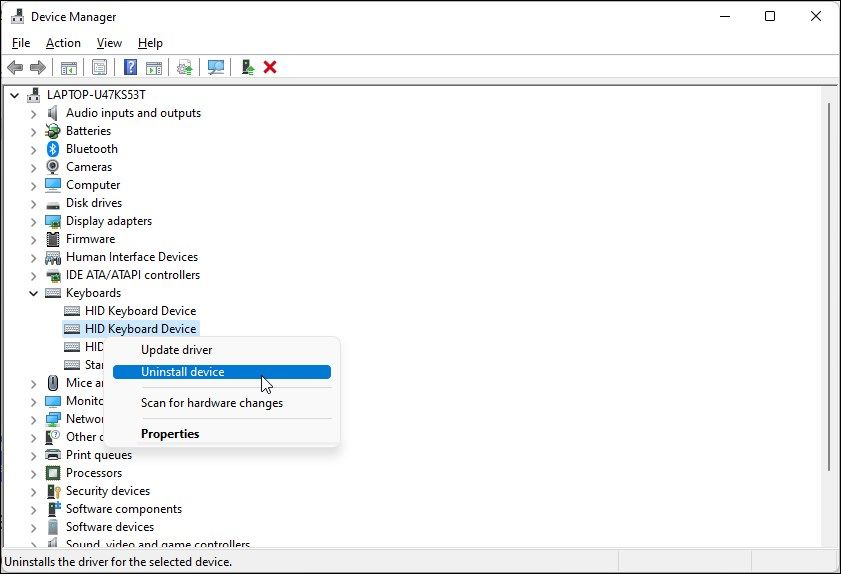
- Right-click on all the HID and PS/2 Keyboard entries with the Properties Location set to Location 1 or Plugged into keyboard.

- Next, select Uninstall Device from the context menu.
- Click Yes to confirm the action.
- That’s it. You have disabled your laptop’s internal keyboard successfully.
That said, this is a temporary solution. As soon as you restart your system, Windows will look for the connected but unrecognized devices and install the necessary drivers to make them functional.
How to Disable Your Laptop Keyboard Permanently
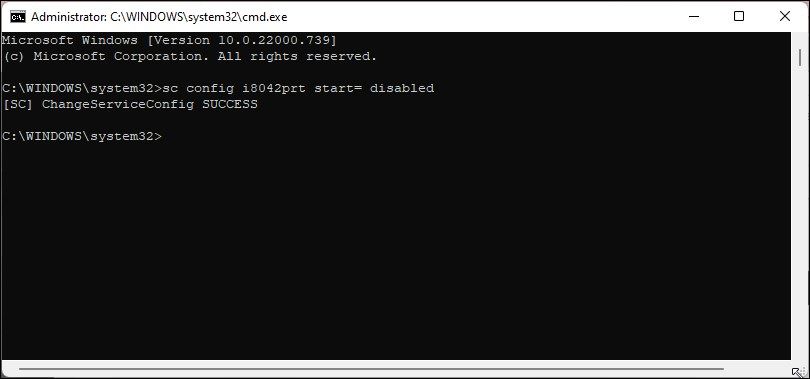
If you want to disable your laptop keyboard permanently, you can disable your laptop’s built-in keyboard driver PS/2 i8042prt service using the Command Prompt. We’ll use the sc command-line utility to configure the service and set its start parameter to disabled.
To disable the laptop keyboard permanently:
- Press the Win key and type cmd in the Windows search bar.
- Right-click on Command Prompt and select Run as Administrator. Click Yes when the UAC prompt appears.
- In the Command Prompt window, type the following command and press Enter:
sc config i8042prt start= disabled - When the success message appears, close the Command Prompt, and restart your PC. After the restart, your laptop keyboard will stop registering any inputs.
Note that, for this to work, you will need to uninstall your keyboard from Device Manager as shown above and restart your PC.
If you change your mind and want to re-enable the keyboard, you can use the following command in an elevated Command Prompt .
sc config i8042prt start= auto
Once you see the success message, restart your PC to apply the changes.
Disable the Built-in Keyboard Using an Incompatible Driver
Another quirky solution to disable a built-in keyboard is to install an incompatible driver for the input device. Here’s how to do it.
- Open Device Manager and expand the Keyboard section.
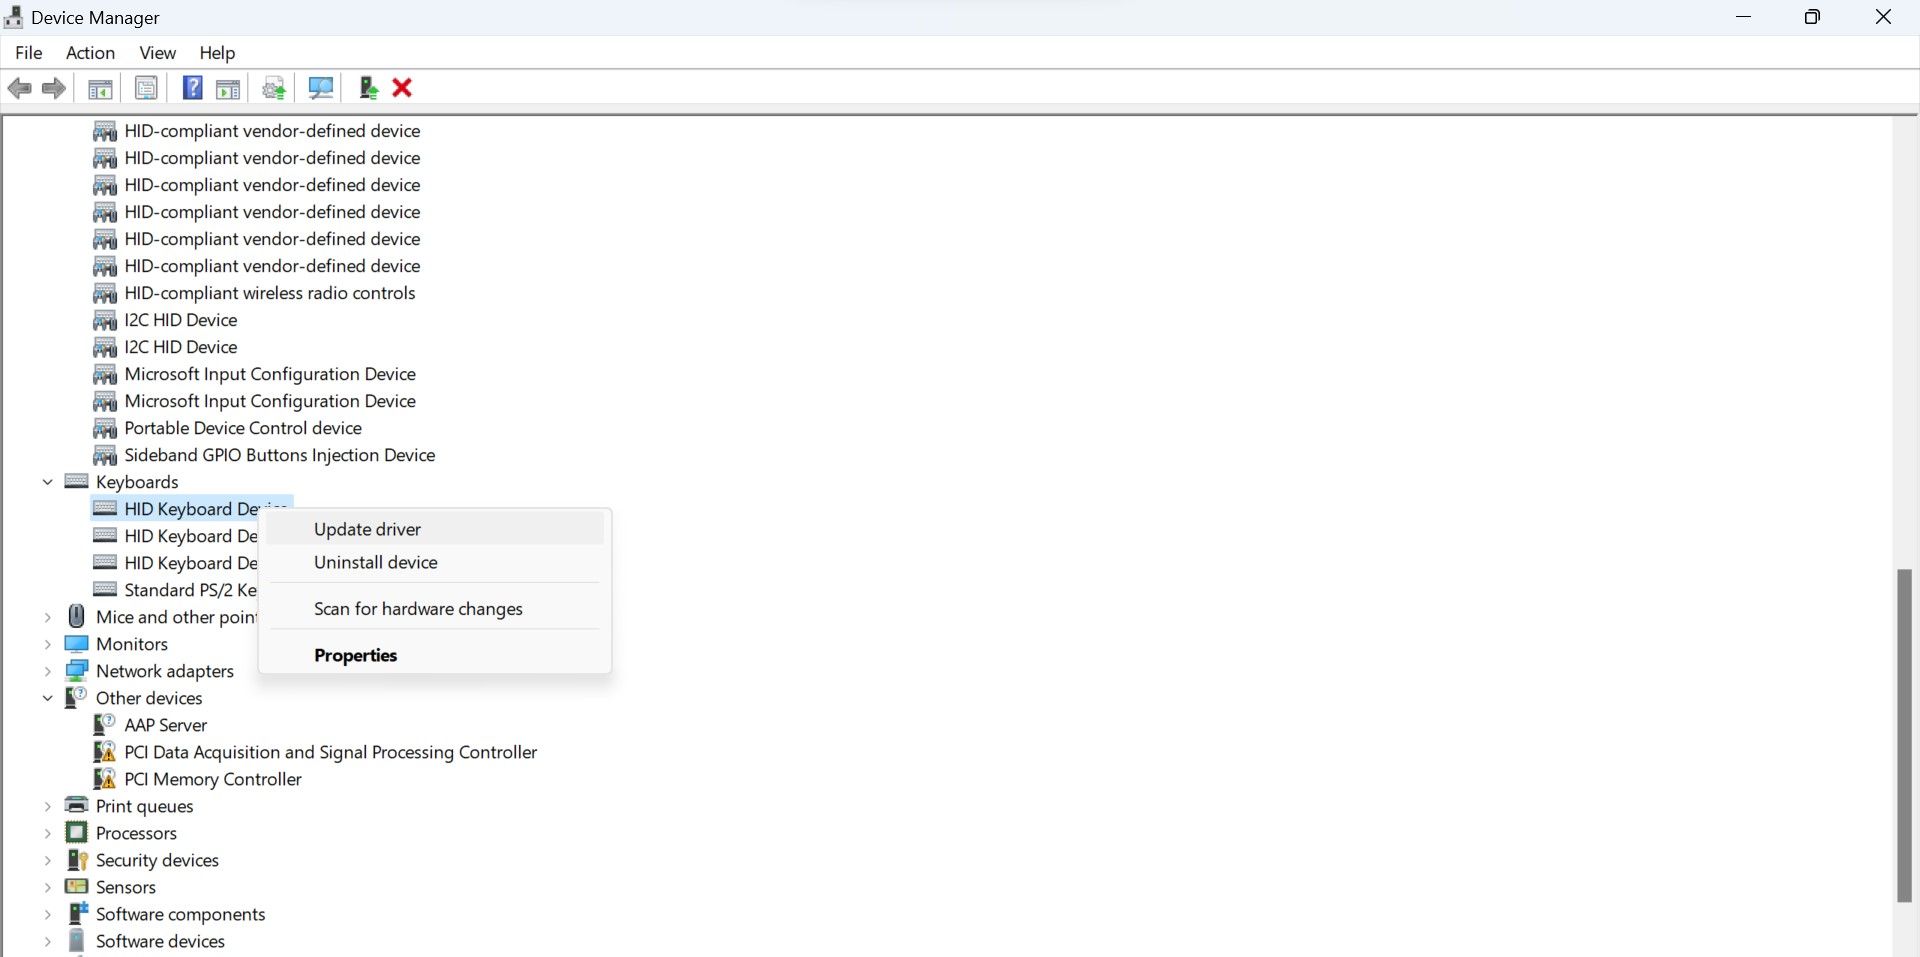
- Right-click on your laptop keyboard device and select Update driver.

- Select Browse my computer for drivers.

- Next, select Let me pick from a list of available drivers on my computer.
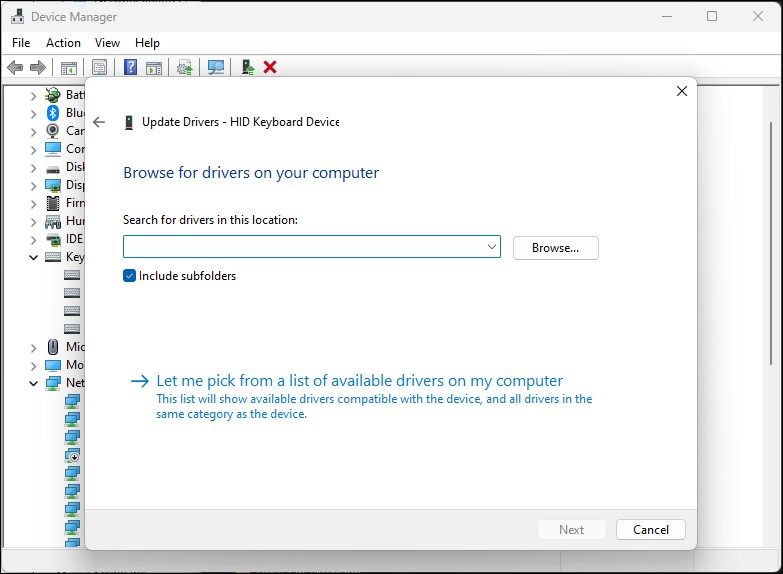
5. Uncheck the Show compatible hardware option.
6. Select a random manufacturer under the Manufacturer column.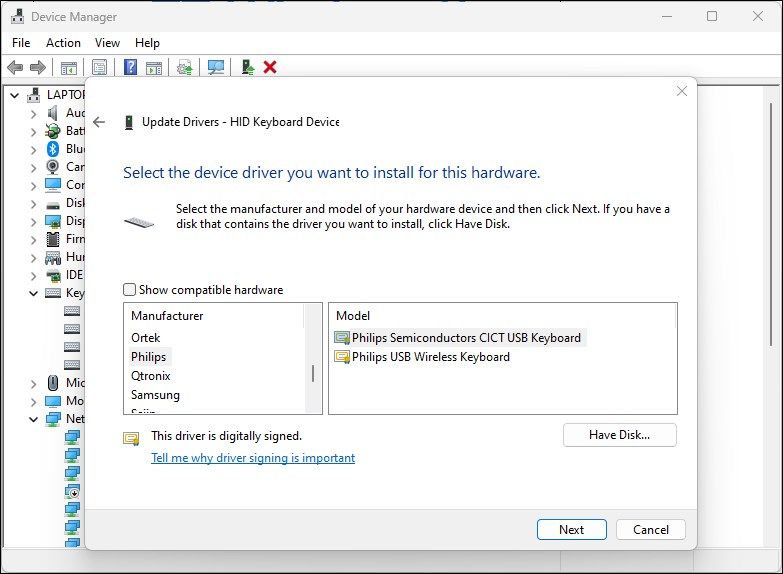
7. Click Next. Click Yes if an Update Driver Warning dialog appears.
8. Once installed, close Device Manager and reboot your computer.
After the restart, your laptop keyboard will stop working. If you need to install the correct driver again to enable the keyboard, right-click on the keyboard device and select Update driver. Next, select Search automatically for drivers. Windows will look for a compatible driver and install it.
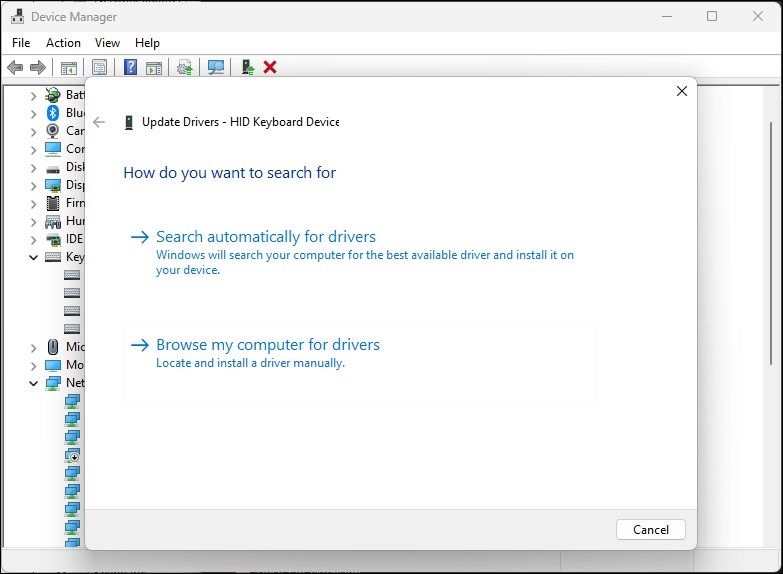
Alternatively, select Browse my computer for drivers in the Update Drivers dialogue. Next, select Let me pick from a list of available drivers on my computer. Make sure the Show compatible hardware option is enabled. Select an HID Keyboard Device driver from the list and click Next.
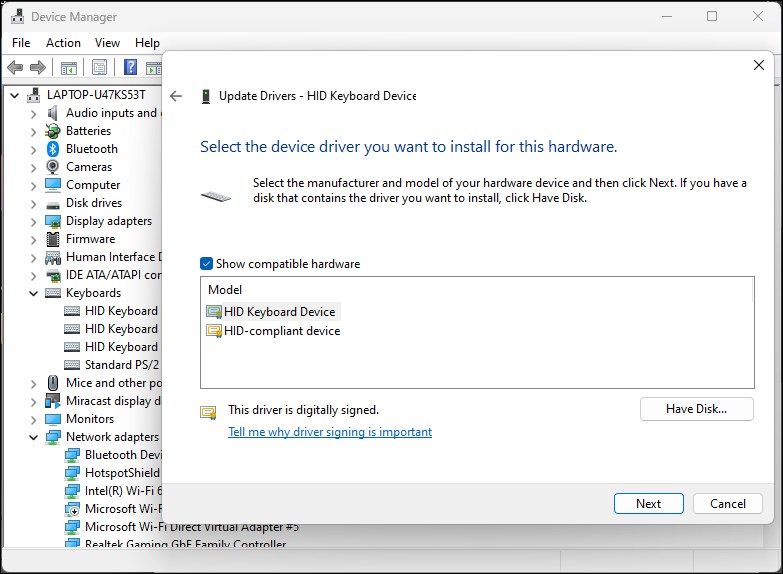
Wait for the driver to install. Once done, reboot your computer, and the keyboard will start working again.
Disable Your Laptop Keyboard Permanently on Windows
The built-in chiclet keyboard on your laptop is the primary input method available, so there is no way to disable it with a single click. Also, you wouldn’t want to disable your keyboard accidentally. If you determine your keyboard to have gone rogue and typing on its own, you can permanently disable it using the Command Prompt and Device Manager.
That said, apart from the hardware issues, your laptop keyboard can act up for many other reasons. To fix your keyboard, check for pending driver updates, use the built-in troubleshooter, or simply disable the individual keys.
Sometimes you don’t want your laptop’s keyboard to take inputs. This is usually because you’re plugging in an external keyboard, either because the built-in one is broken or you just want a larger typing space with a full-sized keyboard.
However, since the keyboard is an integral part of your portable computer, disabling its primary input method is a little tricky. Here, we show you how to temporarily and permanently disable the laptop keyboard on Windows 10 and 11.
Also read:
- [New] Unlocking the Power of Scheduled Instagram Posts for 2024
- [Updated] 2024 Approved The Ultimate Insight Into Using Discord Effectively
- [Updated] Navigating Through YouTube's Metrics A Ranking Analysis for 2024
- A Systematic Approach to Undoing Windows Programs Changes
- Comprehensive Fixes: Overcoming Game Crashes in FIFA 20 When Played on a Desktop or Laptop
- Configuring Optimal Window Size on Windows 11
- Effective Fixes for World of Warcraft 3 Re:Forged - Eliminate Crashing Woes
- Effortless Ways to Transfer Data from Your Apple iPhone 7 Plus to iPhone 15 | Dr.fone
- How To Remove Flashlight From Apple iPhone 8 Lock Screen
- Navigating Windows 11 for Spatial Aural Enhancement
- Reversing Error 0X800704CF in WinStore
- Transform Your Pictures - The Leaderboard of Phone Sticker-Enhancers
- Title: Guide to Cease Built-In Desktop Keyboard in Windows OS
- Author: Joseph
- Created at : 2024-12-12 19:02:15
- Updated at : 2024-12-17 00:30:46
- Link: https://windows11.techidaily.com/guide-to-cease-built-in-desktop-keyboard-in-windows-os/
- License: This work is licensed under CC BY-NC-SA 4.0.
