
File Explorer Missing SD Card: Resolution Guide
File Explorer Missing SD Card: Resolution Guide
Quick Links
- Reasons Why Your SD Card Reader Is Not Working on Windows 10/11
- Clean the SD Card and Adapter
- Assign a Drive Letter to Your SD Card
- Turn Off Write Protection
- Check SD Card Errors With CHKDSK
- Check Your SD Card for Errors in Device Manager
- Update Your SD Card Drivers
- Format Your SD Card to Fix Data Corruption
Key Takeaways
- Poor contact, driver issues, data corruption, and malware infections can cause an SD card to not appear in File Explorer.
- To troubleshoot, clean the SD card and adapter, turn off write protection, assign a drive letter, check for errors with CHKDSK, and update SD card drivers.
- If the SD card still doesn’t show up, check the card reader for hardware issues and consider using a USB adapter. Keep Windows updated for potential fixes.
SD cards are convenient to use with your computer to transfer photos or as extra storage. But if you can’t access yours, we’ll guide you through troubleshooting tips to make Windows detect your card again.
Reasons Why Your SD Card Reader Is Not Working on Windows 10/11
Storage devices like SD cards may not appear in your File Explorer due to temporary glitches. But if reconnecting the SD card reader doesn’t fix the issue, there are other common reasons the issue can persist:
- Your SD card reader is not firmly connected to your computer.
- The SD card file system is corrupted.
- You’re using an outdated device driver.
- The SD card is infected with malware.
- The SD card is missing a drive letter.
Before you start troubleshooting, ensure that the SD card is compatible with your SD card reader. Some older readers may not support newer SD card formats.
1. Clean the SD Card and Adapter
If the SD card wasn’t used for an extended period, the contacts on the card and the adapter may have accumulated dust and debris. As a result, your computer may fail to recognize or detect the SD card.
Gently clean any dust you see on your SD card and the adapter. Then, connect the SD card reader firmly and wait for the computer to detect the device. Make sure the card is inserted firmly into the reader itself. Also, switch to a different USB port and see if that helps—you may have a dead USB port that won’t work with any device.
2. Assign a Drive Letter to Your SD Card
Each memory device connected to your system is assigned a drive letter by default. If these identifiers are missing, you cannot access files stored in the drive directly. Thankfully, you can assign a new drive letter in a few clicks.
To check if your SD card is missing the drive letter and assign one if needed:
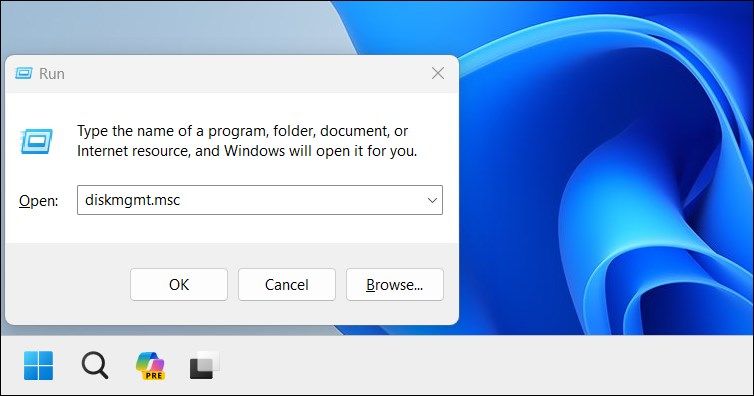
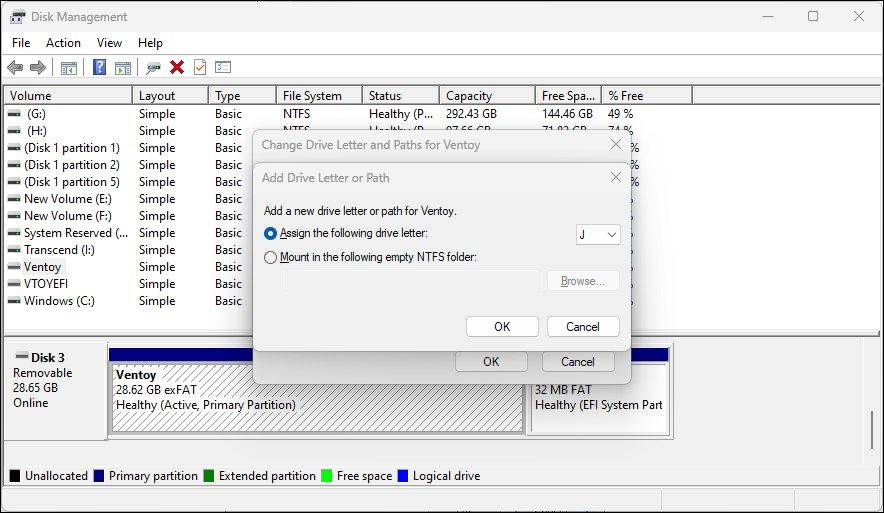
- Press the Windows key + R to open Run.

- Type diskmgmt.msc and click OK. To open the utility, you can also search for Disk Management in the Windows search bar.
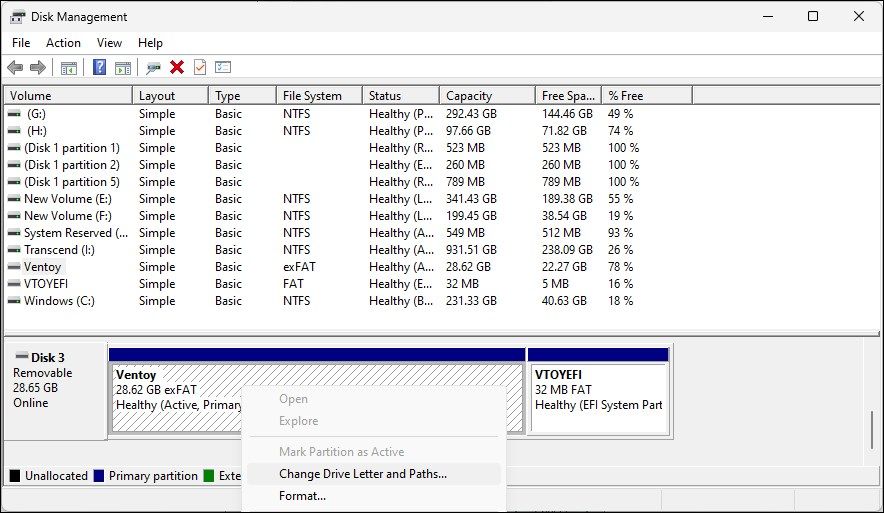
- In Disk Management, check if your SD card reader is detected under Volume and has a drive letter assigned, such as I, E, F, etc.
- If a letter is missing, right-click on the SD card reader and choose Change Drive Letter and Paths.
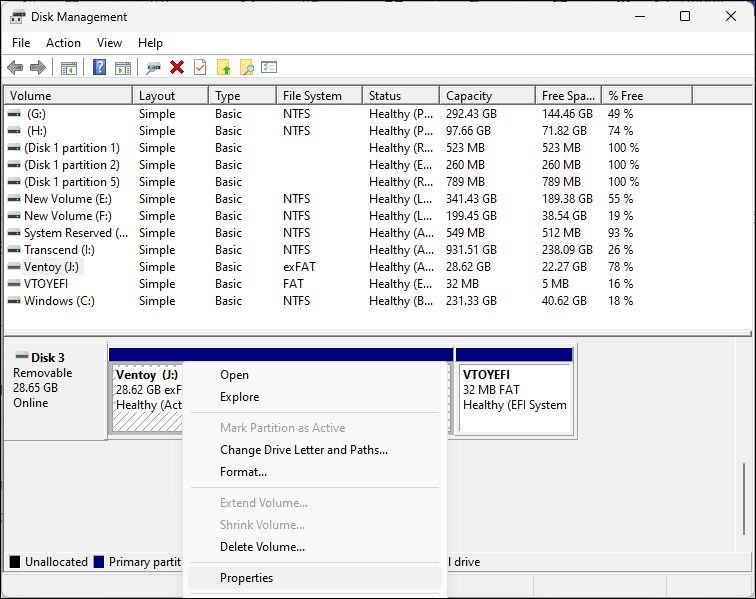
- In the Add Driver or Path window, select Assign the following drive letter, then click Add. This will assign a new drive letter to your SD card reader.
You can also make a drive letter available for use in case drive letters are missing, or there is a drive letter conflict.
Once done, close the Disk Management tool. Disconnect and reconnect your SD card reader and check if it appears in File Explorer.
3. Turn Off Write Protection
It’s important to check if your SD card has write protection turned on. When write protection is enabled, your SD card is read-only, so you can’t add or delete any data on the storage device. This may also trigger the disk is write protected error, hinting at an obvious issue.
To turn off write protection on your SD Card:
- Eject the SD card from your computer and locate the lock switch on its side.
- Slide it in the upward direction to turn off write protection.
- Connect the storage device to see if your computer can detect the SD card now.
4. Check SD Card Errors With CHKDSK
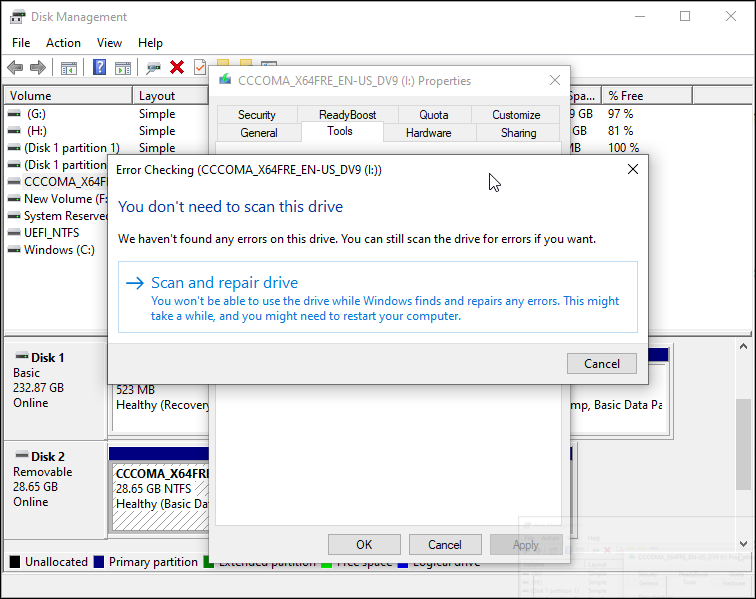
Check Disk (CHKDSK) is a Windows command-line utility that scans your driver for errors. It can scan drives for file system errors and bad sectors and fix them automatically. Here’s how to use CHKDSK to check and fix SD card errors:
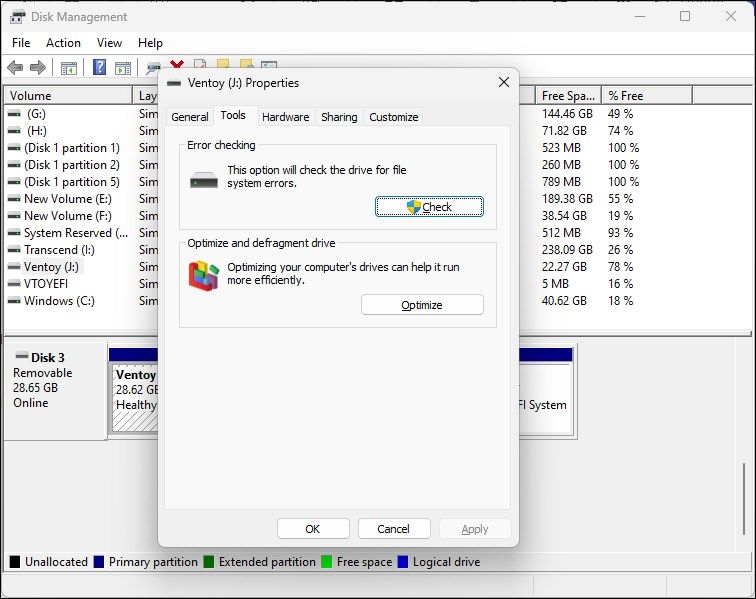
- Open the Disk Management utility.
- Right-click on your SD card under Volume and choose Properties.
- Open the Tools tab in the Properties window.
- Click the Check button under the Error checking section.
- Select Scan and repair drive.
- Windows will scan the drive for errors and fix them automatically.
- Click Close and restart your computer. After the restart, check for any improvements.
5. Check Your SD Card for Errors in Device Manager
Device Manager lists all the devices connected to your computer, including hardware with errors. See if you can locate the SD card in Device Manager to perform further troubleshooting steps:
- Press the Windows key + R to open Run.
- Type devmgmt.msc and click OK to open Device Manager.
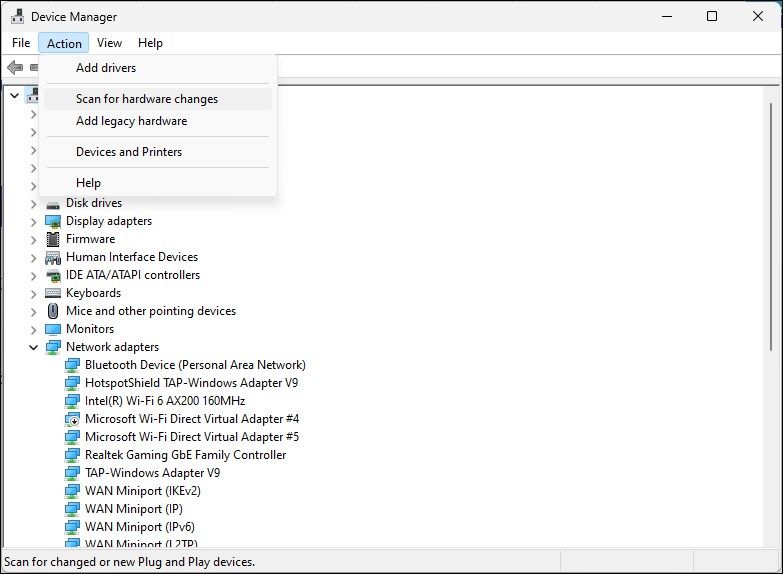
- In Device Manager, click Action and choose Scan for hardware changes.
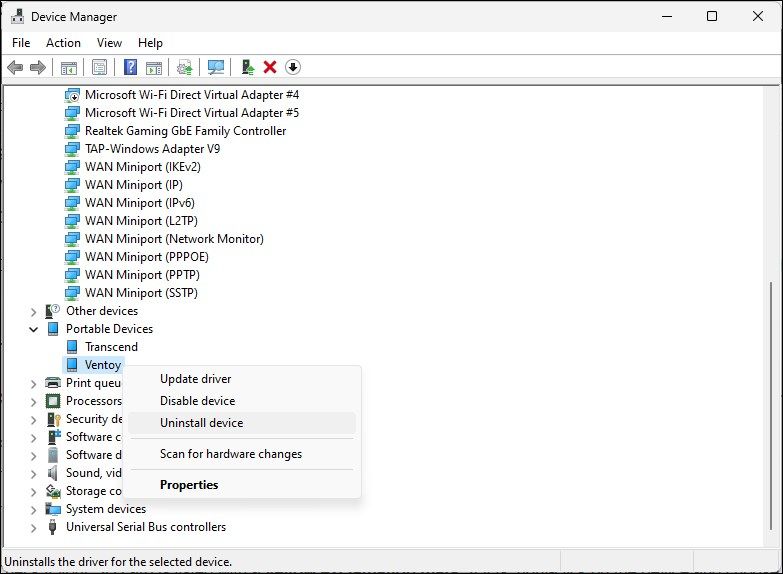
- Next, expand the Portable Devices category.
- Check if your SD card reader is listed with a yellow exclamation mark. If yes, right-click on the device and choose Properties.
- In the Properties window, open the General tab and check the Device status.
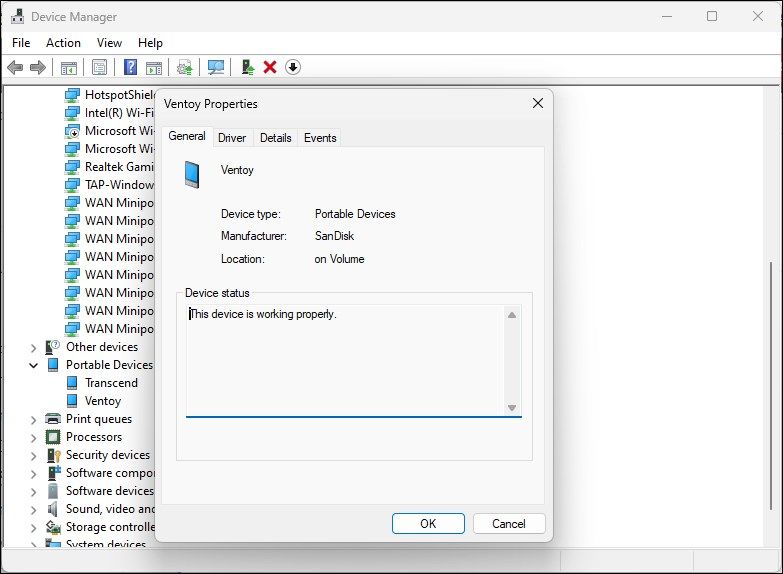
The device status shows if your device is enabled or disabled, followed by an error code or message. If disabled, click Enabled and check for any improvements. Any error messages present can help you troubleshoot your specific issue.
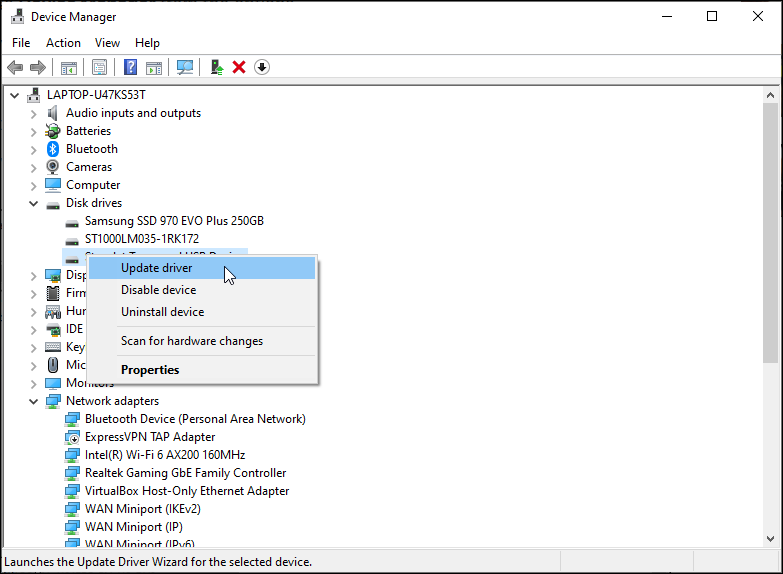
6. Update Your SD Card Drivers
Your computer may fail to recognize or detect the external storage device due to outdated or missing device drivers. Fortunately, you can easily update device drivers from Device Manager . Here’s how to do it:
- Open Device Manager.
- In Device Manager, expand the Disk drives section and locate your SD card.
- If it has a yellow exclamation mark, right-click and choose Update drivers.
- Select Search automatically for drivers. Windows will scan for compatible drivers. If found, it will automatically download and install the required drivers.
After the drivers are installed, restart your PC. Connect your SD card reader again and check if it appears in File Explorer. If the problem persists, reinstall the drivers from scratch.
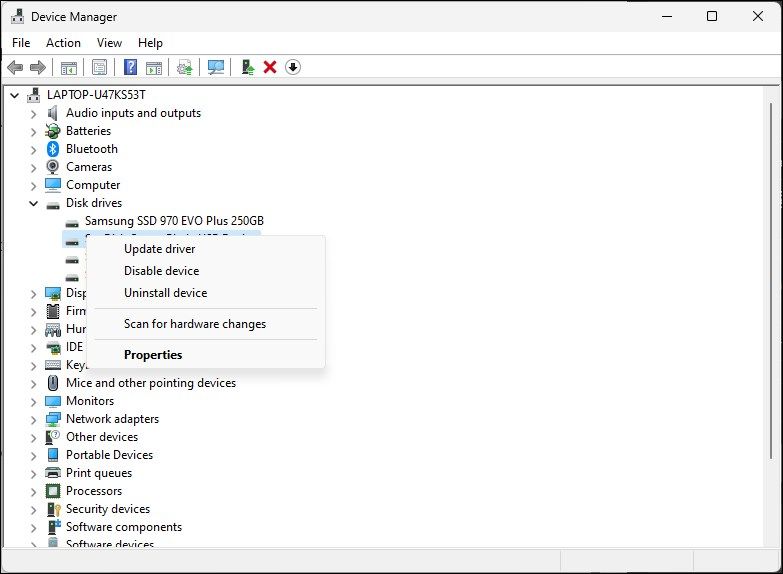
Reinstall the SD Card Driver
If updating the device driver did not help, try reinstalling the SD card driver. You can perform driver updates and reinstallation from Device Manager:
- Open Device Manager.
- Expand the Disk drives category.
- Right-click on your SD card device driver.
- Choose Uninstall Device. Click Uninstall to confirm the action if a prompt appears.
- Once uninstalled, restart your PC and connect your SD card reader. It will automatically detect and reinstall the required drivers.
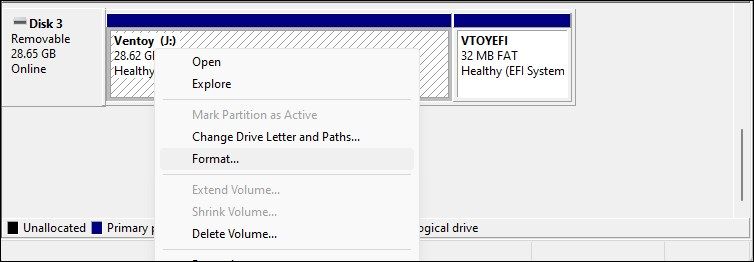
7. Format Your SD Card to Fix Data Corruption
A corrupted SD card may not show up in File Explorer. To make sure your SD card is not corrupted, connect it to another computer. You may have a file system corruption issue if it doesn’t work on other devices.
Thankfully, a quick format can fix any data corruption issues.
Formatting your SD card will erase all its data. Be sure to back up any files you need before proceeding.
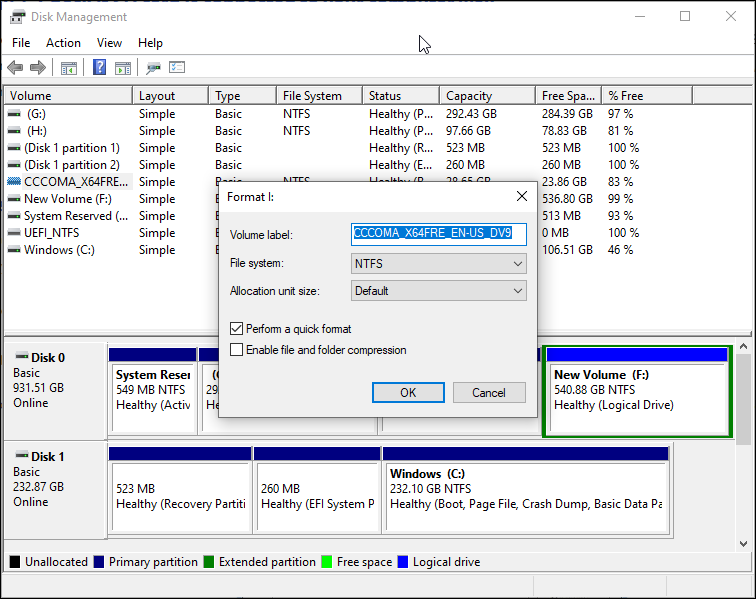
To format your SD card:
- Press the Windows key + R.
- Type diskmgmt.msc and click OK to open the Disk Management utility.
- Locate your SD card in the Volume section.
To format the storage drive, right-click on the device and choose Format.- Choose the Volume label, and File system. Leave Allocation unit size as default.
- Click OK to format your SD card with a compatible file system.
Faulty memory card readers are a common cause for SD cards not showing up in Windows File Explorer. Opt for an external card reader that connects to a USB port. Otherwise, Windows automatically detects portable storage devices such as SD cards and shows them in File Explorer.
Windows 11 also resolves many hardware issues through Windows updates, which include the latest drivers and fixes, so do check if you have the latest updates installed on your PC.
Key Takeaways
- Poor contact, driver issues, data corruption, and malware infections can cause an SD card to not appear in File Explorer.
- To troubleshoot, clean the SD card and adapter, turn off write protection, assign a drive letter, check for errors with CHKDSK, and update SD card drivers.
- If the SD card still doesn’t show up, check the card reader for hardware issues and consider using a USB adapter. Keep Windows updated for potential fixes.
SD cards are convenient to use with your computer to transfer photos or as extra storage. But if you can’t access yours, we’ll guide you through troubleshooting tips to make Windows detect your card again.
Reasons Why Your SD Card Reader Is Not Working on Windows 10/11
Storage devices like SD cards may not appear in your File Explorer due to temporary glitches. But if reconnecting the SD card reader doesn’t fix the issue, there are other common reasons the issue can persist:
- Your SD card reader is not firmly connected to your computer.
- The SD card file system is corrupted.
- You’re using an outdated device driver.
- The SD card is infected with malware.
- The SD card is missing a drive letter.
Before you start troubleshooting, ensure that the SD card is compatible with your SD card reader. Some older readers may not support newer SD card formats.
1. Clean the SD Card and Adapter
If the SD card wasn’t used for an extended period, the contacts on the card and the adapter may have accumulated dust and debris. As a result, your computer may fail to recognize or detect the SD card.
Gently clean any dust you see on your SD card and the adapter. Then, connect the SD card reader firmly and wait for the computer to detect the device. Make sure the card is inserted firmly into the reader itself. Also, switch to a different USB port and see if that helps—you may have a dead USB port that won’t work with any device.
2. Assign a Drive Letter to Your SD Card
Each memory device connected to your system is assigned a drive letter by default. If these identifiers are missing, you cannot access files stored in the drive directly. Thankfully, you can assign a new drive letter in a few clicks.
To check if your SD card is missing the drive letter and assign one if needed:
- Press the Windows key + R to open Run.
- Type diskmgmt.msc and click OK. To open the utility, you can also search for Disk Management in the Windows search bar.
- In Disk Management, check if your SD card reader is detected under Volume and has a drive letter assigned, such as I, E, F, etc.
- If a letter is missing, right-click on the SD card reader and choose Change Drive Letter and Paths.
5. In the Add Driver or Path window, select Assign the following drive letter, then click Add. This will assign a new drive letter to your SD card reader.
You can also make a drive letter available for use in case drive letters are missing, or there is a drive letter conflict.
Once done, close the Disk Management tool. Disconnect and reconnect your SD card reader and check if it appears in File Explorer.
3. Turn Off Write Protection
It’s important to check if your SD card has write protection turned on. When write protection is enabled, your SD card is read-only, so you can’t add or delete any data on the storage device. This may also trigger the disk is write protected error, hinting at an obvious issue.
To turn off write protection on your SD Card:
- Eject the SD card from your computer and locate the lock switch on its side.
- Slide it in the upward direction to turn off write protection.
- Connect the storage device to see if your computer can detect the SD card now.
4. Check SD Card Errors With CHKDSK
Check Disk (CHKDSK) is a Windows command-line utility that scans your driver for errors. It can scan drives for file system errors and bad sectors and fix them automatically. Here’s how to use CHKDSK to check and fix SD card errors:
- Open the Disk Management utility.
- Right-click on your SD card under Volume and choose Properties.
- Open the Tools tab in the Properties window.
- Click the Check button under the Error checking section.
- Select Scan and repair drive.
- Windows will scan the drive for errors and fix them automatically.
- Click Close and restart your computer. After the restart, check for any improvements.
5. Check Your SD Card for Errors in Device Manager
Device Manager lists all the devices connected to your computer, including hardware with errors. See if you can locate the SD card in Device Manager to perform further troubleshooting steps:
- Press the Windows key + R to open Run.
- Type devmgmt.msc and click OK to open Device Manager.
- In Device Manager, click Action and choose Scan for hardware changes.
- Next, expand the Portable Devices category.
- Check if your SD card reader is listed with a yellow exclamation mark. If yes, right-click on the device and choose Properties.
- In the Properties window, open the General tab and check the Device status.
The device status shows if your device is enabled or disabled, followed by an error code or message. If disabled, click Enabled and check for any improvements. Any error messages present can help you troubleshoot your specific issue.
6. Update Your SD Card Drivers
Your computer may fail to recognize or detect the external storage device due to outdated or missing device drivers. Fortunately, you can easily update device drivers from Device Manager . Here’s how to do it:
- Open Device Manager.
- In Device Manager, expand the Disk drives section and locate your SD card.
- If it has a yellow exclamation mark, right-click and choose Update drivers.
- Select Search automatically for drivers. Windows will scan for compatible drivers. If found, it will automatically download and install the required drivers.
After the drivers are installed, restart your PC. Connect your SD card reader again and check if it appears in File Explorer. If the problem persists, reinstall the drivers from scratch.
Reinstall the SD Card Driver
If updating the device driver did not help, try reinstalling the SD card driver. You can perform driver updates and reinstallation from Device Manager:
- Open Device Manager.
- Expand the Disk drives category.
- Right-click on your SD card device driver.
- Choose Uninstall Device. Click Uninstall to confirm the action if a prompt appears.
- Once uninstalled, restart your PC and connect your SD card reader. It will automatically detect and reinstall the required drivers.
7. Format Your SD Card to Fix Data Corruption
A corrupted SD card may not show up in File Explorer. To make sure your SD card is not corrupted, connect it to another computer. You may have a file system corruption issue if it doesn’t work on other devices.
Thankfully, a quick format can fix any data corruption issues.
Formatting your SD card will erase all its data. Be sure to back up any files you need before proceeding.
To format your SD card:
- Press the Windows key + R.
- Type diskmgmt.msc and click OK to open the Disk Management utility.
- Locate your SD card in the Volume section.
To format the storage drive, right-click on the device and choose Format.- Choose the Volume label, and File system. Leave Allocation unit size as default.
- Click OK to format your SD card with a compatible file system.
Faulty memory card readers are a common cause for SD cards not showing up in Windows File Explorer. Opt for an external card reader that connects to a USB port. Otherwise, Windows automatically detects portable storage devices such as SD cards and shows them in File Explorer.
Windows 11 also resolves many hardware issues through Windows updates, which include the latest drivers and fixes, so do check if you have the latest updates installed on your PC.
Key Takeaways
- Poor contact, driver issues, data corruption, and malware infections can cause an SD card to not appear in File Explorer.
- To troubleshoot, clean the SD card and adapter, turn off write protection, assign a drive letter, check for errors with CHKDSK, and update SD card drivers.
- If the SD card still doesn’t show up, check the card reader for hardware issues and consider using a USB adapter. Keep Windows updated for potential fixes.
SD cards are convenient to use with your computer to transfer photos or as extra storage. But if you can’t access yours, we’ll guide you through troubleshooting tips to make Windows detect your card again.
Reasons Why Your SD Card Reader Is Not Working on Windows 10/11
Storage devices like SD cards may not appear in your File Explorer due to temporary glitches. But if reconnecting the SD card reader doesn’t fix the issue, there are other common reasons the issue can persist:
- Your SD card reader is not firmly connected to your computer.
- The SD card file system is corrupted.
- You’re using an outdated device driver.
- The SD card is infected with malware.
- The SD card is missing a drive letter.
Before you start troubleshooting, ensure that the SD card is compatible with your SD card reader. Some older readers may not support newer SD card formats.
1. Clean the SD Card and Adapter
If the SD card wasn’t used for an extended period, the contacts on the card and the adapter may have accumulated dust and debris. As a result, your computer may fail to recognize or detect the SD card.
Gently clean any dust you see on your SD card and the adapter. Then, connect the SD card reader firmly and wait for the computer to detect the device. Make sure the card is inserted firmly into the reader itself. Also, switch to a different USB port and see if that helps—you may have a dead USB port that won’t work with any device.
2. Assign a Drive Letter to Your SD Card
Each memory device connected to your system is assigned a drive letter by default. If these identifiers are missing, you cannot access files stored in the drive directly. Thankfully, you can assign a new drive letter in a few clicks.
To check if your SD card is missing the drive letter and assign one if needed:
- Press the Windows key + R to open Run.
- Type diskmgmt.msc and click OK. To open the utility, you can also search for Disk Management in the Windows search bar.
- In Disk Management, check if your SD card reader is detected under Volume and has a drive letter assigned, such as I, E, F, etc.
- If a letter is missing, right-click on the SD card reader and choose Change Drive Letter and Paths.
- In the Add Driver or Path window, select Assign the following drive letter, then click Add. This will assign a new drive letter to your SD card reader.
You can also make a drive letter available for use in case drive letters are missing, or there is a drive letter conflict.
Once done, close the Disk Management tool. Disconnect and reconnect your SD card reader and check if it appears in File Explorer.
3. Turn Off Write Protection
It’s important to check if your SD card has write protection turned on. When write protection is enabled, your SD card is read-only, so you can’t add or delete any data on the storage device. This may also trigger the disk is write protected error, hinting at an obvious issue.
To turn off write protection on your SD Card:
- Eject the SD card from your computer and locate the lock switch on its side.
- Slide it in the upward direction to turn off write protection.
- Connect the storage device to see if your computer can detect the SD card now.
4. Check SD Card Errors With CHKDSK
Check Disk (CHKDSK) is a Windows command-line utility that scans your driver for errors. It can scan drives for file system errors and bad sectors and fix them automatically. Here’s how to use CHKDSK to check and fix SD card errors:
- Open the Disk Management utility.
- Right-click on your SD card under Volume and choose Properties.
- Open the Tools tab in the Properties window.
- Click the Check button under the Error checking section.
- Select Scan and repair drive.
- Windows will scan the drive for errors and fix them automatically.
- Click Close and restart your computer. After the restart, check for any improvements.
5. Check Your SD Card for Errors in Device Manager
Device Manager lists all the devices connected to your computer, including hardware with errors. See if you can locate the SD card in Device Manager to perform further troubleshooting steps:
- Press the Windows key + R to open Run.
- Type devmgmt.msc and click OK to open Device Manager.
- In Device Manager, click Action and choose Scan for hardware changes.
- Next, expand the Portable Devices category.
- Check if your SD card reader is listed with a yellow exclamation mark. If yes, right-click on the device and choose Properties.
- In the Properties window, open the General tab and check the Device status.
The device status shows if your device is enabled or disabled, followed by an error code or message. If disabled, click Enabled and check for any improvements. Any error messages present can help you troubleshoot your specific issue.
6. Update Your SD Card Drivers
Your computer may fail to recognize or detect the external storage device due to outdated or missing device drivers. Fortunately, you can easily update device drivers from Device Manager . Here’s how to do it:
- Open Device Manager.
- In Device Manager, expand the Disk drives section and locate your SD card.
- If it has a yellow exclamation mark, right-click and choose Update drivers.
- Select Search automatically for drivers. Windows will scan for compatible drivers. If found, it will automatically download and install the required drivers.
After the drivers are installed, restart your PC. Connect your SD card reader again and check if it appears in File Explorer. If the problem persists, reinstall the drivers from scratch.
Reinstall the SD Card Driver
If updating the device driver did not help, try reinstalling the SD card driver. You can perform driver updates and reinstallation from Device Manager:
- Open Device Manager.
- Expand the Disk drives category.
- Right-click on your SD card device driver.
- Choose Uninstall Device. Click Uninstall to confirm the action if a prompt appears.
- Once uninstalled, restart your PC and connect your SD card reader. It will automatically detect and reinstall the required drivers.
7. Format Your SD Card to Fix Data Corruption
A corrupted SD card may not show up in File Explorer. To make sure your SD card is not corrupted, connect it to another computer. You may have a file system corruption issue if it doesn’t work on other devices.
Thankfully, a quick format can fix any data corruption issues.
Formatting your SD card will erase all its data. Be sure to back up any files you need before proceeding.
To format your SD card:
- Press the Windows key + R.
- Type diskmgmt.msc and click OK to open the Disk Management utility.
- Locate your SD card in the Volume section.
To format the storage drive, right-click on the device and choose Format.- Choose the Volume label, and File system. Leave Allocation unit size as default.
- Click OK to format your SD card with a compatible file system.
Faulty memory card readers are a common cause for SD cards not showing up in Windows File Explorer. Opt for an external card reader that connects to a USB port. Otherwise, Windows automatically detects portable storage devices such as SD cards and shows them in File Explorer.
Windows 11 also resolves many hardware issues through Windows updates, which include the latest drivers and fixes, so do check if you have the latest updates installed on your PC.
Also read:
- [New] Voice of Volume 6 Free Apps for Channeling YouTube Music Onto Android Devices
- [Updated] In 2024, Speaking Like a Pro Tips to Upgrade Your Google Meet Skills
- 【マック編集者】無償で手に入るビデオコンバータソフト5品種:最新ラインナップ&使い方解説のポイント!
- Navigating Graphics Drivers: A Windows 10 & 11 Fixation
- Planning to Use a Pokemon Go Joystick on Infinix Smart 8 Pro? | Dr.fone
- Process of Screen Sharing Vivo Y100t to PC- Detailed Steps | Dr.fone
- Pure Functionality: Cleaning and Organizing Your W11 Workspace
- Re-Enabling Print Service After Error Displayed on PC
- Resolving PortAudio Faults in Audacity for Windows 11/11 OS
- Revive Your File Explorer: Top Troubleshooting for Win11
- Seamless Workflow: Excellent Screen Savers with Clock Features
- Start Exploring: Top 8 Ready-to-Use Custom GPT Models Today
- Tackling Error at Interrupt During Debugging Windows
- The Top 5 Android Apps That Use Fingerprint Sensor to Lock Your Apps On Vivo Y100t
- Troubleshooting Roblox Windows Errors
- Unlocking Windows 11 Access: A Step-by-Step Guide
- Updated Slowing Down Music Rhythmically Without Affecting Pitch Perception
- Title: File Explorer Missing SD Card: Resolution Guide
- Author: Joseph
- Created at : 2024-12-04 16:01:52
- Updated at : 2024-12-10 17:13:16
- Link: https://windows11.techidaily.com/file-explorer-missing-sd-card-resolution-guide/
- License: This work is licensed under CC BY-NC-SA 4.0.