Expert-Level Insights Into Windows Non-Adjacent Partition Integration
Expert-Level Insights Into Windows Non-Adjacent Partition Integration
Have you run out of space on one of your drives and want to expand it by merging in it another drive with free space? If so, you can easily do this if the partitions you want to merge are adjacent; if they are not adjacent, the process would be more complicated. This begs the question: how do adjacent and nonadjacent partitions differ?
Below, we’ll show you how to merge adjacent and non-adjacent partitions using Device Management and NIUBI Partition Editor, a third-party app.
How Do Adjacent and Non-Adjacent Partitions Differ?
As the name implies, adjacent partitions are located next to each other. If you have two drives right next to each other, C and D, they are considered adjacent partitions. In contrast, if you have three partitions, C, D, and E, then C and E are nonadjacent partitions because drive D separates them.
It’s straightforward to merge adjacent partitions using the Windows built-in tool and any third-party app. However, merging two non-adjacent partitions could be complicated.
How to Merge Adjacent Partitions Using Windows Disk Management
Disk Management is a Windows built-in utility that allows us to manage the hard drives installed on our device. The tool enables us to create, format, and delete partitions, shrink the drive volume by creating a new partition, expand the drive volume by merging space from another drive, and much more.
When merging a partition with the Disk Management tool, it is necessary to delete an existing volume (adjacent to the drive you wish to extend) and release some space first. Later, you can merge this unallocated space into a partition of your choice.
Therefore, you’ll lose all your data on the drive you want to merge (or delete), which is a major disadvantage. Because of that, you’ll need to relocate your essential Windows apps and files from that drive, and then delete the volume.
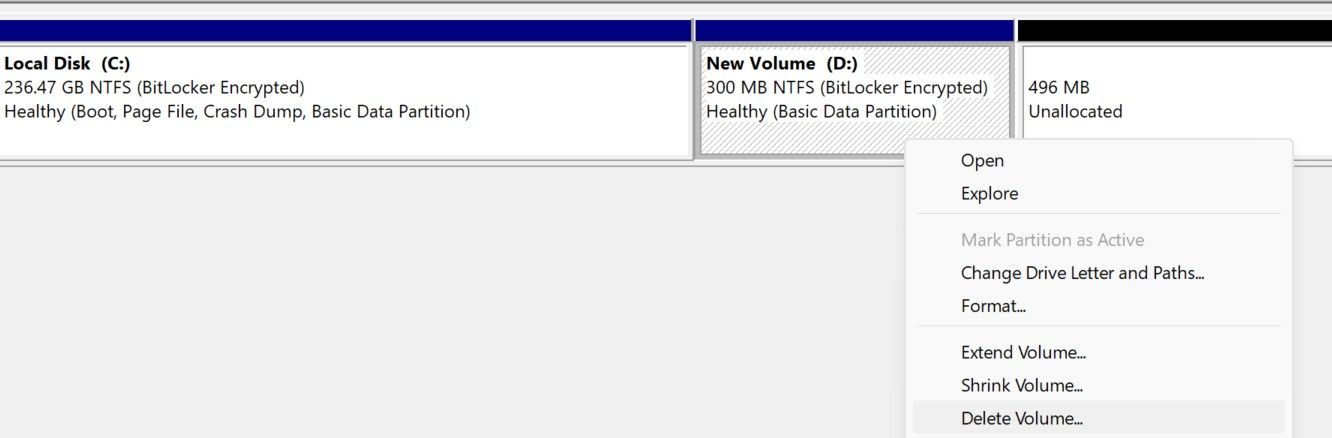
Let’s say you want to merge drive D with drive C. This will require you to delete drive D first and merge it into drive C after that. You can delete the volume by following these steps:
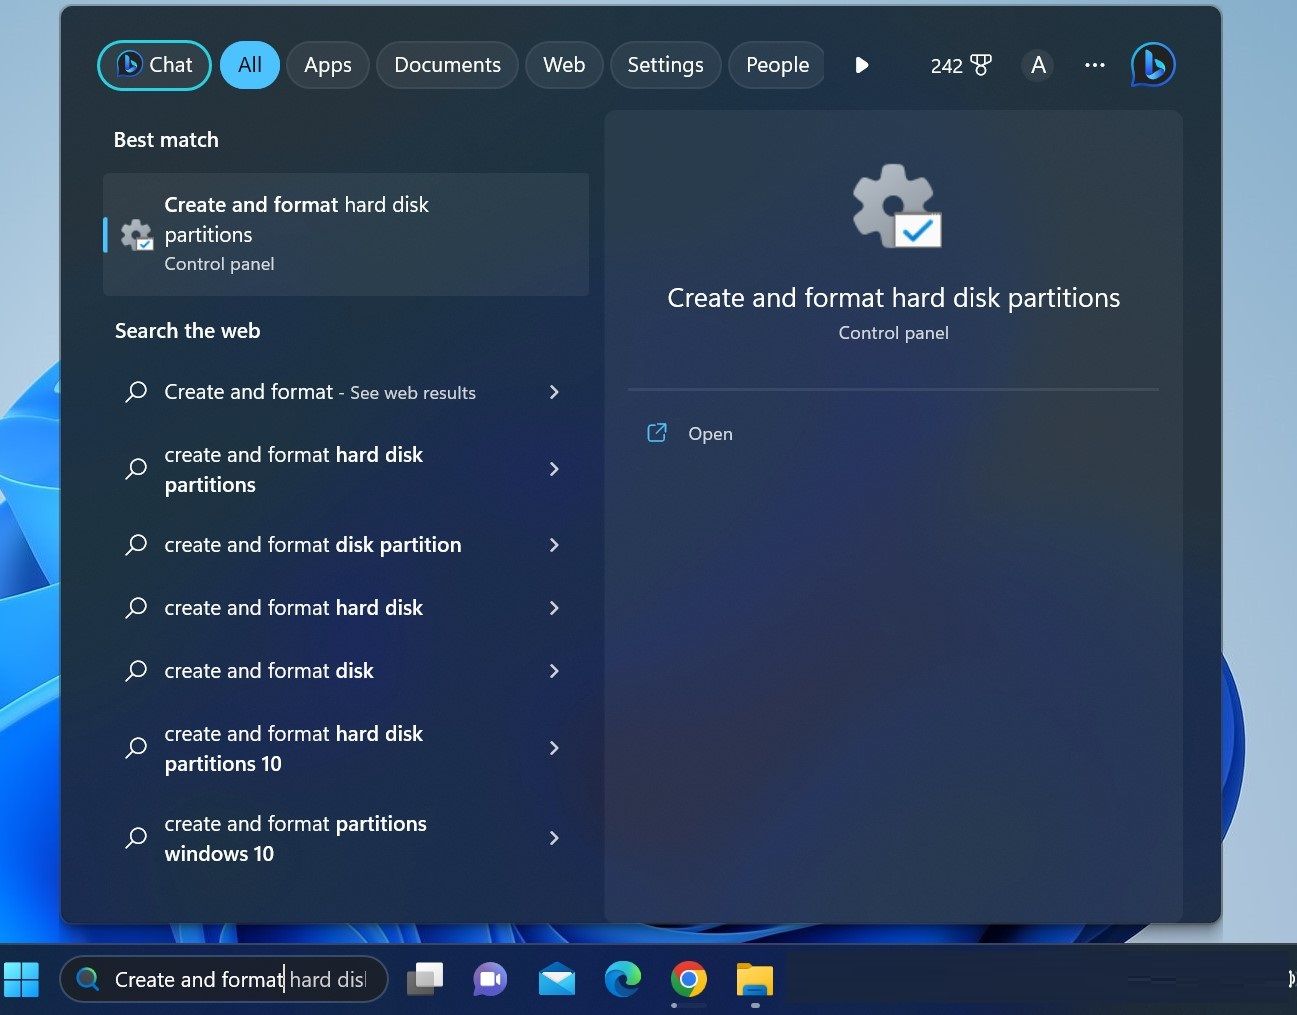
- Type “Create and format” in the Windows Search box and click Create and format hard disk partitions.

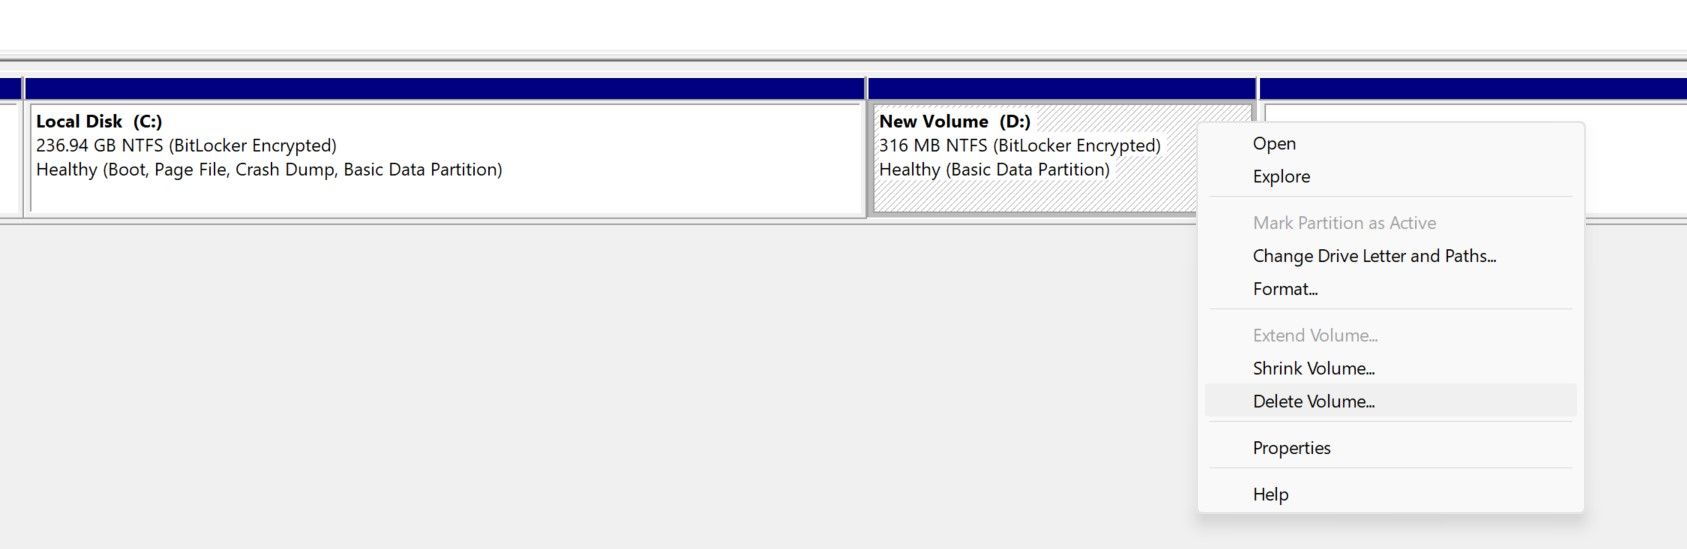
- Right-click the volume (the drive you want to merge into another) and select Delete Volume.
Once you’ve got enough unallocated space available, follow these steps to merge it into your preferred drive:
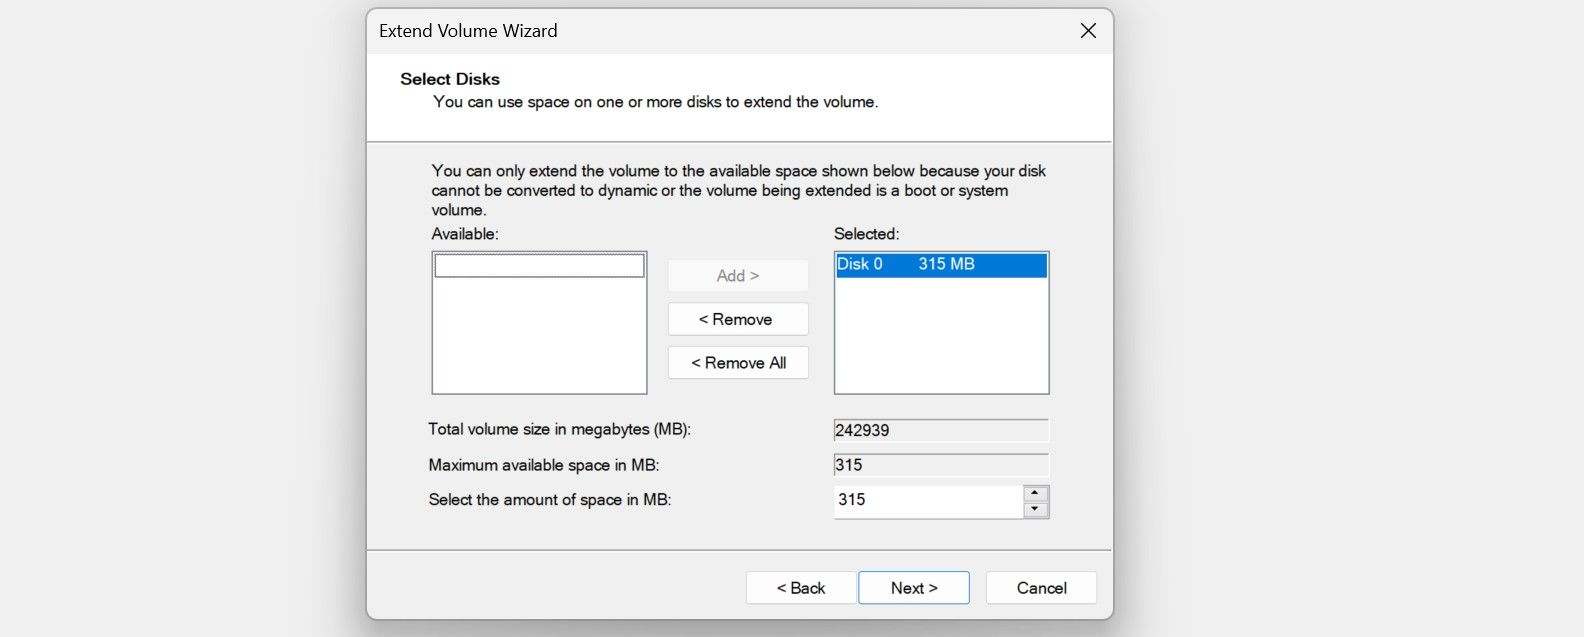
- Right-click the drive you want to extend and select Extend Volume.
- Click Next, then select the amount of space you want to merge in the box next to Select the amount of space in MB. Following that, click Next a second time.
Take advantage of PREMIUM features.
Create your texts / logos without any limitation.
No attribution required when downloading.
No advertising on the website.
TextStudio.com PREMIUM - Monthly Membership - Then, click Finish to merge the unallocated space into your destination drive.

How to Merge Non-Adjacent Partitions With Disk Management
If you have unallocated space non-adjacent to the destination drive, the Extend Volume option will appear grayed out in Disk Management, meaning you can’t merge the non-adjacent space into the destination drive. You need to first delete the volumes between your destination drive and unallocated space.
Deleting the in-between volumes will increase the unallocated space and it’ll become adjacent to your destination drive. Later, you can merge some portion of the unallocated space into the destination drive and use the rest to recreate the in-between volumes you deleted earlier.
Because deleting a volume also deletes its data, you have to create a backup of all drives en route to your destination and unallocated space before deleting them. Because of this, merging nonadjacent partitions using Device Management is considered ineffective and time-consuming. An easy way to avoid this hassle is to use third-party tools.
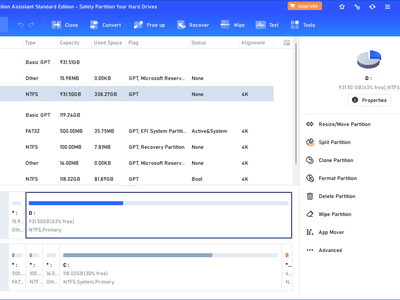
How to Merge Two Non-Adjacent Partitions Using NIUBI Partition Editor
NIUBI Partition Editor makes merging nonadjacent partitions easy and doesn’t require you to delete partitions between the unallocated space and destination partition. Here’s how you can merge two non-adjacent partitions, say C and E, using NIUBI:
- Download the NIUBI Partition Editor software from the HDD-Tool official website . There are two ways to use the software: download and install the setup file or download the portable version and use it without installing it.
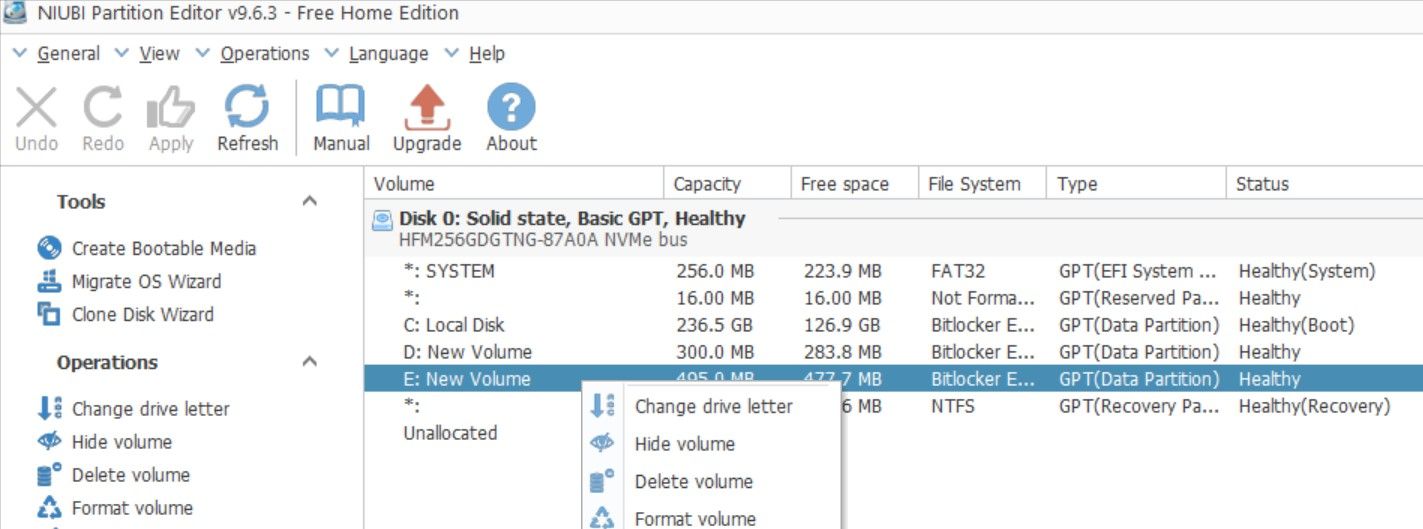
- Search for NIUBI in Windows Search to open the software.
- Right-click the E drive you want to merge into C and click Delete volume. Click Yes to confirm; this will release the space.
Screensaver Factory, Create stunning professional screensavers within minutes. Create screensavers for yourself, for marketing or unlimited royalty-free commercial distribution. Make screensavers from images, video and swf flash, add background music and smooth sprite and transition effects. Screensaver Factory is very easy to use, and it enables you to make self-installing screensaver files and CDs for easy setup and distribution. Screensaver Factory is the most advanced software of its kind.
- Now, right-click on partition D, which is between partition C and unallocated space, and click Resize/Move volume.
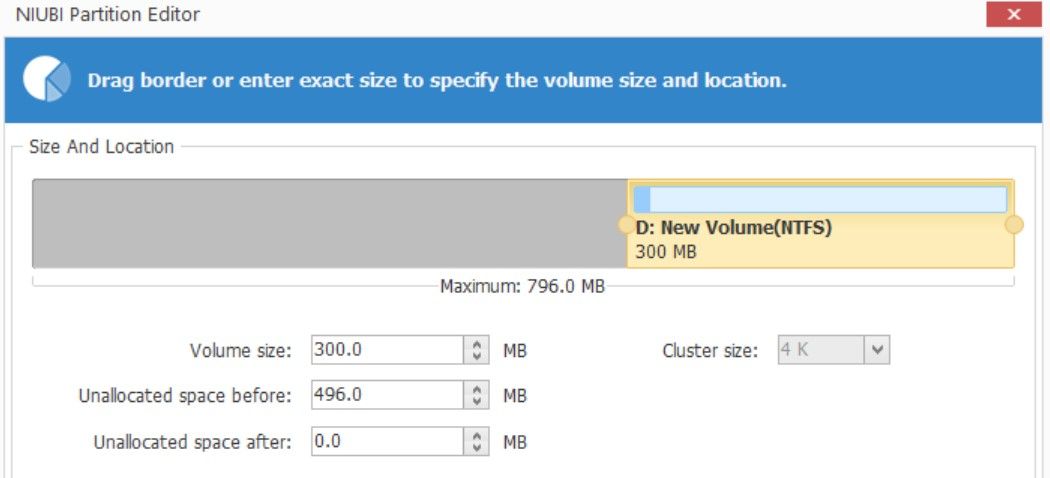
- Then, move the whole volume (don’t extend the volume) to the unallocated space right next to it, which will move drive D to where the unallocated space was, making the unallocated space adjacent to drive C.
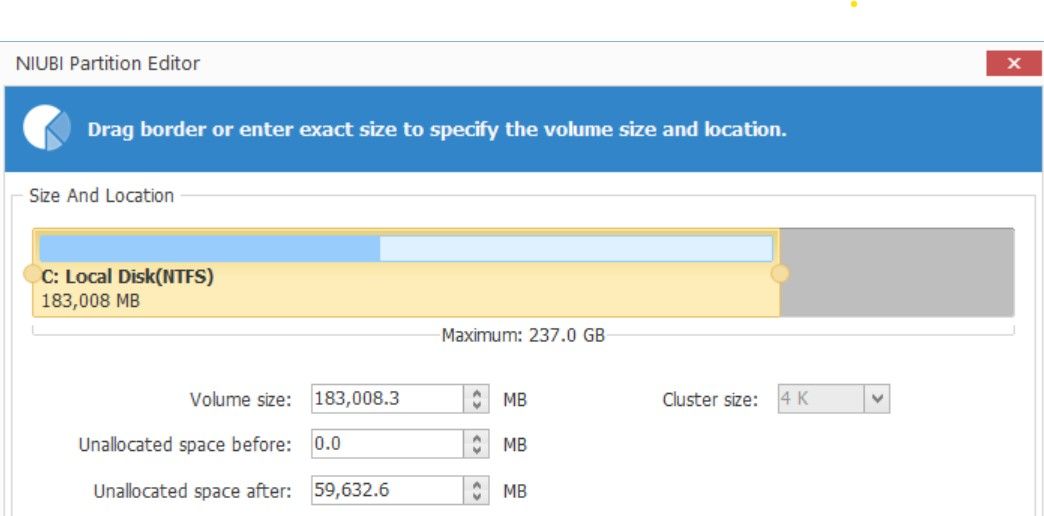
- Once adjacent, right-click the C drive, click Resize/Move Volume, then expand the C drive’s space to cover the unallocated space. It will merge the unallocated space into the C drive.
 Screensaver Factory, Create stunning professional screensavers within minutes. Create screensavers for yourself, for marketing or unlimited royalty-free commercial distribution. Make screensavers from images, video and swf flash, add background music and smooth sprite and transition effects. Screensaver Factory is very easy to use, and it enables you to make self-installing screensaver files and CDs for easy setup and distribution. Screensaver Factory is the most advanced software of its kind.
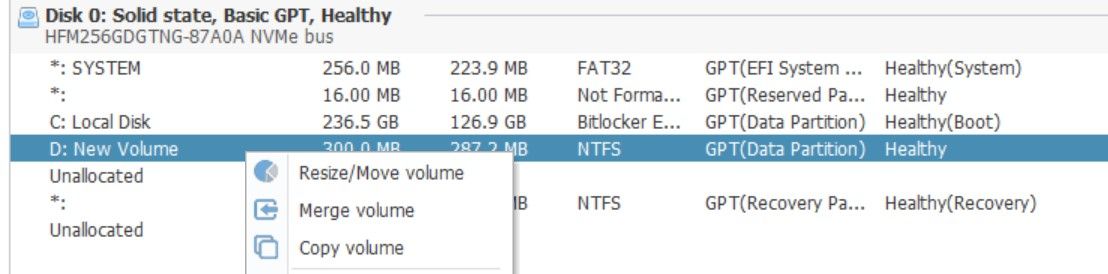
That’s how you can merge two non-adjacent drives without deleting the drives between the source and destination.
 vMix HD - Software based live production. vMix HD includes everything in vMix Basic HD plus 1000 inputs, Video List, 4 Overlay Channels, and 1 vMix Call
How Can You Resize and Move Partitions if NIUBI Partition Editor Doesn’t Let You?
The third-party disk management software, such as NIUBI Partition Editor, sometimes doesn’t allow users to move or resize their drives. They either find these options grayed out or missing altogether. It usually happens when you try to move or resize an encrypted drive.
If you see either of these options missing or grayed out for a specific drive, you should first remove the drive encryption, which is Bitlocker by default in Windows. While you can turn off encryption from individual partitions in different ways, we recommend turning off encryption at the device level for a short period of time. Here’s how:
- Search for “Device Encryption” in the Windows Search and click on Device encryption settings.
- Turn the toggle next to Device encryption off.
Glarysoft File Recovery Pro Annually - Helps to recover your lost file/data, even permanently deleted data.

 Glarysoft File Recovery Pro Annually - Helps to recover your lost file/data, even permanently deleted data.
 Turning off encryption can take a long time, so be patient while the process finishes, and you see the toggle next to Device encryption turned off. Once that’s done, you can resize and move all the drives without restrictions. Once you’re done merging the partitions, re-enable the device encryption.
 SwifDoo PDF Perpetual (2-PC) Free upgrade. No monthly fees ever.
Merge Partitions With Ease on Windows
You can merge partitions to use free space better or expand the volume of a drive running low on storage. Hopefully, you’ll now be able to merge adjacent and non-adjacent partitions more easily. Don’t forget to turn off device encryption if you cannot resize the drive.
Also, it is not necessary to use NIUBI Partition Editor; you can use any disk management software of your choice.
Below, we’ll show you how to merge adjacent and non-adjacent partitions using Device Management and NIUBI Partition Editor, a third-party app.
- Title: Expert-Level Insights Into Windows Non-Adjacent Partition Integration
- Author: Joseph
- Created at : 2024-08-15 15:51:43
- Updated at : 2024-08-16 15:51:43
- Link: https://windows11.techidaily.com/expert-level-insights-into-windows-non-adjacent-partition-integration/
- License: This work is licensed under CC BY-NC-SA 4.0.