Expert Guide to Streamline Program Access via Context Menu

Expert Guide to Streamline Program Access via Context Menu
Context menus are the backbone of Windows—they’re the little menus you see when you right-click the mouse on something. And while Windows 11 has brought in a new context menu for your desktop, there still aren’t any native customization options for it. For example, Windows 11 doesn’t include any built-in setting that enables you to add custom software shortcuts to that menu.
Nevertheless, you can still add program shortcuts to the desktop context menu in Windows 11 by editing the registry. By doing so, you can replace desktop shortcut icons with context menu ones.
How to Add an Edge Shortcut to the Desktop Context Menu
As Microsoft Edge is the default browser included with Windows 11, that’s a software package you’ll all have to set up a context menu shortcut for. So, we’ll add an Edge shortcut to the desktop context menu for the sake of an example. This is how you can add a shortcut for that browser to the desktop context menu with a simple tweak to the Windows registry :
- First, right-click the Start button on the taskbar and select Run.
- Enter regedit in the Open box within Run’s window.
- Click OK to launch the Registry Editor .
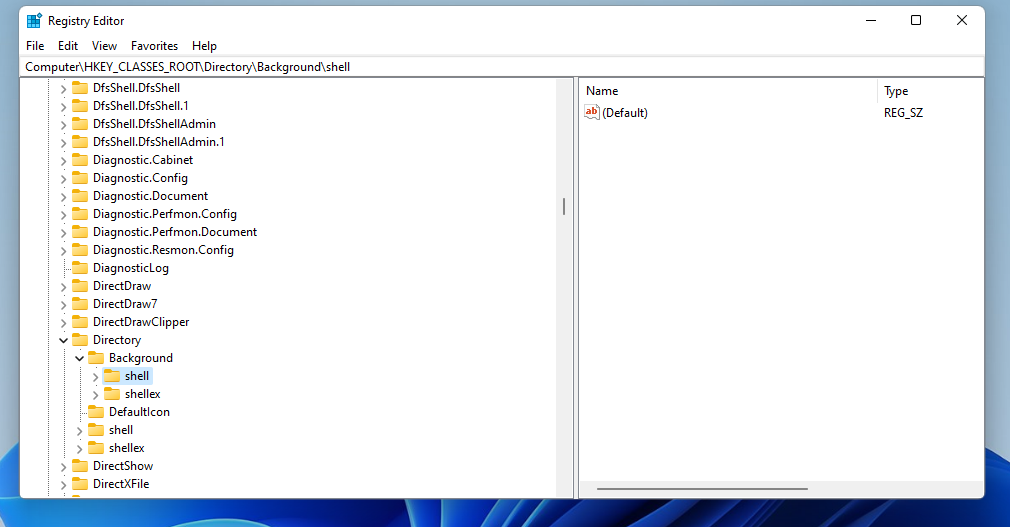
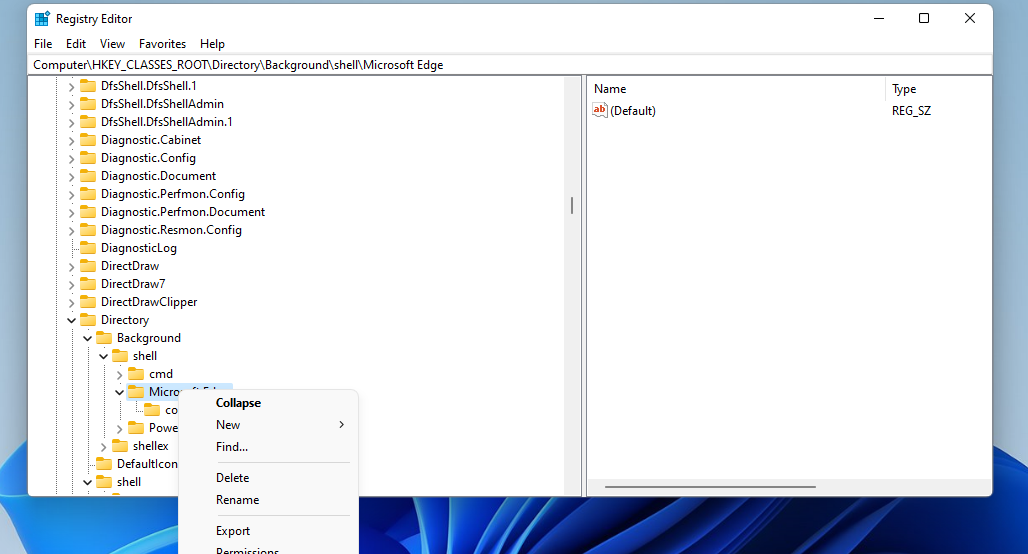
- Then navigate to the Computer > HKEY_CLASSES_ROOT > Directory > Background > shell registry key path.

- Right-click the shell key to select New and Key on the context menu.
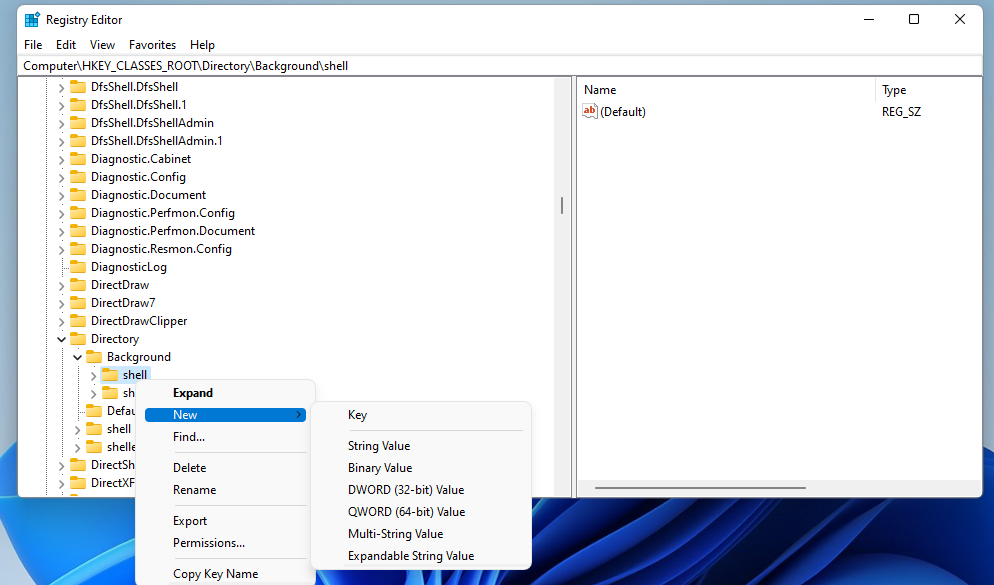
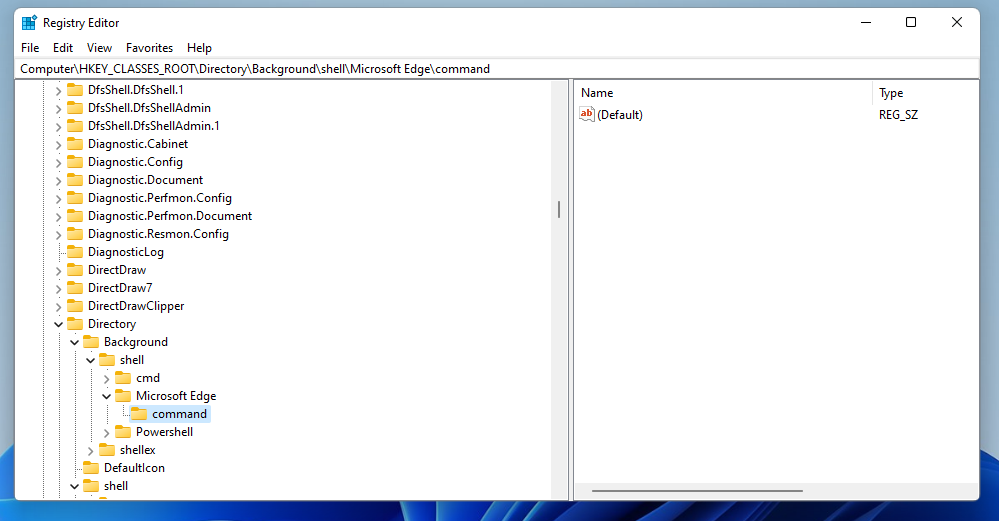
Input Edge as the new registry key’s title.
Right-click your Edge key and select the New > Key options again.
Enter command to be the new subkey’s name.

Click File Explorer’s taskbar button.
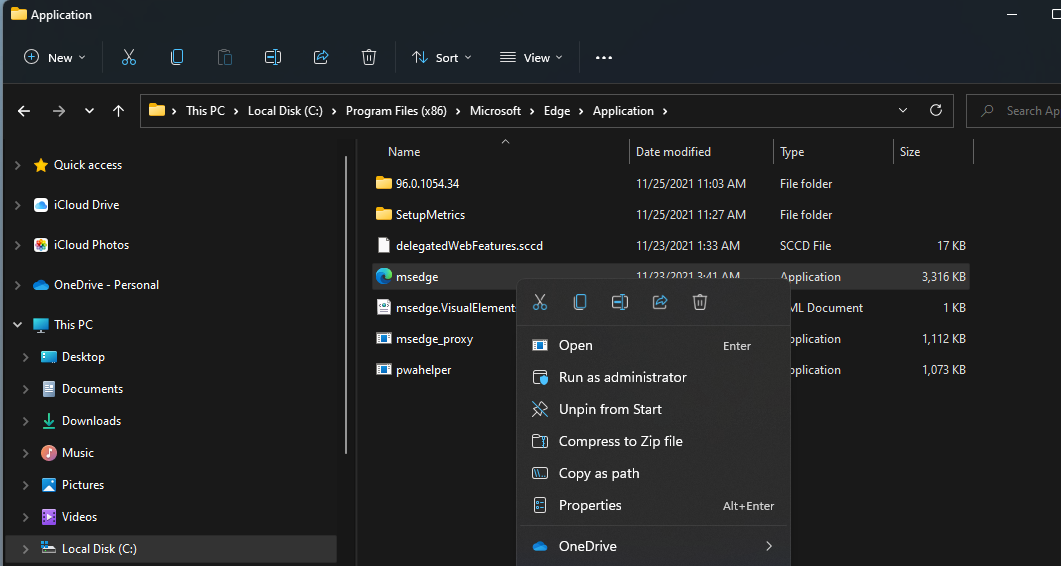
Open Edge’s folder, which has this default path: C:\Program Files (x86)\Microsoft\Edge\Application.
Right-click msedge.exe there to select the Copy as path option shown directly below.

Then return to the Registry Editor, and select the new command key you added.
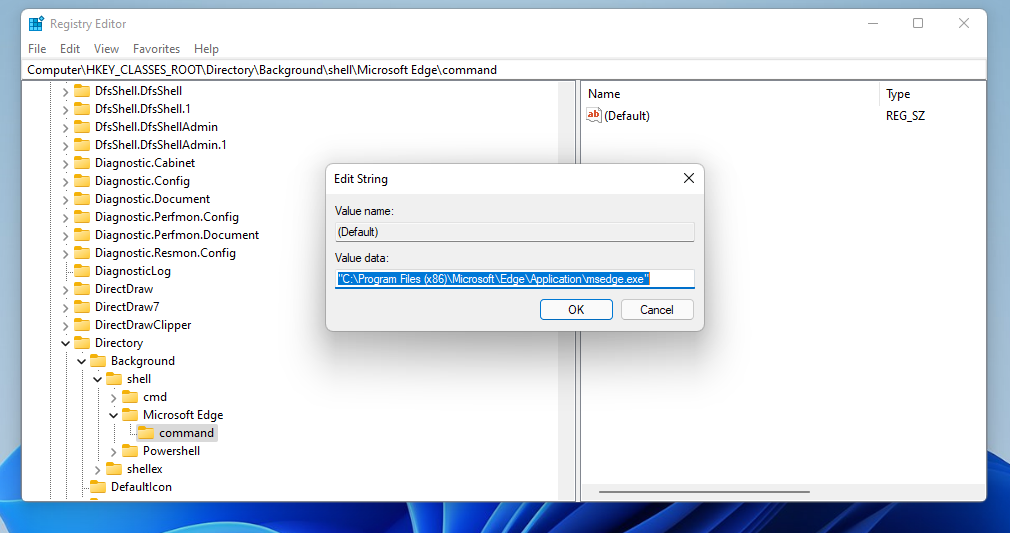
Double-click (Default) for the command key on the right side of the window.
Press the Ctrl + V hotkey to paste the copied Edge path within the Value data box.

Click OK to confirm.
Now you can try out your new Edge context menu shortcut. Right-click the desktop and select Show more options to view the classic menu. Then select Edge there to open that browser.
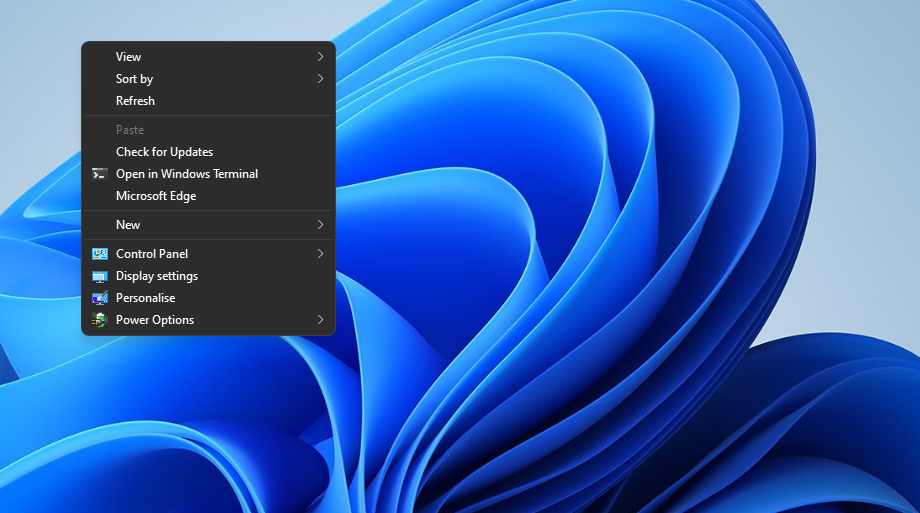
If you prefer, you can bring up the classic context menu in Windows 11 with a handy keyboard shortcut. Press the Shift + F10 hotkey to open the menu instead. Then select your software shortcuts from there.
How to Add Your Own Shortcuts to the Windows 11 Context Menu
You can add a shortcut for whatever software you’d like in a similar way to adding Edge. To do this, you need to change the name of the primary registry key to match the name of the software it’s for. Then, open the program’s folder in File Explorer to copy its full path, and paste it in the Value data box for the command subkey’s (Default) string.
To remove one of your software context menu shortcuts, you’ll need to open the key for it in the Registry Editor. Then right-click its primary key to select a Delete option. Select Yes to confirm and erase.
This registry tweak also works much the same in Windows 10 and earlier Microsoft desktop platforms. So, this isn’t just a Windows 11 trick. As Windows 10 has a classic context menu by default, you don’t need to click Show more options on that menu to select the shortcut.
How to Add Program Shortcuts to the Context Menu With Easy Context Menu
If you prefer not to manually edit the registry, add program shortcuts to the desktop’s context menu with Easy Context Menu. Easy Context Menu is a freeware third-party app for customizing context menus in Windows 11/10. It enables you to add and remove shortcuts to and from the context menu. This is how you can add shortcuts for opening programs to Windows 11’s context menu with that software:
Open this Easy Context Menu page in a web browser and download the app.
Extract the ec_menu ZIP archive with a method in this article about unzipping ZIP files in Windows 11 .
Open the extracted ec_menu folder and double-click the EcMenu_x64 file to open Easy Context Menu.
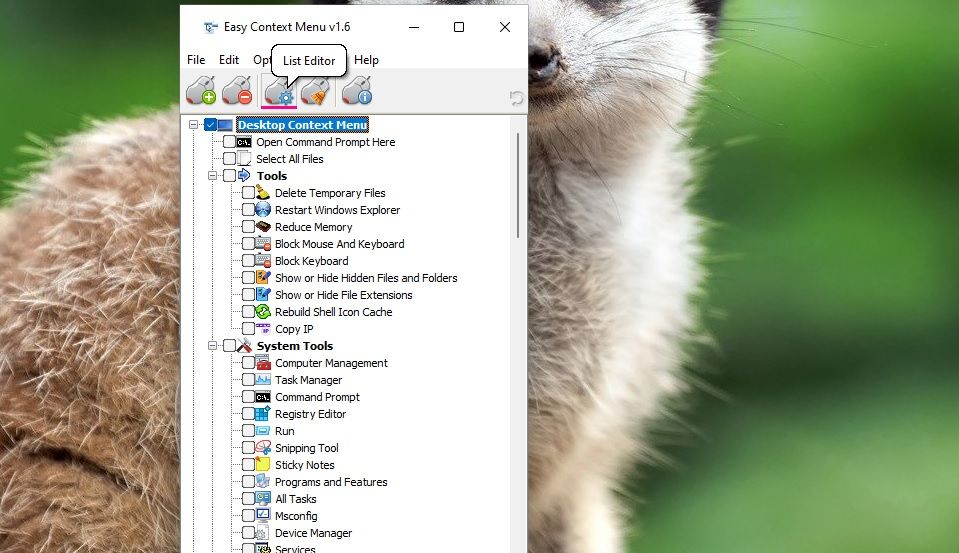
Click the List Editor button.

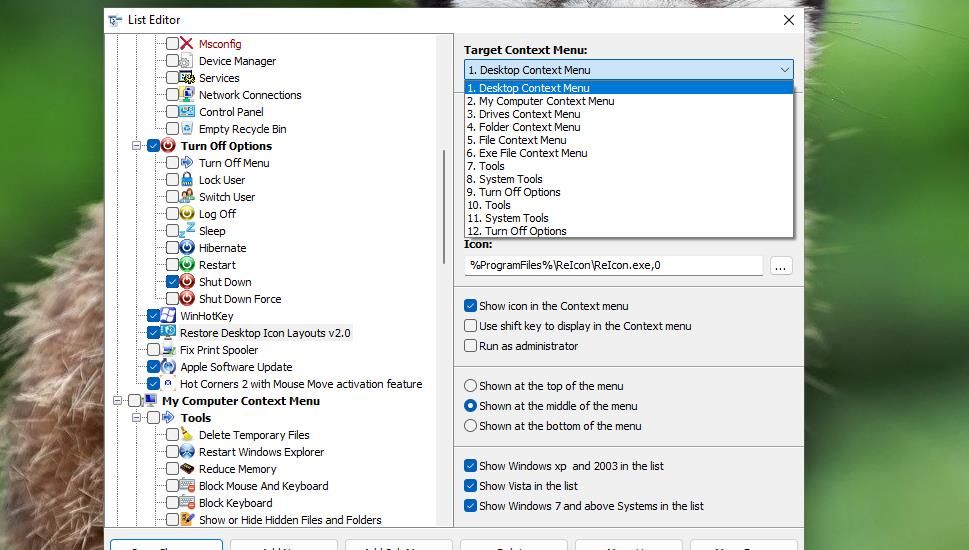
Press the Add new button.
Select the application (EXE) file for a program to add to the context menu and click Open.
Next, select Desktop Context Menu on the Target Context Menu drop-down menu for the shortcut.

Click the Show at bottom of the menu radio button.
Press the Save changes button.
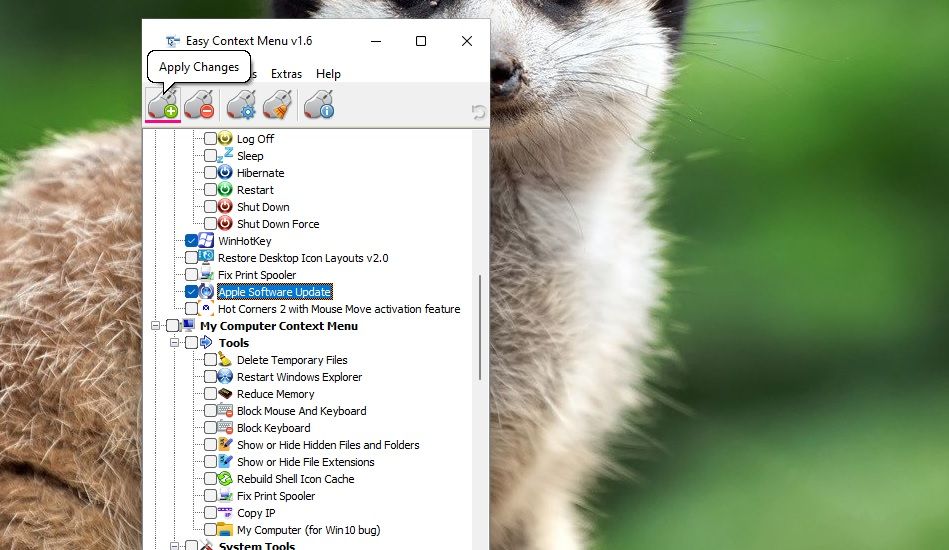
Select the checkbox for the program shortcut in the Easy Context Menu window.
Click the Apply Changes button on the Easy Context Menu window.

Now you’ve added a new program shortcut to the classic context menu in Windows 11. Bring up the classic context menu by right-clicking anywhere on the desktop and selecting Show more options. Then select the new software shortcut, which will be somewhere near the bottom of the classic menu.
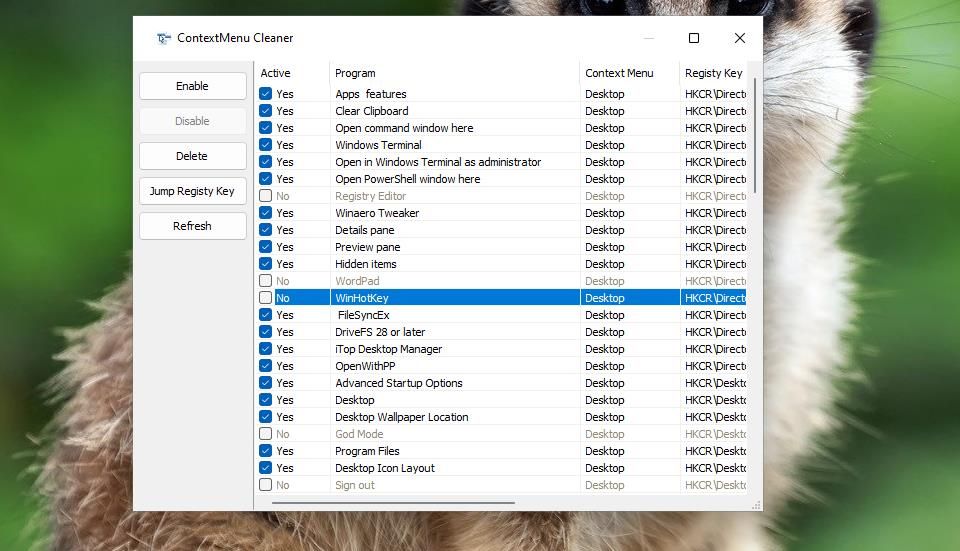
You can remove that shortcut and other options from the right-click menu with Easy Context Menu. To do so, click the ContextMenu Cleaner button; deselect the checkbox for the software shortcut to disable it on the context menu (you can still restore it later). Then click Refresh to save the context menu changes.
There’s also much more you can add to the desktop’s right-click menu with Easy Context Menu than software shortcuts. Easy Context Menu includes many other checkboxes for adding various tools and turn-off options to the right-click menu. Select some of the checkboxes for system tools and turn-off options, and click Apply Changes to add handy shortcuts for accessing utilities and shutting down Windows to the context menu.
Make the Most Out of Windows 11’s Context Menu
Now you can add program shortcuts to the context menu instead of flooding your desktop wallpaper or taskbar with them. That’s a great alternative place to add shortcuts because they don’t clutter your desktop. Keep your Windows 11 desktop clean and tidy by adding more shortcuts to the context menu instead.
Nevertheless, you can still add program shortcuts to the desktop context menu in Windows 11 by editing the registry. By doing so, you can replace desktop shortcut icons with context menu ones.
Also read:
- [New] 2024 Approved Best Tools to Extract and Save Facebook Lite Videos
- [New] Stay Snappin' Strategies for Unbroken Streaks
- [New] YouTube Image Marketing Dos vs Don'ts Explained
- 2024 Approved High-End Broadcast Decision PMix Vs. Wirecast for Professionals
- A Guide Nokia G42 5G Wireless and Wired Screen Mirroring | Dr.fone
- Boost Mouse Click Agility: Nine Strategies to Tweak Speeds
- Crafting Capabilities: Directories with a Click in Win11
- Easy Fixes for Common TikTok Glitches and Errors
- In 2024, Revolutionize Facebook Ads Creative Video Tactics Revealed
- Reconciling Windows Game Bar with Inferior Hardware
- Restoring Lost NVIDIA Configuration: A Guide for WinX Users
- Revitalizing Fall Guys Gaming Experience After Disconnections on Windows
- Revolutionize Your Security: Crafting Unique Lock Patterns for Windows 11
- The Art of Image Enhancement: Building Engaging Slideshows & Fixing Windows 11 Photo Flaws
- The Ultimate List of 6 Performance Monitor Apps For PCs
- Top 10 Password Cracking Tools For Infinix Note 30
- Unveiling Nest Audio's Superiority in Smart Speaker Market - A Must-Have for Connoisseurs of Sound
- Windows 11 Resizing: Discover the Top Six Efficient Methods
- 무료 K-POP 악보가 풍부한 프로그램: 초보자의 최고 선택, 다운LOAD 10걸음
- Title: Expert Guide to Streamline Program Access via Context Menu
- Author: Joseph
- Created at : 2024-11-21 20:01:14
- Updated at : 2024-11-24 16:24:52
- Link: https://windows11.techidaily.com/expert-guide-to-streamline-program-access-via-context-menu/
- License: This work is licensed under CC BY-NC-SA 4.0.
