Essentials of Implementing Windows LAW Filters Effectively
Essentials of Implementing Windows LAW Filters Effectively
Some media players come with them since their creators realize there’s no reason to reinvent the wheel. But you can also download them as a standalone solution and install them yourself.
The result will be broader and better compatibility with most major video and audio formats, increased control over the playback process, and an improved audiovisual experience.
They’re known as “LAV filters” and are a popular and free way to improve your computer’s media playback capabilities. Here’s a quick guide on how to use them.
What Are LAV Filters?
LAV Filters are DirectShow filters that act as alternative decoders of audio and video streams for media players like MediaPlayer Classic Home Cinema (MPC-HC).
Compatible with many formats, from MP4 to MKV and AAC to FLAC, they are highly configurable and come with various options for adjusting output to better match your equipment.
The best part is that these open-source filters are regularly updated, making them problem-free, ever-evolving, and quick to adopt new features.
How to Install LAV Filters for Use With Your Media Player
Most modern media players come with options to replace their default decoding with LAV filters. MPC-HC has the LAV filters built-in. Other players can “collaborate” with LAV filters if you install them manually.
If you’re using a newer version of MPC-HC, you can skip this section and proceed to configure LAV Filters. For other media players, install LAV Filters like this:
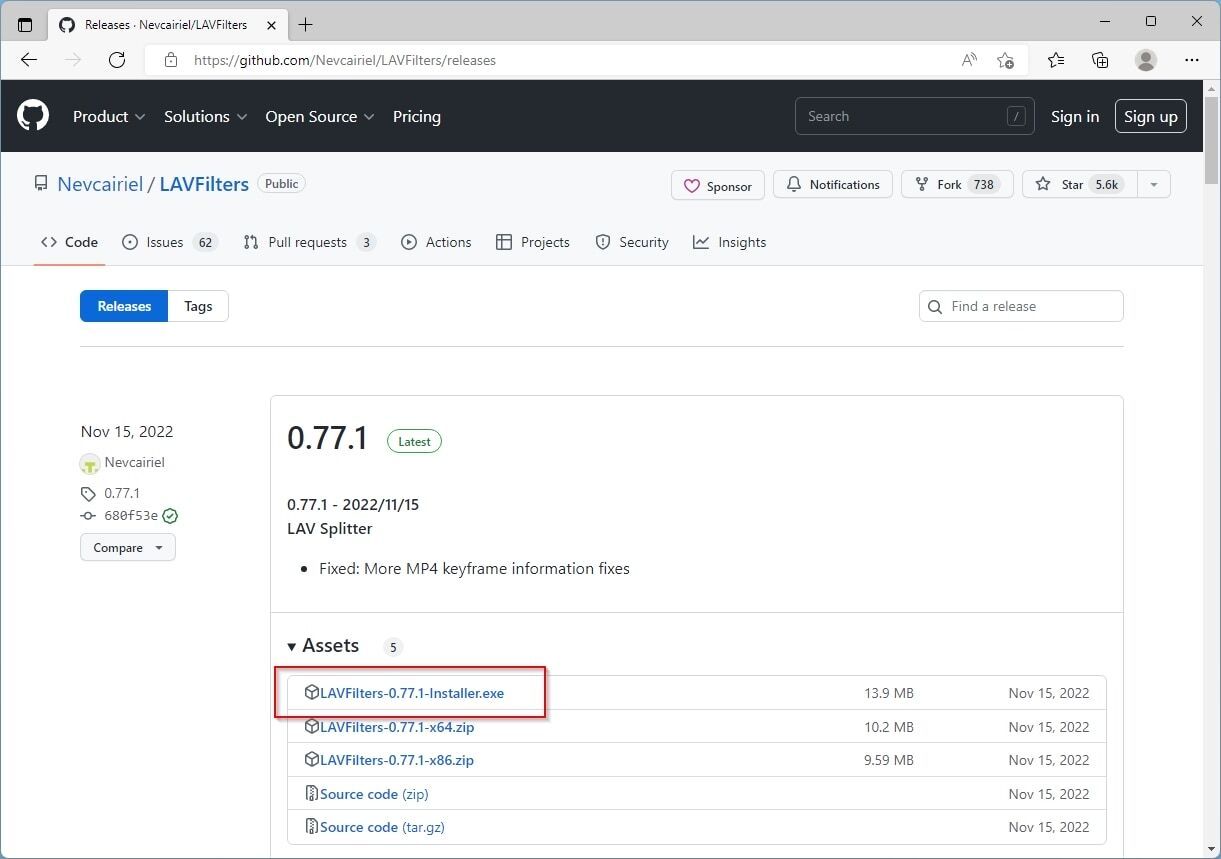
- Download their installer from LAV Filters’ Github page .

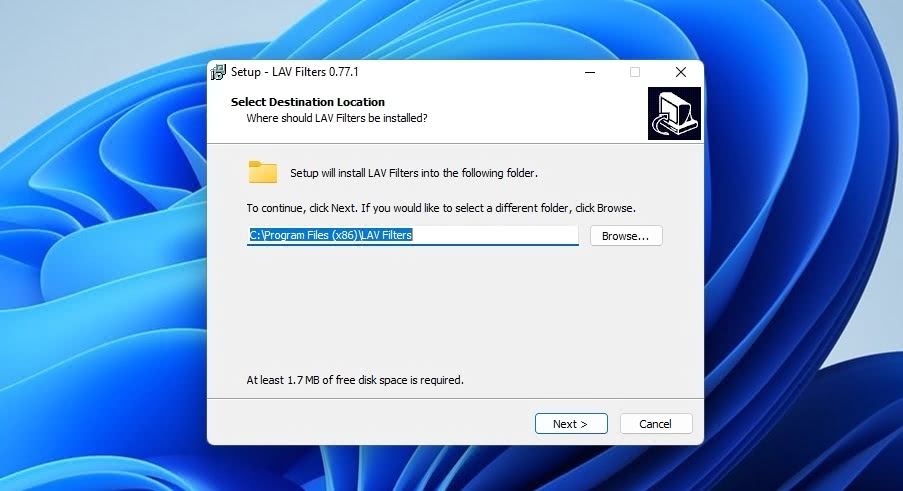
- Execute the downloaded installer and leave the defaultDestination Location as is.
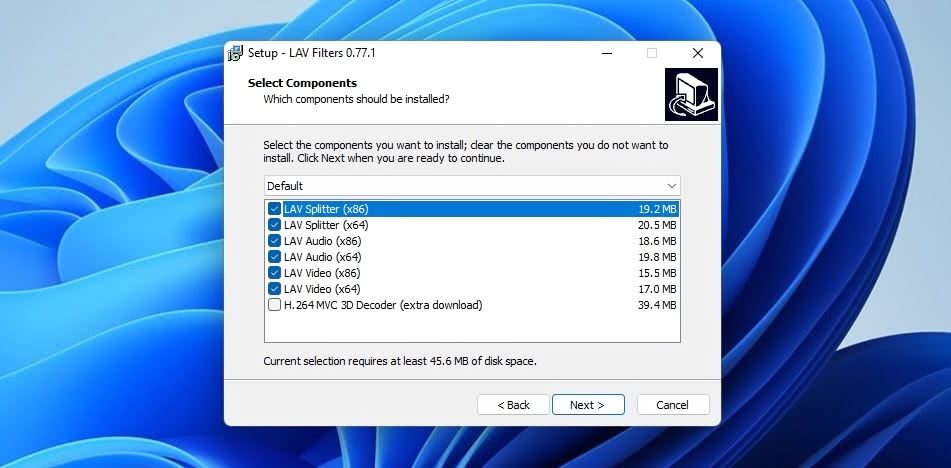
- Make sure all components are marked for installation on the installer’sSelect Components page. SkipH.264 MVC 3D Decoder if you don’t have a 3D-capable display.
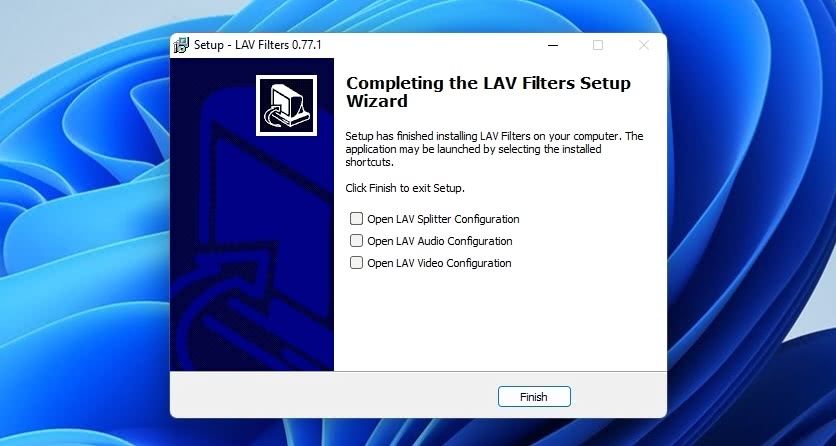
- Leave the rest of the options as they are and hitNext until you reach theCompleting the LAV Filters Setup Wizard page.
- Place a checkmark on all threeOpen LAV X Configuration , where “X” is Splitter, Audio, and Video.

Although MPC-HC already comes with LAV filters, we’re also using it in the following example to keep things simple. However, we made the steps “generic enough” to show you how to add LAV filter functionality to any media player that supports external filters, like PotPlayer.
- Run your media player of choice and visit itsOptions ,Settings , orPreferences page. From there, locate its Filters (for example, in PotPlayer, you’ll find them under theFilter Control sub-page of the app’s options).
- Disableall internal filters/methods related to “splitting” or “demuxing” files, audio, and video.
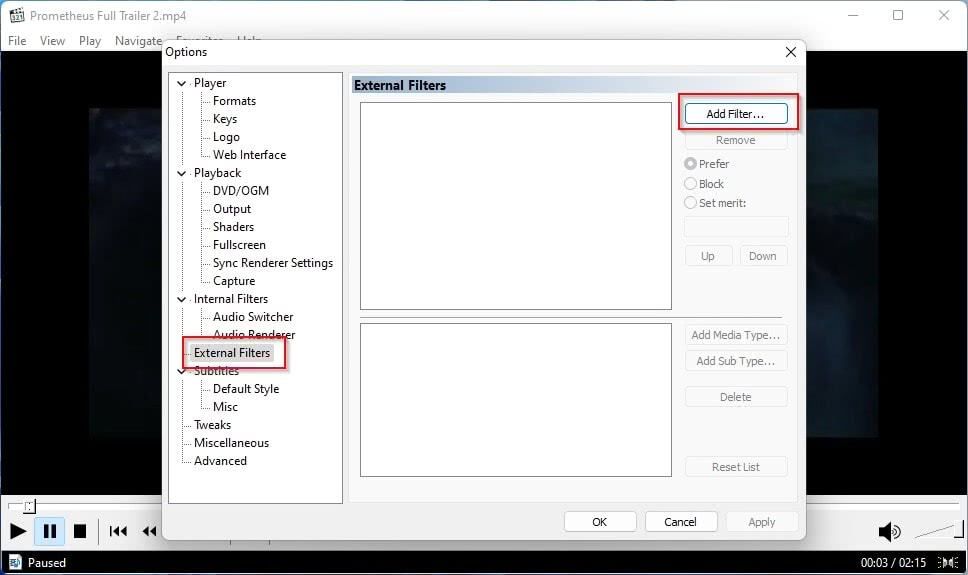
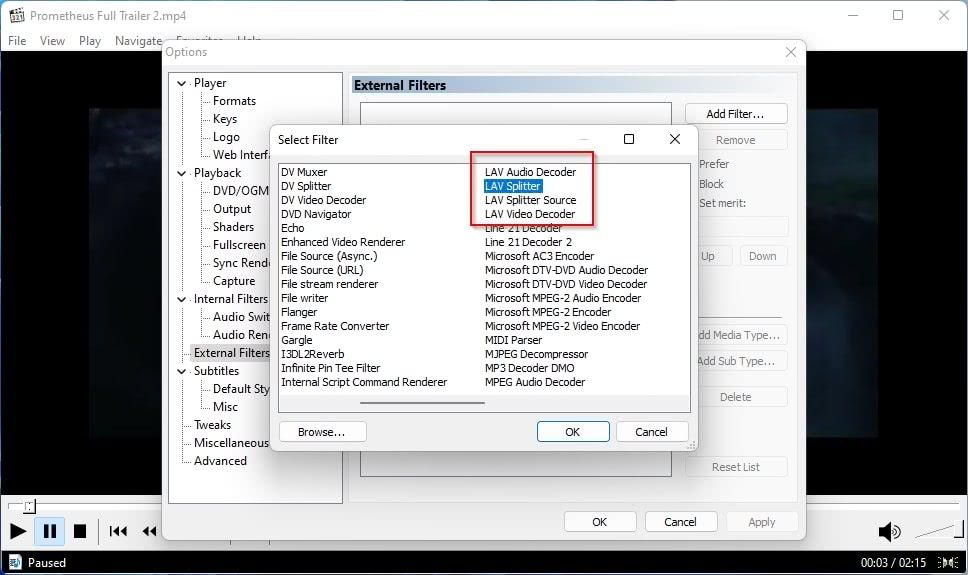
- Move to your media player’s option page about “external filters” and select that you want toAdd (a)Filter .
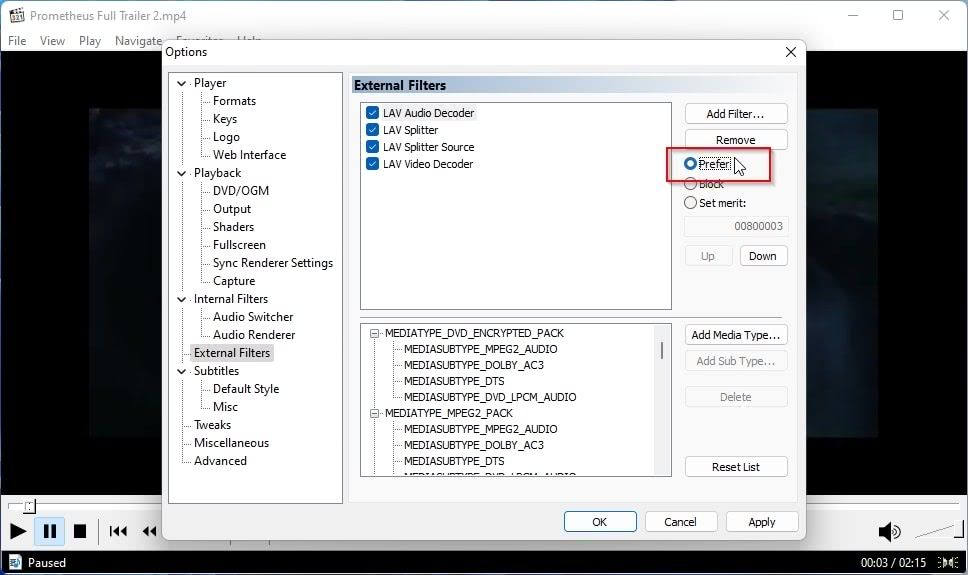
- Choose all four entries related to the LAV Filters:LAV Splitter ,LAV Splitter Source ,LAV Audio Decoder , andLAV Video Decoder . You’ll probably have to add them one by one.
- Depending on your media player, ensure they also appear in that order (for example, PotPlayer offers extra up/down buttons for re-arranging them) and are enabled/have a checkmark next to them (PotPlayer) or are set toPrefer (old versions of MPC-HC).
- On PotPlayer, you’ll also have to enable all formats for them when adding them from theSource/Splitter >Filter Management panel. Click on each of the LAV filters and then enable the appropriate formats for it - file formats for the twoSplitters , audio formats for theAudio Decoder , and video formats for theVideo Decoder . Then, move to eachFilter Control sub-section, likeVideo Decoder andAudio Decoder , and ensure the LAV filters are set as the default for all formats.
- After a click onOK to close your media player’s settings window, LAV Filters should have replaced its internal media-splitting and decoding functions. Close and re-run the app to ensure all changes have been applied.

 Lyric Video Creator Professional Version
How to Configure LAV Filters for Your Media & Hardware
You can configure the LAV filters from their entries in the Start menu. Click on theStart button or press theWindows Key on your keyboard. Then, type “LAV Filters” to locate them, and “run” each filter’s configuration panel.
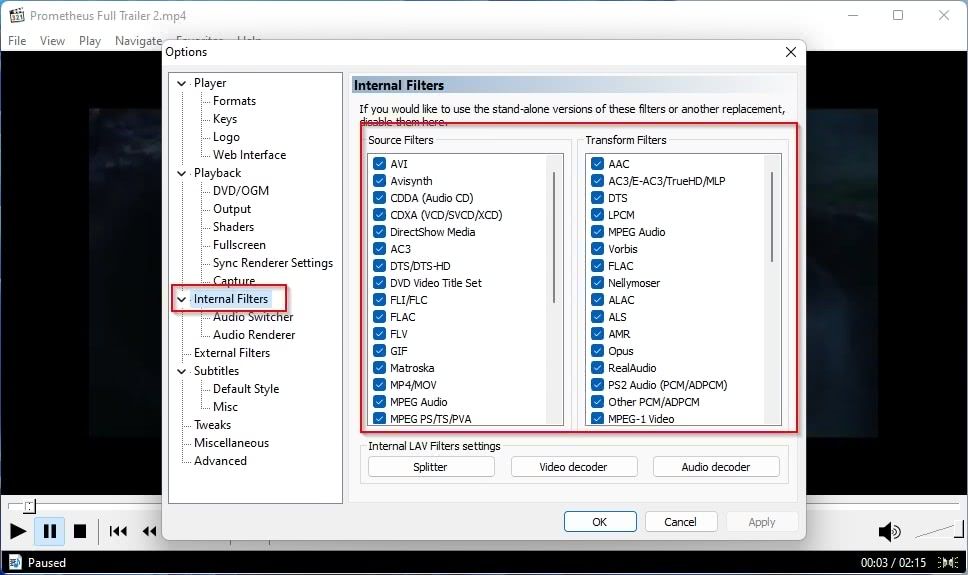
In the last versions of MPC-HC, where the LAV filters are “baked-in”, you can move to the app’sOptions and, from there, to theInternal Filters section. At the bottom of the page, you’ll see three entries underInternal LAV Filters settings .
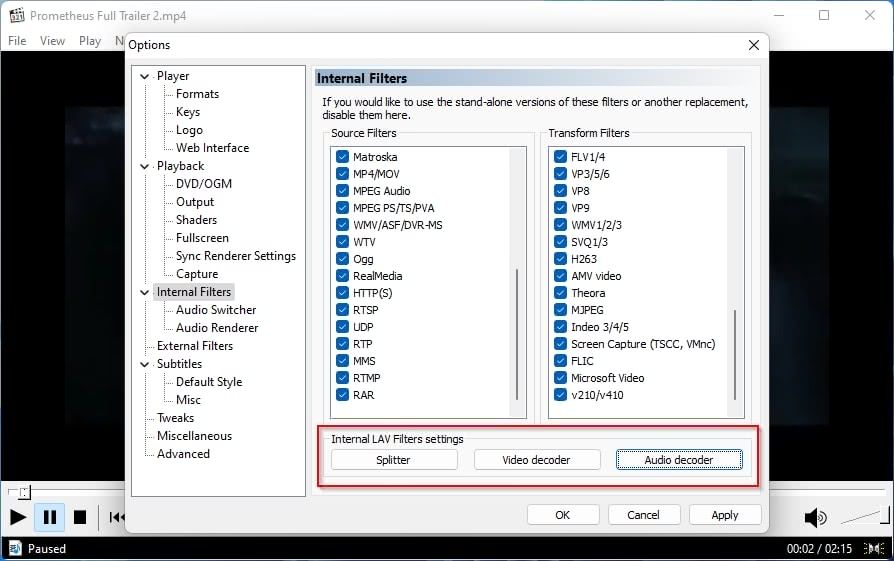
Click on each to access the settings panel for theSplitter ,Video decoder , andAudio decoder LAV filters, respectively.
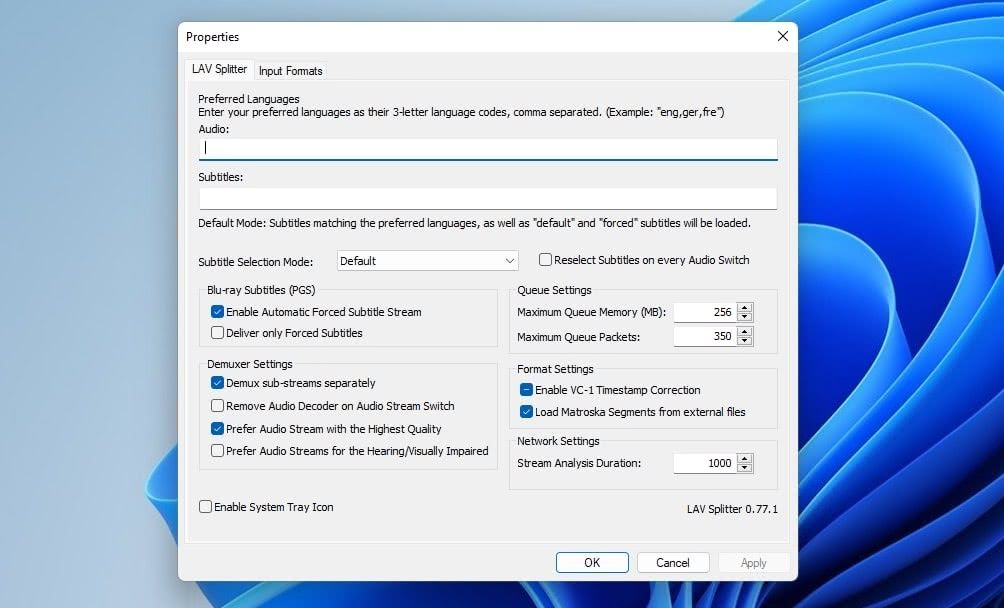
- For the LAV Splitter, you can leave most options as they are. To have it auto-select your preferred language for audio and subtitles, enter its shortcode (like “en” for English) in the fields underAudio andSubtitles . Place a checkmark onEnable System Tray Icon on the bottom left of the window to have the LAV Splitter filter’s options easily accessible from the Windows tray.
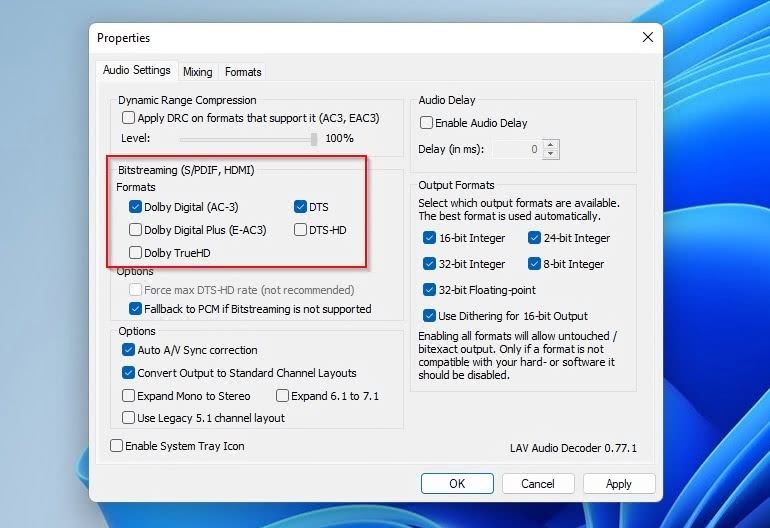
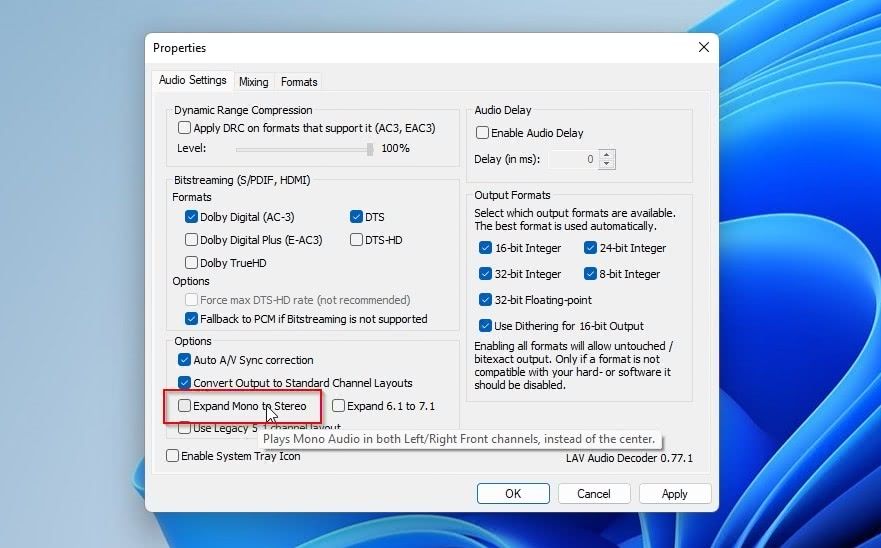
- For theAudio Decoder settings, if the “audio gear” where your PC “sends” its audio (headphones, speakers, monitor) can decode digital streams, enable the appropriate formats underBitstreaming . We can’t offer suggestions on how to do that since different audio equipment requires different settings. LeaveFallback to PCM if Bitstreaming is not supported so that if your audio gear can’t play the above formats, you’ll still hear audio.
- If you’re using a multi-speaker setup, monophonic streams will only play from a single speaker by default. If you’d prefer the classic approach of “expanding” the mono stream to two stereo speakers, enableExpand Mono to Stereo . We’d suggest you also enableExpand 6.1 to 7.1 if you use a 7.1 speaker setup with your PC.
- The next option,Use Legacy 5.1 Channel Layout , may be helpful if your speakers go haywire while playing 5.1 audio and you don’t hear “properly placed” positional audio. If you don’t know what to choose, and only know “you’ve got a bunch of speakers”, check out our guide on how to understand surround sound systems for beginners .
- Make sure to also place a checkmark onEnable System Tray Icon for LAV Filters’ Audio Decoder. Then, move to theMixing tab.
Power Tools add-on for Google Sheets, 12-month subscription
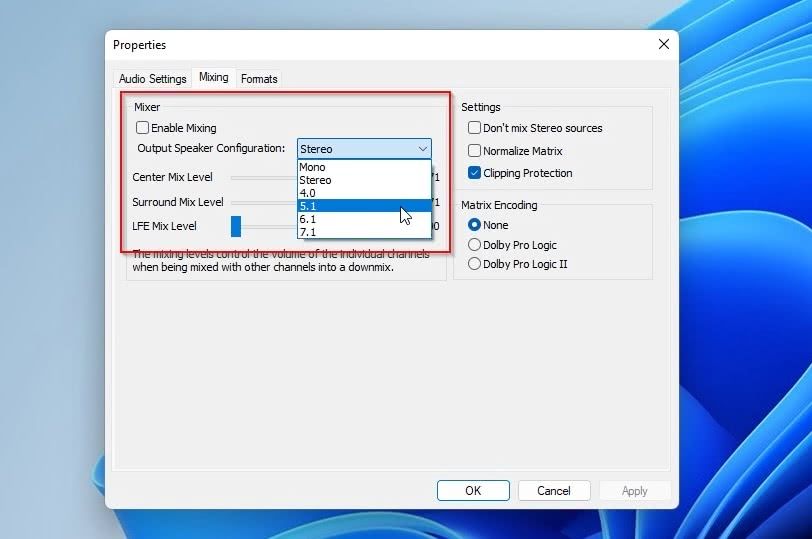
- If you play a lot of audio that doesn’t match your sound output setup, for example, watching old movies with stereo sound on a 5.1 speaker setup, you can have LAV Filters upmix or downmix the sound to “morph” it for your audio gear. Place a checkmark beforeEnable Mixing and choose your speaker setup from the drop-down menu next toOutput Speaker Configuration . You can also individually configure the sound levels for the center speaker, behind left and right speakers, and subwoofer (LFE).
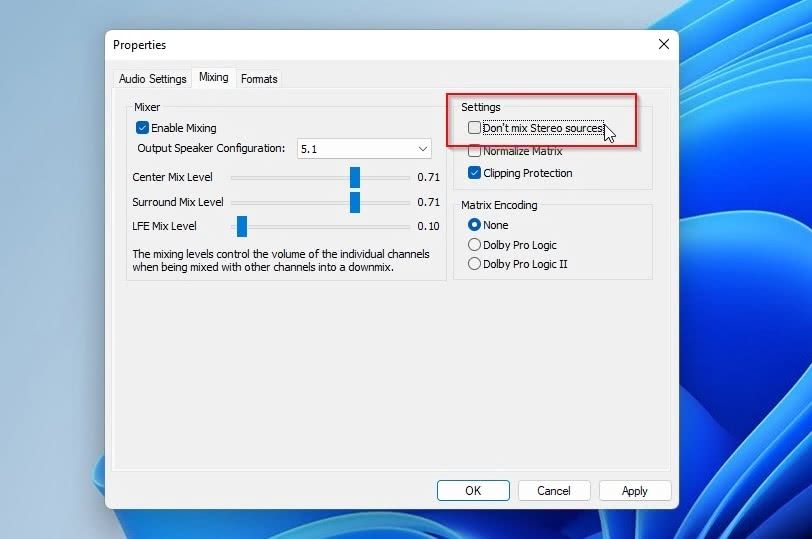
- If you use the same media player for listening to music, you might want to ensure stereo sources (like most of your beloved music) will remain untouched (and “untainted”) from any mixing shenanigans. For that, enable the optionDon’t mix Stereo Sources on the top right of this panel. ClickOK to accept and save the changes.
OtsAV TV Webcaster
- Finally, for the video settings, choose the best hardware decoder for your GPU underHardware Acceleration . At the time of writing (beginning of 2023),DXVA2 andCUVID are better on Nvidia GPUs, whileD3D11 may work best on AMD’s offerings. It’s also worth trying those options out on newer Intel Arc GPUs since they use a different decoding engine than the one for which the optionIntel(R) QuickSync (old) was built.
- Remember the optionEnable System Tray Icon here, too. After enabling it, clickOK to save the changes and close the last LAV Filters configuration panel.
 OtsAV TV Webcaster
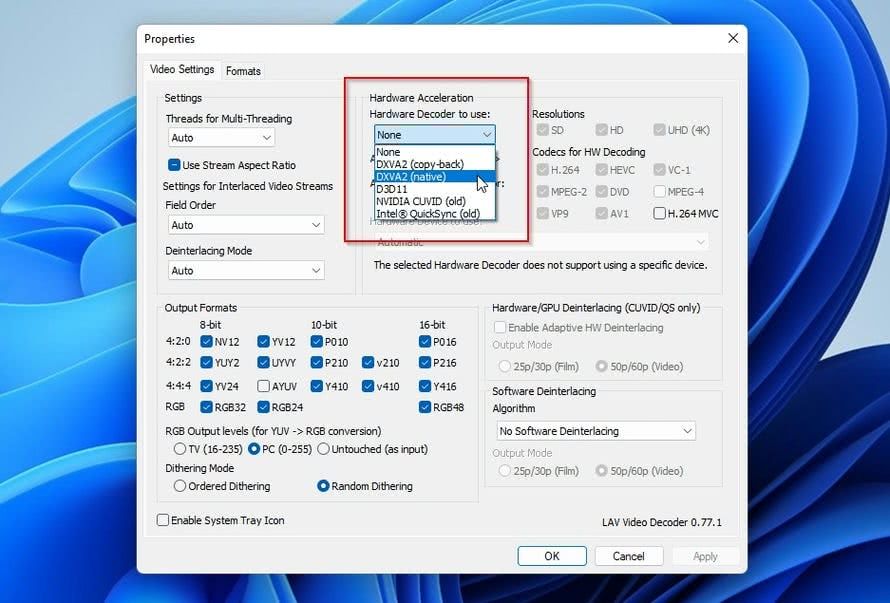

Although your videos will play perfectly with LAV filters, if you try to grab some screenshots of your favorite scenes, they might appear blurry. Thankfully, we have a guide on how to save frame-perfect video screenshots on Windows using a media player that can help you solve this problem, too.
 WinUtilities Pro
Achieve Optimal Playback With LAV Filters
After making sure to close and re-run your media player, LAV Filters should be installed, configured, and ready to go. Try playing some media as usual, and you should see the LAV Filters’ icons pop up on the Windows tray.
More importantly, you should see an improvement compared to your media player’s native decoding, smoother playback, and possibly lower CPU utilization!
- Title: Essentials of Implementing Windows LAW Filters Effectively
- Author: Joseph
- Created at : 2024-08-15 16:01:06
- Updated at : 2024-08-16 16:01:06
- Link: https://windows11.techidaily.com/essentials-of-implementing-windows-law-filters-effectively/
- License: This work is licensed under CC BY-NC-SA 4.0.