Ensuring Continuous Access to Your Digital Post-Its

Ensuring Continuous Access to Your Digital Post-Its
Sticky Notes on Windows turn your computer into a virtual board for posting notes, reminders, lists, and pretty much anything that you need to remember at a glance. So it makes sense that you wouldn’t want to lose them, whether you’re switching computers or a problem with your PC has caused you to lose your data.
In this guide, we’re going to show you a couple of ways to back up your sticky notes on Windows.
How to Back Up and Restore YourSticky Notes Using a Microsoft Account
The easiest way to back up your sticky notes is to use a Microsoft account, which stores the notes on the cloud. If you don’t have one already, then you can learn how to create a Microsoft account or skip to the next section to learn how to back up the notes manually.
If you’ve been using Windows with your Microsoft account all along, the notes could be synced to the cloud already. If you’re not, you can switch from a local account to a Microsoft account for that to happen.
To be sure if Sticky Notes is syncing your notes already or, if you’re using a local account, give the app the ability to do so, follow the steps below:
- Connect your Windows PC to the internet and open Sticky Notes.
- Click on Settings (the gear icon) in the top right corner.
- If you’ve already signed in, you’ll see the details of your Microsoft account at the top with a Sign out link. If that’s the case, you can skip to step #7 to sync the notes. If you’re not signed in, click Sign in.
- In the Use one of these accounts section, select the Microsoft account you want to sign in with. If there are no accounts there, select either Microsoft account or Work or school account in the Use a different account section.
- Click Continue and follow the instructions to complete the sign-in process.
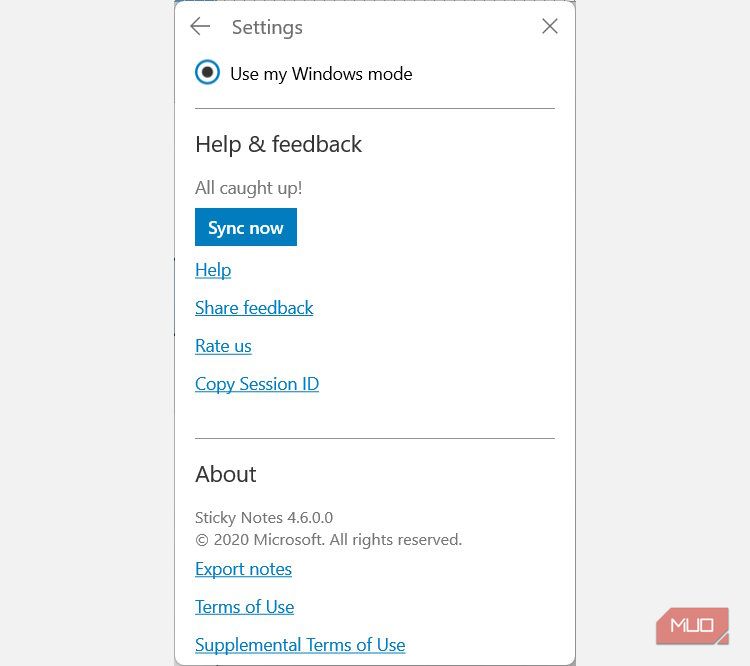
- Once you’re signed in, click on Settings again in the top right corner.
- Scroll down and click Sync now.

To restore the notes on another computer, open the Sticky Notes app (make sure the PC is connected to the internet) and sign in with your Microsoft account. Once signed in, the app will load all the notes you previously synced. Furthermore, every time you finish writing a Sticky Note or edit one, the app will automatically back it up to the cloud.
How to Manually Back Up and Restore Your Sticky Notes
If you don’t want to use a Microsoft account or want to have an extra backup of your sticky notes, then you can manually back them up yourself. While it’s not as easy as just syncing them to the cloud, it can definitely come in handy when you don’t have internet access and want to restore the notes.
To manually back up your sticky notes, follow the steps below:
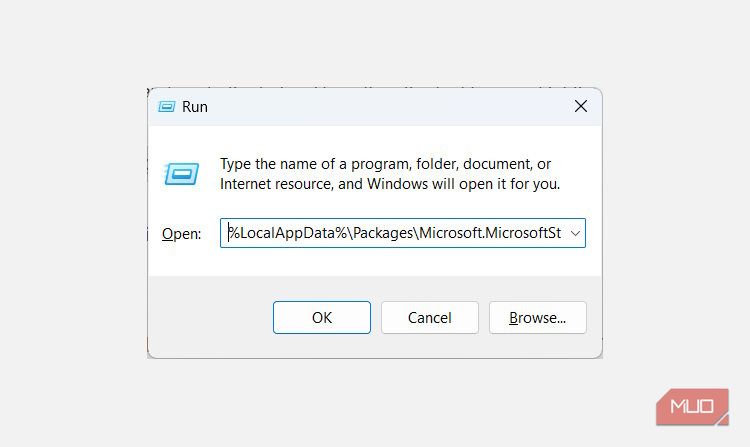
- Copy the following file path: %LocalAppData%\Packages\Microsoft.MicrosoftStickyNotes_8wekyb3d8bbwe\LocalState.
- Press Win + R to open Windows Run, paste the file path in the text box, and hit the Enter key.

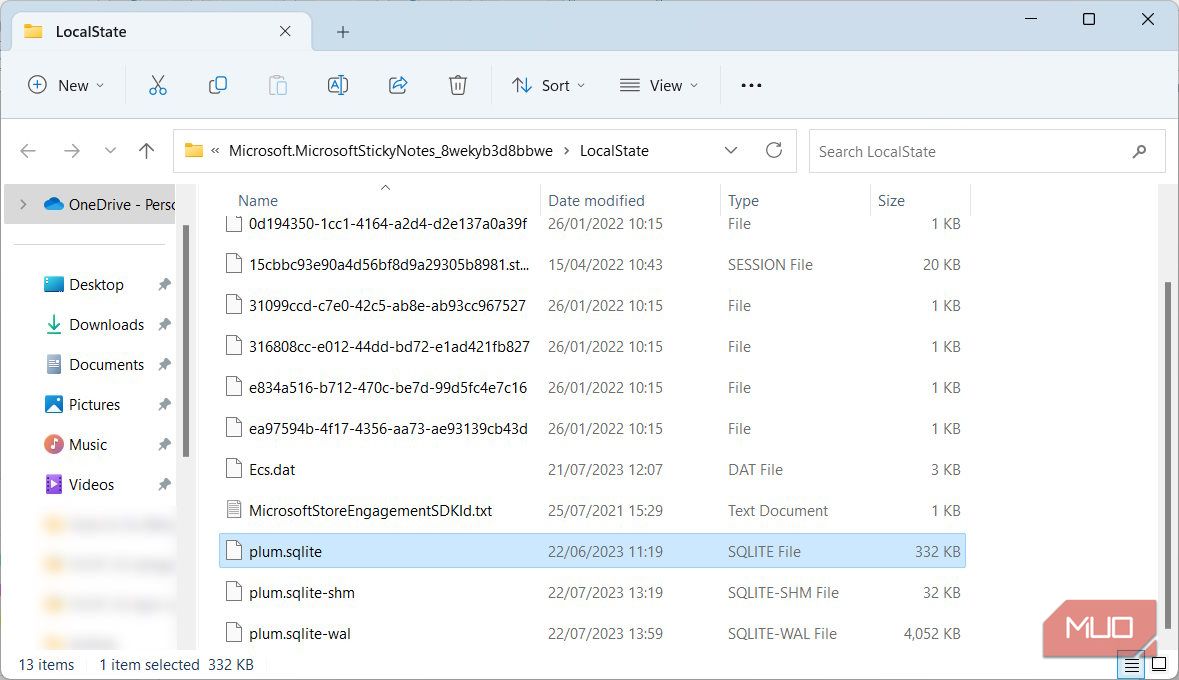
- In the LocalState folder, copy the plum.sqlite file.

4. Paste the plum.sqlite file to an external drive, such as a flash drive or external SDD, or upload it to cloud storage, such as OneDrive or Google Drive, for safekeeping.
To manually restore your sticky notes on another Windows computer, follow the steps below:
- Copy the following file path: %LocalAppData%\Packages\Microsoft.MicrosoftStickyNotes_8wekyb3d8bbwe\LocalState.
- Press Win + R to open Windows Run, paste the file path in the text box, and hit the Enter key.
- Go to where you saved the backup of your sticky notes (the plum.sqlite file) and copy it.
- In the LocalState folder, delete the current plum.sqlite file.
- Paste the backup plum.sqlite file in the LocalState folder.
Now when you open Sticky Notes, it will load the plum.sqlite file, and you should see all your notes appear in the app.
Never Lose Your Sticky Notes Again
Losing your sticky notes means you could lose potentially important information. So it makes sense to always have a copy stored somewhere in case you need to restore them. We recommend using your Microsoft account to back up the notes, considering it’s convenient to both sync and restore them later on, but it’s also a good idea to know that there’s a manual option available.
In this guide, we’re going to show you a couple of ways to back up your sticky notes on Windows.
Also read:
- [New] Essentials to Skyrocketing Video Views on YouTube
- [New] Swift Techniques for Shifting iPhone Media to PC
- 2024 Approved Transform Your Images Into NFTs - The Best Generators Listed
- Biometric Betrayal: Windows Hello's Security Under Fire?
- Circumventing Windows Security Controlled by Domain Admins
- Correction of Inaccessible Device Path Issue in Win
- Discovering Facebook's Core Design Ethos
- Evaluating Your System’s Electrical Utilization on Windows OS
- Expert Guidance: Manual Time Zone Setup for Windows Users
- In 2024, Fake the Location to Get Around the MLB Blackouts on Honor 90 GT | Dr.fone
- Incorerpt Quotes From Siegel's Research as Titles for Different Sections of the Assembly Instructions (E.g., The Key Here Was...).
- Quick Remedy for Rearranged Character Inputs
- Secure Your Account: Easy Password Reset Instructions Using YL Computing's Control Panel
- Smoothening Playback Speed in VLC for Windows
- The Dore Lectures on Mental Science | Free Book
- Troubleshooting Synaptics Pointing Device Drivers Compatibility with Windows nX
- Windows 11'S Evolution: Unveiling the Latest System Updates
- Title: Ensuring Continuous Access to Your Digital Post-Its
- Author: Joseph
- Created at : 2025-01-03 04:41:31
- Updated at : 2025-01-04 04:29:27
- Link: https://windows11.techidaily.com/ensuring-continuous-access-to-your-digital-post-its/
- License: This work is licensed under CC BY-NC-SA 4.0.

