Enabling Steam Library Folder Editability in Win 11
Enabling Steam Library Folder Editability in Win 11
While Steam is without any issues for many, some users face the “Steam library folder not writable” error when they try to install a game using the Steam client. The error also appears while installing an update for the app.
If you face the same predicament, don’t fret. Let’s explore multiple methods to resolve this annoying error code and help you successfully install your games on Steam again.
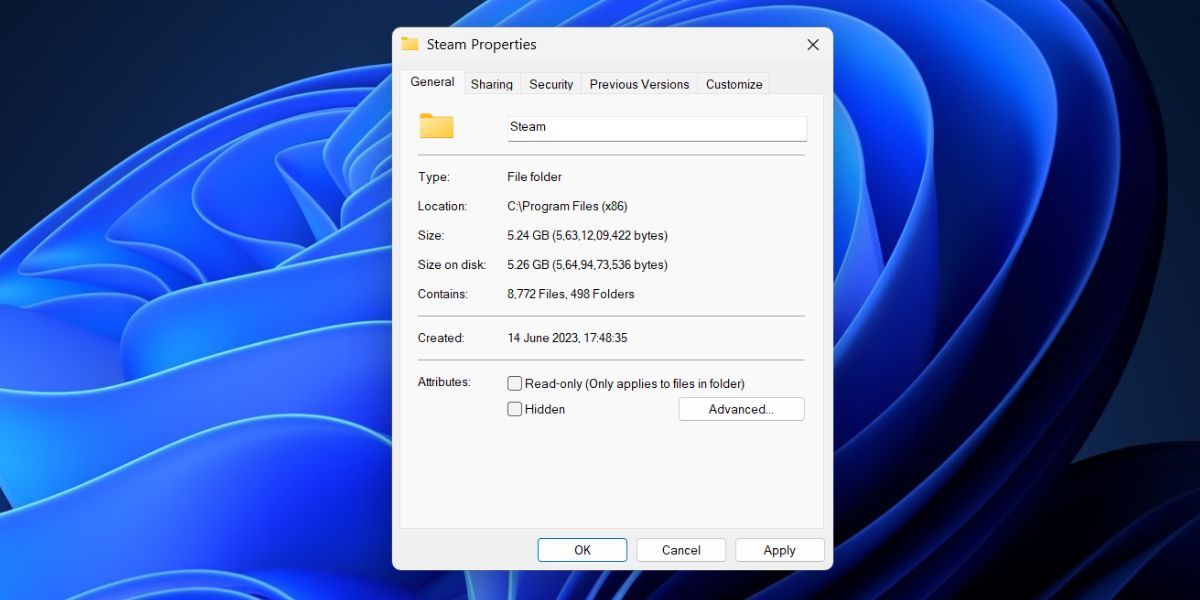
1. Change the Steam Folder Attributes
Steam needs to have both read and write permissions to make changes to any sub-folder inside the Steam folder. If the steamapps folder is set to “read-only,” the error can pop up and prevent you from installing the game. Repeat the following steps to change the Steam folder attributes:
- Press Win + E to open a new File Explorer window .
- Type the following path in the address bar at the top and press the Enter key to navigate to it: C:\Program Files (x86)
- Double-click on the Steam folder. Now, right-click on the steamapps folder and select the Properties option from the context menu.
- Navigate to the Attributes section and uncheck the Read-only option.

- Click on the Apply button and then click on the OK button.
- Closethe File Explorer window and reopenthe Steam client.
- Try to install the game and check if the error appears or not.

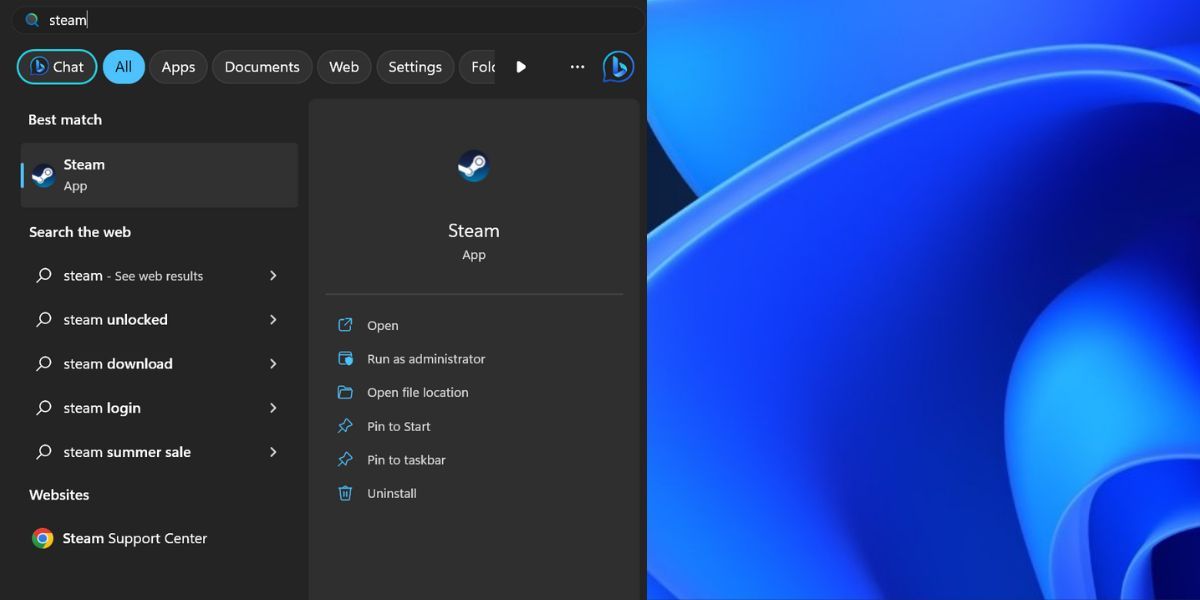
2. Run the Steam App With Administrator Privileges
Missing privileges can cause issues with some features in Steam. So, you must close and restart the Steam app with admin rights. Here’s how:
- Press Ctrl + Shift + Esc keys together to launch Task Manager .
- Find the Steam process and right-click on it. Select the End Task Option.
- Press the Win key, type Steam, and click on the Run as administrator option.
- The User Account Control window will launch. Click on the Yes button.
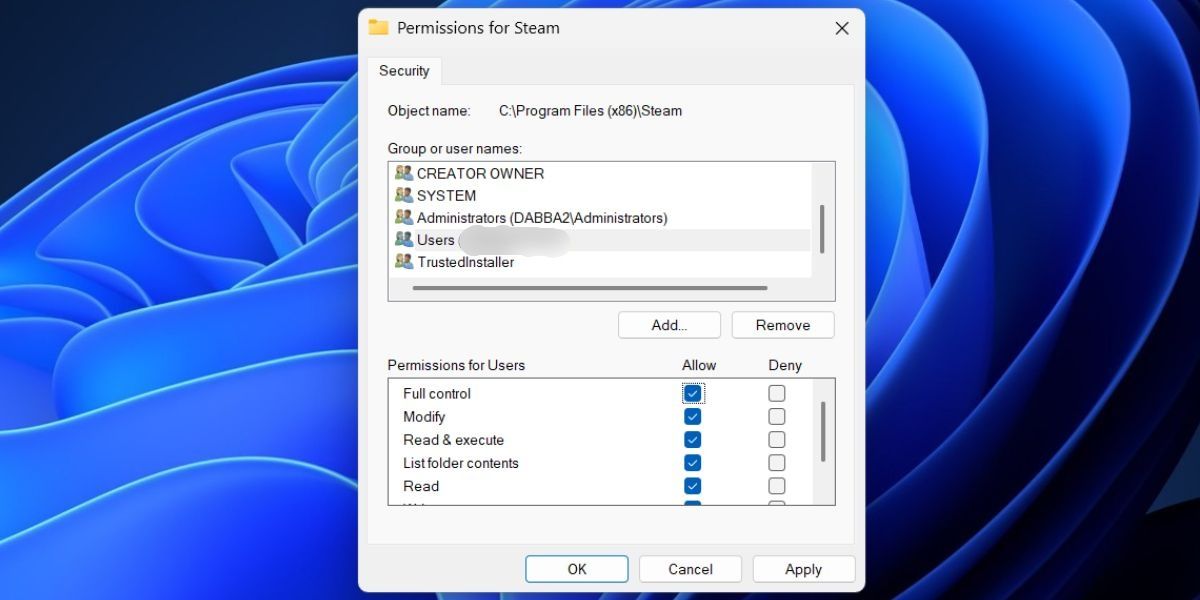
3. Grant Full Ownership of the Steam Folder
If you don’t have complete ownership of the Steam folder, you can face problems while installing a game or making changes to any file or folder. Repeat the following steps to gain complete ownership of the Steam folder:
- Press Win + E to open the File Explorer.
- Type “ C:\Program Files (x86)” in the address bar at the top and press Enter to navigate to it:
- Click on the Steam folder to select it. Then, press Alt + Enter to open the Properties window.
- Switch to the Security tab.
- Click on the Edit button.
- Select your User Profile and click on the Edit button.
- Click on the Full Control checkbox to grant all the permissions for your user profile.
- Now, click on the Apply button.
- Lastly, click on the OK button and then close the Properties window.
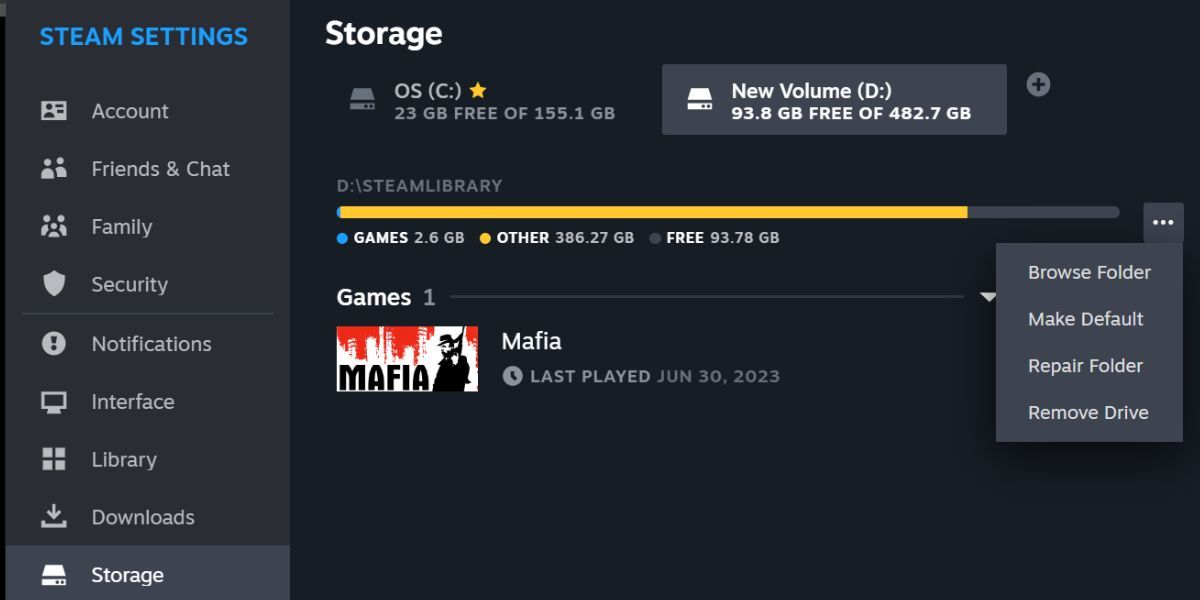
4. Repair the Steam Library Folder
Steam offers the option to repair the Steam library folders to fix issues with it. Here’s how to repair the folder using the Steam app:
- Open the Steam client.
- Click on the Steam button at the top left corner and then click on the Settings option in the context menu.
- Scroll down and click on the Storage option.
- Click on the horizontal ellipsis (three dots) button. Select the Repair folder option.
Epubor Audible Converter for Mac: Download and convert Audible AAXC/AA/AAX to MP3 with 100% original quality preserved.
- The User Account Control window will pop up. Click on the Yes button.
- After the repair completes, click on the Close button.
 Epubor Audible Converter for Mac: Download and convert Audible AAXC/AA/AAX to MP3 with 100% original quality preserved.
 The Tube Sites Submitter is a fast and efficient tool for anyone who needs to upload videos quickly, easily and automatically to hundreds of tube sites in mere minutes .
 5. Re-Add the Steam Library Folder
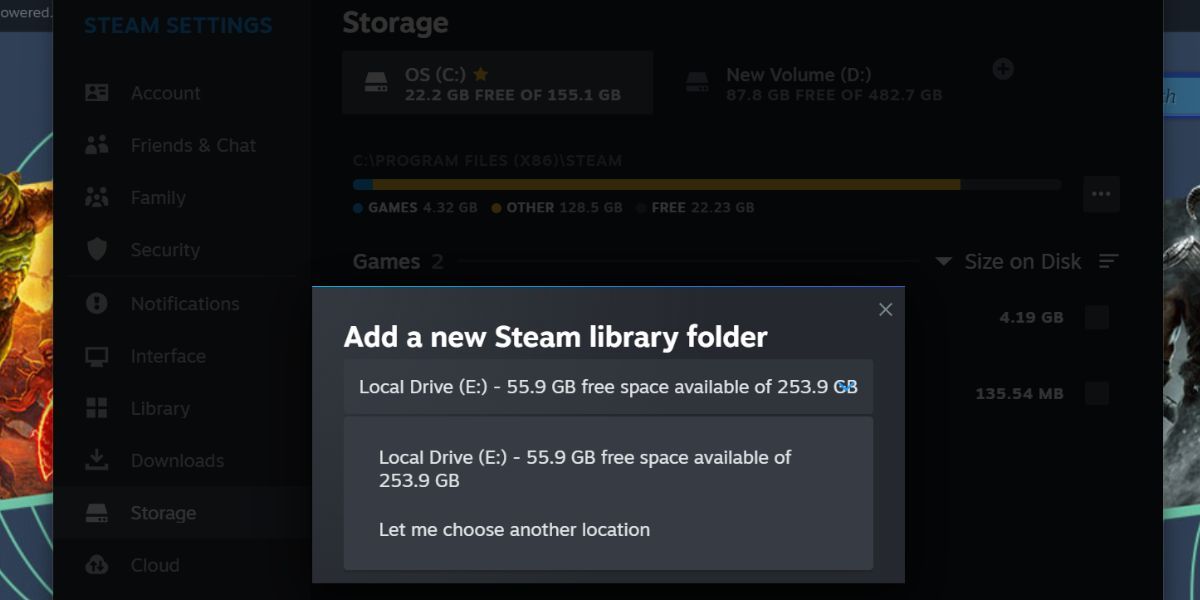
If you still face the “Steam library folder not writable” error, you must remove and re-add the Steam library folder using the Storage settings. Repeat the following steps:
- Open the Steam client.
- Click on the Steam button and then click on the Settings option.
- Scroll down and click on the Storage option.
- Select a Steam library folder and then click on the horizontal ellipsis (three dots) button. Select the Remove Drive option.
- Now, click on the plus icon. Select the folder location and click on the Add button.
- Close and relaunch Steam.

6. Flush the Steam Download Cache
An outdated or corrupt download cache can cause interference while installing games or updating the Steam client. So, you must empty the Steam download cache using the settings. Repeat the following steps to do so:
- Launch the Steam client on your PC.
- Click on the Steam button and then click on the Settings option to open the app settings.
- Navigate down and click on the Downloads option.
- Find the Clear Download Cache option in the right pane. Click on the Clear Cache button.
- Steam will reconfirm your decision to clear the cache. Click on the Confirm button.
- The app will restart after purging the download cache. You will have to sign in again to your Steam account.

7. Run a Check Disk Scan
Hard Disk errors can be a reason due to which Steam is unable to add or modify files. You can use the Check Disk utility in Windows to check your hard disk for errors and fix them. The Check Disk utility will scan the hard disk for errors and repair them, if possible.
8. Reinstall the Game on Another Drive
If you are unable to install the game on the C drive, you must add another drive in the Steam Storage settings. Then, attempt the game installation in the newly added drive. Here’s how to do it:
- Open the Steam app and click on the Steam button.
- Click on the Settings option.
- Scroll down and click on the Storage option.
- Click on the plus icon. Expand the drop-down list and select a drive.
- Now, click on the Add button.

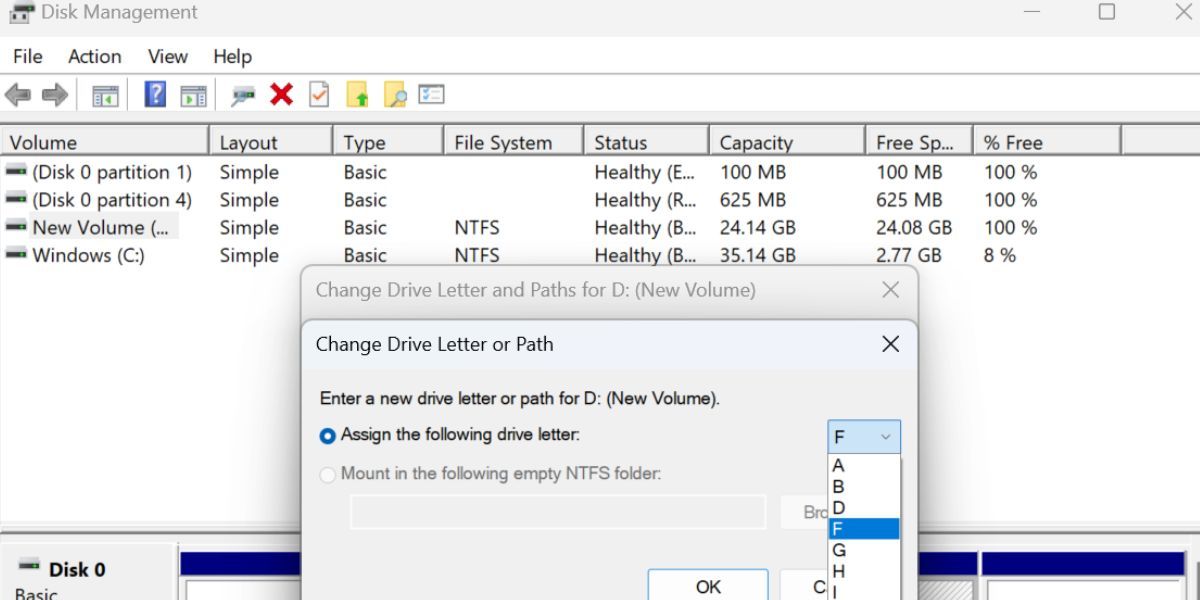
9. Format the Disk and Try Again
Many users want to install games on a newly added disk drive but face the “Steam library folder not writable” error in the process. It is mainly because the newly added disk drive bears the same letter as the old drive with a Steam Library folder.
As such, you must assign a new driver letter and reformat the disk. Here’s how to do it:
- Open the Start menu and type create and format disk partitions. Click on the Open option in the right pane.
- Right-click on the new drive whose letter you want to change. Select the Change Drive Letter and Paths option.
- Click on the Change button.
- Expand the drop-down list and select a new drive letter. Click on the OK button.
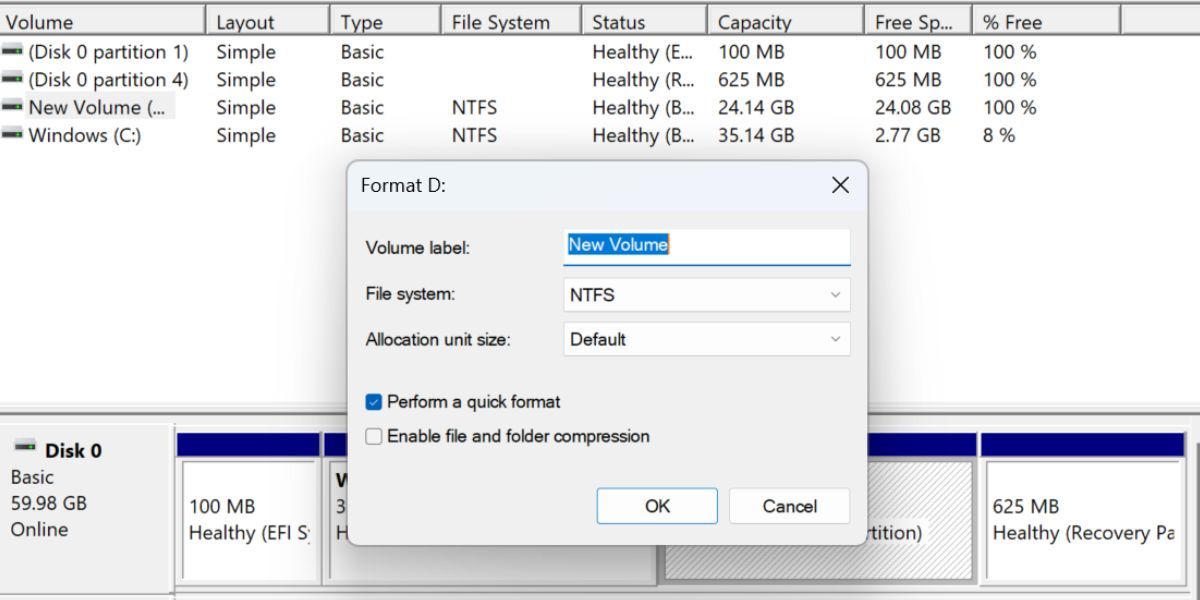
- Now, right-click on the disk drive and select the Format option.
- Keep the File System as NTFS and click on the OK button.
- Lastly, click on the OK button once again.
- Close the Disk Management utility.
Make Your Steam Library Folder Writable Again on Windows
These were the methods to fix the “Steam library folder not writable” error. Start by changing the file attributes and relaunching the Steam app with administrator rights. After that, repair the Steam library folder, flush the download cache, and run a check disk scan to fix disk errors.
If you face the same predicament, don’t fret. Let’s explore multiple methods to resolve this annoying error code and help you successfully install your games on Steam again.
- Title: Enabling Steam Library Folder Editability in Win 11
- Author: Joseph
- Created at : 2024-08-15 16:12:18
- Updated at : 2024-08-16 16:12:18
- Link: https://windows11.techidaily.com/enabling-steam-library-folder-editability-in-win-11/
- License: This work is licensed under CC BY-NC-SA 4.0.