
Eliminating Windows' DISM Failure 0X800F082F Quickly
Eliminating Windows’ DISM Failure 0X800F082F Quickly
DISM is a powerful command-line utility that can help you repair, modify, and update the Windows operating system image, but even the mightiest of tools have their bad days. There are instances when this powerful tool encounters issues of its own, leading to errors like the 0x800F082F error in Windows.
Below, we talk about the different causes of this error, followed the troubleshooting methods that can help you fix it for good.
What Might Be Preventing DISM From Working Properly?
The DISM (Deployment Image Servicing and Management) might not be working properly because of one or more of the following reasons:
- Corrupted component store: The component store contains critical system files and if any of these files become corrupted, DISM may not be able to complete the requested action.
- Network connectivity issues: If you are relying on a network location to access the source files, problems with network connectivity can prevent DISM from working properly.
- Corrupted system files: The corrupt system files in Windows can prevent DISM from modifying or repairing the system image. This can be due to malware infections or hardware problems.
- Insufficient permissions: Tools like DISM require administrative privileges to scan your system and fix issues. If you are not logged into your system as an administrator, you will not be able to run DISM and run into issues like the one at hand.
Regardless of the reason, the different troubleshooting methods we have listed below should help you fix the 0x800F082F error for good. Proceed with the method that fits your situation the best.
1. Perform Some General Windows-Based Fixes
There are a few general Windows-based fixes you can apply to this DISM error that apply to a lot of Windows errors. This includes:

Run DISM in Safe Mode
In some cases, DISM fails to function if a background process or service is conflicting with it.
An easy way to check if this is the case in your situation is by booting into Safe Mode and then using the DISM utility. Safe Mode is a diagnostic environment that boots Windows with a set of only the essential drivers and services.
To do this, check out how to boot into Safe Mode in Windows 10 and Windows 11 . Upon reboot, launch DISM and perform the action that was initially triggering the error.
If a background process was causing it, you should no longer face the issue in Safe Mode. In that case, you can go ahead and perform a system restore , which will essentially restore your system back to a previous point in time where the issue was not present.
Update Windows
Your Windows might also be outdated, which is causing the problem. It is possible that the newer version of DISM has dependencies or requirements that your operating system does not meet.
If you haven’t updated your system in a while, we suggest you take your time to do so. Check out how to update Windows, apps, and drivers for instructions on how to get your PC up to speed.
Once all the updates are installed, your system will automatically reboot. Upon the restart, you can check if the issue is resolved.

company, user or members of the same household. Action! - screen and game recorder</a>
2. Switch to an Administrator Account
Running DISM involves making changes to the system image and accessing critical system files, which requires administrative access to Windows. This is why, before we move on to the specific troubleshooting methods, ensure that you are logged into Windows using your administrator account .
Moreover, switching to an administrator account will also grant you the necessary permissions needed to execute the methods we have listed later in this guide. Without this, you may encounter restrictions or limitations that might prevent you from making changes in the system successfully.
Once you have switched to an administrator account, try using DISM again.

3. Perform a Registry Fix
Several users also managed to fix the problem by editing the SessionsPending key in the Registry Editor.
We have described the steps of doing so below. However, we recommend creating a Registry backup before you proceed, just to be safe.
Once that is done, follow these steps:
- Press the Win + R keys together to open Run.
- Type “regedit” in Run and click Enter.
- Click Yes in the User Account Control prompt.
- In the Registry Editor, navigate to the location below:
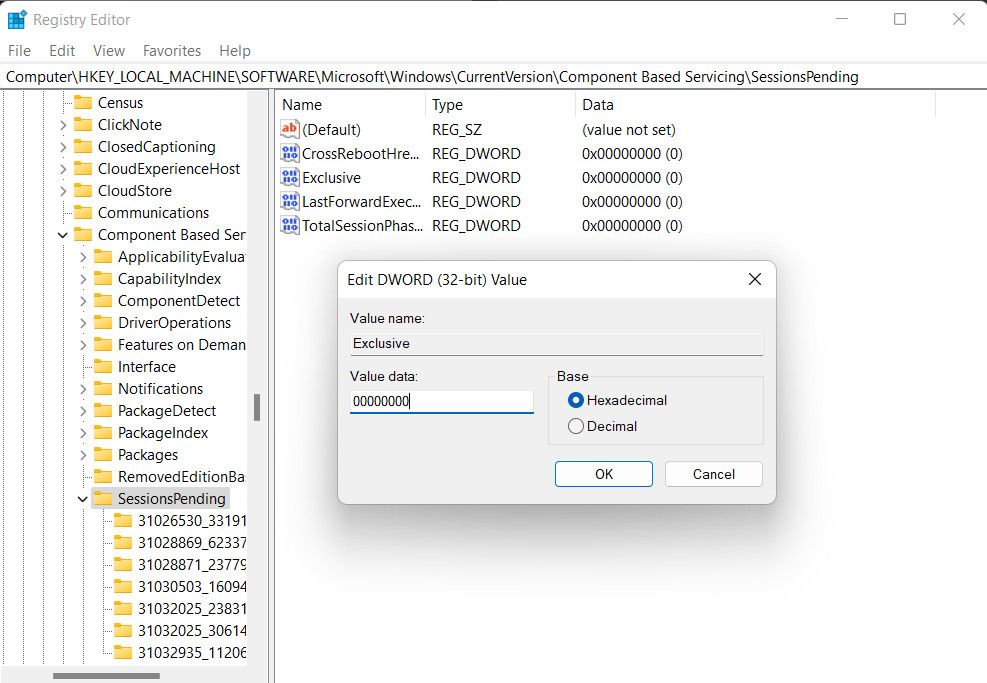
Computer\HKEY_LOCAL_MACHINE\SOFTWARE\Microsoft\Windows\CurrentVersion\Component Based Servicing\SessionsPending - Move to the left side to locate the Exclusive value and double-click on it.
- Change the Value data of Exclusive to “00000000” and click OK to save the changes.
- Modify the Value data of the TotalSessionPhases value in the window the same way.
- Once done, close the Registry Editor and restart your computer.
Hopefully, upon reboot, you will be able to use DISM without any problems.
4. Clean the Component Store
As we mentioned earlier, the component store may have become corrupted, which is preventing DISM from functioning properly.
You can fix this by cleaning the component store using the System File Checker (SFC) and DISM cleanup command. These tool work by scanning the system files for potential errors. If a problematic file is identified, they will replace it with its healthier cached counterpart, fixing the problem.
Here is all that you need to do:
- Press the Win + R keys together to open Run.
- Type “cmd” in Run and click Ctrl + Shift + Enter to open Command Prompt as an administrator.
- Click Yes in the User Account Control prompt.
- Now, paste the following commands in Command Prompt one by one and click Enter to execute them:
dism.exe /online /Cleanup-Image /StartComponentCleanupsfc /scannow
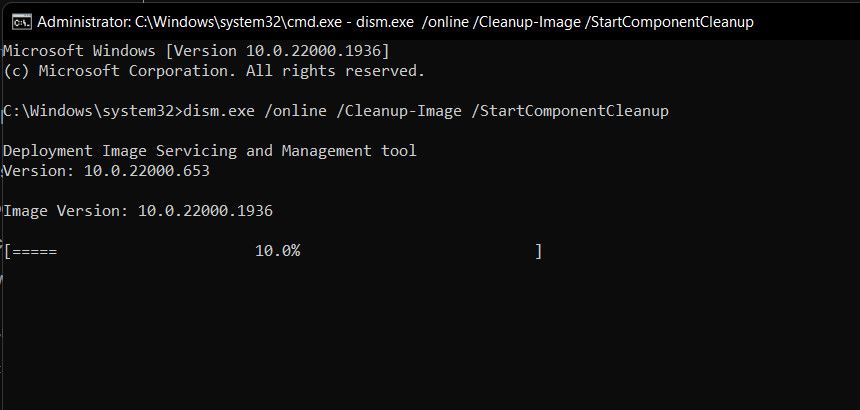
Wait for the commands to execute and once it’s done, close the Command Prompt window. You should now be able to use the DISM without any problems.
 WinUtilities Pro
DISM Error 0x800F082F, Resolved
By following the steps outlined above, you can successfully get DISM up and running again. To avoid this problem from occurring again in the future, we highly recommend installing the system updates on time, avoiding interrupting DISM operations, and maintaining a healthy system.
Below, we talk about the different causes of this error, followed the troubleshooting methods that can help you fix it for good.
- Title: Eliminating Windows' DISM Failure 0X800F082F Quickly
- Author: Joseph
- Created at : 2024-08-15 16:08:10
- Updated at : 2024-08-16 16:08:10
- Link: https://windows11.techidaily.com/eliminating-windows-dism-failure-0x800f082f-quickly/
- License: This work is licensed under CC BY-NC-SA 4.0.