
Decoding the Mysteries of RAM in Windows Devices
Decoding the Mysteries of RAM in Windows Devices
Knowing the type of RAM installed on your Windows PC can help you make more informed decisions when upgrading or diagnosing performance issues. Thankfully, it’s possible to check the RAM type on your Windows PC without opening the computer case and getting your hands dirty.
This guide will walk you through some easy methods for identifying the type of RAM housed within your computer.
1. How to Check the RAM Type With Command Prompt
The most straightforward to check the RAM type on your Windows PC is via Command Prompt. You can use this method even if you’re a beginner with the Command Prompt , as it only requires you to run a single command.
Here’s how you can check the RAM type on Windows using the Command Prompt:
- Right-click on the Start icon and select Terminal (Admin) from the menu that appears.
- Select Yes when the User Account Control (UAC) prompt appears.
- In the console, type the command mentioned below and press Enter.
wmic memorychip get devicelocator, memorytype - Note down the code number under the MemoryType column.

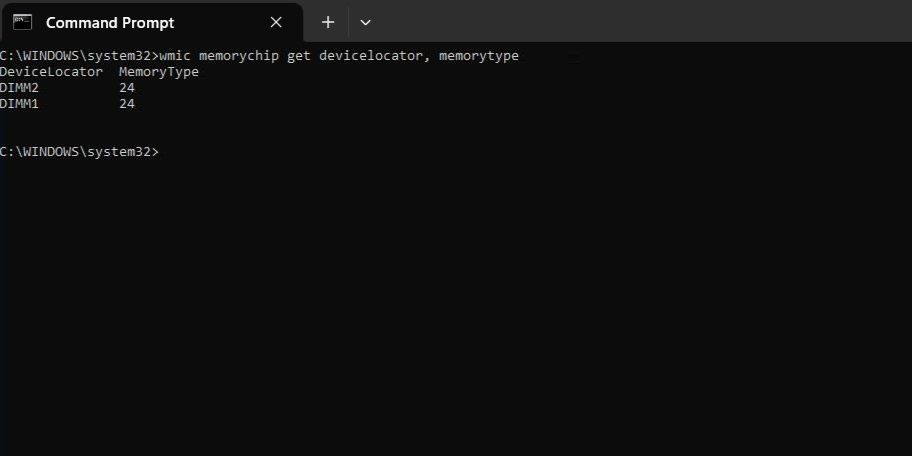
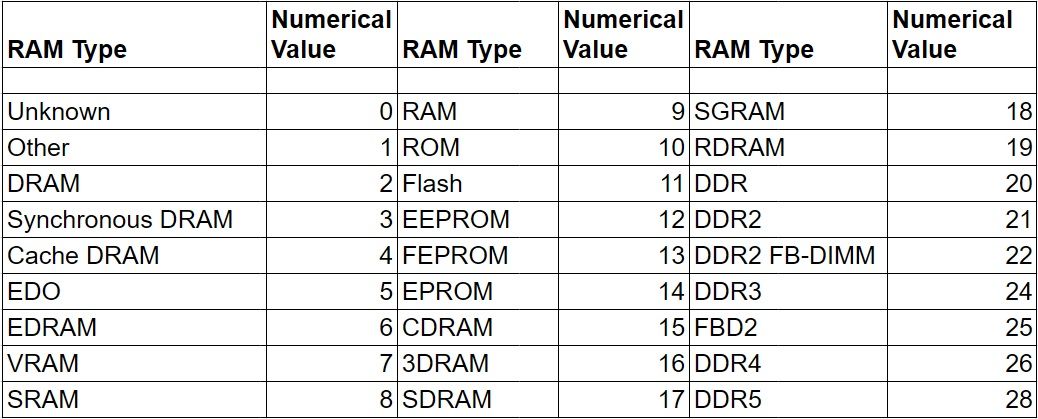
Compare the numerical value from the MemoryType column with the following table to identify the RAM type. For instance, if the code number is 24, it means your computer has DDR3 RAM.

2. How to Check the RAM Type With PowerShell
Like Command Prompt, you can use PowerShell to find out the type of RAM installed on your Windows computer. Here are the steps for the same.
- Press Win + S to open the search menu.
- Type powershell in the box.
- Select Run as administrator.
- When the User Account Control (UAC) prompt appears, select Yes to continue.
- Type the following command in the PowerShell window and hit Enter.
Get-CimInstance -ClassName Win32_PhysicalMemory | Format-Table SMBIOSMemoryType

Under the SMBIOSMemoryType column, note down the code number and compare it with the following table to determine the RAM type.
Power Tools add-on for Google Sheets, 12-month subscription
3. How to Check the RAM Type Using the Task Manager App
Windows Task Manager can provide you with all the necessary hardware information you need about your PC, including the type of RAM installed. However, it’s important to note that Task Manager does not show the memory type if your PC has DDR4 or DDR5 RAM . So, this method will only work for PCs with DDR3 or lower-generation RAM.
To check the RAM type using Windows Task Manager, follow these steps:
- Press Ctrl + Shift + Esc to open the Task Manager.
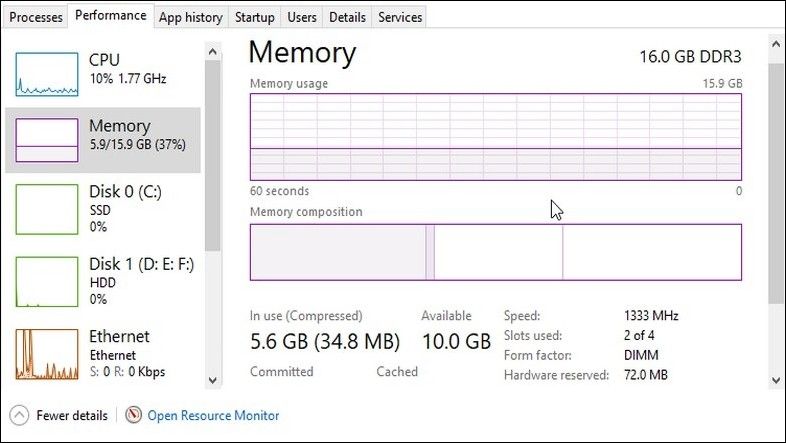
- Switch to the Performance tab.
- Select Memory from the left pane. You should see the amount and type of RAM your PC has in the top right corner of the screen.
The Windows Task Manager does more than show hardware information. You also use it to manage running programs, end tasks, and view resource usage. To learn more, read our guide on the best Windows Task Manager tips that you may not know .
 The Tube Sites Submitter is a fast and efficient tool for anyone who needs to upload videos quickly, easily and automatically to hundreds of tube sites in mere minutes .
 4. How to Check the RAM Type Using CPU-Z
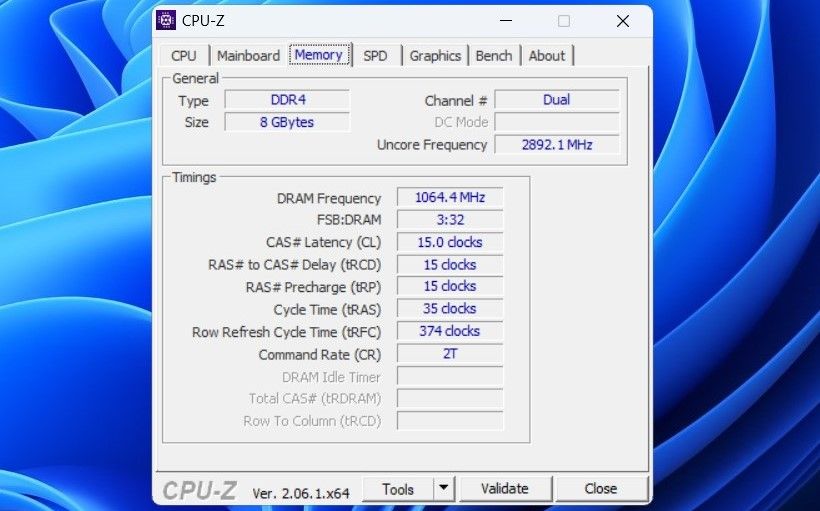
If you’re seeking a relatively uncomplicated method to check the RAM type along with other hardware details, you can use a third-party app like CPU-Z. It is available for free and allows you to access various sets of information about your computer, including details about both the CPU and the RAM.
Download and open the CPU-Z app on your PC. Click on the Memory tab to get a detailed breakdown of the installed RAM. Under the General section, look for the value in the Type field to know the type of RAM installed on your PC.
 Lyric Video Creator Professional Version
Know the Type of RAM Installed on Your Windows PC
The performance of your computer is affected not only by the amount of RAM installed but also by the type of RAM. Fortunately, identifying the RAM type on your Windows PC is a quick and painless process with the methods mentioned above.
This guide will walk you through some easy methods for identifying the type of RAM housed within your computer.
- Title: Decoding the Mysteries of RAM in Windows Devices
- Author: Joseph
- Created at : 2024-08-15 15:57:50
- Updated at : 2024-08-16 15:57:50
- Link: https://windows11.techidaily.com/decoding-the-mysteries-of-ram-in-windows-devices/
- License: This work is licensed under CC BY-NC-SA 4.0.