
Curing Grayed Screen Savers: Quick Fixes for Windows Users
Curing Grayed Screen Savers: Quick Fixes for Windows Users
Just when you’re about to change the screen saver on your Windows device, the system settings start malfunctioning. You realize that the screen saver settings are grayed out—making it hard for you to change your current screen saver.
Fortunately, we’ve got all the solutions you need. So, let’s dive in and check out the four ways to resolve this issue.
1. Use the Local Group Policy Editor
The “grayed out screen saver settings” error might be caused by issues that stem from the Local Group Policy Editor (LGPE). So, the best way to tackle the problem is to make some changes in the LGPE.
However, bear in mind that the LGE is only available on Windows Pro, Enterprise, and Education editions. If you’re using the Home edition, then check out tips on how to access the LGPE on Windows Home .
Let’s now explore how to use the LGPE to resolve the issue at hand:
- Press Win + R to open the Run command dialog box.
- Type gpedit.msc and press Enter to open the LGPE.
- Navigate to User Configuration > Administrative Templates > Control Panel > Personalization.
- Double-click on the Enable screen saver option on the right-hand side.
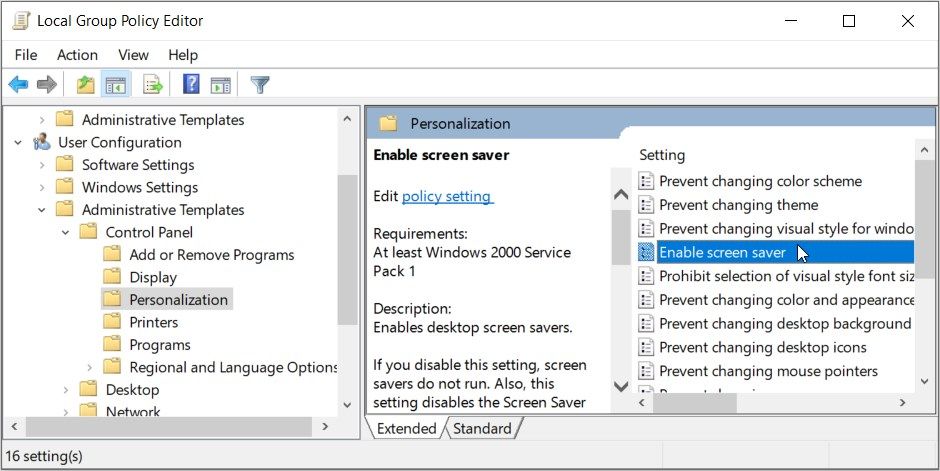
Check the Enabled box on the next screen. From there, click Apply and then click OK.
But then how would enabling the “screen saver” option resolve the “grayed out screen saver settings” error?
As per the description in the LGPE, enabling the “screen saver” option enables the “Screen Saver” section in the Screen Saver Settings window. Simply put, this means enabling this option will ensure that the “screen saver settings” section isn’t grayed out.
Now, let’s explore how to enable another LGPE feature to tackle the “grayed out screen saver settings” error:
- Open the LGPE and navigate to the Personalization folder as per the previous steps.
- Double-click on the Force specific screen saver option on the right-hand side.
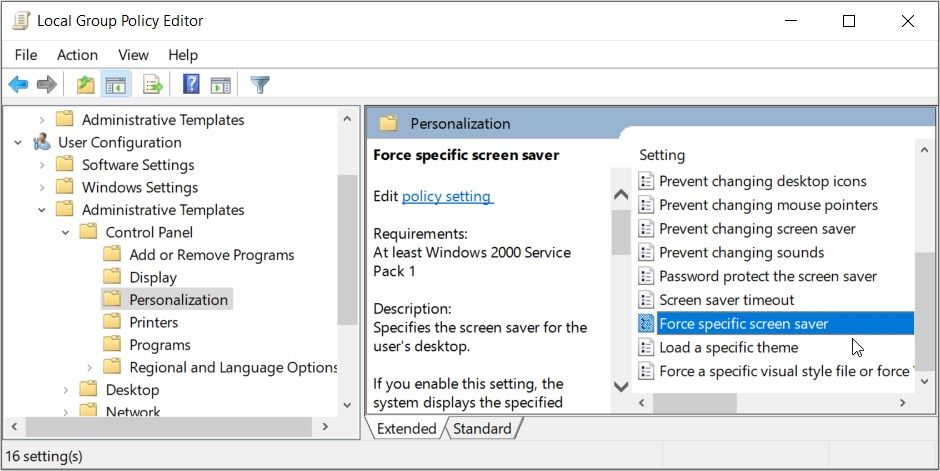
Check the Disabled box, click Apply, and then click OK.
So, how does disabling the “Force specific screen saver” option help?
When the “Force specific screen saver” option is enabled, the drop-down list of screen savers in the “Windows Screen Saver” dialog will be grayed out. This means you won’t be able to change your screen saver, but you may still be able to configure other related settings
So, by disabling the “Force specific screen saver” feature, the “screen saver” drop-down menu in the Screen Saver Settings window won’t be grayed out.
2. Use the Registry Editor

Now, we’ll show you how to get rid of the “grayed out screen saver settings” error using the Registry Editor. But if you tweak the wrong Registry keys by mistake, your device might end up crashing. That’s why we always recommend that you back up the Registry before editing its keys.
Let’s now check out how this tool can help you resolve the issue at hand:
- Press Win + R to open the Run command dialog box.
- Type Regedit and press Enter to open the Registry Editor.
- Copy-paste the following command into the address bar and press Enter:
HKEY_CURRENT_USER\Software\Policies\Microsoft\Windows
Next, click the Control Panel key (folder) from the options within the “Windows” key.


If the “Control Panel” key is missing, here’s how you can create it:
- Right-click on the Windows folder (key) in the LGPE and select New > Key.
- Name the key Control Panel and press Enter.
Once you’re inside the “Control Panel” key, navigate to the right-hand side and locate the ScreenSaveActive option.

If this value is missing, create it through these steps:
- Right-click on a blank space and select New > DWORD (32-bit) Value.
- Name the value as ScreenSaveActive and press Enter.
The “ScreenSaveActive” option in the Registry Editor performs the same function as the “Enable screen saver” option in the LGPE. Remember, enabling the “Enable screen saver option” in the LGPE ensures that the settings on the Screen Saver Settings window aren’t grayed out.
To enable the “ScreenSaveActive” option in the Registry Editor, double-click on this option and then set the “Value data” as 1. From there, press OK and then restart your device to save the changes.
 Forex Robotron Basic Package
3. Change the Power Settings

 Glarysoft File Recovery Pro Annually - Helps to recover your lost file/data, even permanently deleted data.
You might not be aware of this, but configuring the power settings usually has an effect on the other system settings.
For example, if you enable power-saving mode, then your device will pause some tasks in an effort to save power. But enabling some power-saving features might end up graying out some settings and tools.
Now, let’s check out how to configure a few power settings to tackle the “grayed out screen saver settings” issue.
Change the Power Settings Via the Screen Saver Settings Window
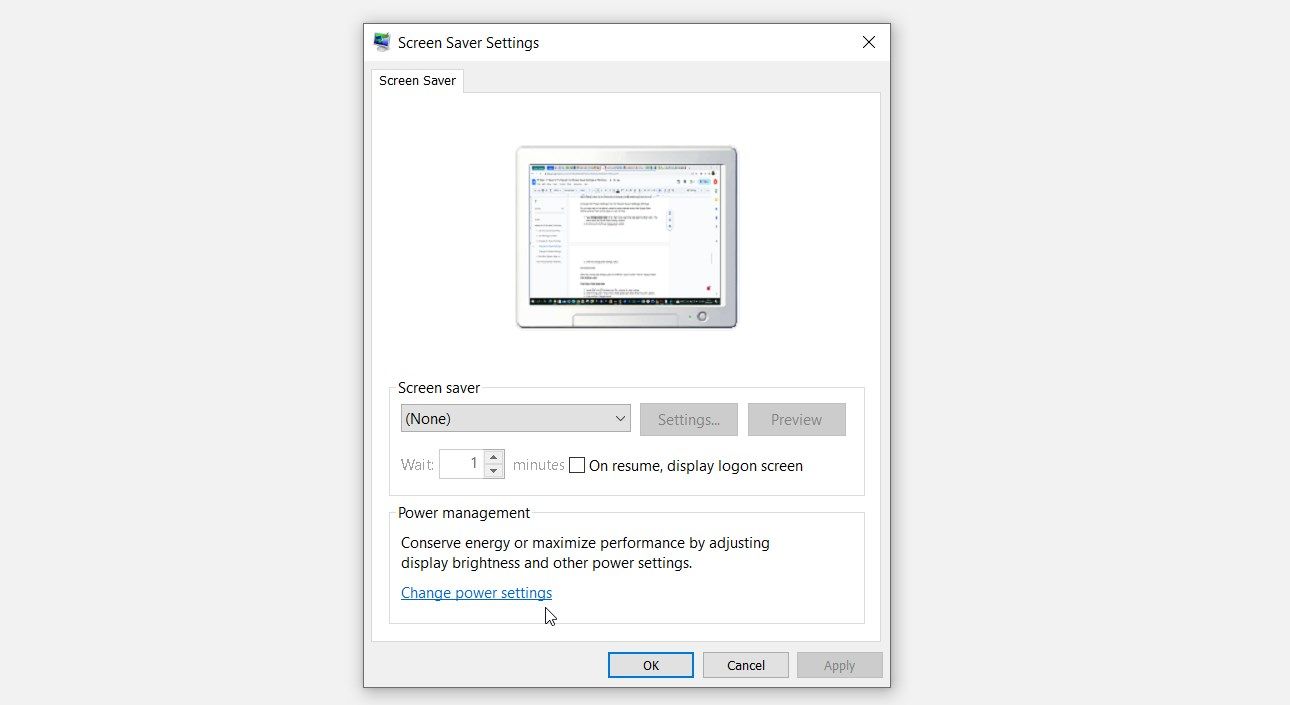
Did you know that you can tweak the power settings directly from the Screen Saver Settings window? Here are the steps you need to follow:
- Type Change screen saver in the Start menu search bar and select the Best match. This should open the Screen Saver Settings window.
- Scroll down to the Power management section.
- Click the Change power settings option.
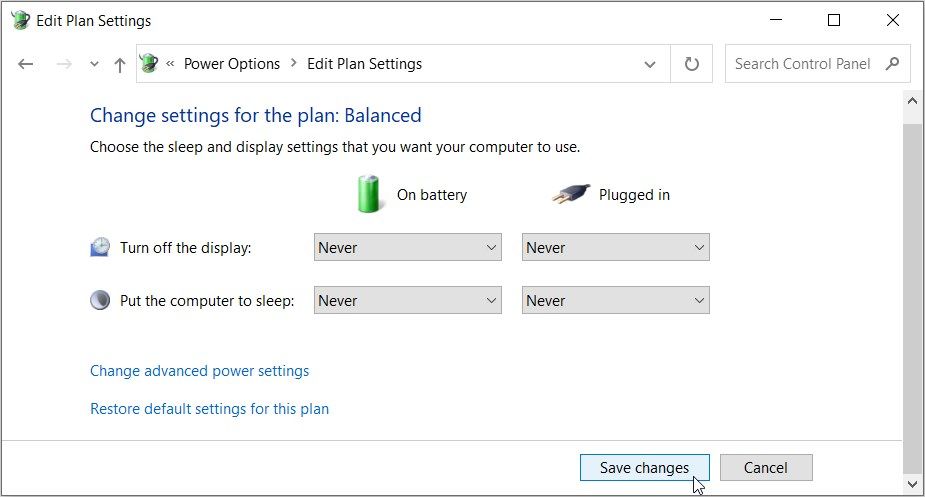
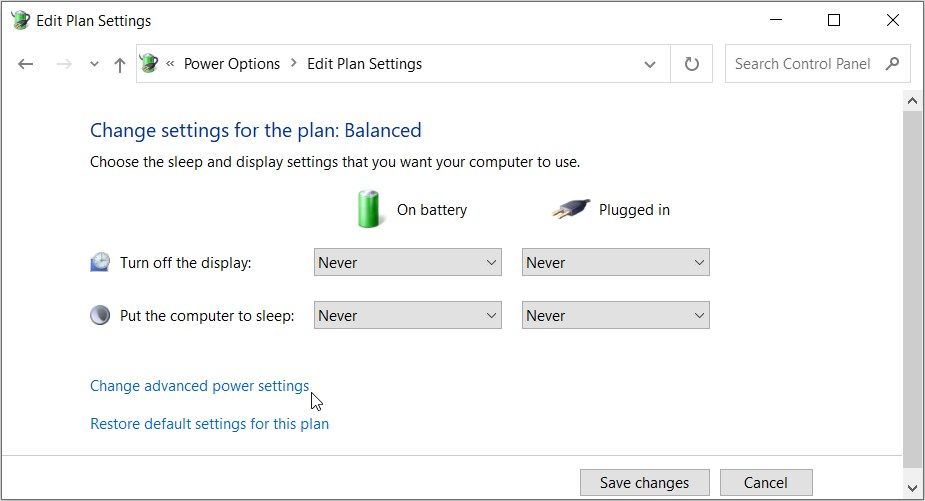
Select the Change plan settings option on the “Power Options” screen. This will display the “Edit Plan Settings” screen.
From there, follow these steps:
- Locate the Turn off the display and Put computer to sleep options.
- Click the drop-down menus next to these options and select Never for all the options.
- Click the Save Changes button.
Next, configure the advanced power settings through these steps:
- Type Change screen saver in the Start menu search bar and select the Best match.
- Click the Change power settings option.
- Select the Change advanced power settings option in the “Edit Plan Settings” window. This will display the “Power Options” screen.
Expand the contents in the “Display” section and select Never for both the “On battery” and “Plugged in” options.
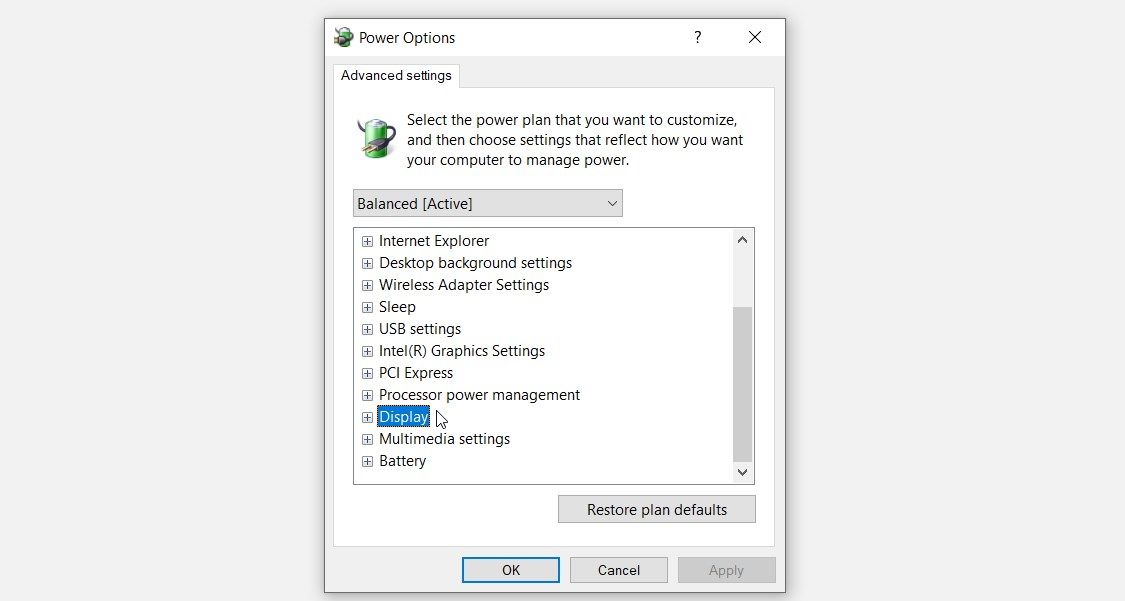

Next, expand the “Desktop background settings” option and select Never for all the options in this section. Finally, click Apply and then click OK to save these changes.
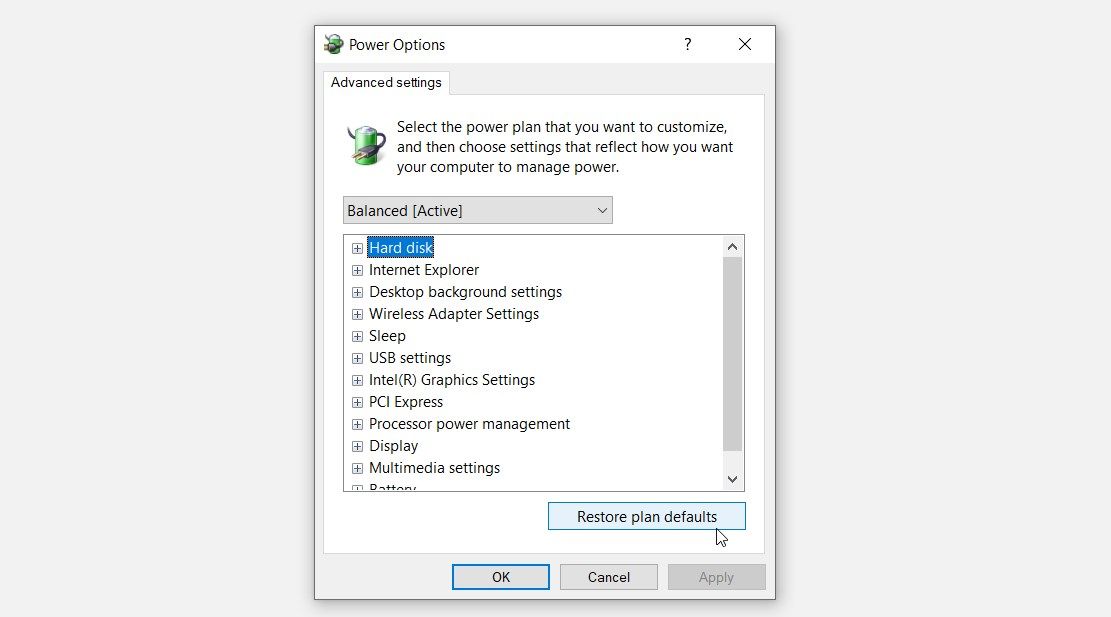
Want to restore your power settings to their defaults at a later stage?
Simply navigate to the “Power Options” screen as per the previous steps and then click the Restore plan defaults button. Finally, click Apply and then click OK.
Change the Power Settings via the Control Panel
In some rare instances, you might not be able to access the power settings via the Screen Saver Settings window. So, this means you’d have to configure the power settings directly via the Control Panel.
Let’s take you through the steps you should follow:
- Type Control Panel in the Start menu search bar and select the Best match. Alternatively, check out the various ways to open the Control Panel .
- Click the View by drop-down menu and select Small icons.
- Select Power Options from the menu items.
- Click Change plan settings from the options. This will take you to the “Edit Plan Settings” screen.

From there, you can edit all the necessary power settings using the tips we covered in the previous section.
4. Get Rid of System Corruption or Update Your PC

Still struggling to resolve the “grayed out screen saver settings” issue? If so, then maybe the error is caused by corrupted system files. In this case, you can repair corrupt Windows files with built-in tools like DISM and SFC.
And if all else fails, update your Windows device and see if that helps.
You’ve Successfully Restored Your Screen Saver Settings
There’s no denying that changing your screen saver regularly makes your PC look cool. But then being unable to change the screen saver settings is uncool.
If your screen saver settings are grayed out, then check out any of the methods we’ve covered. And once the problem is out of the way, be sure to start exploring some of the coolest, free Windows screensavers.
Fortunately, we’ve got all the solutions you need. So, let’s dive in and check out the four ways to resolve this issue.
- Title: Curing Grayed Screen Savers: Quick Fixes for Windows Users
- Author: Joseph
- Created at : 2024-08-15 15:47:25
- Updated at : 2024-08-16 15:47:25
- Link: https://windows11.techidaily.com/curing-grayed-screen-savers-quick-fixes-for-windows-users/
- License: This work is licensed under CC BY-NC-SA 4.0.