Correcting Non-Deletable Keys: A Windows Guide

Correcting Non-Deletable Keys: A Windows Guide
You don’t realize how important keyboard keys are until they stop working. And when that key is the Delete key, it disrupts your workflow and leads to frustration. But before rushing to the store for a replacement keyboard, try these troubleshooting tips to restore its functionality.
This guide walks you through possible fixes for a non-functioning Delete key on a Windows PC.
1. Check for Physical Damage
The first thing you should do is check the Delete key for physical damage. Sometimes cleaning or adjusting the keys can solve the issue. Here’s what to do:
- Clean your keyboard: Over time, dust and debris accumulate underneath the keys. This may cause them to stick or stop working altogether. Try using a compressed air duster or a small brush to clear out debris.
- Check for stuck keys: Spilled liquid or food particles can jam keys. Press the Delete key and wiggle it around to see if it responds. If it does, you may need to clean or replace the key.
- Adjust the keycap: If the keycap is slightly misaligned, it may fail to register. Push the sides of the Delete key and see if that makes a difference. If so, remove the keycap and reattach it again.
2. Restart Your Computer
If your keyboard is not physically damaged, reboot your Windows computer . This general troubleshooting tip often repairs minor glitches and refreshes your system. Once your computer restarts, see if the Delete key works.
3. Run the Hardware and Devices Troubleshooter
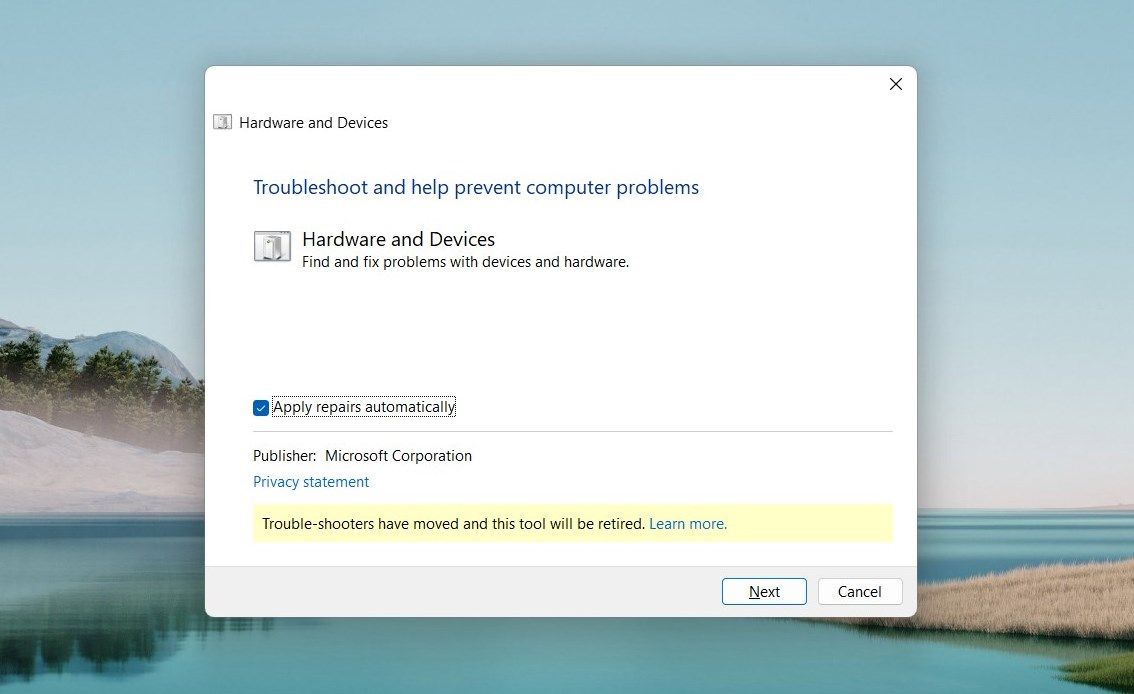
Hardware and Devices troubleshooter is an inbuilt Windows program that diagnoses and solves hardware-related issues. So, if restarting the computer didn’t work, try this tool. It will scan your system for problems and suggest fixes.
To run the troubleshooter, follow these steps:
- Press Win + R to open the Run command dialog box.
- In the text field, type msdt.exe -id DeviceDiagnostic and press Enter. The Hardware and Devices troubleshooter will open.
- Click Advanced and check Apply repairs automatically.

- Now click Next and it’ll scan for hardware problems.
In the end, it will suggest possible fixes. Follow the instructions and see if that resolves the issue.
4. Run the Keyboard Troubleshooter
If the Hardware and Devices troubleshooter finds no issues, try running the Keyboard troubleshooter. This tool is similar to the previous one, but it targets keyboard-related problems.
To run the keyboard troubleshooter, follow the steps:
- Right-click on Start and select Settings. You can also press the Win + I keyboard shortcut.
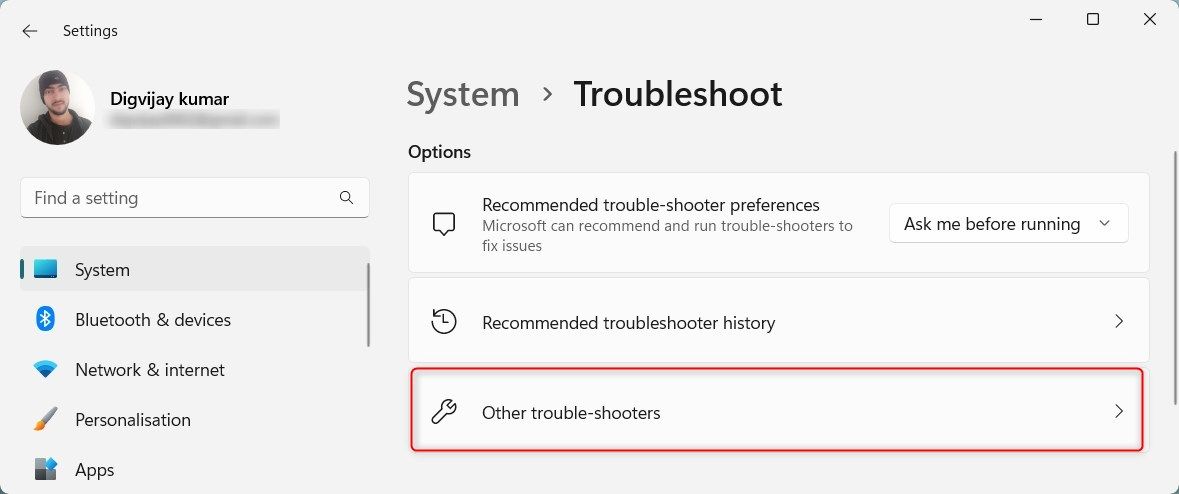
- In the Settings window, navigate to System > Troubleshoot > Other troubleshooters.

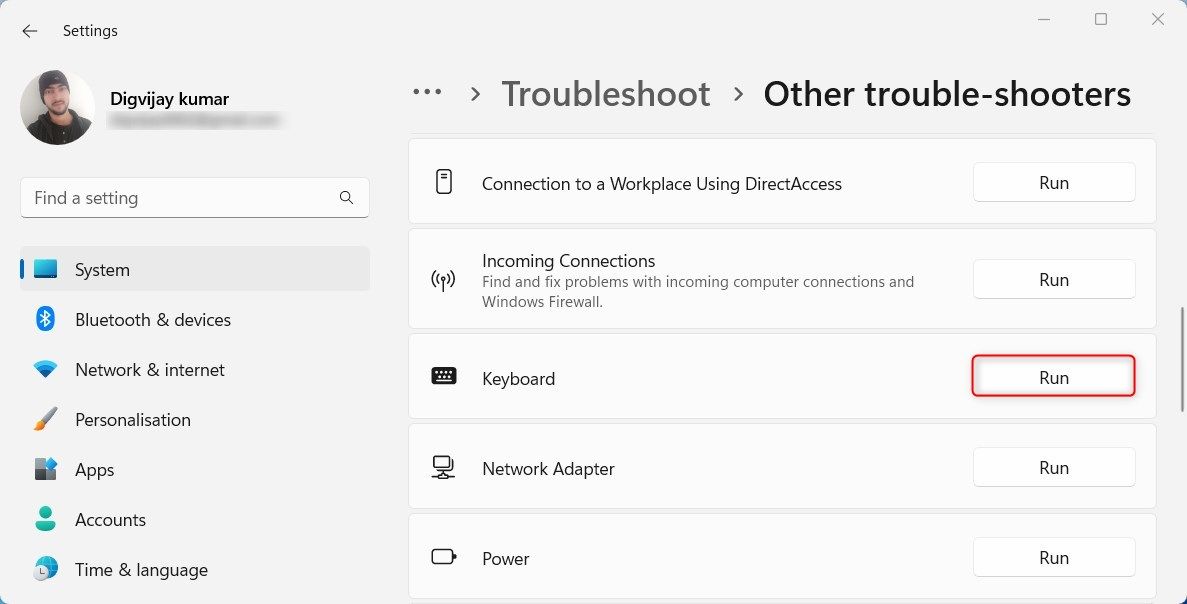
- Scroll down and locate the Keyboard troubleshooter.

- Next, click Run. You’ll see a prompt asking for your consent to run diagnostics and attempt automated steps to resolve the issue.
- Click on Yes, and the troubleshooter starts scanning.
If it finds any problems, it will suggest possible fixes. Follow the instructions to see if it solves the Delete key issue.
5. Check for Driver Updates
Another reason your Delete key may not work is outdated drivers. To make sure you have the latest updates, follow these steps:
- Press Win + X on your keyboard and select Device Manager from the menu.
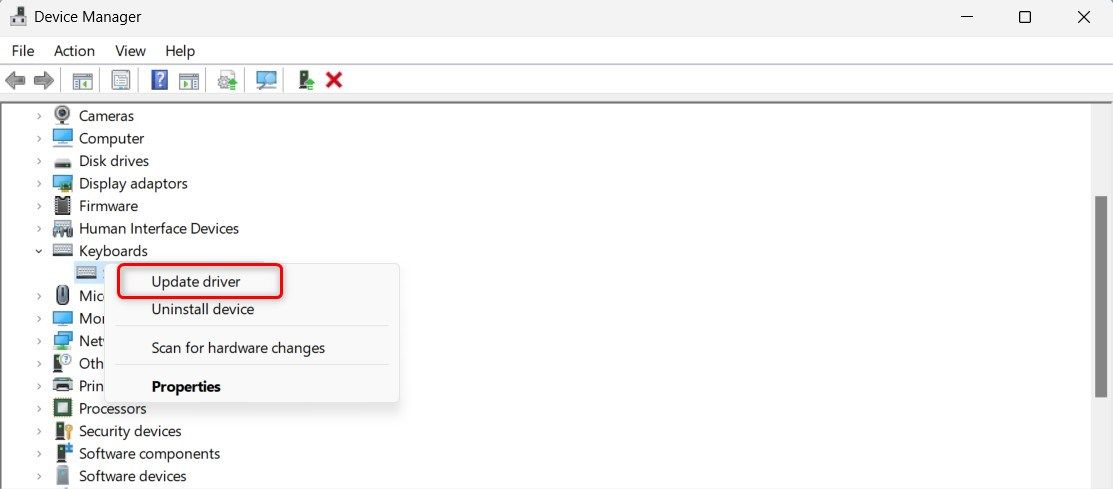
- Expand the Keyboards section and right-click on your keyboard driver.

- Select Update driver from the context menu. You’ll see two options: Search automatically for drivers and Browse my computer for drivers.
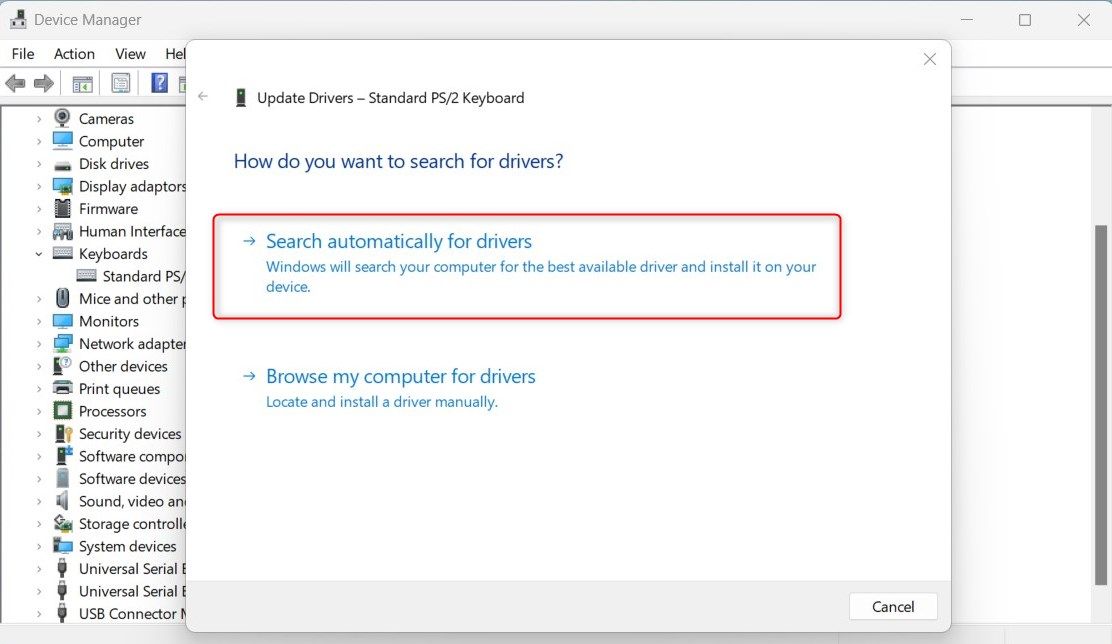
4. Choose the first option and let Windows search for available updates. If it finds one, follow the prompts to install it.
5. After that, restart your computer and see if the Delete key works.
If you see the message “The best drivers for your device are already installed,” it means your keyboard drivers are up-to-date. In that case, reinstall the drivers and see if it solves the issue.
In Device Manager, right-click on the keyboard driver and select Uninstall device. You’ll see a prompt asking for confirmation. Click on Uninstall again. Follow the prompts to complete the process.
After that, restart your computer and Windows will automatically reinstall the driver. Check if it solves the issue.
6. Try a Different Keyboard Layout
Sometimes, the issue is with your keyboard layout settings. Your Delete key may be mapped to another function or disabled altogether. To check this, switch to a different keyboard layout and see if it works. Here’s how:
- Press Win + X on your keyboard and select Settings.
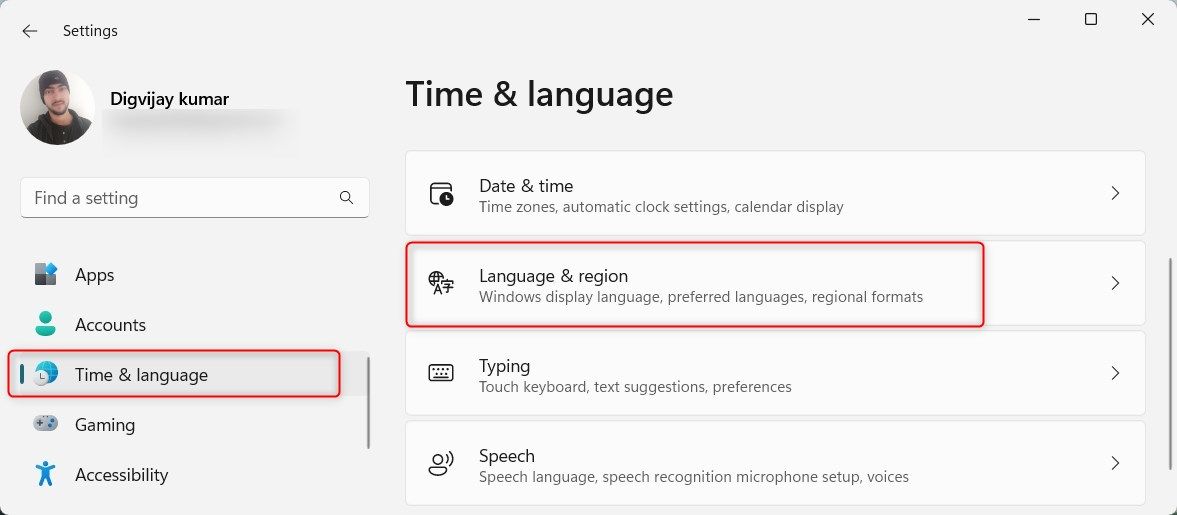
- From the left sidebar, select Time & language.

- In the right pane, click on Language & region.
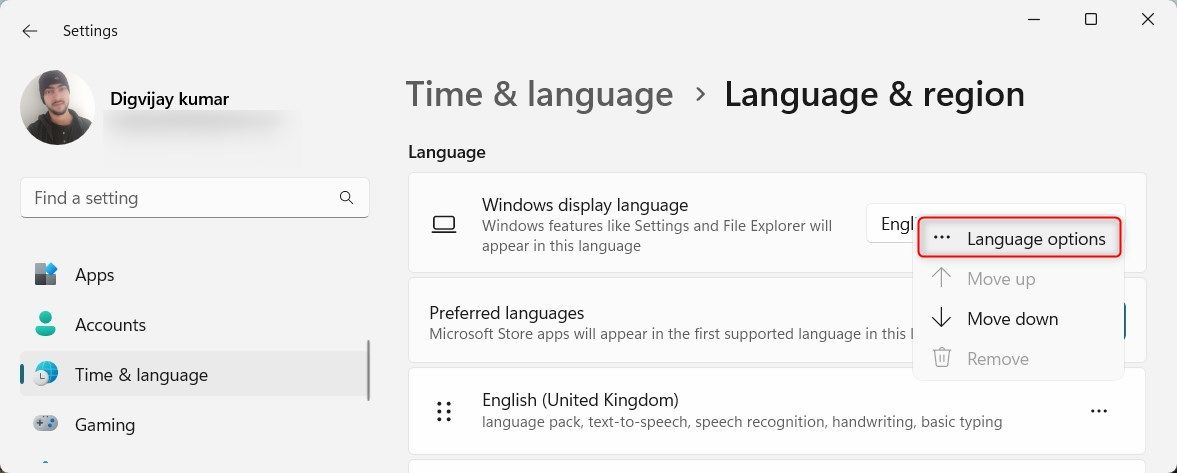
- Under Preferred languages, click the three dots next to the language you’re using and select Language options.

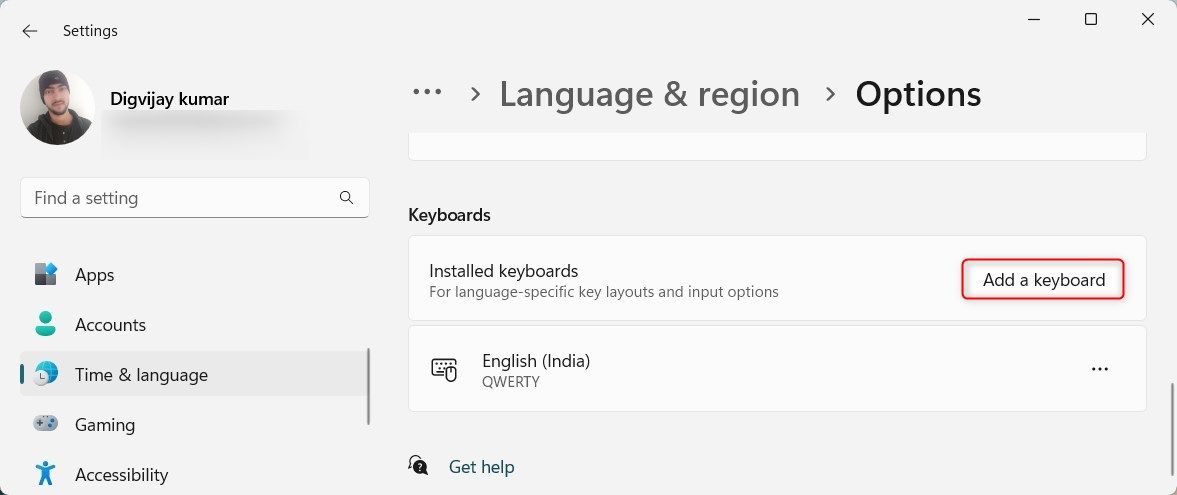
- Next, scroll down to the Keyboards section and click Add a keyboard. Then choose a different layout from the list.

After adding the new layouts, switch to them and see if the Delete key works. To switch between layouts, press Win + Space on your keyboard. If switching to a different layout solves the Delete key issue, you can remove the added layouts and stick to the one that works for you.
7. Check for Malware or Software Conflicts
Windows OS is also prone to malware attacks. It could disrupt the normal functioning of your keyboard. So, if none of the methods above work, try running a malware scan .
For this, you must use antivirus software that provides real-time protection . If you don’t have one, we recommend Windows Defender. It’s a free and reliable alternative. You can also try Windows PowerShell to scan and remove malware . After running a full system scan, see if the Delete key works correctly.
8. Try the On-Screen Keyboard
Digital technologies make life easier. The on-screen keyboard is one of them.
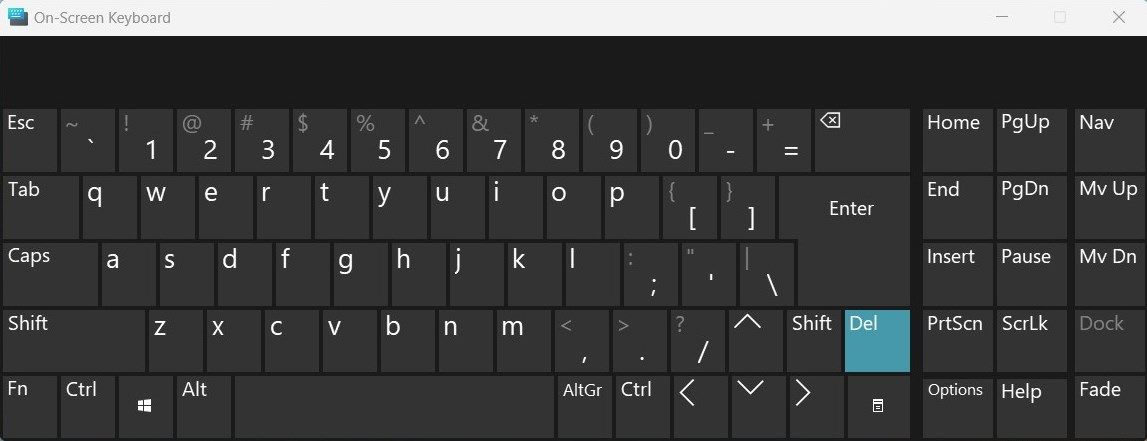
If you still can’t delete even after trying all these methods, use the on-screen keyboard as a temporary fix. To open the on-screen keyboard, follow these steps:
- Open the Run command dialog box .
- Type osk in the text box and press Enter. This will pop up an on-screen keyboard.

Use the mouse or touchpad to click on the Delete key and see if it works. If it does, you can continue using the on-screen keyboard until you find a permanent solution.
Your Delete Key Is Now Working Again
The Delete key is a vital component of our daily computer usage. Any issue with it can significantly affect our productivity and workflow. If your Delete key is not working, try the methods mentioned in this guide until you find one that works for you. Also, remember to regularly update your system and drivers to prevent such issues in the future.
This guide walks you through possible fixes for a non-functioning Delete key on a Windows PC.
Also read:
- [New] In 2024, Leading PSP iOS Game Simulators - Our 2023'S Choices
- [New] Shoot Cool Vids From Scratch with Your Mac, Newcomers Guide
- [Updated] Guide to Progressive Audio Diminishment via Lumafusion
- 2024 Approved Hurry-Up Screen Record, With Audio
- Demystifying Blue Screen Errors: Expert Advice and Solutions by YL Computing Team
- How to Fix Error 495 While Download/Updating Android Apps On Oppo K11 5G | Dr.fone
- In 2024, How to Reset your Lava Yuva 3 Pro Lock Screen Password
- MapMyRide Reviewed: A Detailed Breakdown
- Maximizing Efficiency: Shortcut Placement in Win11 Menu Bar
- Orator’s Oasis: Premier Training for Verbal Proficiency
- Precision Setup: Integrating Latest Network Drivers From Intel in Fedora
- Seamless Audio Transmission: Phones & Windows Integration
- The Mystery of Undelivered iMessages Resolved: Insights Explained
- Title: Correcting Non-Deletable Keys: A Windows Guide
- Author: Joseph
- Created at : 2025-01-03 23:24:45
- Updated at : 2025-01-10 22:13:18
- Link: https://windows11.techidaily.com/correcting-non-deletable-keys-a-windows-guide/
- License: This work is licensed under CC BY-NC-SA 4.0.
