
Boosting WinOS: Stop Autominize Apps
Boosting WinOS: Stop Autominize Apps
One day, you’re using your Windows device and realize that some apps minimize themselves without warning. But why are you encountering this issue? Well, there are several potential causes—ranging from misconfigured settings to malware infections.
Fortunately, we’ve got all the solutions that’ll help you resolve this problem. So, let’s explore why you’re encountering this issue and how you can tackle it.
Why Do Your Programs Automatically Minimize Themselves?
Here are some common reasons why your programs may be automatically minimizing themselves:
- Focus Stealing: Certain apps or background processes may steal the focus from an active program and cause it to minimize. This can happen due to notifications, pop-up messages, or other system events that require attention.
- Misconfigured Multitasking Settings: Windows has built-in multitasking features such as the “Snap windows” tool. Such features allow you to automatically arrange a window when you drag it to the edge of the screen. But if these tools are misconfigured, they can cause programs to minimize unexpectedly.
- Faulty Display Drivers: Outdated or corrupted display drivers can cause conflicts with apps and make your apps minimize themselves unexpectedly.
- Compatibility Issues: Some programs may not be fully compatible with your Windows version. So, such apps might often minimize themselves as a response to compatibility issues.
- Third-Party Software Interference: Sometimes, certain third-party apps (such as antivirus programs) can conflict with other programs and cause them to minimize without warning.
- Malware or Viruses: Malicious software can interfere with your programs and cause them to minimize themselves or behave unexpectedly.
Now, it’s time to explore the solutions.
1. Disable Unnecessary Background Processes
If the issue is caused by focus stealing, then stopping some of your background processes could help. Here’s how you can do it:
- Press Ctrl + Shift + Esc to open the Task Manager.
- Navigate to the Processes tab.
- Scroll down to the Background processes section.
- Right-click on the processes that you deem unnecessary and select End Task to stop them.
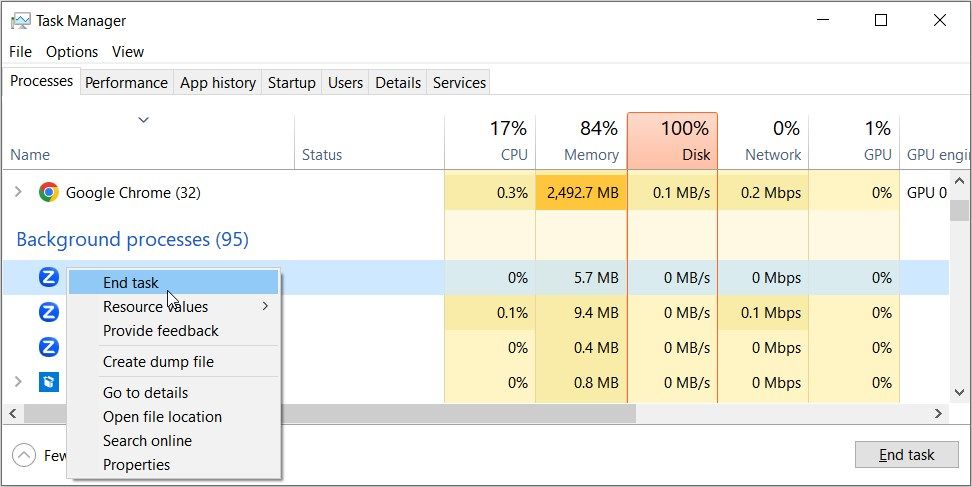
Close the Task Manager and restart your device to save these changes.
Keep in mind that some background processes are essential for the proper functioning of your PC. So, exercise caution when terminating processes in the Task Manager. If you’re unsure about a particular process, research it first to ensure that it’s safe to stop.
2. Configure the Windows Multitasking Settings
There’s a high chance that your apps minimize themselves because of the way you’ve configured the multitasking settings. So, let’s check out the few tweaks you should make to tackle this problem:
- Press Win + I to open the system settings.
- Click the System option.
- Select Multitasking from the options on the left.
- Uncheck the When I snap a window, automatically size it to fill available space option. When this option is enabled, you can make an app fill the entire screen by dragging it to the edge. But this will automatically minimize other apps, which is something you probably don’t want to do.
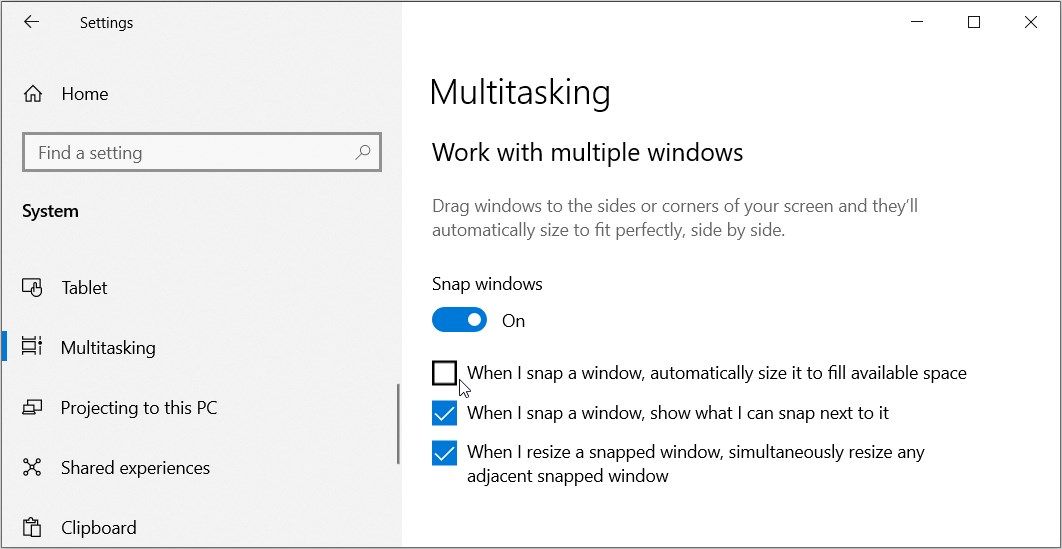
If the issue persists, consider disabling the box in the bottom part of the “Snap windows” section. Alternatively, you could consider turning off the “Snap windows” feature.
3. Update the Display Drivers or Run the Compatibility Troubleshooter
By updating the display drivers on Windows , you provide a stable and compatible graphics environment for your PC. Not only will this reduce the chances of programs automatically minimizing, but it’ll also tackle other system issues.
And if you suspect that the error is caused by compatibility issues, then the compatibility troubleshooter should help. The tool will attempt to detect and resolve any compatibility issues related to the program.
Here are the steps to run the compatibility troubleshooter on Windows:
- Press Win + I to open the system settings.
- Click Update & Security from the options.
- Select Troubleshoot on the left-hand side.
- Click the Additional troubleshooters option on the right.
- Select the Program Compatibility Troubleshooter option and click the Run the troubleshooter button.

To further resolve compatibility issues, consider updating your Windows device .
4. Resolve Software Conflicts
We discovered earlier that security software (or faulty third-party apps) can interfere with the normal functioning of other programs. This means it’s likely that such programs could cause other apps to minimize unexpectedly.
Now, let’s explore how to resolve software conflicts that stem from security software or faulty third-party apps:
- Identify Suspicious Software: Take note of any recently installed software that’s likely causing other apps to minimize unexpectedly.
- Temporarily Disable or Reinstall Security Software: Temporarily disable security software (such as antivirus programs) and see if that helps. And if you’re using a third-party security program, uninstall it temporarily and check if that resolves the issue. From there, reinstall the tool from a reputed website.
- Update Conflicting Software: If you suspect the issue is caused by outdated third-party apps, try updating those apps and see if that tackles the issue.
So, what if the issue stems from malware? In that case, you’d need to clean up your PC with the best malware removal tools .
5. Turn Off Game Mode
Game Mode is a Windows feature designed to optimize system performance for gaming. However, it may sometimes interfere with some tools and cause them to minimize unexpectedly. This means disabling the “Game Mode” feature can be a potential solution to the issue at hand.
So, let’s check out how you can turn this feature off:
- Press Win + I to open the system settings.
- Select Gaming from the options.
- Click Game Mode on the left-hand side.
- Turn off the “Game Mode” button on the right-hand side pane.
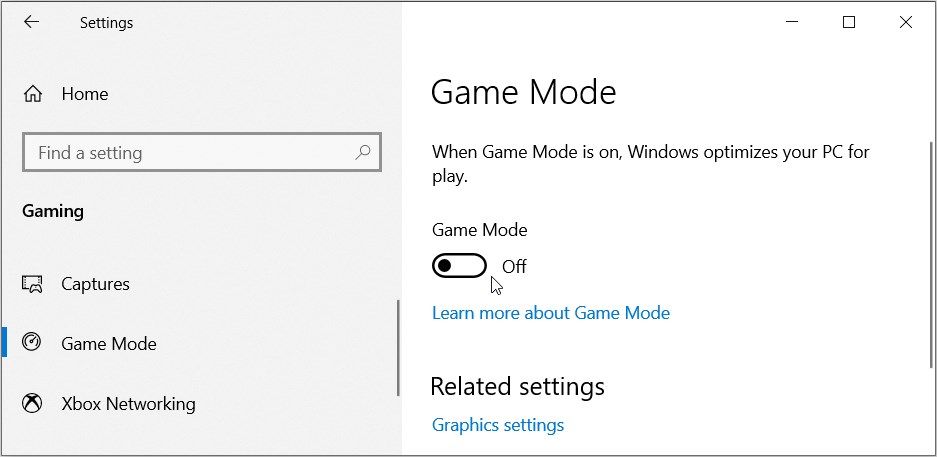
Close the settings app and check if this resolves the issue.
Turning off Game Mode may slightly affect gaming performance because the system will no longer focus on allocating resources specifically for gaming.
6. Run the System Maintenance Troubleshooter
Maybe the issue at hand is caused by system maintenance problems. And in that case, running the System Maintenance troubleshooter should help tackle the problem. So, let’s take you through how you can use this tool:
- Type Perform recommended maintenance tasks automatically in the Start menu search bar.
- Select the Best match result to open the System Maintenance troubleshooter.
- Click the Advanced option and then check the Apply repairs automatically box.
- Click Next and follow the on-screen steps to finalize the process.

7. Edit the Registry Editor
As a last resort, you could consider tweaking some settings in the Registry Editor. But make sure you back up the Registry first before you proceed. That’s because you might wreak havoc on your PC if you mistakenly tweak the wrong Registry keys.
To resolve the issue at hand, you’ll have to tweak the ForegroundLockTimeout registry key. This is a setting that controls the timeout duration for foreground processes. Simply put, it determines the amount of time a process must remain in the foreground before the device considers it unresponsive.
To ensure that everything runs smoothly, you’ll have to set the value of the ForegroundLockTimeout registry key to its default.
Here are the steps you need to follow:
- Type Registry Editor in the Start menu search bar and select the Best match result.
- Copy-paste the following command into the address bar and press Enter:
Computer\HKEY_CURRENT_USER\Control Panel\Desktop
From there, double-click on the ForegroundLockTimeout value on the right-hand side pane.
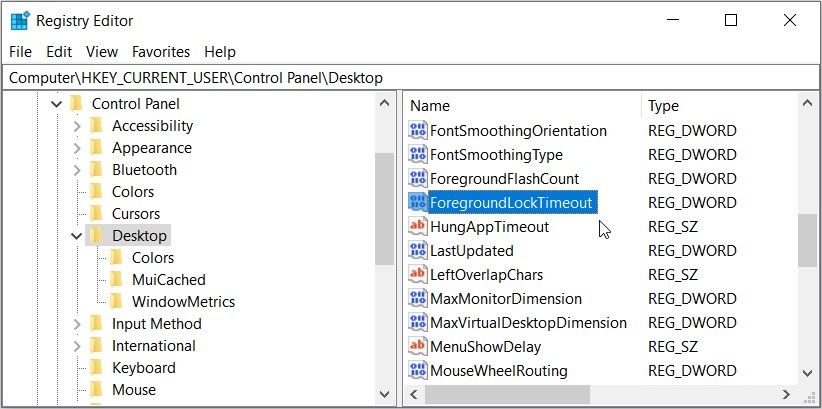
Next, set its Value data to 249f0 and then click OK. This is the default value that should help get rid of the issue at hand. Finally, close the Registry Editor and restart your device to save these changes.
Say Goodbye to App Minimizing Issues
It can be quite irritating when apps decide to minimize themselves without your permission. But if you apply the tips we’ve covered, you should be able to tackle this problem in no time.
Fortunately, we’ve got all the solutions that’ll help you resolve this problem. So, let’s explore why you’re encountering this issue and how you can tackle it.
Also read:
- [New] Content Creation Crossroads IGTV Vs. YouTube - Which One Fits Best for 2024
- [Updated] 2024 Approved Demystifying Camera Technology in Auto and AI-Enhanced HDR
- [Updated] Navigating Figma Erase Background Elements Seamlessly
- [Updated] The Financial Worth One Million YouTube Eyes
- 4 Methods to Turn off Life 360 On Vivo S18e without Anyone Knowing | Dr.fone
- AD DS and Printer Woes: A Guide for Windows 11 Users
- Fix Non-Responsive Slack Alerts: A Quick Win for Windows Users
- Linus Torvalds Discusses the Power of Rust in Linux Development & Personal Gadget Insights | TechCrunch
- Precision Photography Snippets From Videos on Windows 11 for 2024
- Reasons for Poco M6 Pro 4G Stuck on Boot Screen and Ways To Fix Them | Dr.fone
- Rehabbing Windows 10/11'S Recycle Bin Crisis: A Step-by-Step Guide
- Tailoring the Hover Over Sensitivity and Visibility in Windows 11
- Unblocking FBM Issues on Your PC Screen
- Title: Boosting WinOS: Stop Autominize Apps
- Author: Joseph
- Created at : 2025-01-14 14:40:09
- Updated at : 2025-01-15 22:13:27
- Link: https://windows11.techidaily.com/boosting-winos-stop-autominize-apps/
- License: This work is licensed under CC BY-NC-SA 4.0.