
Avoiding In-Use Device Naming: 5 Fixes for Windows Errors
Avoiding In-Use Device Naming: 5 Fixes for Windows Errors
The Local device name is already in use error is not particularly unusual. If you work with any type of network, even a local network, you are quite likely to encounter it at some point. Luckily, it is also usually easy to resolve.
Here are the most common causes of this error, along with the most likely solutions.
What Causes the Local Device Name Error?
There can be a couple of possible causes of this error, but pinpointing the exact cause can be difficult. The most common are unassigned drive letters and incorrect file and printer sharing settings.
It is also possible that a lack of space on the network server can result in this error appearing. You should check this possibility first. If lack of storage is the cause, none of the following solutions will make a difference.
If the network server has ample space, you can move on to trying the methods below to solve the problem on your local device.

1 Enable File and Printer Sharing
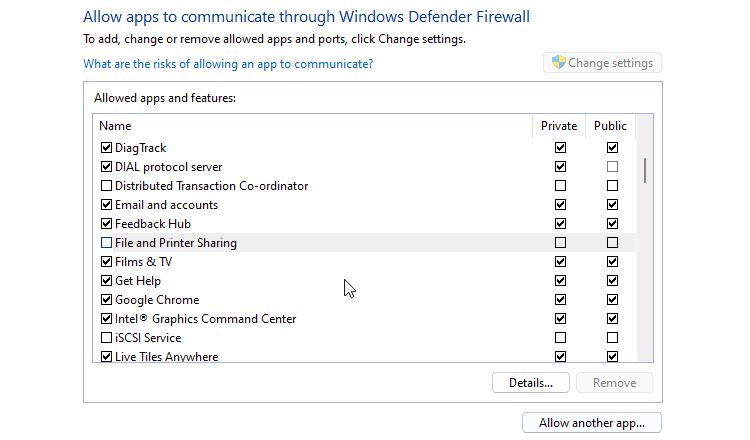
You should always keep your firewall enabled , but it can sometimes interfere with file and printer sharing. This can lead to seeing the Local device name is already in use error. Luckily you can enable file and printer sharing easily in the firewall settings.
If you’re using a third-party firewall, refer to the documentation to find the setting. Here’s how to enable file and printer sharing in the Microsoft Firewall.
- Search for Control Panel using Windows Search, and click the search result to open it.
- ClickSystem and Security > Windows Defender Firewall to see the firewall settings.
- In the left menu, clickAllow an app or feature through the firewall and then click theChange settings button.

- Scroll down to findFile and Printer Sharing in the list, and click thePublic checkbox.
- ClickOk and restart your computer to apply the change.
Occasionally, the file and printer sharing settings for the firewall can get reset after a major update. Just because you know you have enabled it in the past, it is worth checking again.
2 Remap the Network Drive With Command Prompt
Windows will automatically assign a letter to your network drive. During network mapping, the assigned letters can become mixed and even be missing altogether. Remapping the network drive can fix this and prevent the error.
- The best way to remap the network drive is through the Command Prompt. Search forcmd in Windows Search and selectRun as Administrator .
- At the cursor, type:net use D /delete . ReplaceD with the drive letter you want to delete. Then pressEnter .
- Now remap the drive by typing:net use D: \\server\share /user:username password . Replace the drive letter and user and username password with the relevant details.
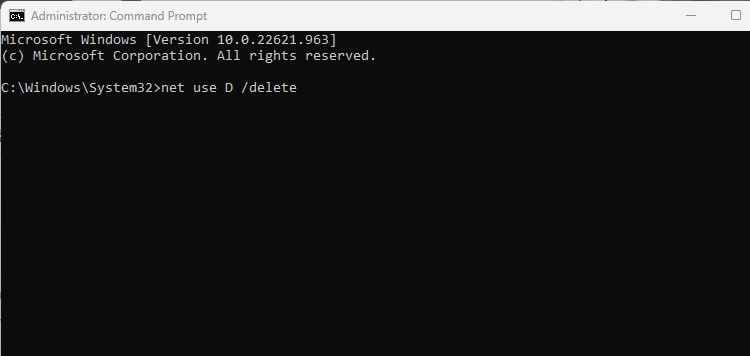
If this doesn’t help, you may need to try reassigning the drive letters manually. The end result is similar, but sometimes remapping won’t work when manually reassigning the drive path will work.
3 Re-assign Drive Letters
Another common cause of this error is an incorrectly assigned drive letter. Reassigning a drive letter is easy, as long as you don’t run into the Drive letter not available error.
- Search forDisk Management using Windows Search, or right-click the Start Menu and select it from the hidden menu.
- In Disk Management, find the partition or drive you want to change and right-click on it.
- SelectChange Drive Letter and Paths , and then click theAdd button.
- ClickAssign the following drive letter and use the drop-down menu to choose a new letter for the partition or drive.
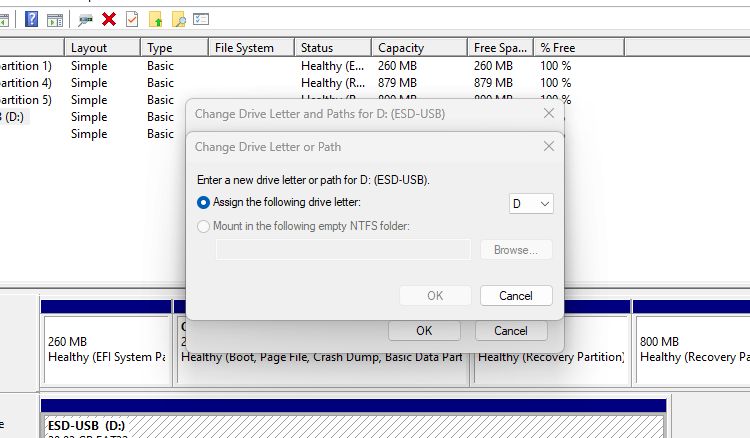
If the drive letter you require is not available, it may already be being used on another drive or partition. It could also be associated with a removable drive that is not currently connected. If the A and B drive letters are available, and they often aren’t, it is best not to use them. These letters are traditionally reserved for floppy drives and for use with old OS versions.
Learn more about why drive letters usually start with C on Windows .
Advanced Find and Replace for Google Sheets, Lifetime subscription
4 Reinitialize the Computer Browser
A less likely solution to this error, but one that does sometimes help, is reinitializing the browser. Browser settings can, in some cases, interfere with network drive settings. By stopping the browser and reinitializing it, those settings should be reverted.
- Open Windows Search and typecmd . In the result, selectCommand Prompt and clickRun as Administrator .
- At the Command Prompt cursor, type:net stop “Computer Browser” and then pressEnter .
- When the command finishes executing, type:net start “Computer Browser” and pressEnter .
- You can now close the Registry Editor and check to see if the error persists.
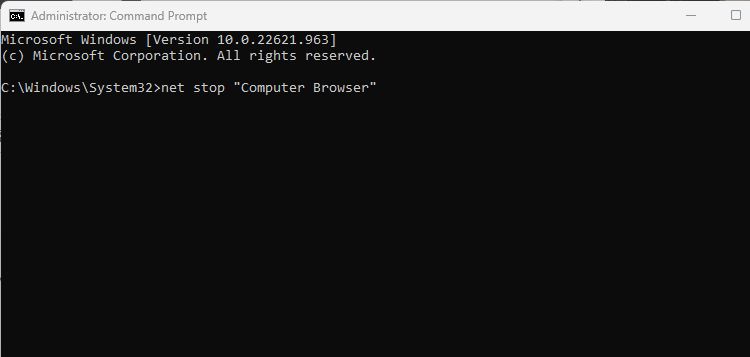
Reinitializing the browser is different from simply closing and reopening the browser window. It is a much more forceful solution to clearing any browser settings that may be in conflict.
Learn how to optimize and get the most from your computer with these essential Windows performance tips .
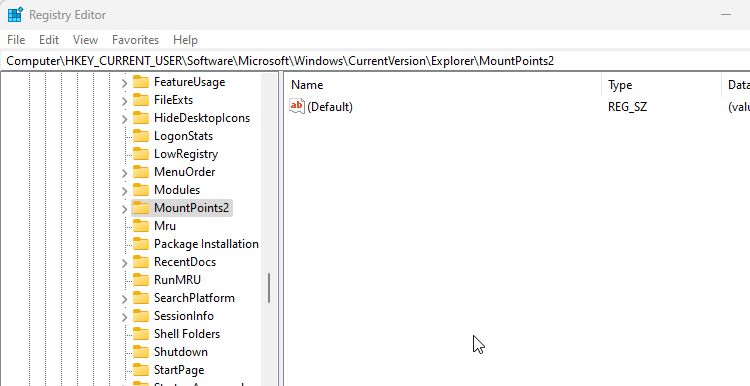
5 Delete the MountPoints Registry Key
If none of the above solutions have fixed the problem, you can try deleting the MountPoints registry key as a last resort. This key stores data about USB and other removable drives. Deleting the key can sometimes resolve conflicts in drive letter assignments.
- Deleting the MountPoints key shouldn’t cause problems, but it is best to back up the Registry just in case. Do this before you continue.
- Open the Registry Editor by searching for it in Windows Search.
- Navigate to HKEY_CURRENT_USER\Software\Microsoft\Windows\CurrentVersion\Explorer .
- Look for theMountPoints2 key in the right-hand panel, right-click on it and selectDelete .
- Close the Registry Editor and restart your computer.
The MountPoint registry key will be regenerated after deleting and restarting. You can then check to see if this fixed the Local Device name is already in use error.
Fixing Local Device Name Errors on Windows
The Local device name is already in use error is not uncommon, and it can be frustrating. But by working through the solutions here, you will normally be able to fix it within a few minutes. Just be sure to check the remaining storage on the network server before you start digging deeper.
- Title: Avoiding In-Use Device Naming: 5 Fixes for Windows Errors
- Author: Joseph
- Created at : 2024-08-15 16:12:11
- Updated at : 2024-08-16 16:12:11
- Link: https://windows11.techidaily.com/avoiding-in-use-device-naming-5-fixes-for-windows-errors/
- License: This work is licensed under CC BY-NC-SA 4.0.