Audio Visual Verification: A Windows User’s Pre-Meet Checklist
Audio Visual Verification: A Windows User’s Pre-Meet Checklist
Quick Links
- Test the Webcam Before Your Meeting
- Test the Microphone You Plan to Use
- Pick Your Best Microphone as the Default
- Set Your Preferred Webcam as the Default
- Check Microphone and Camera Permissions
- Disable Exclusive Control of Your Microphone
- Unmute the Microphone and Camera in Your Video Conferencing App
Testing your microphone and webcam before an online meeting can help you identify potential issues before they become a waste of time or embarrassing. Here’s how to check whether your microphone and webcam are configured and functioning correctly in Windows 11.
1. Test the Webcam Before Your Meeting
There are two types of webcams: built-in and external. If your PC has an integrated webcam, use the Camera app to test it—type “camera”in Windows Search to open this app. You know your webcam is optimally configured if you get high-quality footage without any errors. Make sure to remove any webcam covers!

External webcams often come with dedicated software to manage their operation. Try opening the official app and seeing how good the visuals are. This pre-meeting check can help you confirm that your external webcam is connected and functioning.

2. Test the Microphone You Plan to Use
When using an external microphone, connect it to your device and start the test like this:
- Right-click the Start button and select Settings.
- Select System > Sound.
- In the Input section, select the microphone you wish to use (if you have more than one connected) and open its settings.
- Ensure that the Input volume slider isn’t set too low.
- Click on Start test.
- Speak into your microphone briefly and click the Stop test button.
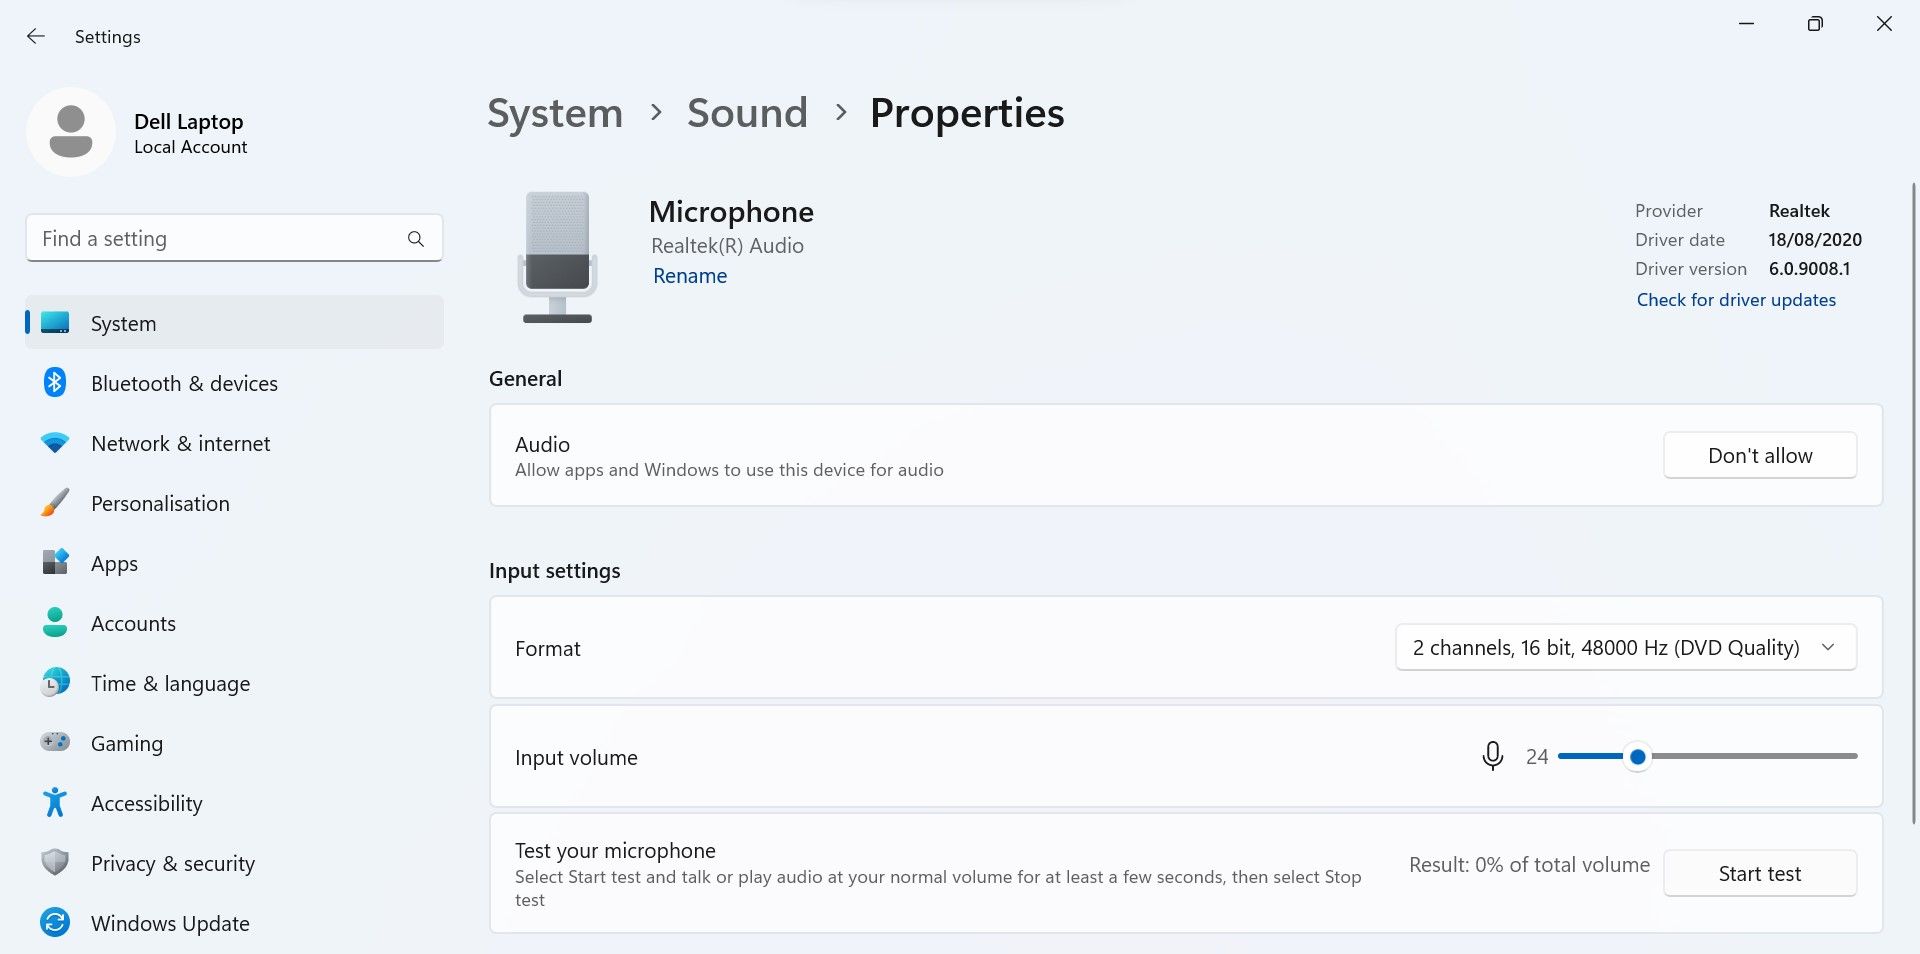
Next to the Start test button, you’ll see the result as a percentage of total volume. A number above 75 is ideal, but it shouldn’t be below 50. Something could be wrong if the percentage is lower than that, or if your microphone doesn’t pick up your voice clearly. In that case, troubleshoot your microphone and test it again. Make sure you don’t have any on-mic mute buttons enabled.
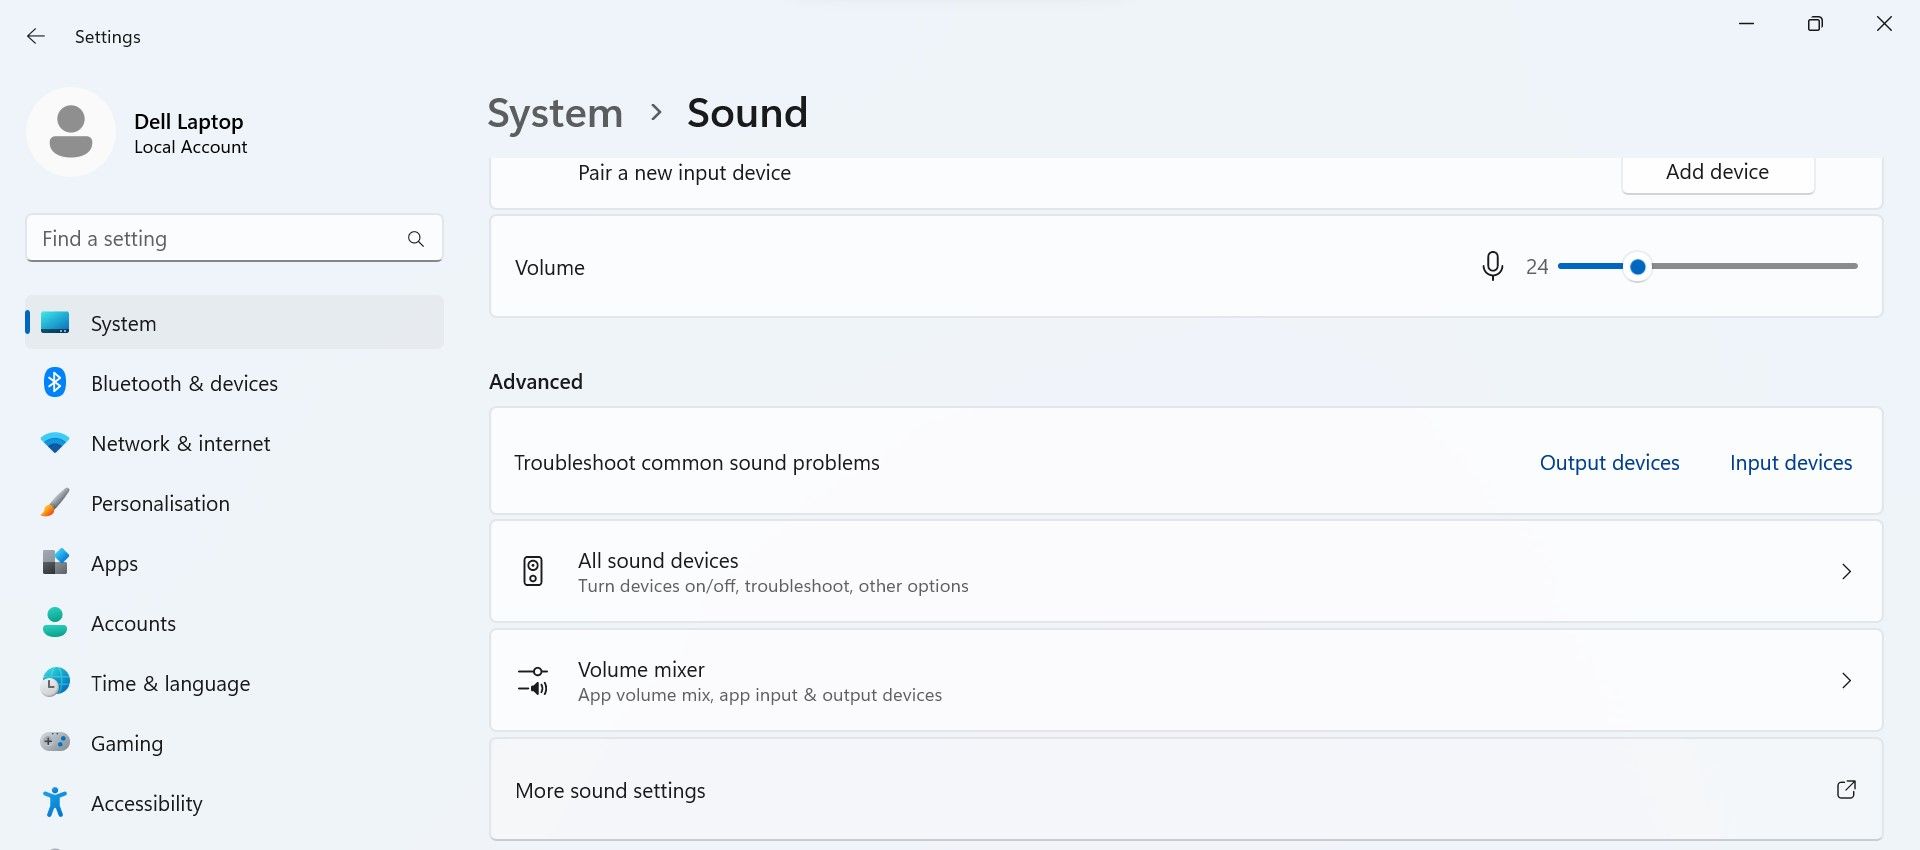
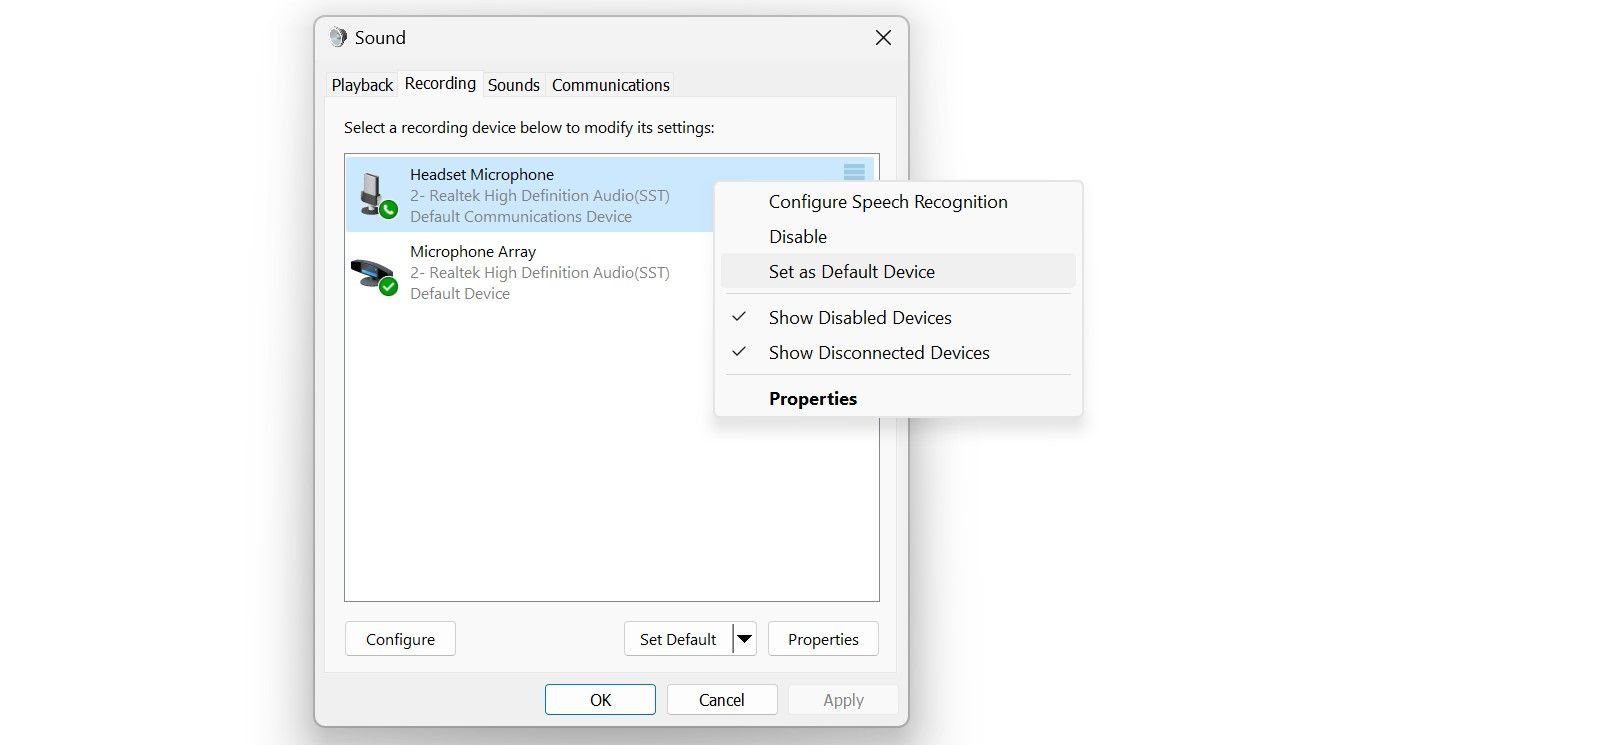
3. Pick Your Best Microphone as the Default
You can skip this step if your device’s built-in microphone is the only option you have for voice input. However, if you want to use a microphone with better fidelity, it’s wise to make it your default device. To change your default microphone, follow these steps:
- Open Settings.
- Go to System > Sound.
- Scroll to the Advanced settings and click More sound settings.
- Select the Recording tab.
- Locate the microphone device you want to make your default, right-click on it, and select Set as Default Device.
 OtsAV Radio Webcaster
4. Set Your Preferred Webcam as the Default
Unlike microphones, you can’t directly choose a camera as the default. Instead, you have to turn off every camera other than the one you intend to use. Here’s how to do this:
- Right-click the Start button and select Settings.
- Select the Bluetooth & devices tab on the left and go to Cameras on the right pane. Here, you can see all the cameras that are connected.
- Open the settings of the device you want to disable.
- Click the Disable button and the Yes to confirm the change.


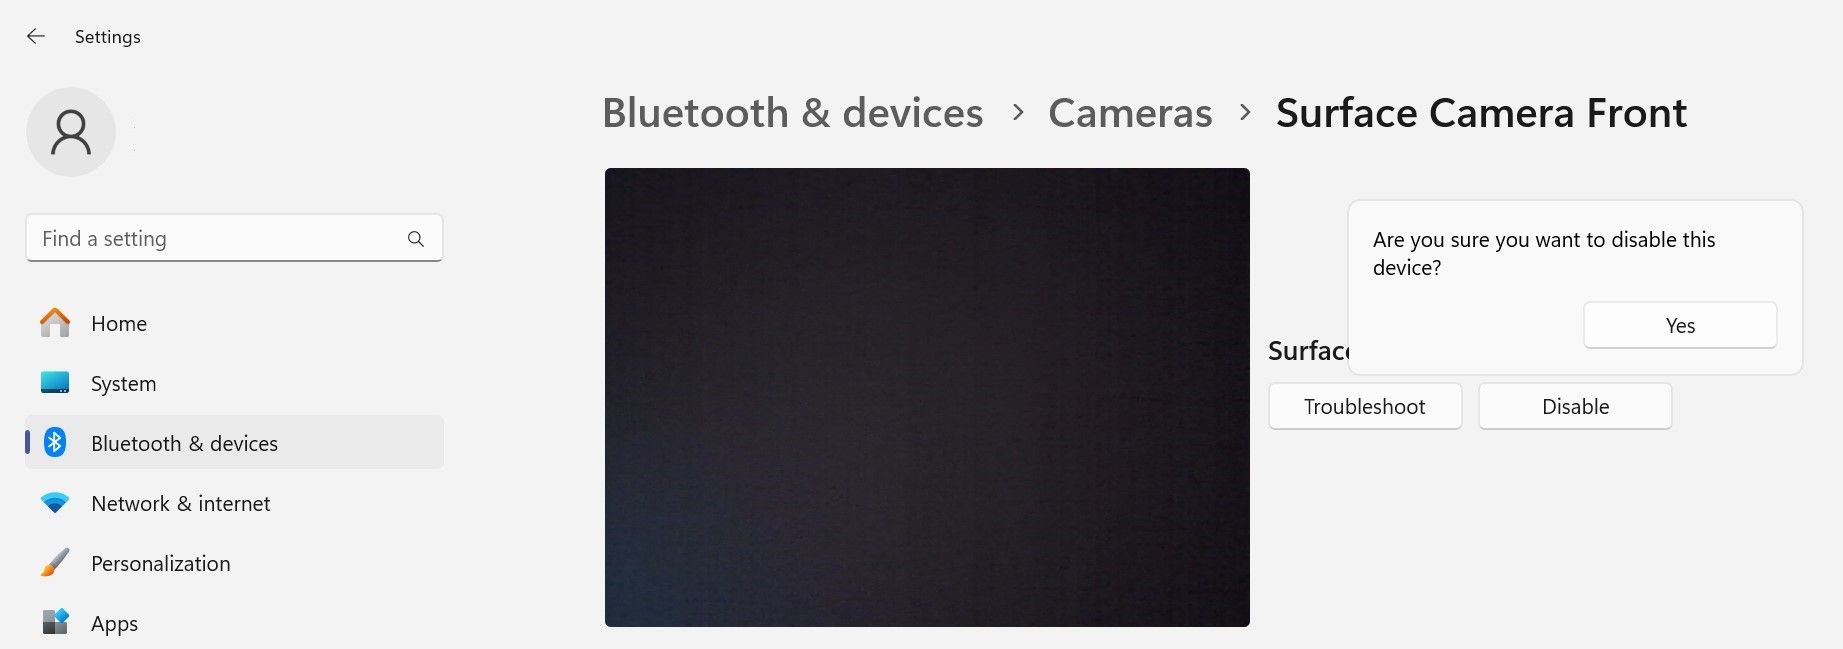
Repeat this process for all other camera devices you want to turn off. With all other cameras disabled, Windows will use the only enabled device as your primary camera.
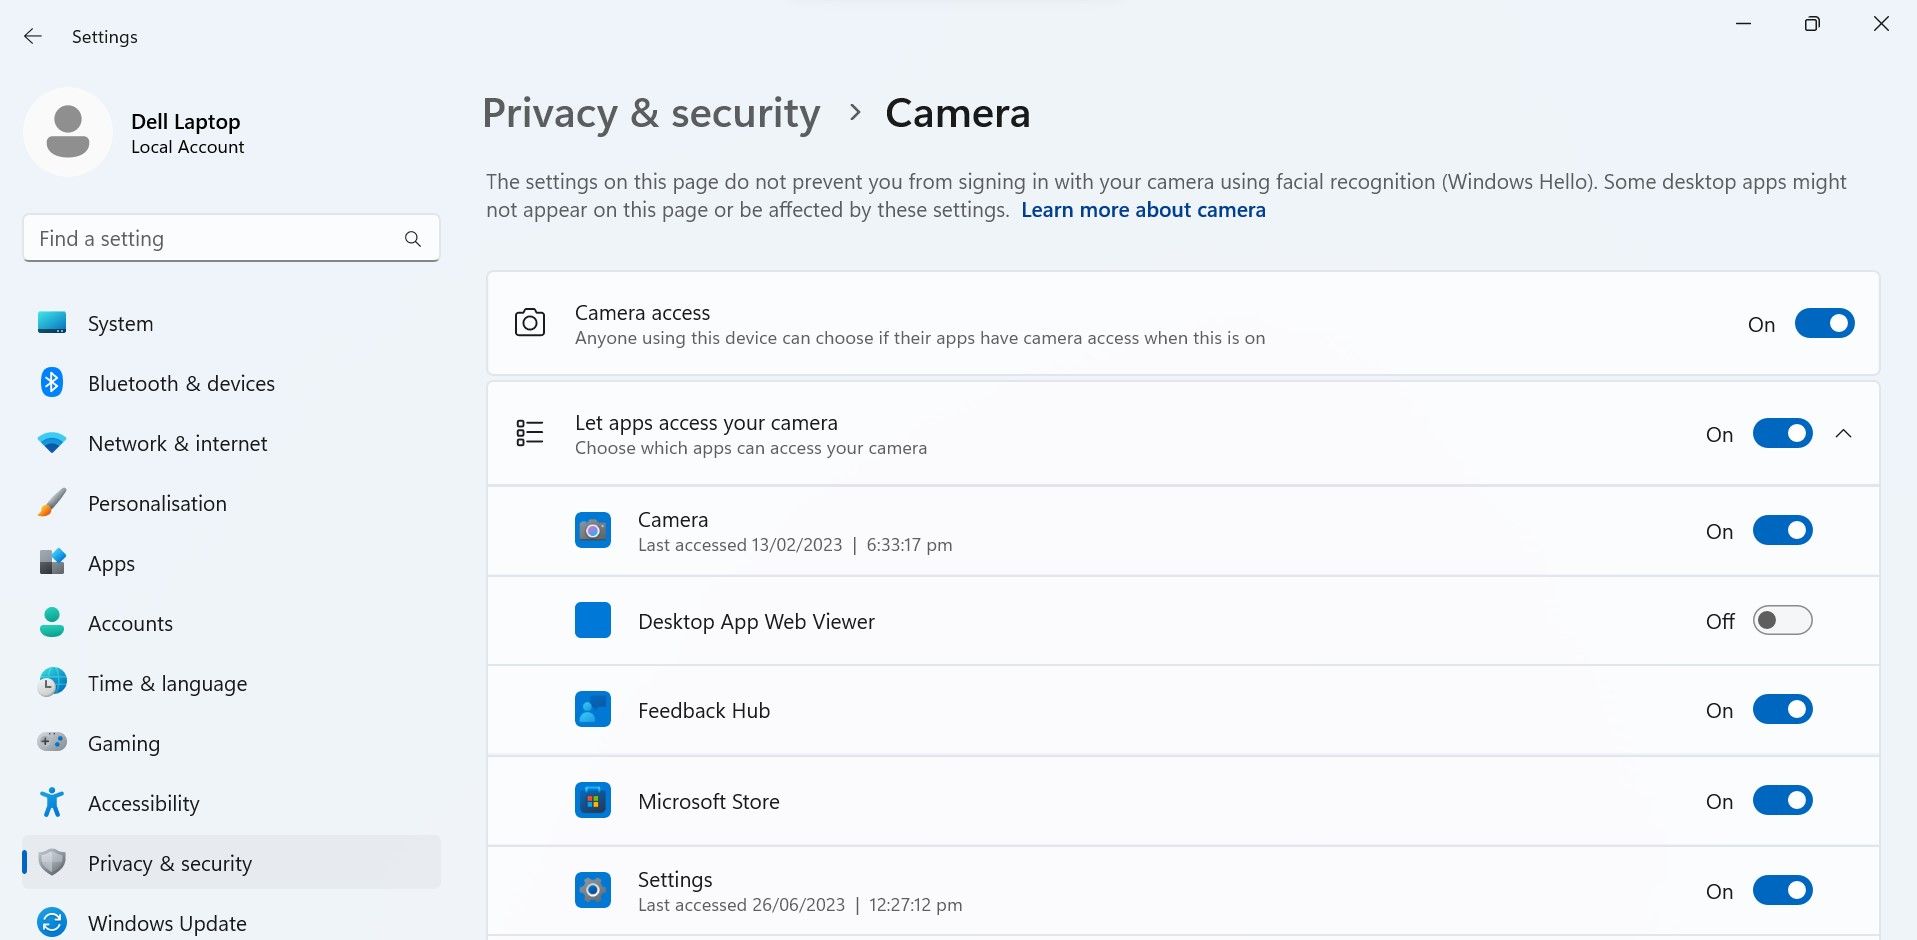
5. Check Microphone and Camera Permissions
The video conferencing app you want to use for an online meeting must have permission to access your camera and microphone. If the app’s access to these devices is blocked, Windows won’t let the app use them. To allow an app to access your default camera, follow these steps:
- Open Settings.
- Select Privacy and security on the sidebar.
- Scroll to the bottom of the page until you see the App permissions section.
- Click Camera.
- Ensure the toggles next to Camera access and Let apps access your camera are turned on. If not, turn them on.
- Also, check the toggle next to the app you intend to use for video conferencing is switched on.
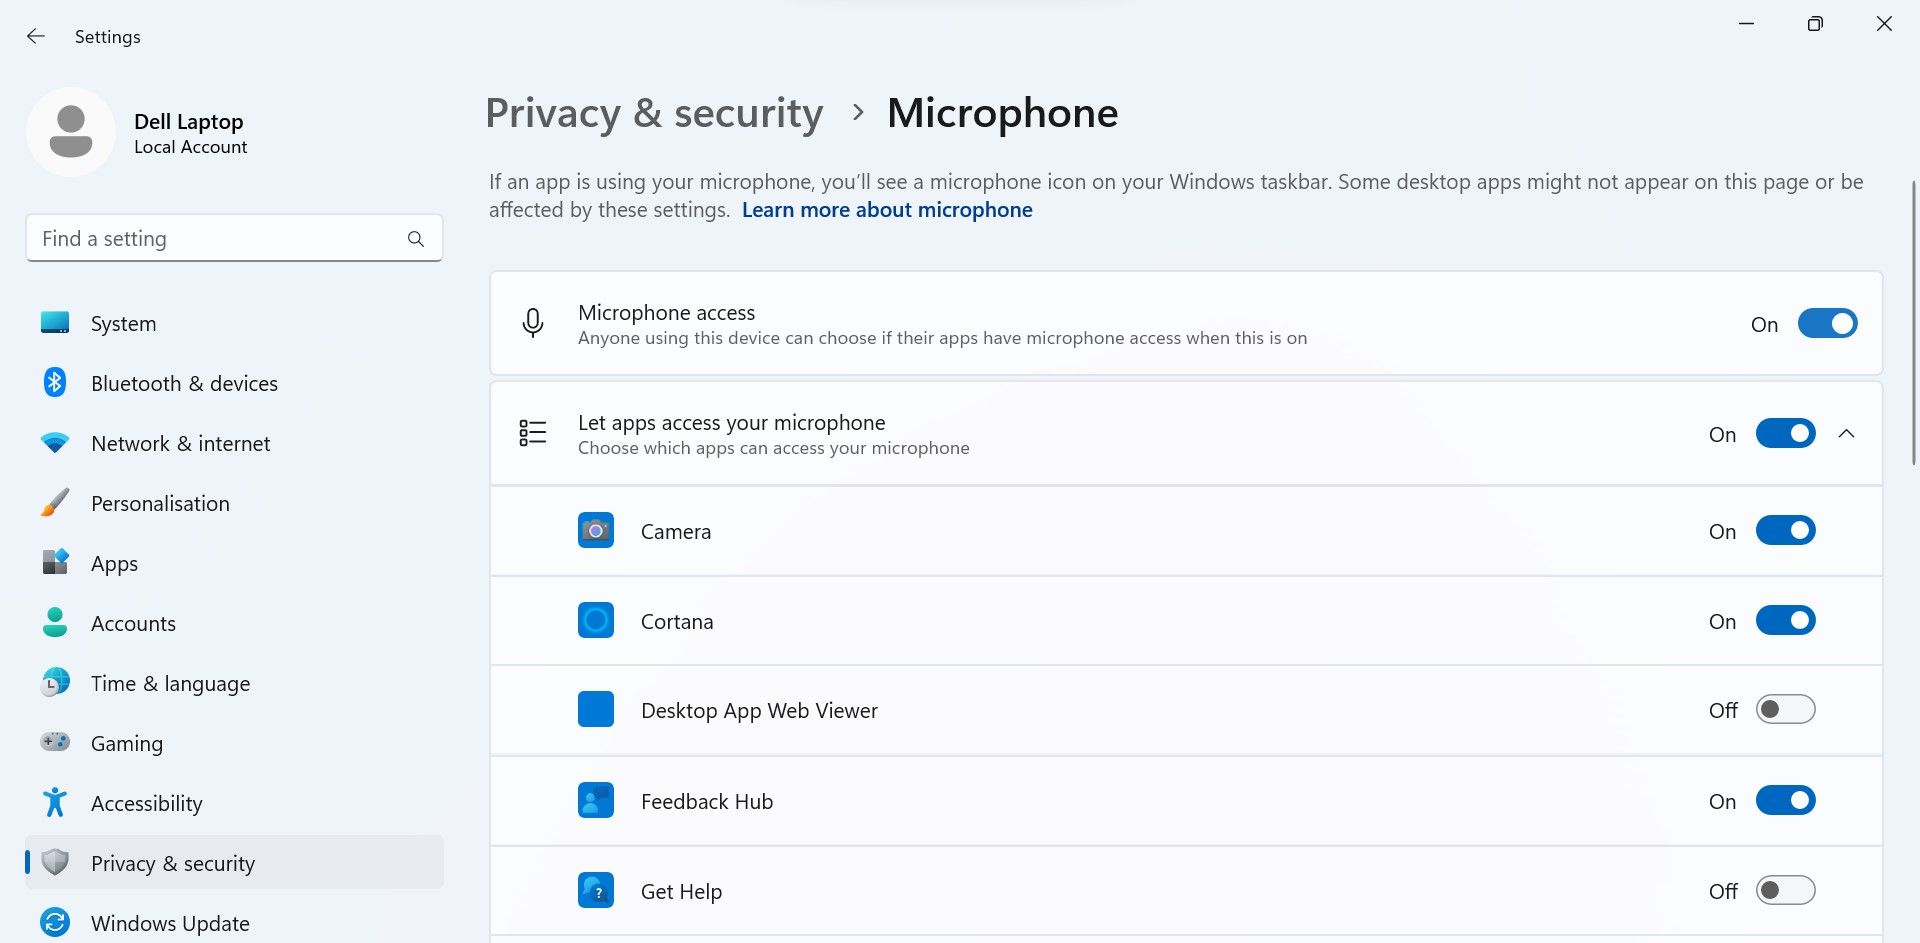
To make sure the app you want to use has access to your default microphone, go to Settings > Privacy and security > Microphone. Then, enable the toggles next to Microphone access, Let apps access your microphone,and the app you want to use for your online meeting.
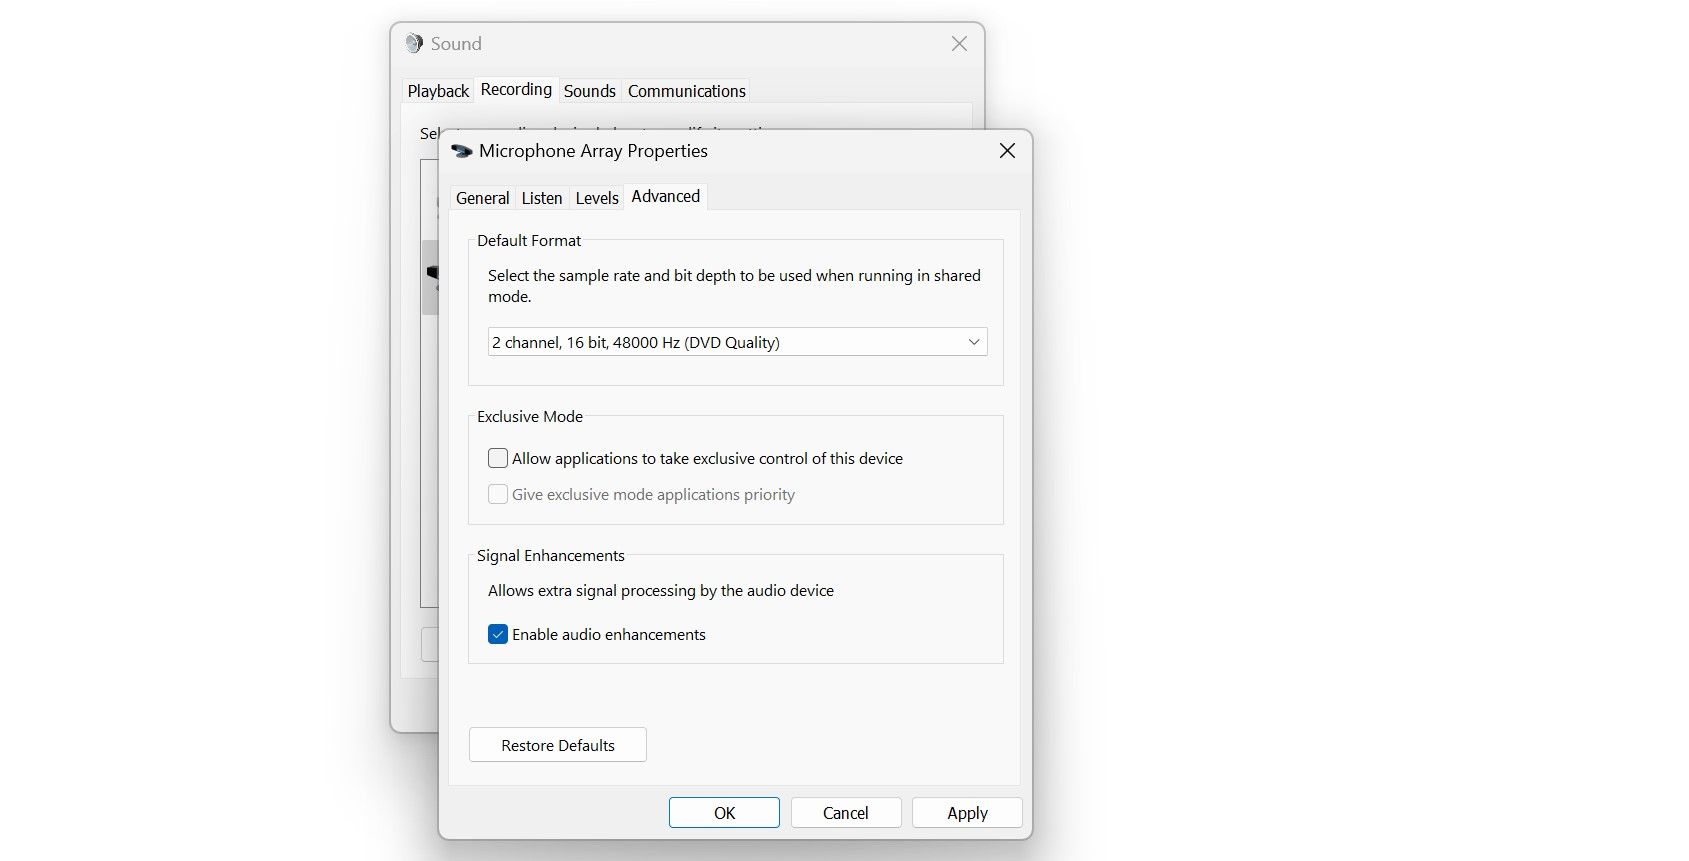
6. Disable Exclusive Control of Your Microphone
The Exclusive Mode checkbox allows a program to completely control an audio device. When that happens, the audio device becomes unavailable for other apps. Enabling this feature leads to audio problems most of the time, so we recommend turning off this feature before your meeting starts. Here’s how:
- Open Settings.
- Navigate to System > Sound.
- Click on More sound settings.
- Right-click on your default microphone device and select Properties.
- Select the Advanced tab.
- Uncheck the box beside Allow applications to take exclusive control of this device.
7. Unmute the Microphone and Camera in Your Video Conferencing App
Most video conferencing applications prompt you to unmute your microphone and webcam (if they’re muted) when you launch them. Still, double-check that you haven’t muted the microphone and the camera isn’t blocked in your video conferencing app. You must also ensure your default microphone and camera are selected in the app’s settings.
The process to check that varies for each application. If you’re unfamiliar with it, check the app developer’s website for instructions.
Besides video conferencing apps, you can use other tools to make online meetings more efficient .
A faulty or incorrectly configured microphone or camera can easily ruin a critical video conference . Take the above steps to ensure that your microphone and audio are set up correctly and that there are no hardware issues before your meeting begins.
Testing your microphone and webcam before an online meeting can help you identify potential issues before they become a waste of time or embarrassing. Here’s how to check whether your microphone and webcam are configured and functioning correctly in Windows 11.
 Video Converter Factory Pro
1. Test the Webcam Before Your Meeting
There are two types of webcams: built-in and external. If your PC has an integrated webcam, use the Camera app to test it—type “camera”in Windows Search to open this app. You know your webcam is optimally configured if you get high-quality footage without any errors. Make sure to remove any webcam covers!

External webcams often come with dedicated software to manage their operation. Try opening the official app and seeing how good the visuals are. This pre-meeting check can help you confirm that your external webcam is connected and functioning.
2. Test the Microphone You Plan to Use
When using an external microphone, connect it to your device and start the test like this:
- Right-click the Start button and select Settings.
- Select System > Sound.
- In the Input section, select the microphone you wish to use (if you have more than one connected) and open its settings.
- Ensure that the Input volume slider isn’t set too low.
- Click on Start test.
- Speak into your microphone briefly and click the Stop test button.
Next to the Start test button, you’ll see the result as a percentage of total volume. A number above 75 is ideal, but it shouldn’t be below 50. Something could be wrong if the percentage is lower than that, or if your microphone doesn’t pick up your voice clearly. In that case, troubleshoot your microphone and test it again. Make sure you don’t have any on-mic mute buttons enabled.
3. Pick Your Best Microphone as the Default
You can skip this step if your device’s built-in microphone is the only option you have for voice input. However, if you want to use a microphone with better fidelity, it’s wise to make it your default device. To change your default microphone, follow these steps:
- Open Settings.
- Go to System > Sound.
- Scroll to the Advanced settings and click More sound settings.
- Select the Recording tab.
- Locate the microphone device you want to make your default, right-click on it, and select Set as Default Device.

4. Set Your Preferred Webcam as the Default
Unlike microphones, you can’t directly choose a camera as the default. Instead, you have to turn off every camera other than the one you intend to use. Here’s how to do this:
- Right-click the Start button and select Settings.
- Select the Bluetooth & devices tab on the left and go to Cameras on the right pane. Here, you can see all the cameras that are connected.
- Open the settings of the device you want to disable.
- Click the Disable button and the Yes to confirm the change.
Repeat this process for all other camera devices you want to turn off. With all other cameras disabled, Windows will use the only enabled device as your primary camera.
5. Check Microphone and Camera Permissions
The video conferencing app you want to use for an online meeting must have permission to access your camera and microphone. If the app’s access to these devices is blocked, Windows won’t let the app use them. To allow an app to access your default camera, follow these steps:
- Open Settings.
- Select Privacy and security on the sidebar.
- Scroll to the bottom of the page until you see the App permissions section.
- Click Camera.
- Ensure the toggles next to Camera access and Let apps access your camera are turned on. If not, turn them on.
- Also, check the toggle next to the app you intend to use for video conferencing is switched on.
To make sure the app you want to use has access to your default microphone, go to Settings > Privacy and security > Microphone. Then, enable the toggles next to Microphone access, Let apps access your microphone,and the app you want to use for your online meeting.
6. Disable Exclusive Control of Your Microphone
The Exclusive Mode checkbox allows a program to completely control an audio device. When that happens, the audio device becomes unavailable for other apps. Enabling this feature leads to audio problems most of the time, so we recommend turning off this feature before your meeting starts. Here’s how:
- Open Settings.
- Navigate to System > Sound.
- Click on More sound settings.
- Right-click on your default microphone device and select Properties.
- Select the Advanced tab.
- Uncheck the box beside Allow applications to take exclusive control of this device.
7. Unmute the Microphone and Camera in Your Video Conferencing App
Most video conferencing applications prompt you to unmute your microphone and webcam (if they’re muted) when you launch them. Still, double-check that you haven’t muted the microphone and the camera isn’t blocked in your video conferencing app. You must also ensure your default microphone and camera are selected in the app’s settings.
The process to check that varies for each application. If you’re unfamiliar with it, check the app developer’s website for instructions.
Besides video conferencing apps, you can use other tools to make online meetings more efficient .
A faulty or incorrectly configured microphone or camera can easily ruin a critical video conference . Take the above steps to ensure that your microphone and audio are set up correctly and that there are no hardware issues before your meeting begins.
Testing your microphone and webcam before an online meeting can help you identify potential issues before they become a waste of time or embarrassing. Here’s how to check whether your microphone and webcam are configured and functioning correctly in Windows 11.
1. Test the Webcam Before Your Meeting
There are two types of webcams: built-in and external. If your PC has an integrated webcam, use the Camera app to test it—type “camera”in Windows Search to open this app. You know your webcam is optimally configured if you get high-quality footage without any errors. Make sure to remove any webcam covers!
External webcams often come with dedicated software to manage their operation. Try opening the official app and seeing how good the visuals are. This pre-meeting check can help you confirm that your external webcam is connected and functioning.

2. Test the Microphone You Plan to Use
When using an external microphone, connect it to your device and start the test like this:
- Right-click the Start button and select Settings.
- Select System > Sound.
- In the Input section, select the microphone you wish to use (if you have more than one connected) and open its settings.
- Ensure that the Input volume slider isn’t set too low.
- Click on Start test.
- Speak into your microphone briefly and click the Stop test button.


Next to the Start test button, you’ll see the result as a percentage of total volume. A number above 75 is ideal, but it shouldn’t be below 50. Something could be wrong if the percentage is lower than that, or if your microphone doesn’t pick up your voice clearly. In that case, troubleshoot your microphone and test it again. Make sure you don’t have any on-mic mute buttons enabled.

3. Pick Your Best Microphone as the Default
You can skip this step if your device’s built-in microphone is the only option you have for voice input. However, if you want to use a microphone with better fidelity, it’s wise to make it your default device. To change your default microphone, follow these steps:
- Open Settings.
- Go to System > Sound.
- Scroll to the Advanced settings and click More sound settings.
- Select the Recording tab.
- Locate the microphone device you want to make your default, right-click on it, and select Set as Default Device.
Power Tools add-on for Google Sheets, 12-month subscription
4. Set Your Preferred Webcam as the Default
Unlike microphones, you can’t directly choose a camera as the default. Instead, you have to turn off every camera other than the one you intend to use. Here’s how to do this:
- Right-click the Start button and select Settings.
- Select the Bluetooth & devices tab on the left and go to Cameras on the right pane. Here, you can see all the cameras that are connected.
- Open the settings of the device you want to disable.
- Click the Disable button and the Yes to confirm the change.
Jutoh Plus - Jutoh is an ebook creator for Epub, Kindle and more. It’s fast, runs on Windows, Mac, and Linux, comes with a cover design editor, and allows book variations to be created with alternate text, style sheets and cover designs. Jutoh Plus adds scripting so you can automate ebook import and creation operations. It also allows customisation of ebook HTML via templates and source code documents; and you can create Windows CHM and wxWidgets HTB help files.
Repeat this process for all other camera devices you want to turn off. With all other cameras disabled, Windows will use the only enabled device as your primary camera.

5. Check Microphone and Camera Permissions
The video conferencing app you want to use for an online meeting must have permission to access your camera and microphone. If the app’s access to these devices is blocked, Windows won’t let the app use them. To allow an app to access your default camera, follow these steps:
- Open Settings.
- Select Privacy and security on the sidebar.
- Scroll to the bottom of the page until you see the App permissions section.
- Click Camera.
- Ensure the toggles next to Camera access and Let apps access your camera are turned on. If not, turn them on.
- Also, check the toggle next to the app you intend to use for video conferencing is switched on.
To make sure the app you want to use has access to your default microphone, go to Settings > Privacy and security > Microphone. Then, enable the toggles next to Microphone access, Let apps access your microphone,and the app you want to use for your online meeting.
6. Disable Exclusive Control of Your Microphone
The Exclusive Mode checkbox allows a program to completely control an audio device. When that happens, the audio device becomes unavailable for other apps. Enabling this feature leads to audio problems most of the time, so we recommend turning off this feature before your meeting starts. Here’s how:
- Open Settings.
- Navigate to System > Sound.
- Click on More sound settings.
- Right-click on your default microphone device and select Properties.
- Select the Advanced tab.
- Uncheck the box beside Allow applications to take exclusive control of this device.
7. Unmute the Microphone and Camera in Your Video Conferencing App
Most video conferencing applications prompt you to unmute your microphone and webcam (if they’re muted) when you launch them. Still, double-check that you haven’t muted the microphone and the camera isn’t blocked in your video conferencing app. You must also ensure your default microphone and camera are selected in the app’s settings.
The process to check that varies for each application. If you’re unfamiliar with it, check the app developer’s website for instructions.
Besides video conferencing apps, you can use other tools to make online meetings more efficient .
A faulty or incorrectly configured microphone or camera can easily ruin a critical video conference . Take the above steps to ensure that your microphone and audio are set up correctly and that there are no hardware issues before your meeting begins.
Testing your microphone and webcam before an online meeting can help you identify potential issues before they become a waste of time or embarrassing. Here’s how to check whether your microphone and webcam are configured and functioning correctly in Windows 11.
1. Test the Webcam Before Your Meeting
There are two types of webcams: built-in and external. If your PC has an integrated webcam, use the Camera app to test it—type “camera”in Windows Search to open this app. You know your webcam is optimally configured if you get high-quality footage without any errors. Make sure to remove any webcam covers!
External webcams often come with dedicated software to manage their operation. Try opening the official app and seeing how good the visuals are. This pre-meeting check can help you confirm that your external webcam is connected and functioning.
2. Test the Microphone You Plan to Use
When using an external microphone, connect it to your device and start the test like this:
- Right-click the Start button and select Settings.
- Select System > Sound.
- In the Input section, select the microphone you wish to use (if you have more than one connected) and open its settings.
- Ensure that the Input volume slider isn’t set too low.
- Click on Start test.
Epubor Ultimate for Win:Helps you read books anywhere, including the best eBook Converter + eBook DRM Removal functions. - Speak into your microphone briefly and click the Stop test button.
Next to the Start test button, you’ll see the result as a percentage of total volume. A number above 75 is ideal, but it shouldn’t be below 50. Something could be wrong if the percentage is lower than that, or if your microphone doesn’t pick up your voice clearly. In that case, troubleshoot your microphone and test it again. Make sure you don’t have any on-mic mute buttons enabled.
3. Pick Your Best Microphone as the Default
You can skip this step if your device’s built-in microphone is the only option you have for voice input. However, if you want to use a microphone with better fidelity, it’s wise to make it your default device. To change your default microphone, follow these steps:
- Open Settings.
- Go to System > Sound.
- Scroll to the Advanced settings and click More sound settings.
- Select the Recording tab.
- Locate the microphone device you want to make your default, right-click on it, and select Set as Default Device.
4. Set Your Preferred Webcam as the Default
Unlike microphones, you can’t directly choose a camera as the default. Instead, you have to turn off every camera other than the one you intend to use. Here’s how to do this:
- Right-click the Start button and select Settings.
- Select the Bluetooth & devices tab on the left and go to Cameras on the right pane. Here, you can see all the cameras that are connected.
- Open the settings of the device you want to disable.
- Click the Disable button and the Yes to confirm the change.
Any DRM Removal for Win:Remove DRM from Adobe, Kindle, Sony eReader, Kobo, etc, read your ebooks anywhere.
 Any DRM Removal for Win:Remove DRM from Adobe, Kindle, Sony eReader, Kobo, etc, read your ebooks anywhere.
Repeat this process for all other camera devices you want to turn off. With all other cameras disabled, Windows will use the only enabled device as your primary camera.
 EmEditor Professional (Lifetime License, non-store app)
5. Check Microphone and Camera Permissions
The video conferencing app you want to use for an online meeting must have permission to access your camera and microphone. If the app’s access to these devices is blocked, Windows won’t let the app use them. To allow an app to access your default camera, follow these steps:
- Open Settings.
- Select Privacy and security on the sidebar.
- Scroll to the bottom of the page until you see the App permissions section.
- Click Camera.
- Ensure the toggles next to Camera access and Let apps access your camera are turned on. If not, turn them on.
- Also, check the toggle next to the app you intend to use for video conferencing is switched on.
To make sure the app you want to use has access to your default microphone, go to Settings > Privacy and security > Microphone. Then, enable the toggles next to Microphone access, Let apps access your microphone,and the app you want to use for your online meeting.
6. Disable Exclusive Control of Your Microphone
The Exclusive Mode checkbox allows a program to completely control an audio device. When that happens, the audio device becomes unavailable for other apps. Enabling this feature leads to audio problems most of the time, so we recommend turning off this feature before your meeting starts. Here’s how:
- Open Settings.
- Navigate to System > Sound.
- Click on More sound settings.
- Right-click on your default microphone device and select Properties.
- Select the Advanced tab.
- Uncheck the box beside Allow applications to take exclusive control of this device.

7. Unmute the Microphone and Camera in Your Video Conferencing App
Most video conferencing applications prompt you to unmute your microphone and webcam (if they’re muted) when you launch them. Still, double-check that you haven’t muted the microphone and the camera isn’t blocked in your video conferencing app. You must also ensure your default microphone and camera are selected in the app’s settings.
The process to check that varies for each application. If you’re unfamiliar with it, check the app developer’s website for instructions.
Besides video conferencing apps, you can use other tools to make online meetings more efficient .
A faulty or incorrectly configured microphone or camera can easily ruin a critical video conference . Take the above steps to ensure that your microphone and audio are set up correctly and that there are no hardware issues before your meeting begins.
- Title: Audio Visual Verification: A Windows User’s Pre-Meet Checklist
- Author: Joseph
- Created at : 2024-08-15 16:11:05
- Updated at : 2024-08-16 16:11:05
- Link: https://windows11.techidaily.com/audio-visual-verification-a-windows-users-pre-meet-checklist/
- License: This work is licensed under CC BY-NC-SA 4.0.