
Addressing Error 0X00000709 in Windows
Addressing Error 0X00000709 in Windows
Have you encountered an error 0x00000709 with the message “Operation could not be completed. Double check the printer name and make sure that the printer is connected to the network” when setting up your default printer or installing a new one? This means Windows has failed to change your device’s default printer or install a new one. But why?
In this article, we will examine the error in more detail and discuss why it occurs. In addition, we’ll cover a few fixes that you can apply to resolve the issue.
An Overview of the “0x00000709: Operation Could Not Be Completed” Error
The “0x00000709:operation could not be completed” error occurs when a user performs the steps to change their default printer on Windows , but Windows fails to do so. Users are further advised to verify that the printer name has been added correctly and that it is connected to the network. So, what can you do to fix it?
To resolve the error code 0x00000709, you must first change the printer name in Registry Editor and then change the RPC connection settings policy. If these steps do not resolve the issue, you can run the printer troubleshooter, change the printer preferences settings, and uninstall the problematic update.
1. Check for Interference From Other Printers
Changing the default printer settings when your device is connected to multiple printers may result in a “0x00000709:operation could not be completed” error. Therefore, disconnect all other printers except the one you want to set as default before changing settings.
If you continue to receive the error despite having no other printer connected to your device, then it is not interference from other printers causing the problem but rather a setting in your operating system. So, start applying the following fixes.
2. Rename the Printer in Registry Editor
The error message advises us to correctly set the printer’s name. So, in this next step, we should rename it manually in Registry Editor. Although it is known to fix the problem, you need to be careful to follow the steps correctly. You should avoid messing up registry keys as it can cause serious problems. As such, follow the instructions below:
- In Windows Search, type “Registry Editor.”
- Right-click on the Registry Editor app and click on Run as administrator.
- In the Registry Editor address bar, paste the following path:
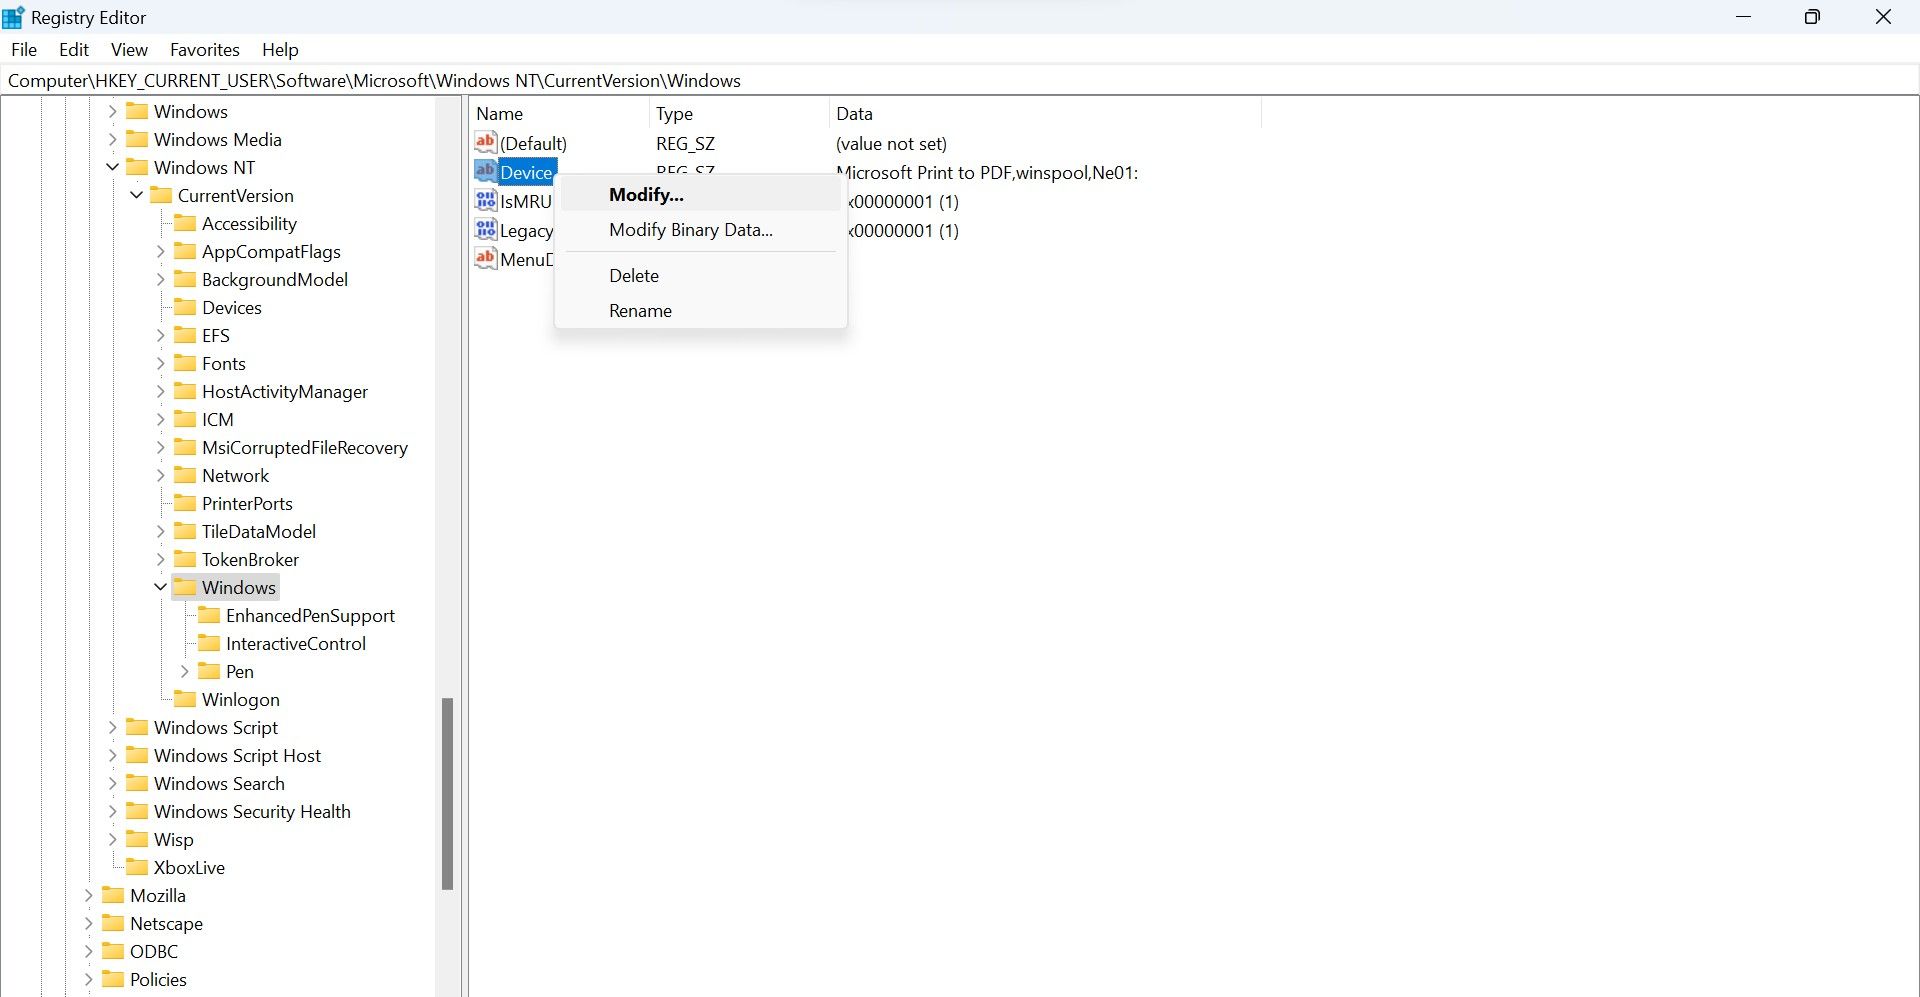
Computer\HKEY_CURRENT_USER\Software\Microsoft\Windows NT\CurrentVersion\Windows - Right-click on the Device key and click Modify.

- In the Value data field, replace the first entry with the name of your printer.
- Then click OK.

Make sure you restart your computer after completing the above steps. If renaming the registry keys makes no difference, apply the remaining fixes.
3. Change RPC Connection Settings
Once you’ve changed the printer name, you should ensure your printer is connected to the network. If it’s connected, but you’re still getting the error, modify the RPC connection settings in the group policy editor. This policy controls the protocol settings for outgoing RPC connections to a remote print spooler.
To enable and change the policy settings, follow these steps:
- Type “Group Policy” in Windows Search. See how to find and use Windows Search if you need help with this.
- Click on Edit group policy.
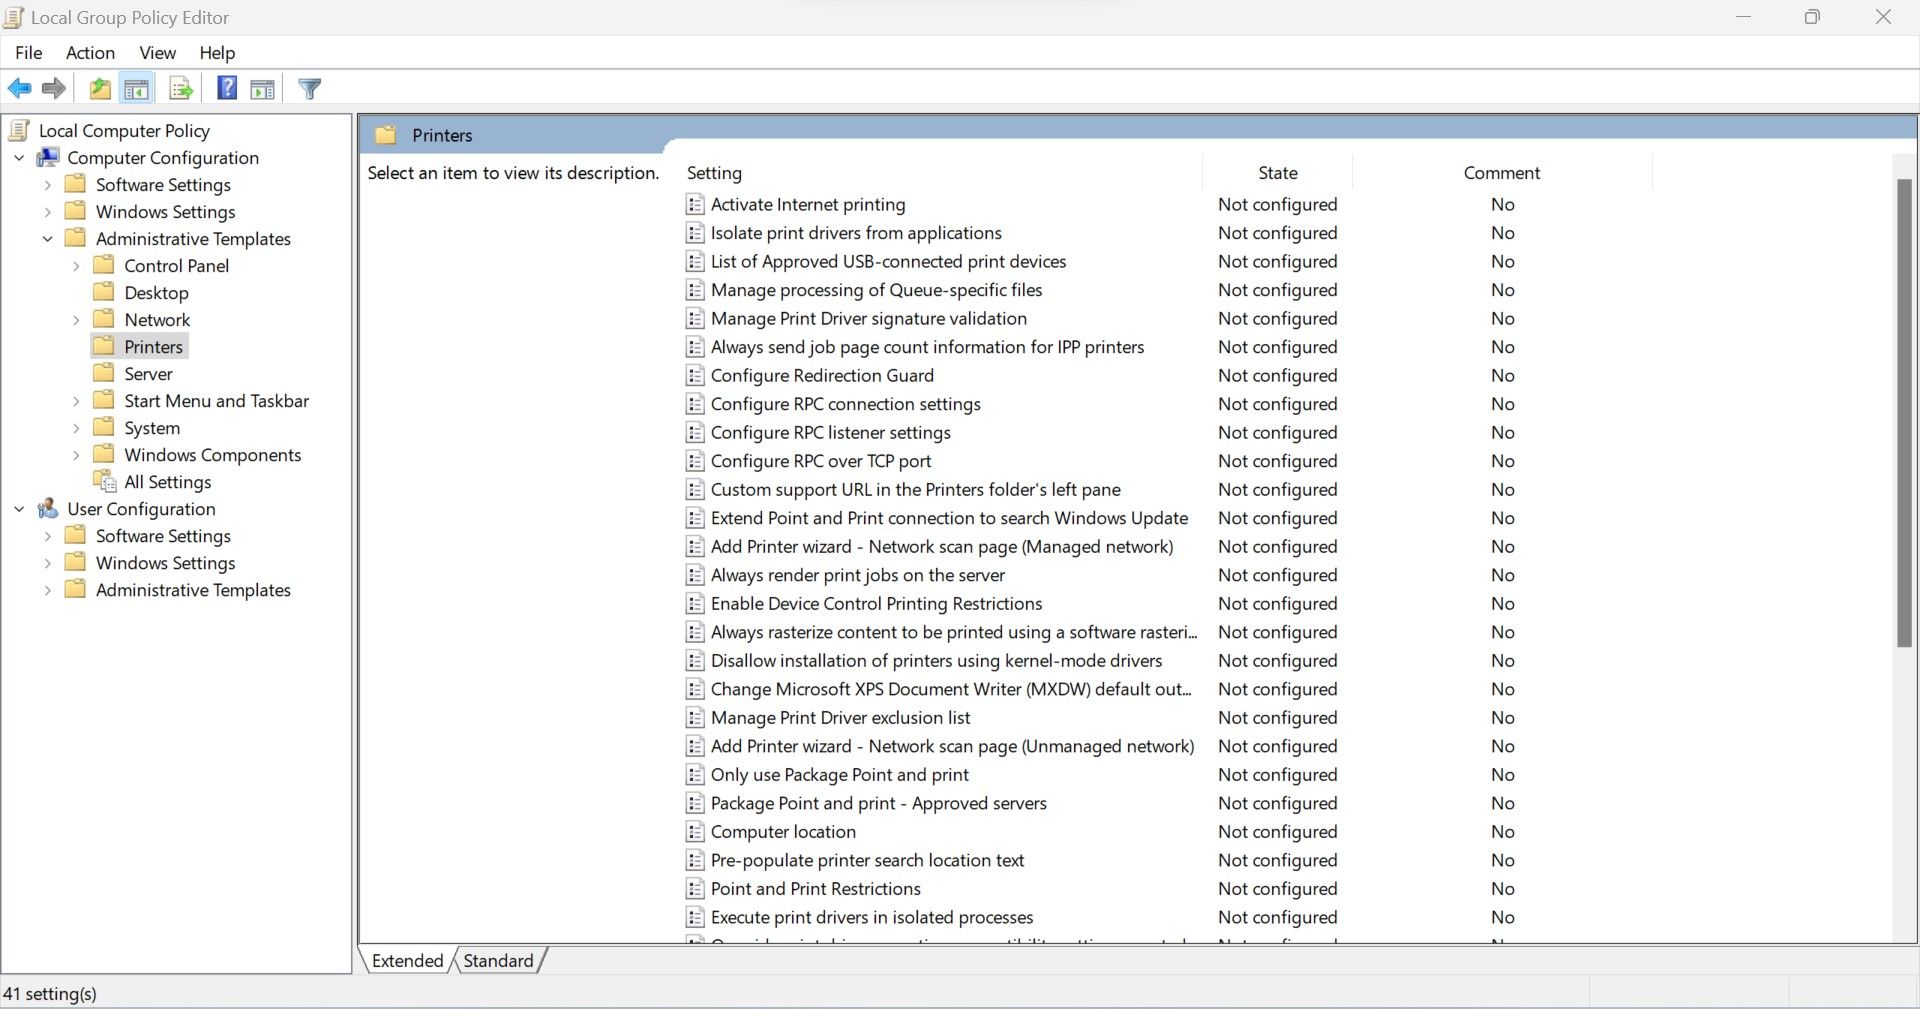
- In the left-sidebar, select Administrative Templates > Printers.
- Click Configure RPC connection settings twice.
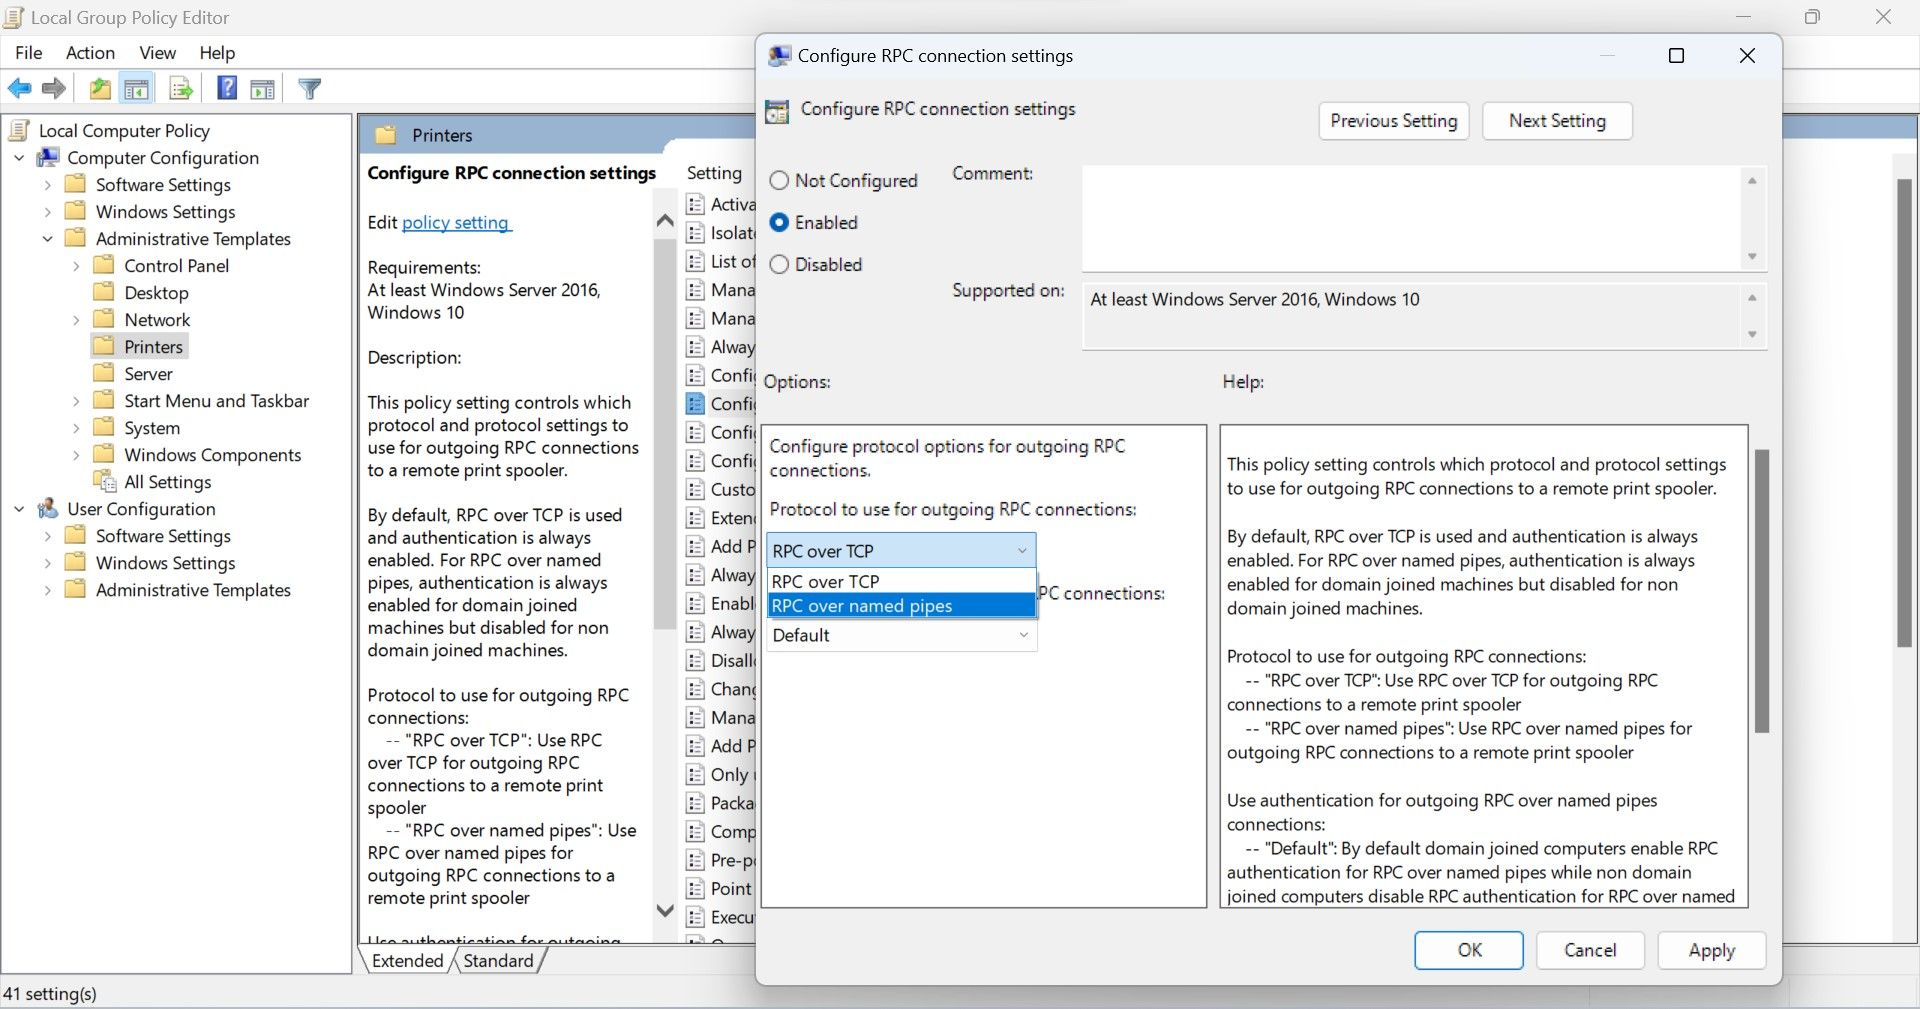
- To enable this policy, check the circle for Enabled.
- Select RPC over named pipes from the dropdown menu for Protocol to use for outgoing RPC connections.
- Hit OK after clicking Apply.
- Restart your device.
If the above instructions don’t work, you can select RPC over TCP from the Protocol to use for outgoing RPC connections dropdown.
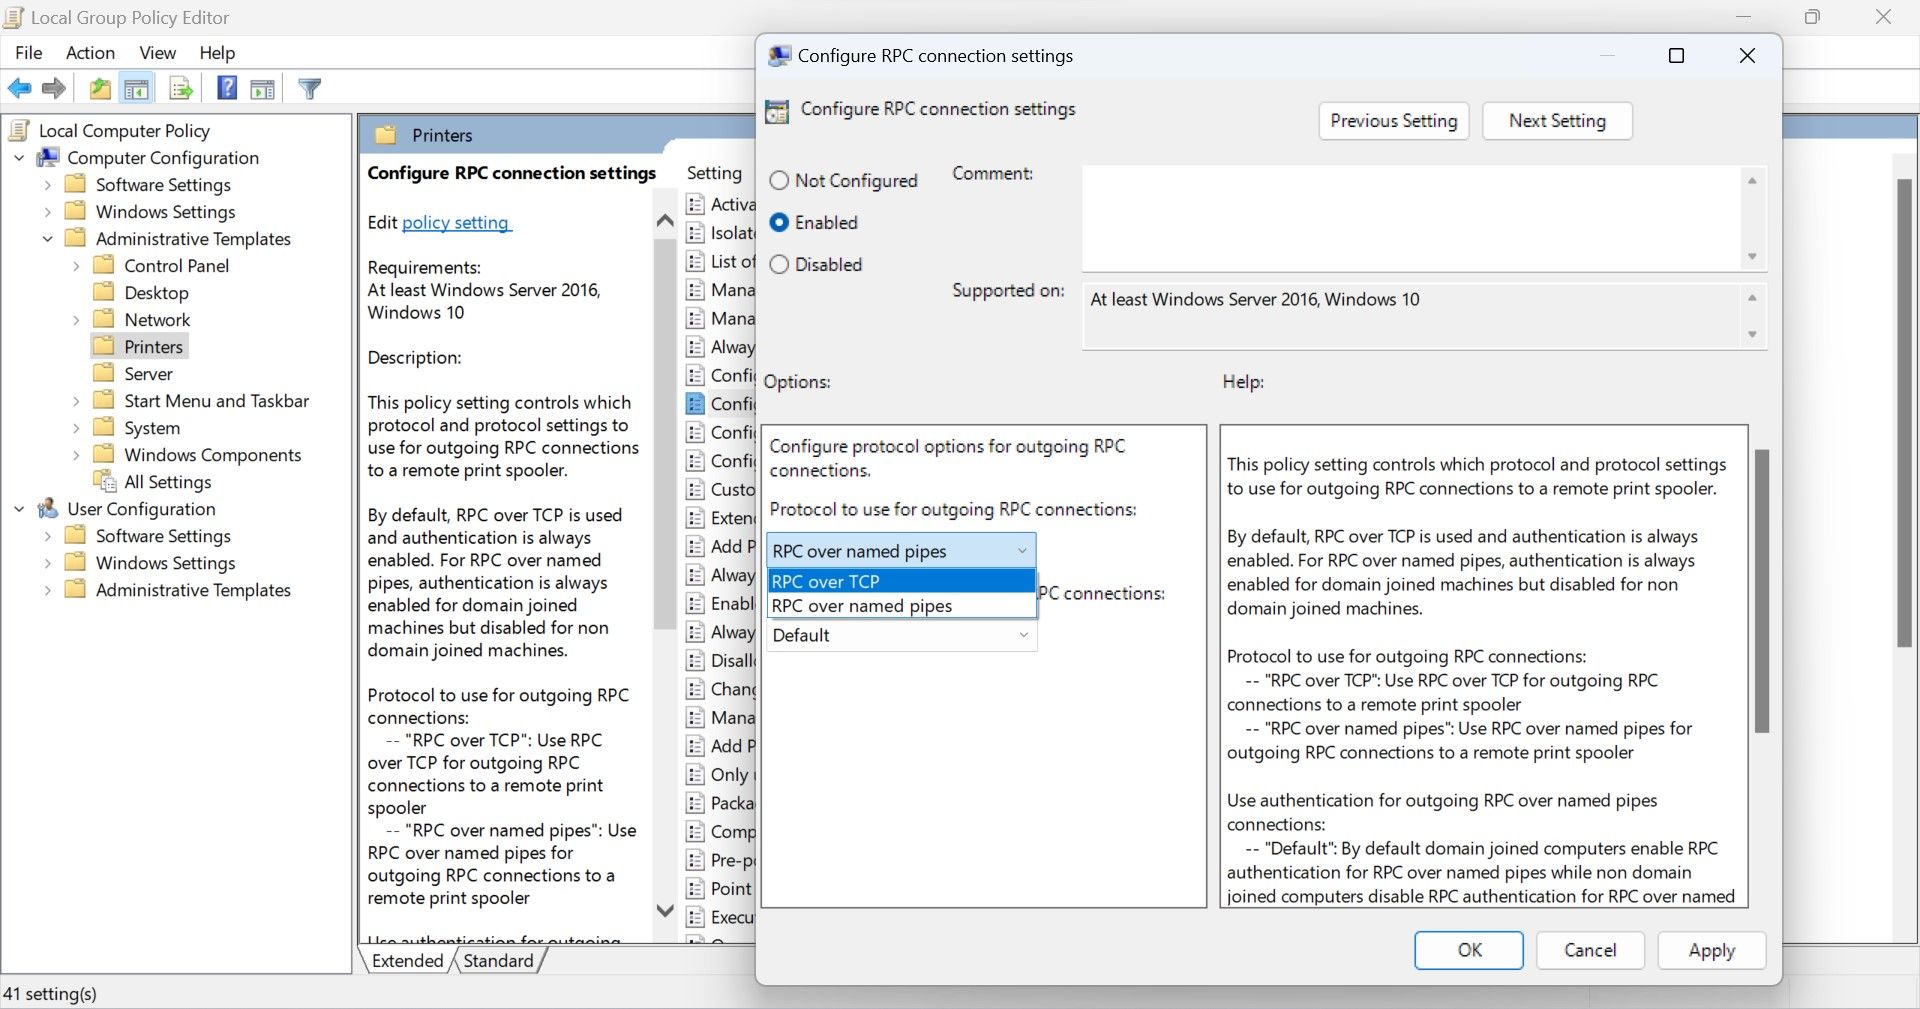
When that doesn’t work either, you can enable or disable authentication from the Use authentication for outgoing RPC connections dropdown menu.
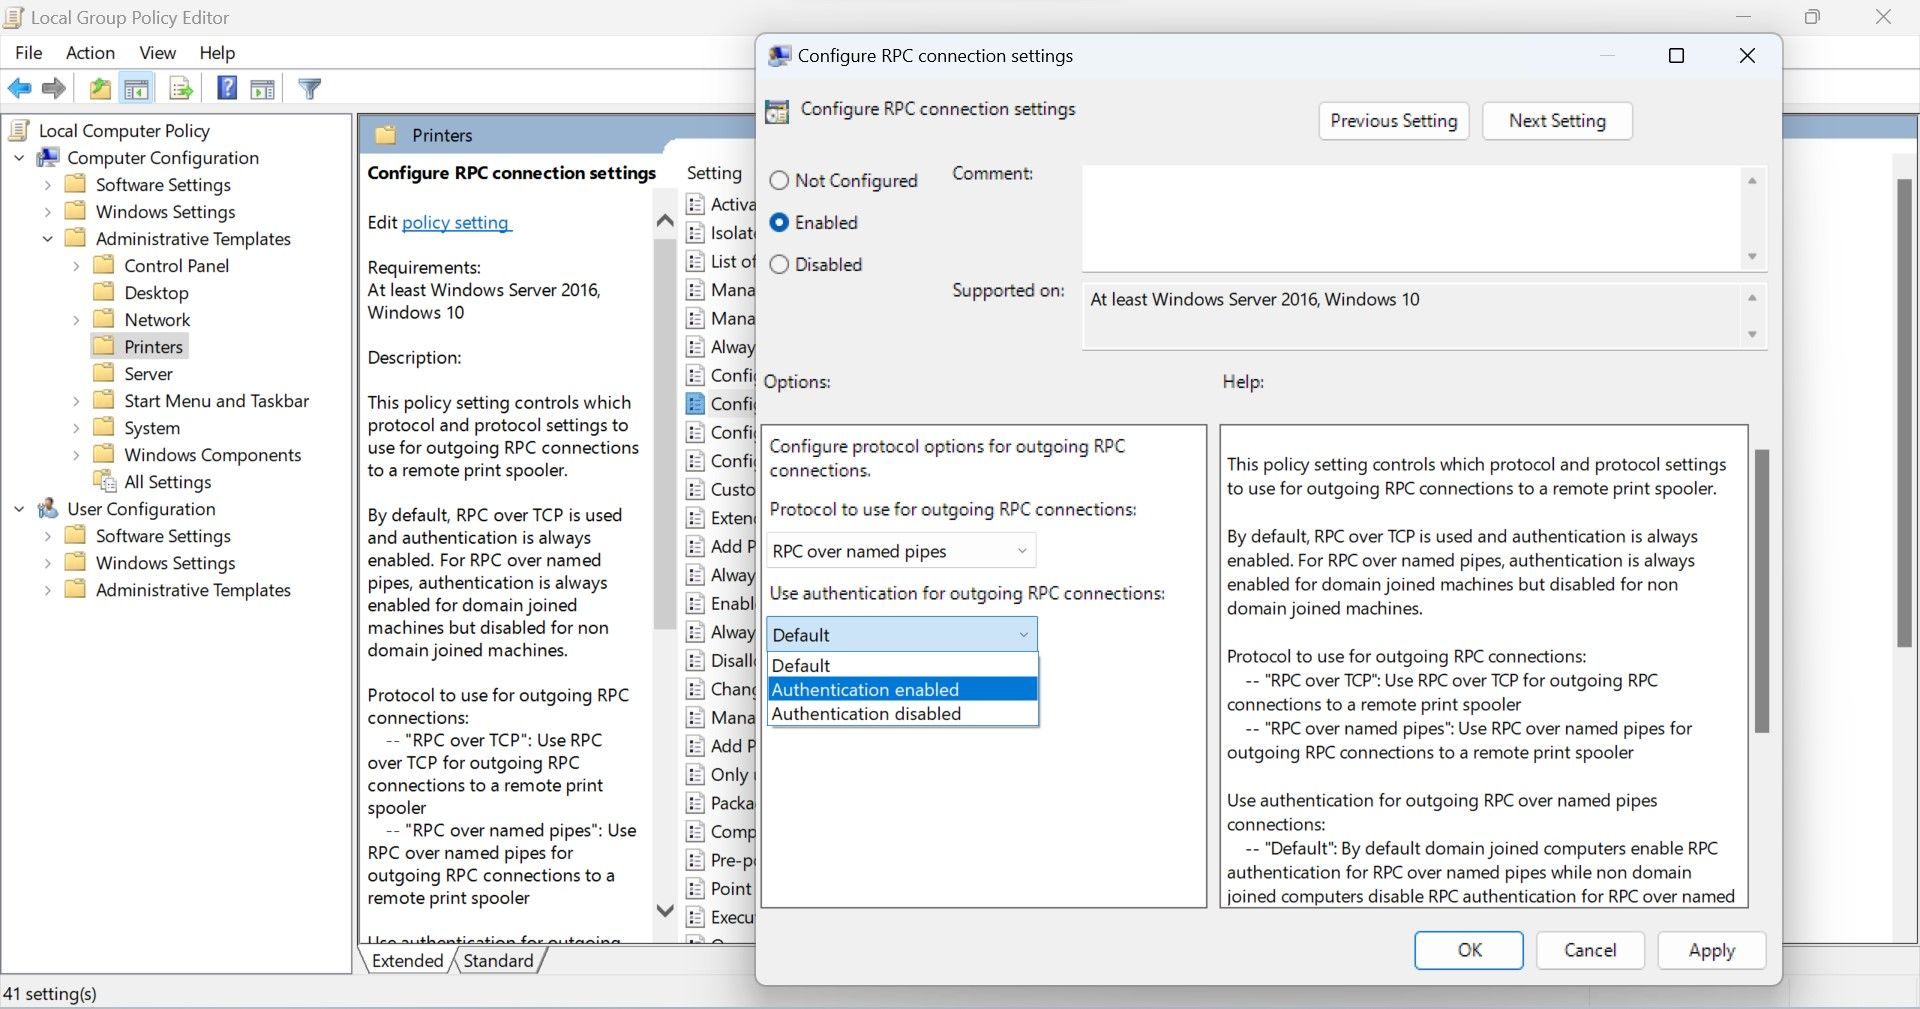
Apply this fix carefully, as it has the highest chance of fixing the error message.
4. Run the Printer Troubleshooter
To troubleshoot printer-related issues, Windows includes an in-built troubleshooter. The tool helps diagnose and fix most problems related to printer connectivity. If you try it, it may resolve the “operation could not be completed” error. To run the troubleshooter, follow the steps below:
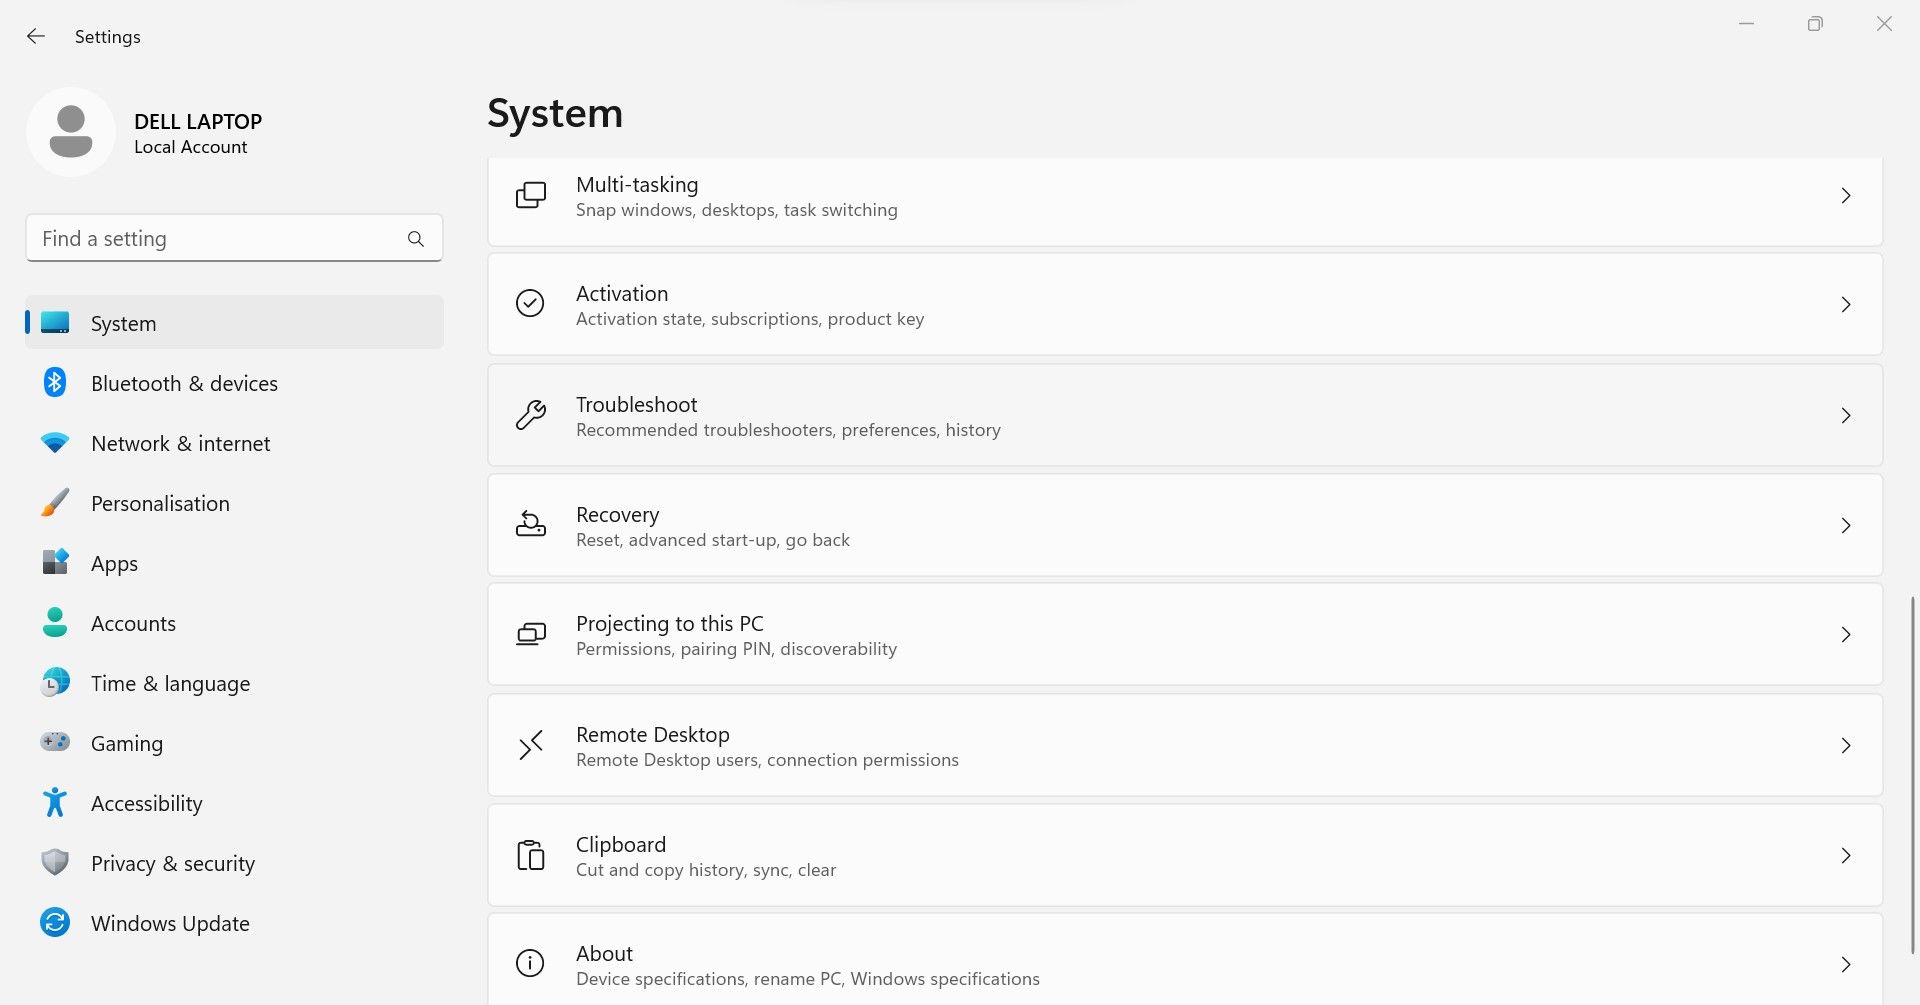
- Right-click the Start button and select Settings.
- Select the System tab from the left sidebar.
- In the right pane, click Troubleshoot.
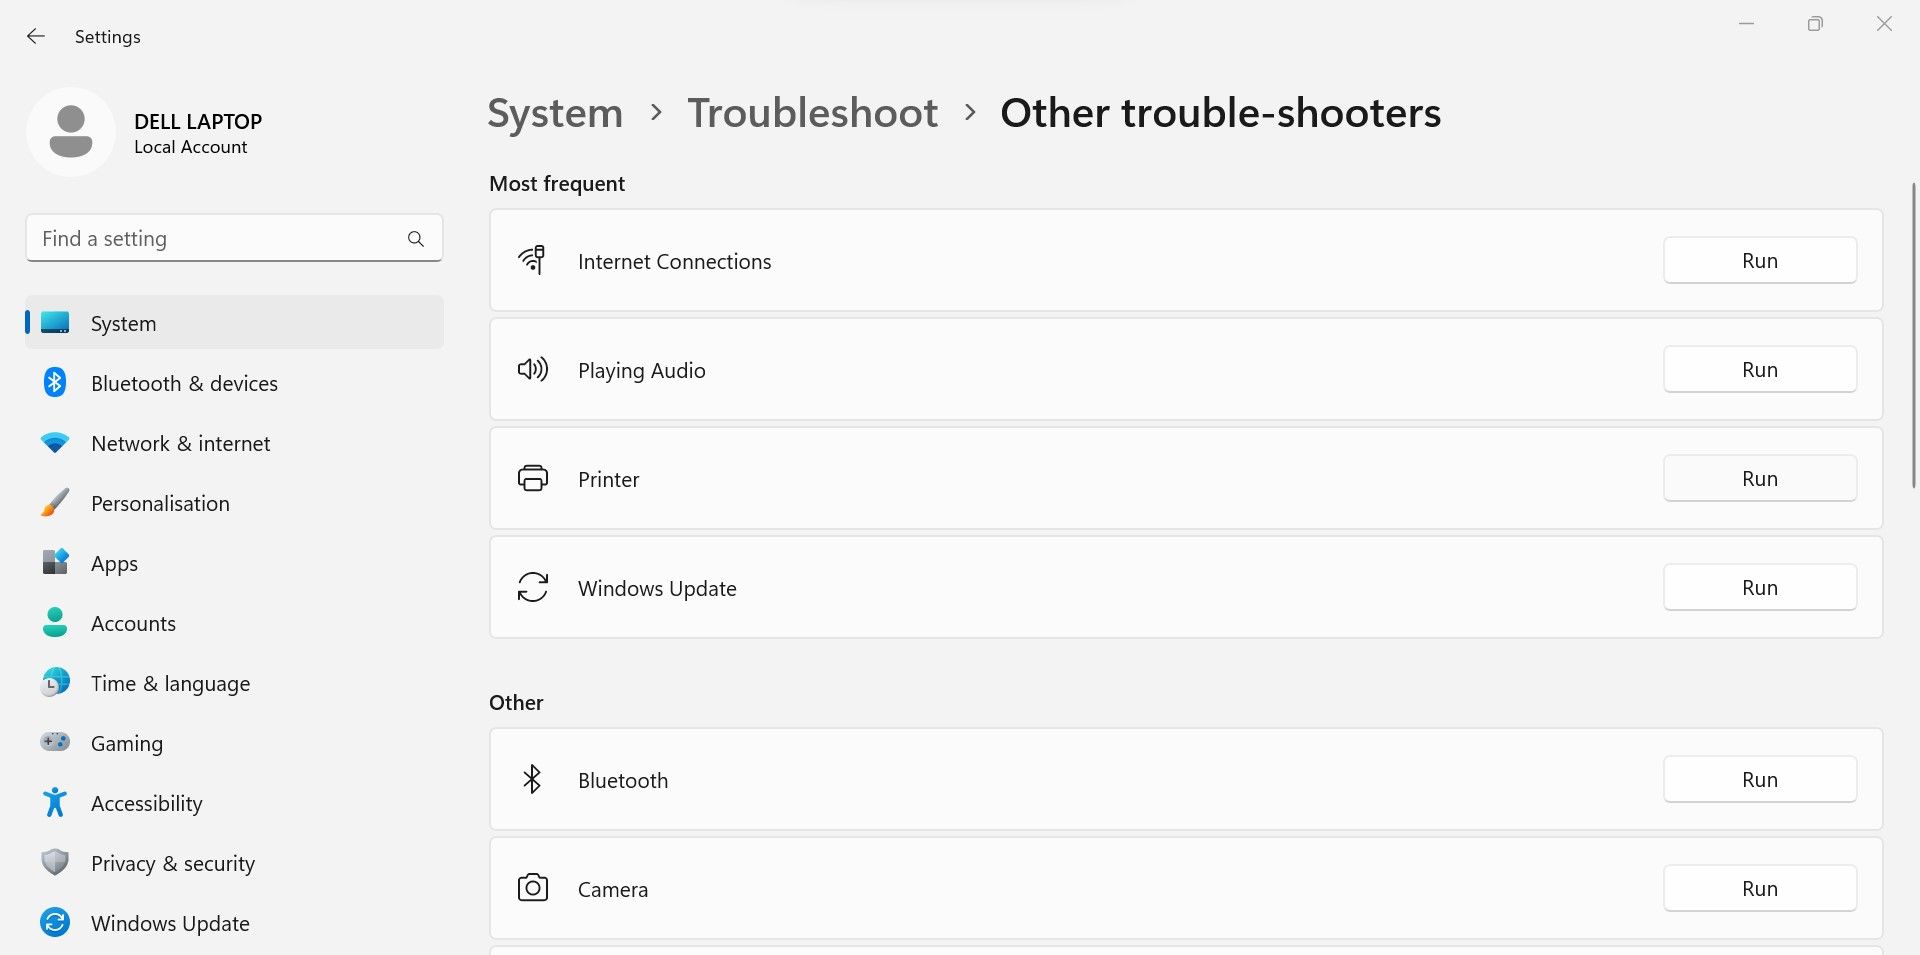
- Click Other troubleshooters.
- Locate the Printer troubleshooter, and click on the Run button next to it.
- Follow the on-screen instructions to help the troubleshooter get started.
After that, make your preferred printer your default printer again. In case the same error occurs again, apply the next fix.
5. Change Printer Preferences
By default, Windows manages the default printer for the user. The setting is helpful, especially if you frequently connect your device to different printers, but it can sometimes cause problems. Hence, you should disable this feature to ensure it is not causing the problem.
To do that, follow these steps:
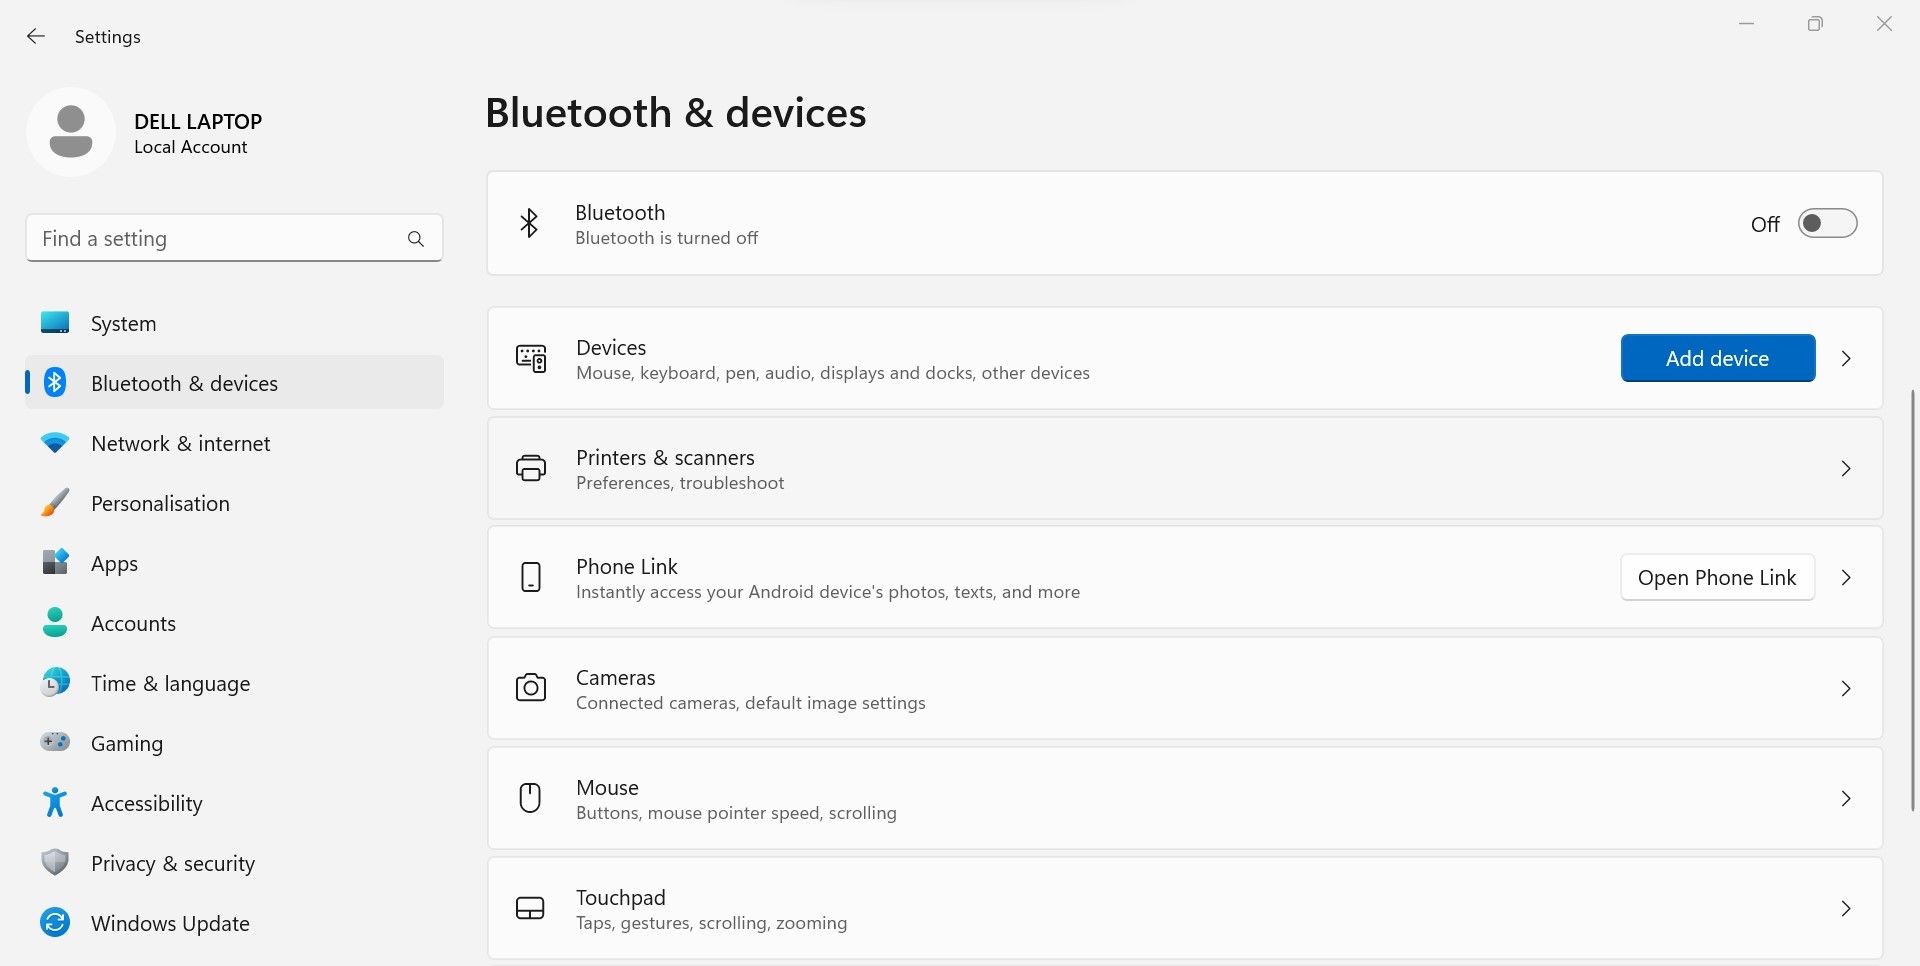
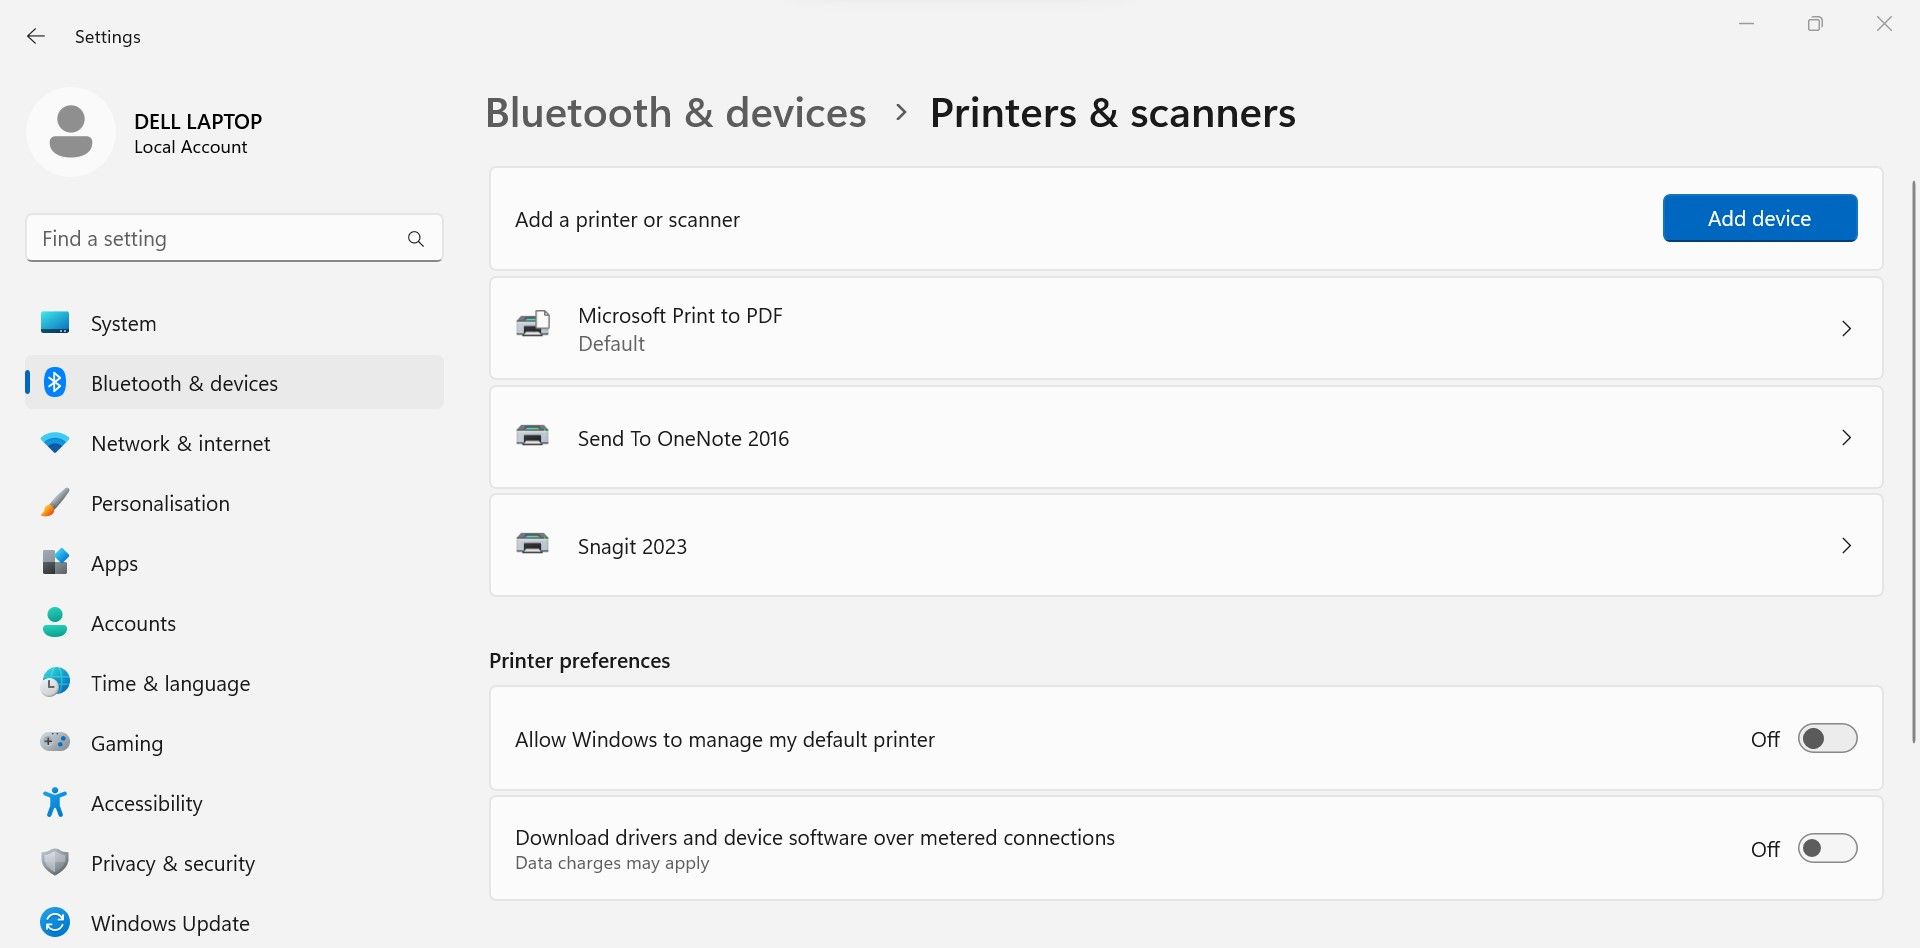
- Right-click the Start button and select Settings.
- Select the Bluetooth & devices tab from the left sidebar.
- In the right pane, click Printers & scanners.
- Turn off the toggle next to Allow Windows to manage my default printer under Printer preferences.
6. Uninstall the Problematic Update
Have you recently installed an update and encountered this error? If so, the newly installed update might be problematic. Therefore, you should uninstall it. To do that, follow these steps:
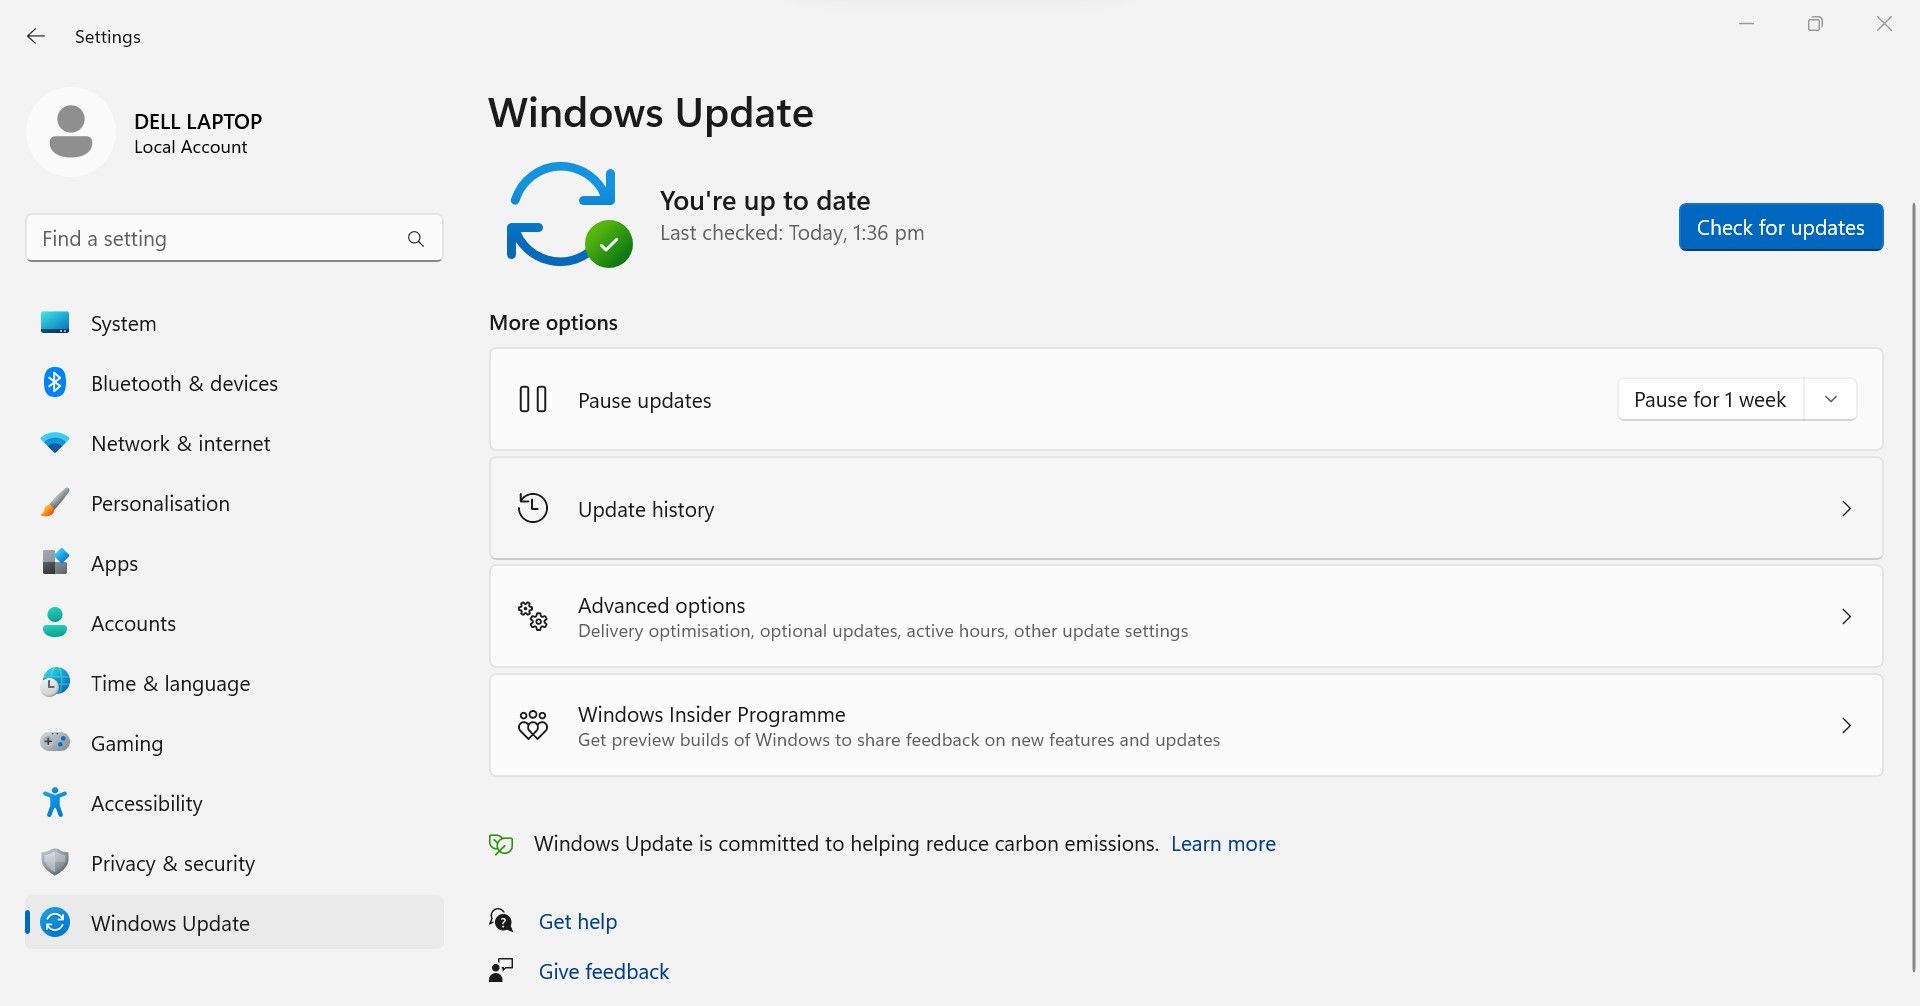
- Press Win + I to open the Windows Settings app.
- In the left sidebar, click Windows Update.
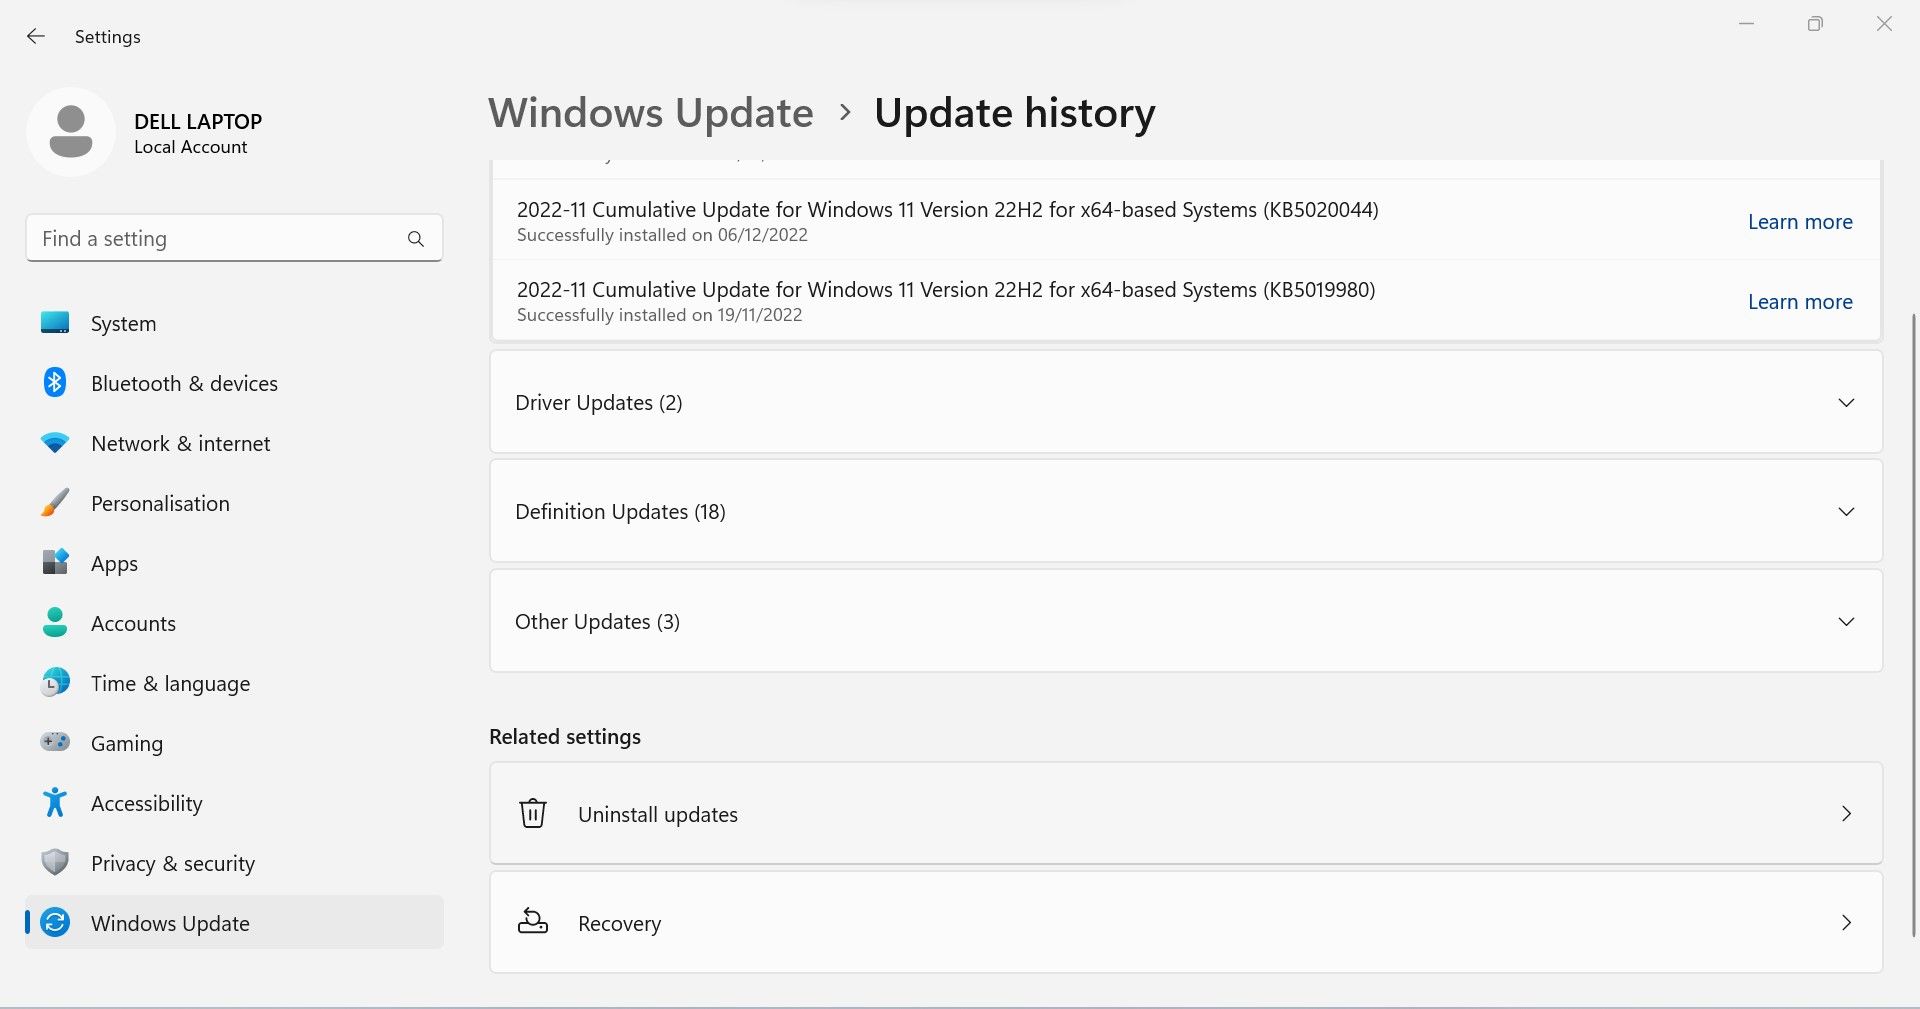
- In the right pane, click on Update history.
- Under Related settings, click Uninstall updates.
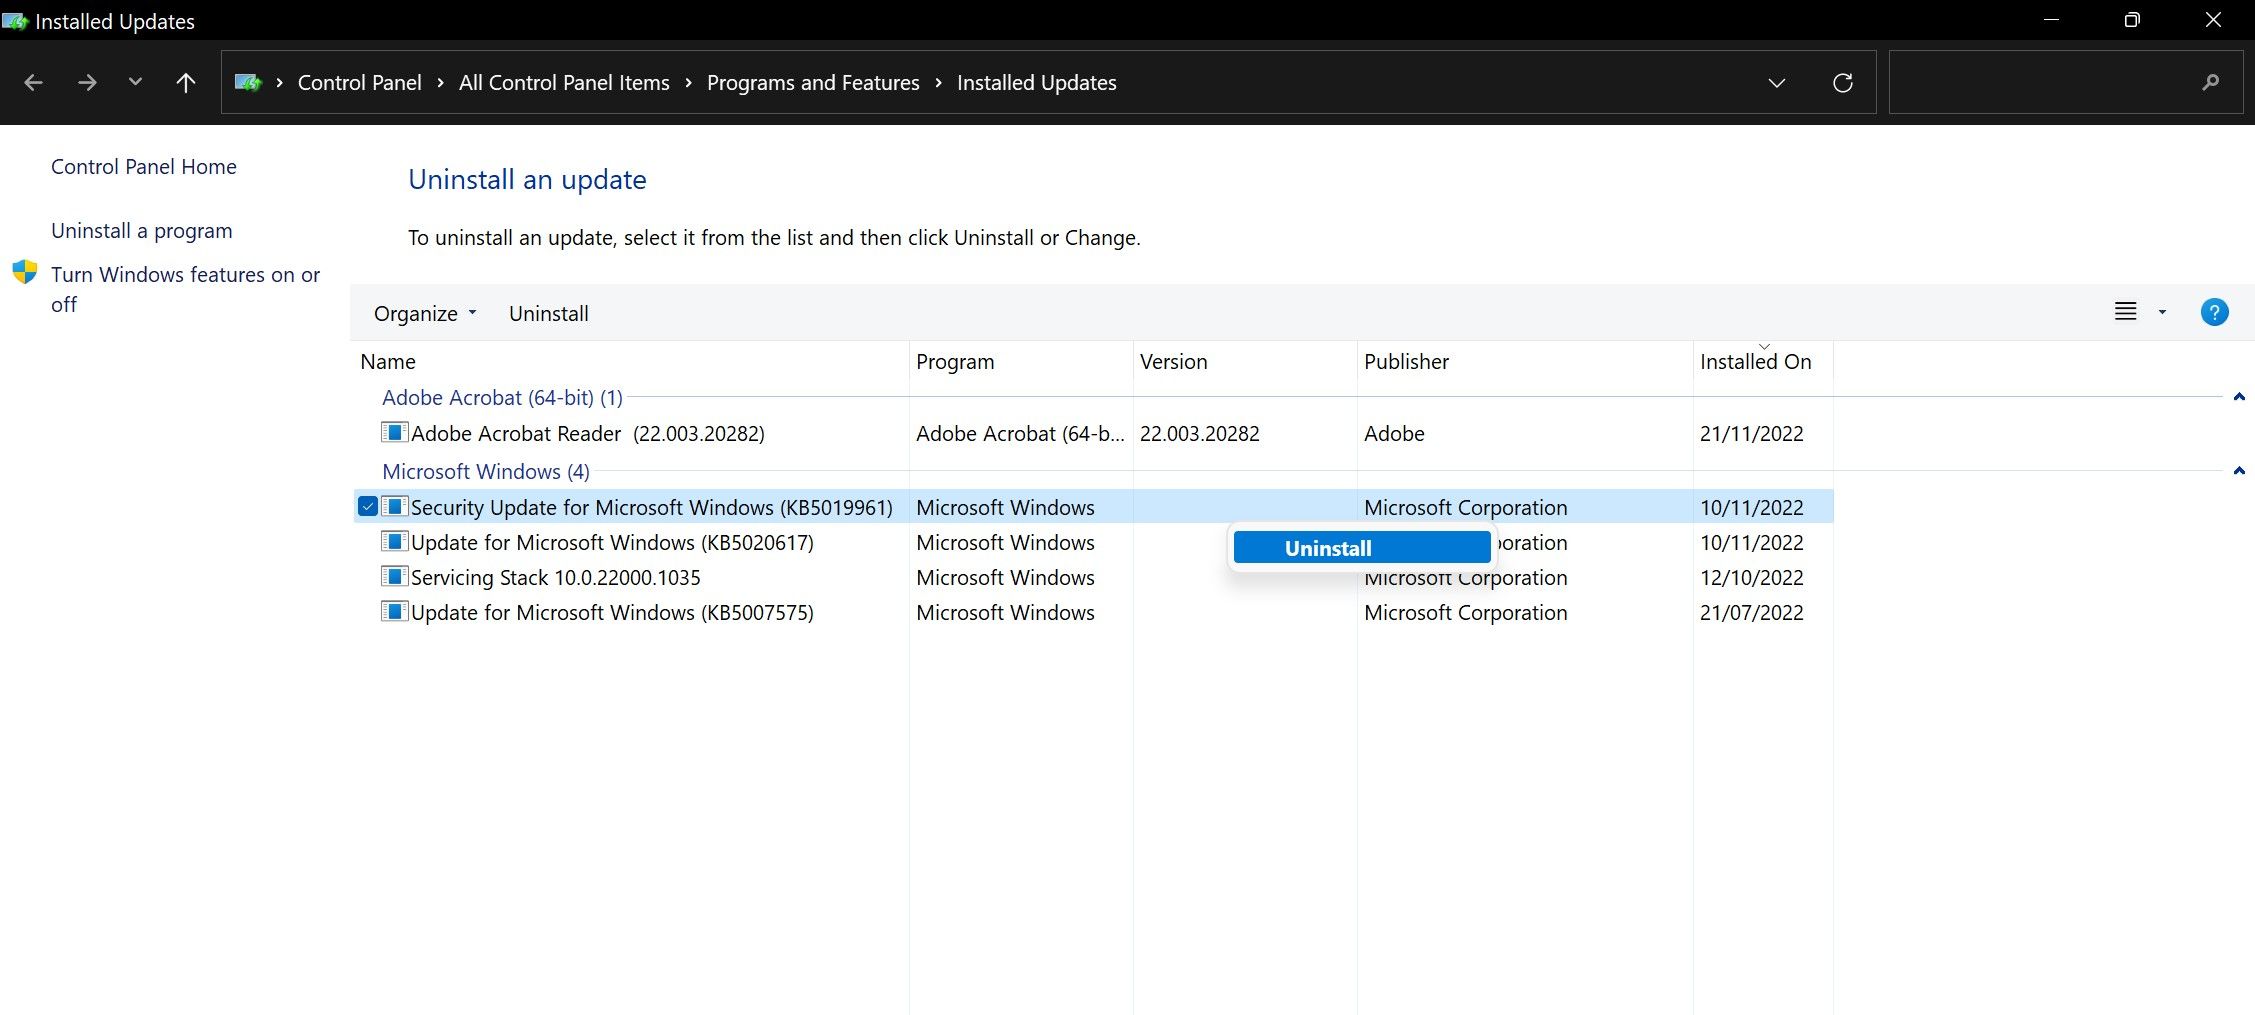
- Find the most recent update in the Control Panel app by checking its installation date. Once it has been located, right-click on it and click Uninstall.
See if you encounter the same error again. If uninstalling a problematic update resolves the issue, you should take extra steps to prevent this update from automatically installing again. You can do that by following these steps:
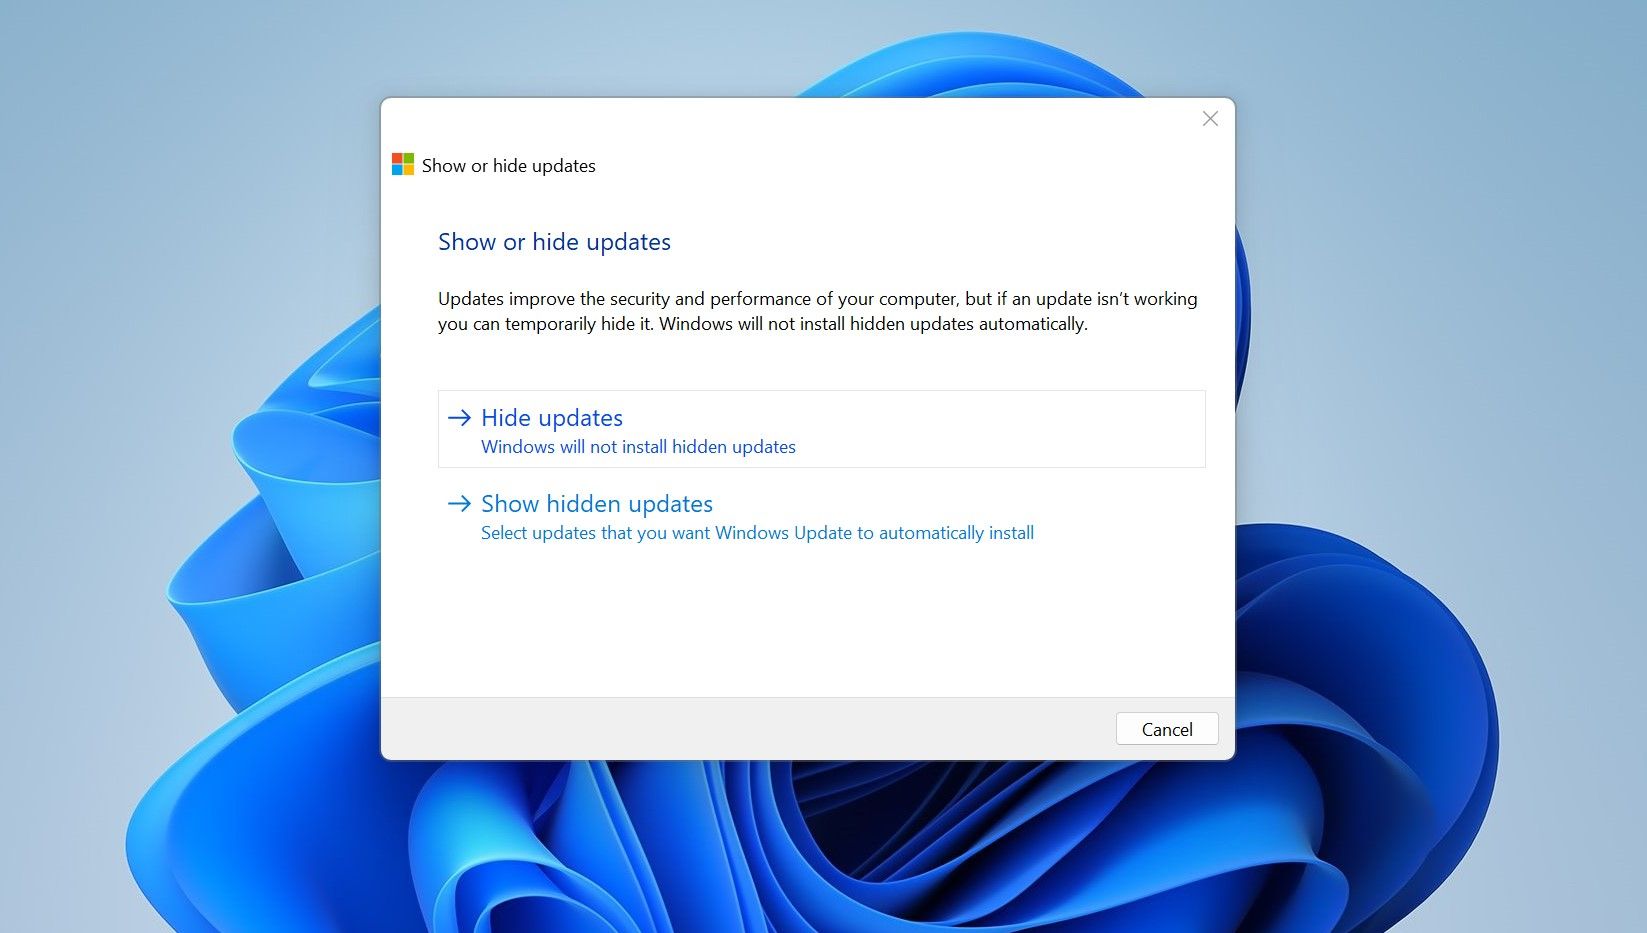
- Download Microsoft’s show or hide updates troubleshooter from MajorGeeks .
- Once the file has been downloaded, run it.
- Let the tool detect problems by clicking Next.
- Click on Hide updates.
- The tool will display the problematic update you uninstalled.
- Check the box for it and click Next.
Let the tool finish processing, and the specific update will not install on your device again. However, if uninstalling the update makes no difference, there is no need to prevent it from installing again.
Enjoy Printing Again on Windows
Not being able to set a printer default is very annoying, especially when taking urgent prints. Hopefully, our guide will help fix the annoying 0x00000709 error. By doing so, you can print with your preferred printer.
Have you ever encountered your printer printing blank pages without understanding why? Most of the time, a software issue causes it, and fixing it is very simple.
Have you encountered an error 0x00000709 with the message “Operation could not be completed. Double check the printer name and make sure that the printer is connected to the network” when setting up your default printer or installing a new one? This means Windows has failed to change your device’s default printer or install a new one. But why?
In this article, we will examine the error in more detail and discuss why it occurs. In addition, we’ll cover a few fixes that you can apply to resolve the issue.
Also read:
- [New] Navigating the 2024 Cloud Cost Landscape
- [New] YouTube Profitability Blueprint Determining Key View Counts
- [Updated] 2024 Approved Ultimate Guide 7 Preferred Android Ad Blocking Tools
- [Updated] Elevate IG Stories With Seamless Audio Integration for 2024
- 2024 Approved Optimize Periscope Broadcasts for Maximum Velocity
- Authenticity at Risk: Recognizing AI Influence on Writing
- Expedite Your Epic Experience with Enhanced Setup
- From Phone to Desktop: Embracing Android Gaming with Google Play
- Setup Smart Energy Saving with Automatic Wake/Sleep Mode
- Unlocking Knowledge About Batch Files in Windows
- Unlocking Windows 11/11 Discord Install Obstructions
- Title: Addressing Error 0X00000709 in Windows
- Author: Joseph
- Created at : 2025-02-25 01:21:19
- Updated at : 2025-03-01 17:03:21
- Link: https://windows11.techidaily.com/addressing-error-0x00000709-in-windows/
- License: This work is licensed under CC BY-NC-SA 4.0.