
Activate Virtualization: Your Step by Step Guide for Win 11 Homes
Activate Virtualization: Your Step by Step Guide for Win 11 Homes
You can enable Hyper-V in Windows 11 as an optional feature included by default with the operating system. It lets you create virtual machines to install and run the guest OS on virtual hardware. However, Hyper-V is only available for the Pro, Education, and Enterprise edition of the OS. If you are using the Home edition, you have to rely on a third-party virtual machine manager.
If you don’t want to use a third-party virtual machine manager, here is how to install Hyper-V on Windows 11 Home using a batch script hack.
How to Enable Hardware Virtualization in Windows 11
Hyper-V is a bare-metal hypervisor and requires Hardware Virtualization enabled in BIOS to work . Most modern systems support Hardware Virtualization, and you can enable it in BIOS.
The below steps are for an HP laptop. Refer to the user manual or Knowledge Base resources on the computer manufacturer’s website for other systems.
To enable Hardware Virtualization in BIOS:
- Shut down your PC if it is powered on.
- Press the Power button to turn on the computer and then start pressing the F10 key to enter BIOS. The BIOS setup key varies depending on the manufacturer. So, use F10, F2, F12, F1, or DEL and see which one works for you.
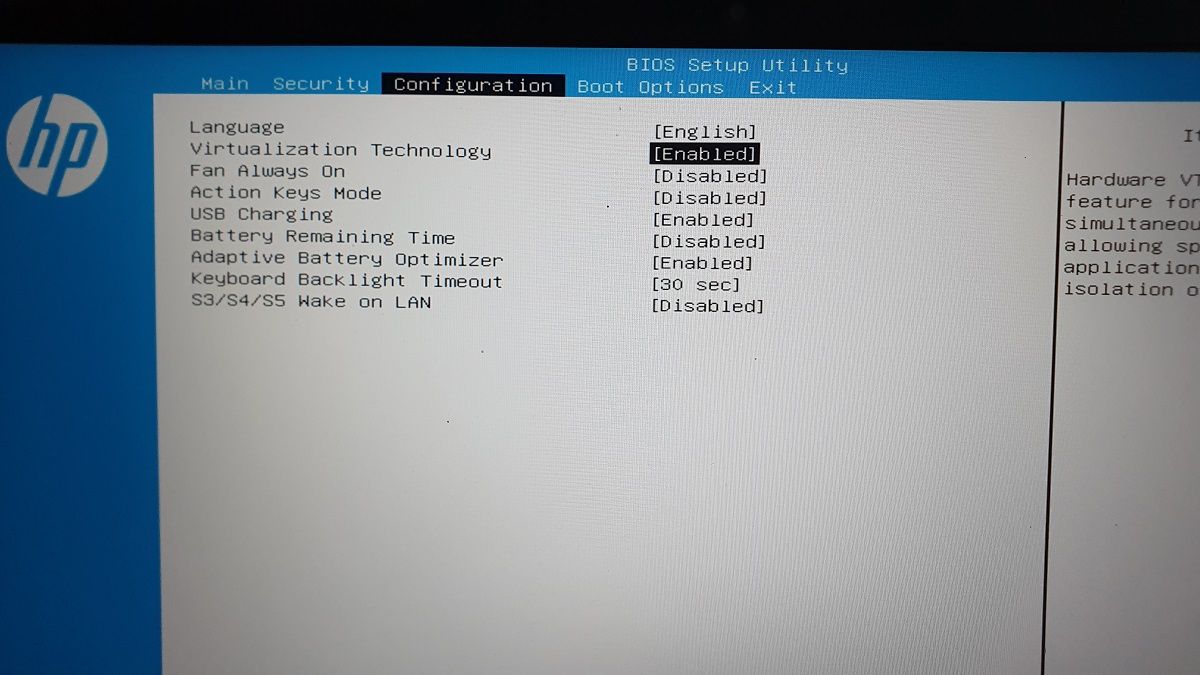
- Once in the BIOS Setup utility, open the Configuration tab.
- Use the down arrow key and highlight Virtualization Technology.
- Hit Enter and then select Enabled. Press Enter again to make the selection.
- Next, press F10 to save the changes and exit BIOS.
- Your PC will restart with the Hardware Virtualization enabled. Now you can continue to install Hyper-V on your system.
How to Install Hyper-V on Windows 11 Home
The next step is to create and run a batch script to install the required files to enable Hyper-V in Windows 11 Home.
Before you proceed with the next set of steps, create a restore point . This will help you restore your computer to its current state if something goes wrong during the process.
To enable Hyper-V in Windows 11 Home:
1. Open a new Notepad file. To do this, press Win + R, type notepad, and click OK.
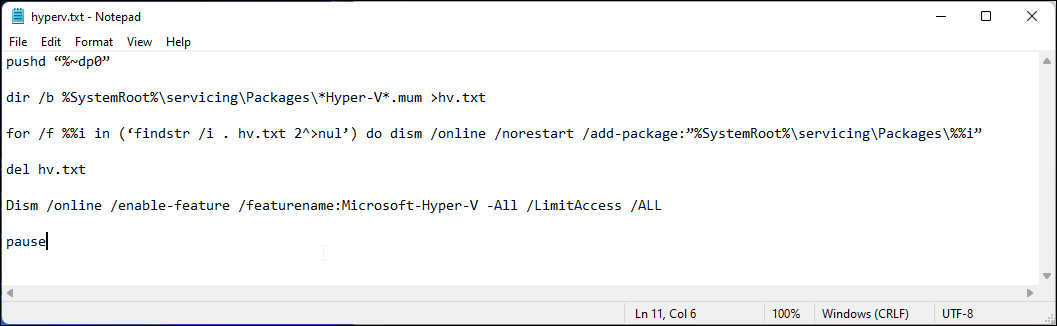
2. In the Notepad file, copy and paste the following script:
pushd "%~dp0" dir /b %SystemRoot%\servicing\Packages\*Hyper-V*.mum >hyper-v.txt for /f %%i in ('findstr /i . hyper-v.txt 2^>nul') do dism /online /norestart /add-package:"%SystemRoot%\servicing\Packages\%%i" del hyper-v.txt Dism /online /enable-feature /featurename:Microsoft-Hyper-V -All /LimitAccess /ALL pause
3. Press Ctrl + S to open the save dialog.
4. In the file name field, type hyperv.bat. The .bat extension at the end of the file name is important to execute the script.
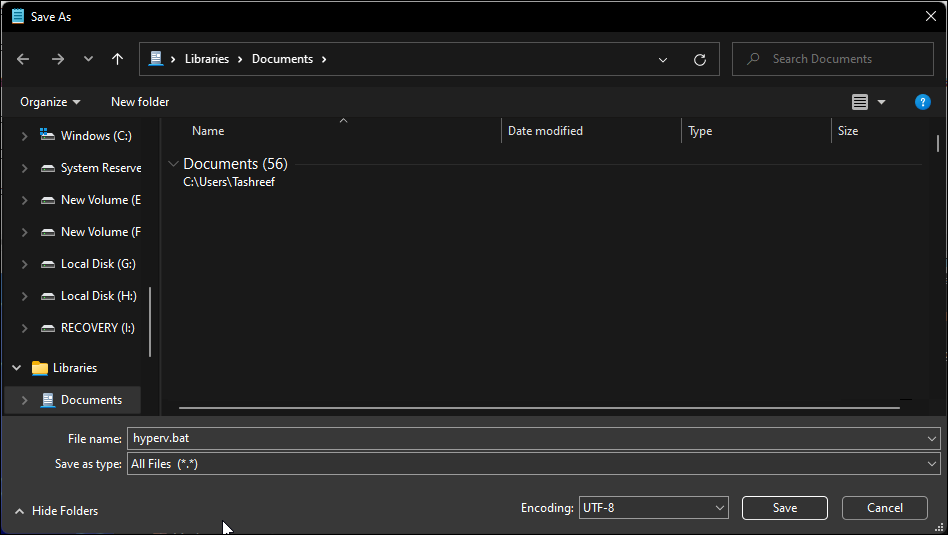
5. Next, click the drop-down for Save as type and select All Files.
6. Click the Save button to save the file.
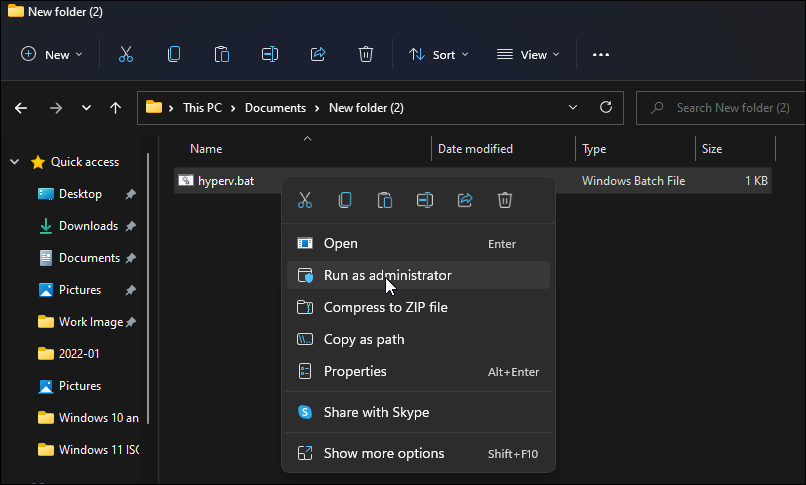
7. Next, right-click on the hyperv.bat file and select Run as administrator. Click Yes if prompted by User Account Control.
8. The scrip will start executing in the Command Prompt to install Hyper-V. It may take a while, so wait till the process is complete.
9.Once completed, you will see the Operation completed successfully message.
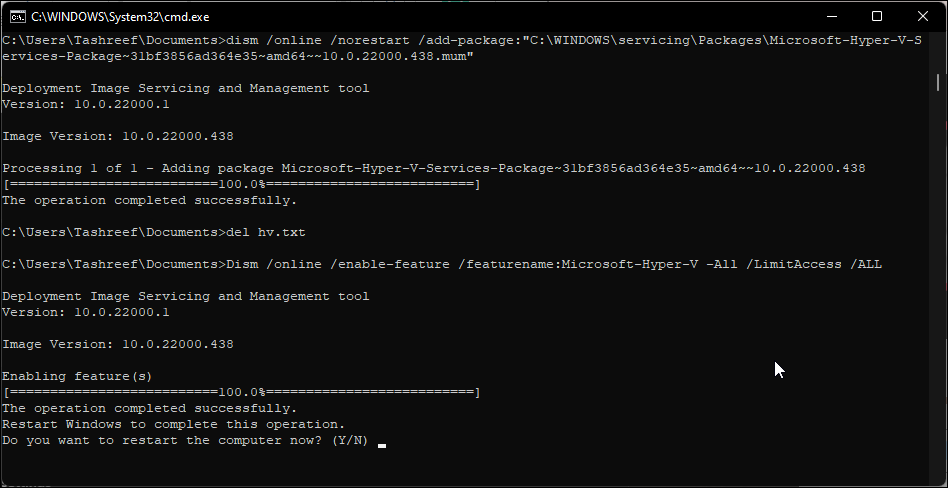
10. Type Y to confirm and restart your PC. If not, enter N to exit the Command Prompt.
Note that you will need to restart your PC to apply the changes. After the restart, you should have Hyper-V installed in Windows 11 Home. Type Hyper-V in Windows search and click on Hyper-V Manager to create new a virtual machine.
If it is still not available, you can enable Hyper-V using the Windows Features dialog , Command Prompt, and Windows PowerShell.
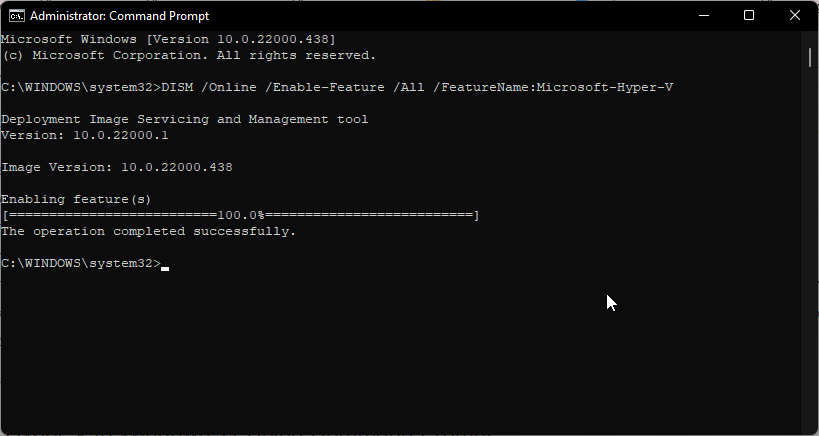
Here’s how you can quickly add Hyper-V to Windows 11 using Command Prompt:
- Press the Win key and type cmd. Then right-click on Command Prompt and select Run as administrator.

- In the Command Prompt window, type the following command and press Enter:
<code>DISM /Online /Enable-Feature /All /FeatureName:Microsoft-Hyper-V - The above command uses the Deployment Imaging Service and Management (DISM) tool to enable Microsoft Hyper-V and the necessary dependencies on your Windows computer. The operation completed successfully message means you have successfully enabled Hyper-V.
How to Disable Hyper-V on Windows 11 Home

You can disable Hyper-V in Windows 11 Home using the Windows Features dialog.
To disable Hyper-V:
- Press Win + R to open the Run dialog box.
- Type optionalfeatures.exe and click OK.
- In the Windows Features dialog, locate the Hyper-V option.
- Uncheck the Hyper-V option and click OK. Wait for the uninstallation process to complete.
- Next, click on Restart Now to restart your PC and apply the changes.
Apart from Hyper-V, the Windows OS features another nifty virtualization solution, Windows Sandbox—a lightweight desktop environment to run applications in isolation. You can enable Windows Sandbox from Windows Features , but only on the Pro and Enterprise edition of the OS.
Unlike Hyper-V, there is no batch script hack to install the sandbox app on the Home edition of Windows 11. Instead, you can use one of the Windows Sandbox Alternatives for Windows to run and test applications in isolation.
Run Hyper-V on Windows 11 Home
Microsoft has officially restricted the use of Hyper-V to the Pro, Education, and Enterprise edition of the OS. However, a little tweak in the BIOS and a handy batch script can help you install Hyper-V on Windows 11 Home.
Once you have Hyper-V up and running, you can install Windows, Ubuntu, and other supported operating systems in a virtual machine.
If you don’t want to use a third-party virtual machine manager, here is how to install Hyper-V on Windows 11 Home using a batch script hack.
Also read:
- [Updated] 2024 Approved 10 Best Web-Based Tools for Clearing Up Fuzzy Images
- [Updated] A Newbie's Blueprint to Mastering AV1
- [Updated] In 2024, Charting the Course for Profitable Youtube Videos
- Creative Tim's Premium, Zero-Cost Bootstrap & Materialize CSS Framework Collection for Web Developers
- Fixed Freeze Panes not Working in Excel 2010
- How to Intercept Text Messages on Honor X9b | Dr.fone
- How to Utilize the Windows ODBC Tools?
- In 2024, Decoding the Divergence 360° Film Vs. Virtual Reality
- Resolving Java Setup Issues on Windows Systems
- Securing Administrator-Level PowerShell Execution Window in W11
- Smooth Play Ahead! Mastering Windows 11'S Full Screen Gaming with Sonic
- The Seasoned Guide to Windows PC Ages
- Ultimate Review of Highest Quality Range Boosters to Optimize Your Home Network
- Unlocking Access to Steam Libraries on Windows 11 Devices
- Why Won't My iPhone Buzz on Silent or Ring? Explore These 8 Fixes for Non-Vibrating Problems
- Title: Activate Virtualization: Your Step by Step Guide for Win 11 Homes
- Author: Joseph
- Created at : 2025-02-25 23:07:37
- Updated at : 2025-03-02 00:54:14
- Link: https://windows11.techidaily.com/activate-virtualization-your-step-by-step-guide-for-win-11-homes/
- License: This work is licensed under CC BY-NC-SA 4.0.