
A Simple Guide to Activating Windows Hello on PC
A Simple Guide to Activating Windows Hello on PC
Signing in to a Windows 10 or 11 PC requires you to enter your account password. Ideally, you need this to be a strong password with some complexities, especially if you share your computer with others.
However, remembering passwords isn’t easy. Microsoft understands this and offers Windows Hello on Windows 10 and Windows 11 to make signing in to your computer easier.
If you’ve never used Windows Hello before, stick around to find out how to set up Windows Hello fingerprint login on your Windows 11 computer to make it more secure and enable faster authentication.
What Is Windows Hello?
Windows Hello is a convenient and secure way to unlock your Windows 10 or Windows 11 PC. It facilitates quick access to your system by allowing you to sign in to your computer using your face, fingerprint, or PIN.
As such, you can choose between any of the available sign-in options, such as PIN, facial recognition, or fingerprint recognition . While PIN is available for pretty much everyone, the availability of fingerprint and facial recognition is dependent on your computer’s hardware.
However, generally speaking, if you have a moderately-good laptop, it very likely features a compatible fingerprint scanner. Meanwhile, if you have a PC, you can get a decent external fingerprint reader and connect it to your computer via USB.
How to Set Up Windows Hello on Windows 11
Setting up Windows Hello on Windows 11 requires you to set up a PIN first. It’s required as a backup, so you aren’t locked out of your computer in the event your computer’s hardware fails to recognize your face or fingerprint. Once you’ve set the PIN, you can then set up Windows Hello fingerprint login on your computer.
How to Set Up a Windows Hello PIN
If you haven’t set up a PIN on your computer already, you can do so using the following steps:
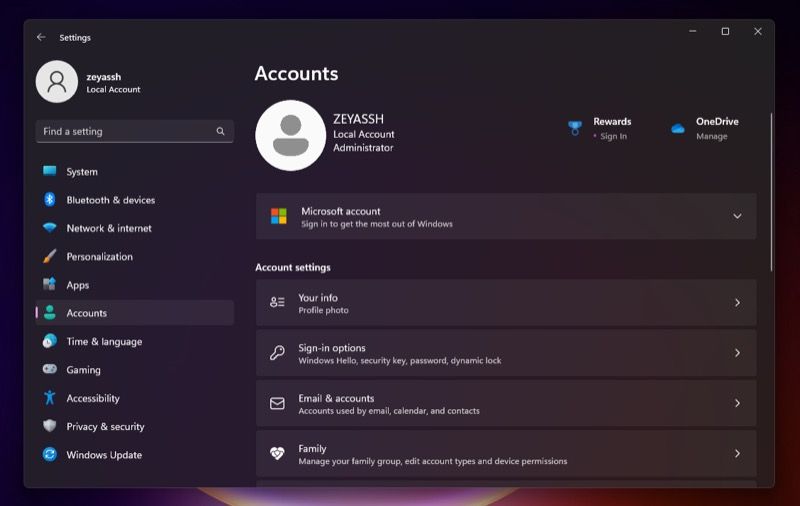
- LaunchSettings .
- SelectAccounts from the left sidebar.
- On theAccounts page in the right-hand pane, scroll down to theAccount settings section and tap onSign-in options to expand them.

- Now, click onPIN (Windows Hello) to expand its options and hit theSet up button.
5. Enter your account password and hitOK to authenticate yourself and proceed.
6. Enter a PIN in theNew PIN field and input it again in theConfirm PIN field. If you wish to include letters and symbols in your PIN, check off the Include letters and symbols option.
7. ClickOK to create and set the PIN as your new sign-in option.
How to Set Up a Windows Hello Fingerprint Login on Windows 11
After you’ve created a Windows Hello PIN, setting up fingerprint recognition is simple. Use the steps below to set it up on your PC. Irrespective of whether you’re using a built-in fingerprint reader on your laptop or a USB fingerprint scanner , the steps you need to take are the same.
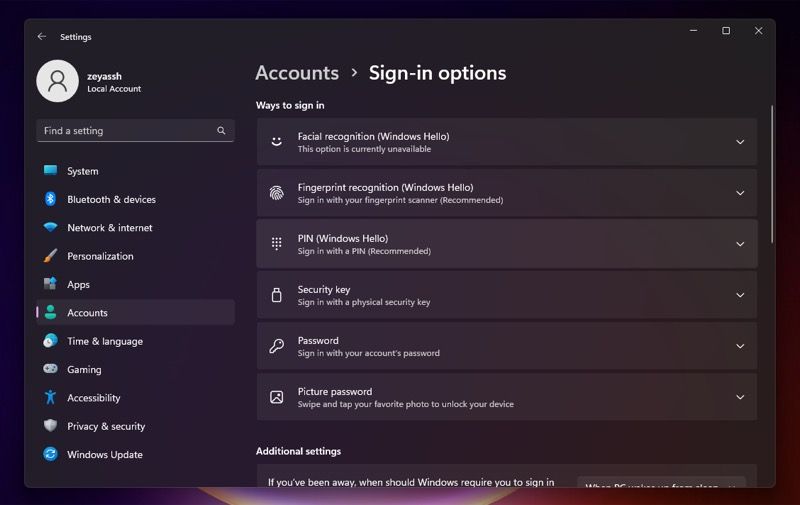
- OpenSettings on your Windows 11 PC.
- Tap onAccounts in the sidebar.
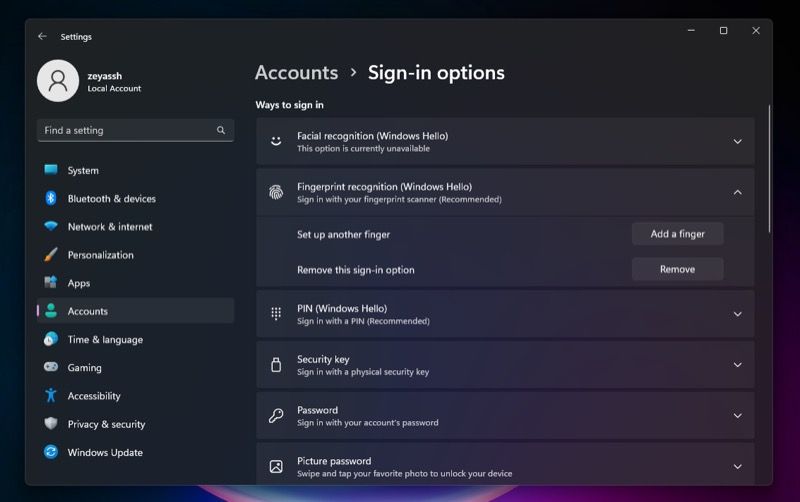
- In theAccounts page on the right, click onSign-in options to view all the available Windows Hello options.
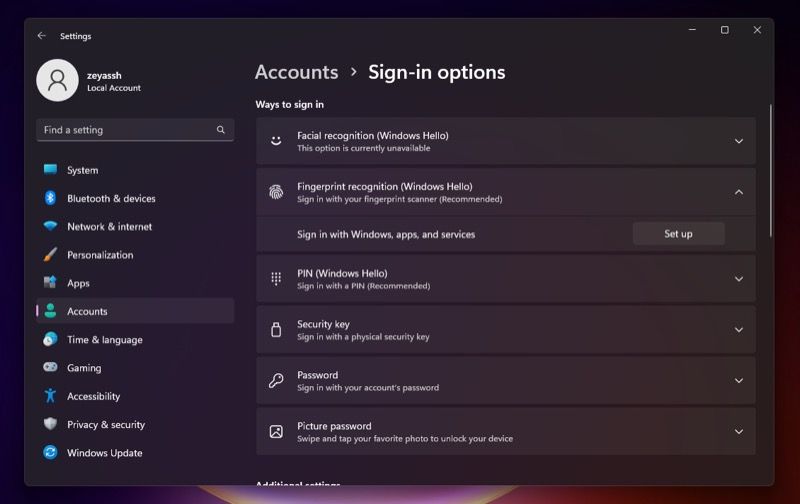
- Click onFingerprint recognition (Windows Hello) to open its options.
- Tap on theSet up button.
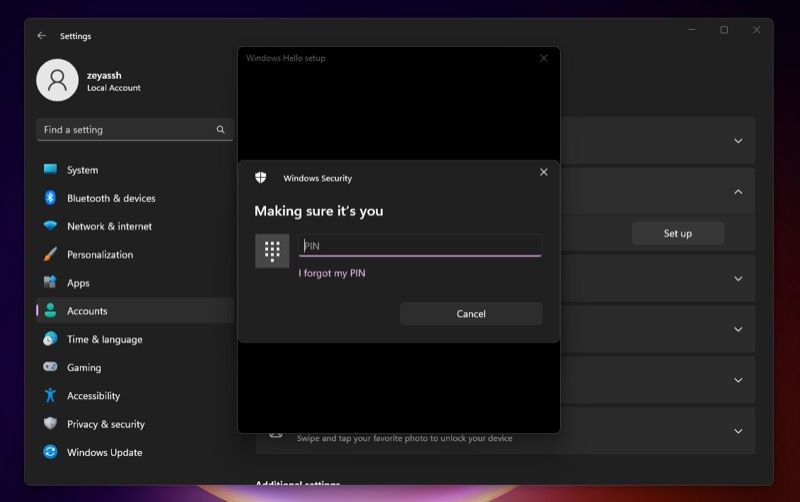
- On theWindows Hello setup window, click onGet started , and when prompted to enter your PIN, type the PIN you created earlier.
- Swipe your finger across the fingerprint reader on your PC until it registers it completely.
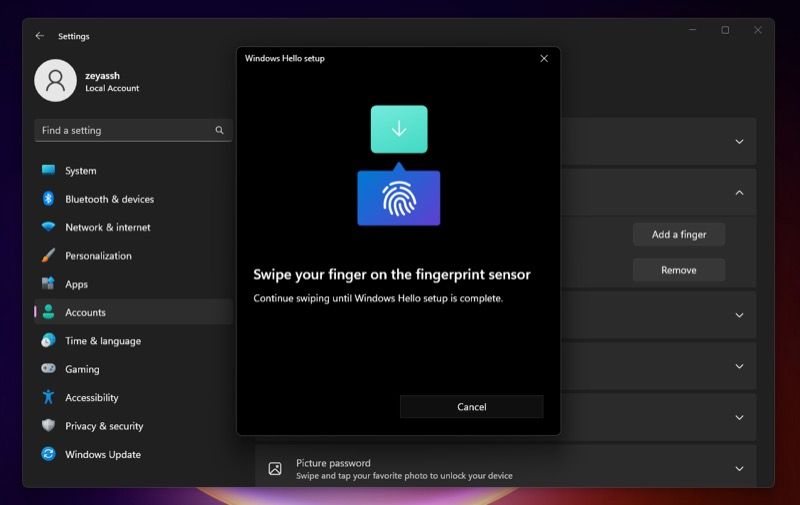
8. HitClose to close the setup window.
If you want to be extra cautious, you can register a second finger with Windows Hello. That way, if your scanner fails to recognize one fingerprint, you can try the other one to sing-in instead of having to resort to using the PIN.
To add a second fingerprint, tap theAdd another finger in theWindows Hello setup window and repeat the above steps again. Alternatively, you can do this later by expandingFingerprint recognition settings , clicking theAdd a finger button, and repeating the same process.
How to Log Into Your Windows 11 PC Using a Fingerprint
With Windows Hello enabled and fingerprint unlocking enabled on your computer, you can verify if the fingerprint scanner on your PC works by putting it to the test.
To do this, press theWin + L keys to lock your PC. Now, swipe your registered finger across the fingerprint scanner on your computer. If your fingerprint scanner is functional, and you managed to register your fingerprint properly, you should’ve unlocked your PC by now.
However, if this doesn’t work, try another finger if you’ve registered it. Alternatively, enter the PIN when your PC asks you for it upon failing to recognize your fingerprint. And subsequently, remove the fingerprint login and try registering your fingerprint again.
How to Remove the Windows Hello Fingerprint Login in Windows 11
If you wish to remove Windows Hello fingerprint recognition on your Windows 11 computer, perhaps because it’s slow or some other reason, you can get rid of it using these steps:
- LaunchSettings .
- SelectAccount from the left sidebar and tap on theSign-in options on the right pane.
- Click theRemove button.
Irrespective of how many fingerprints you’ve set, this will delete all of them for you and remove the Windows Hello fingerprint login from your computer. After you do this, you can still sign in to your PC using the PIN you generated earlier.
Sign Into Your Windows 11 PC Quickly and Securely
Using the guide above, you should be able to set up Windows Hello on your Windows 11 PC fairly easily. Once done, logging in to your computer and authenticating access across different apps will seem much more convenient than before
While currently there are only a handful of apps that use Windows Hello for authentication, (like Microsoft Office, Chrome, and Dropbox), Microsoft has said it understands the importance of Windows Hello and is working with more service providers to offer users a secure and convenient way to authenticate on their Windows machines.
Also read:
- [New] 2024 Approved Step-by-Step Filming Your Overwatch Victories
- [Updated] 2024 Approved Comprehensive YouTube Video Editing with FinalCut Pro Skills
- 解決 Windows 11 / 10上的 0xC0000005 錯誤:免疫化方法
- Effortless Entry to Sticky Notes in Windows 11
- Eliminating Ads From Win 11'S Start Interface
- Eliminating Chrome's Grey Screen Hurdle
- Enabling Samsung DeX: A Step-by-Step PC Control
- Enhance Productivity: Setting Up Windows to Delete Files Automatically
- Enhancing Underperforming Systems with Intel GPU Fixes
- Escape Into Blissful Functionality with These Windows Fixes
- Facing Startup Problems with Baldur's Gate 3? These Hacks Will Help!
- The Revolutionary M3 MacBook Air From Apple - Bringing AI Accessibility to Everyday Users | Tech Insights by ZDNET
- Ultimate Troubleshooting Steps for Solving the Discord Audio Interruption Issue
- Understanding Generative AI: An Insightful Guide
- Windows-Inspired ChromeOS Update Arrives, Bringing New Functionality to Chromebooks as Reported
- Title: A Simple Guide to Activating Windows Hello on PC
- Author: Joseph
- Created at : 2025-01-15 18:36:41
- Updated at : 2025-01-22 17:13:03
- Link: https://windows11.techidaily.com/a-simple-guide-to-activating-windows-hello-on-pc/
- License: This work is licensed under CC BY-NC-SA 4.0.