
8 Essential Steps to Bring Back Lost Windows Files
8 Essential Steps to Bring Back Lost Windows Files
Is a deleted file or folder mysteriously reappearing on your Windows system? This can be both frustrating and puzzling.
Whether it’s an important work document or an unwanted folder, this recurring file deletion error can disrupt your workflow. But don’t worry—we’ll show you how you can easily tackle this problem.
1. Force Delete the Problematic File or Folder
Force deleting a problematic file involves using the Command Prompt (or specialized software) to remove a file forcefully. This method bypasses any restrictions or issues that may prevent the file or folder from being deleted.
Be cautious when using command-line tools to delete folders. Force deleting can permanently remove data without any possibility of recovery. So, you might want to back up all your important files first before applying this method.
Here are the steps on how to force delete a folder on Windows:
- Press Win + E to open File Explorer.
- Navigate to the target folder.
- Copy the folder path from the address bar, but omit the part containing the name of your target folder. For example, I have a folder named “New_Documents” on my PC, and here’s the folder path:
C:\Users\tladi\Desktop\New_Documents
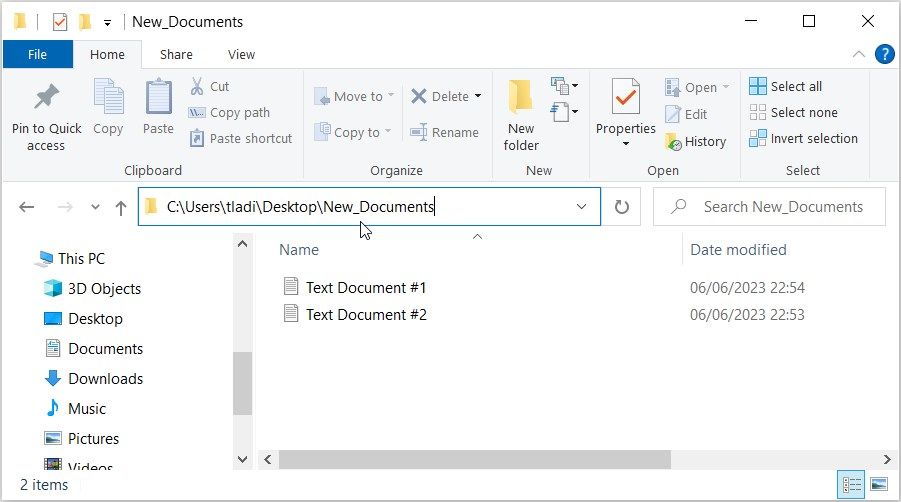
In this case, I need to copy all the contents in the address bar except the name of the target folder (New_Documents). This means all I need to copy is “C:\Users\tladi\Desktop.”
After copying your folder path through the previous steps, here’s what you need to do:
- Press Win + R to open the Run command dialog box.
- Type CMD and press Ctrl + Shift + Enter to open an elevated Command Prompt.
- Type cd and press the spacebar, paste the folder path, and then press Enter. For example, here’s what your command should look like:
cd C:\Users\tladi\Desktop

To delete the target folder, type the following command and replace “New_Documents” with the name of your target folder:
rd /s /q New_Documents
Press Enter to continue. From there, restart your PC to apply the changes.
2. Take Ownership of the File or Folder Before Deleting It

If you have insufficient permissions on a file, the system will likely prevent you from deleting it permanently. In such cases, Windows may recreate the file or folder with default permissions.
Now, taking ownership of a folder before deleting it could help. This method helps you gain full control of that specific folder. This means you can edit or even delete the folder in question without restrictions.
And if the process seems complicated for you, take ownership of Windows files and folders using third-party tools . From there, try deleting the problematic file and see how that goes.
If the issue persists, then you’re likely dealing with a complex problem (such as a corrupted program or system glitch). But lucky for you, we have other advanced troubleshooting methods that can help.
3. Repair a Corrupted Recycle Bin
In some cases, your deleted files might keep reappearing because the Recycle Bin is malfunctioning. So, repairing it can help resolve the issue
Here are the steps for repairing a corrupted Recycle Bin:
- Close all the active programs on your PC .
- Press Win + R to open the Run command dialog box.
- Type CMD and press Ctrl + Shift + Enter to open an elevated Command Prompt.
- Type the following command and press Enter:
rd /s /q C:\$Recycle.bin
This command will delete the “$Recycle.bin” folder from the C: drive. The folder will then be restored automatically upon system reboot.
Restart your device to save these changes. If the Recycle Bin icon doesn’t appear, right-click on the desktop and select Refresh. Now, your deleted files will be properly sent to the Recycle Bin and shouldn’t keep reappearing.
4. Clear Temporary Files and Folders
Clearing temporary files and folders on Windows can help free up disk space and improve system performance. This can also ensure that you don’t run into problems when deleting your files.
But be careful when deleting temporary files and folders. Always ensure that you don’t end up deleting important system or personal files.
5. Disable Folder Synchronization
Do you have a cloud storage device (like Dropbox, OneDrive, or Google Drive) that’s configured to sync specific folders? If so, then that’s likely where the problem lies.
In this case, the cloud storage device may be restoring some of your deleted files online. When you delete the files locally, the sync process may bring them back from the cloud storage.
So, what’s the best solution here? Temporarily prevent Windows from saving files to OneDrive or any other cloud storage provider!
Also, you might want to turn off your cloud storage tool temporarily and see if that helps.
6. Avoid Using the System Restore Tool

Windows has an incredible feature called System Restore. The tool creates restore points to help you revert your system to a previous state.
But here’s the catch—if your deleted files were present in a restore point, they can be automatically recovered when performing a system restore.
So, the best solution would be to avoid using restore points more often unless it’s necessary. This will ensure that your unwanted, deleted files don’t keep reappearing.
Also, some backup software may keep copies of hidden or deleted files as part of the backup process. When restoring a backup, these unwanted files can be reintroduced to the system. So, temporarily disable such backup programs and see if that helps.
7. Update or Reinstall Faulty Third-Party Programs
In some cases, software glitches or bugs on your PC can cause files to reappear after deletion. The best solution here would be to update or reinstall all faulty third-party programs.
And when you reinstall the apps, ensure that they’re compatible with your Windows version. Also, make sure that you configure the apps properly to avoid any unwanted issues.
8. Configure the File Explorer Settings
Some files and folders are marked as “system files” or “protected operating system files.” Windows usually recreates these files automatically if they’re deleted.
So, perhaps the file or folder you’re trying to delete is protected. If you don’t want to keep seeing such file, the best solution is to hide it.
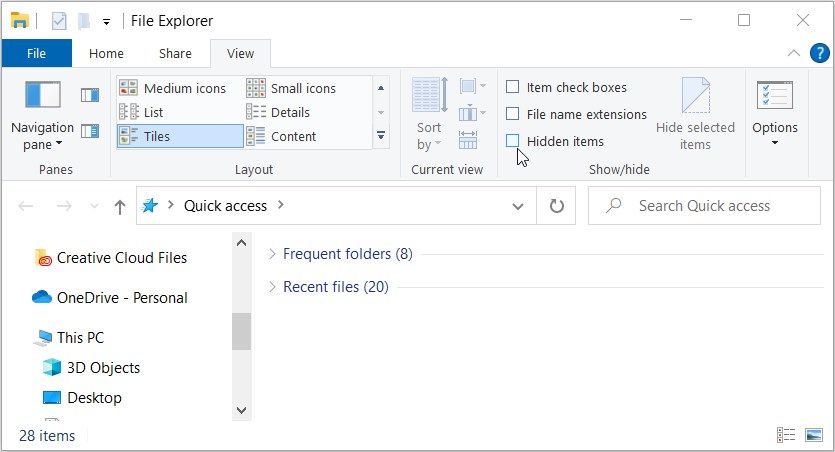
Now, let’s take you through the steps for hiding sensitive system files:
- Press Win + E to open File Explorer.
- Click on the View tab.
- Navigate to the Show/hide section and uncheck the Hidden items box. This will ensure that your PC doesn’t display system files and folders that cause clutter.
Say Goodbye to Unwanted Reappearing Files
Dealing with a file or folder that keeps restoring itself can be a nightmare. But if you implement the solutions we’ve covered, you should easily overcome this challenge.
And to avoid damaging your PC, make sure you don’t delete the default Windows files and folders. This includes the “Program Files” and “System 32” folders.
Also read:
- [New] 2024 Approved DIY YouTube Thumbnails Made Simple
- [New] Numbers that Shook! YouTube Facts in Visual Form (2017) for 2024
- [Updated] Leading List Elite Call Alert Engineers
- [Updated] Navigating the Path to Viewable Reach Responsibly
- [Updated] Unveiling IGTV Your Ultimate Tutorial
- Audio Capture While Screen Recording with Snipping Tool (Max 156)
- Automation Made Simple: Windows Task Scheduler Batch
- Bless Your PC: God Mode Enhancements
- Boost Clarity with These Budget-Friendly Tools
- Boost Efficiency with Top Practices for WSL 2 Usage on PCs
- Calculating Wattage: Your Windows PC’s Electricity Needs
- Comprehensible Guide to Revoking Custom Search on Windows 11
- Delve Into Multi-Display Setup in Windows 11
- Exploring the Growth and Impact of Electric Car Adoption
- Get Latest Epson Artisan 1430 Driver Software on PC - Compatible with Windows 11/10/8
- How to Fix iPhone 15 Pro Passcode not Working?
- Top Zodiac-Inspired WhatsApp Bios Enhancing Personal Connections
- Title: 8 Essential Steps to Bring Back Lost Windows Files
- Author: Joseph
- Created at : 2025-01-17 18:01:21
- Updated at : 2025-01-22 20:02:01
- Link: https://windows11.techidaily.com/8-essential-steps-to-bring-back-lost-windows-files/
- License: This work is licensed under CC BY-NC-SA 4.0.